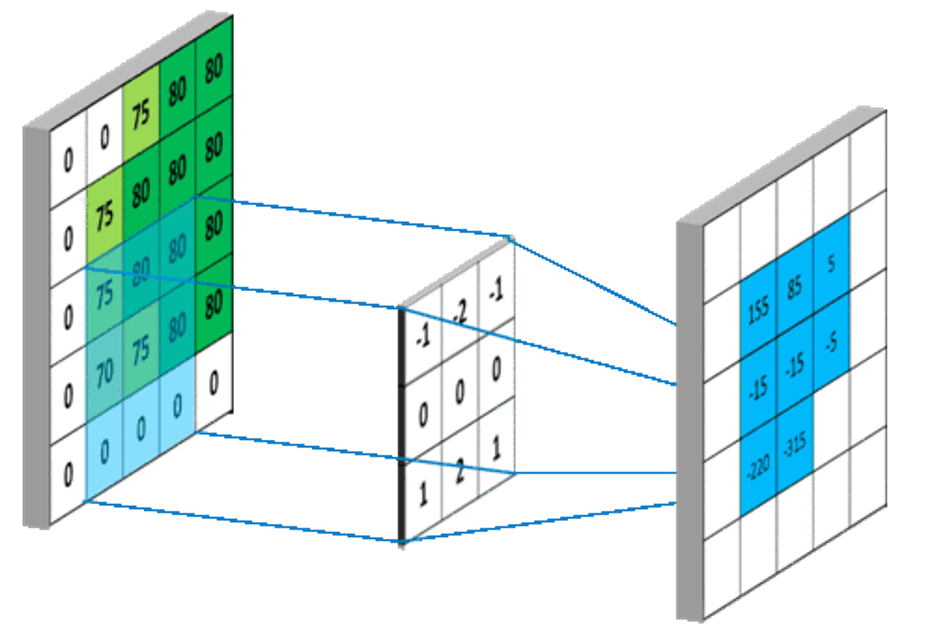
In TensorFlow, you can define a convolutional layer using tf.keras.layers.Conv2D. This function has many parameters, such as filters indicating the number of convolutional kernels, kernel_size indicating the size of the convolutional kernels, strides indicating the step size, and padding indicating the padding method.
import tensorflow as tf
input_shape = (None, 28, 28, 3)  # Shape of the input tensor, (batch size, height, width, channels)
model = tf.keras.models.Sequential()  # Create a sequential model
model.add(tf.keras.layers.Conv2D(filters=32, kernel_size=3, strides=1, padding='same', activation='relu', input_shape=input_shape[1:]))
import tensorflow as tf
import matplotlib.pyplot as plt
# Read image
path = r'C:\Users\yh\Pictures\rm.png'  # Replace with the actual image path
image_raw = tf.io.read_file(path)
image = tf.image.decode_image(image_raw, channels=3)  # Specify the number of channels as 3
# Expand image dimensions to fit Conv2D input shape
input_image = tf.expand_dims(image, axis=0)
# Define convolutional layer
model = tf.keras.Sequential()
model.add(tf.keras.layers.Conv2D(filters=1, kernel_size=3, strides=1, padding='same', activation='relu', input_shape=input_image.shape[1:]))
# Run convolution operation
convolved_image = model.predict(input_image)
# Sum the convolution results of the three channels
convolved_image = tf.reduce_sum(convolved_image, axis=-1)
# Transform the shape and pixel value range of the convolution result
convolved_image = tf.squeeze(convolved_image, axis=0)  # Remove batch dimension
convolved_image = tf.clip_by_value(convolved_image, 0, 255)  # Clip pixel values to 0-255 range
convolved_image = tf.cast(convolved_image, dtype=tf.uint8)  # Convert to integer type
# Display the original image and convolution result
plt.subplot(1, 2, 1)
plt.imshow(image)
plt.title('Original Image')
plt.subplot(1, 2, 2)
plt.imshow(convolved_image, cmap='gray')  # Display convolution result in grayscale
plt.title('Convolved Image')
plt.show()
import tensorflow as tf
from tensorflow.keras import layers
# Build CNN model
model = tf.keras.Sequential()
# Add convolutional layer
model.add(layers.Conv2D(32, (3, 3), activation='relu', input_shape=(64, 64, 3)))
model.add(layers.MaxPooling2D((2, 2)))
# Add more convolutional and pooling layers
model.add(layers.Conv2D(64, (3, 3), activation='relu'))
model.add(layers.MaxPooling2D((2, 2)))
model.add(layers.Conv2D(128, (3, 3), activation='relu'))
model.add(layers.MaxPooling2D((2, 2)))
# Flatten feature map to a one-dimensional vector
model.add(layers.Flatten())
# Add fully connected layer
model.add(layers.Dense(64, activation='relu'))
# Output layer
model.add(layers.Dense(10, activation='softmax'))
# Compile model
model.compile(optimizer='adam',              loss=tf.keras.losses.SparseCategoricalCrossentropy(from_logits=True),              metrics=['accuracy'])
# Load data and train model
(x_train, y_train), (x_test, y_test) = tf.keras.datasets.cifar10.load_data()
model.fit(x_train, y_train, epochs=10, validation_data=(x_test, y_test))

Want to know more?
Quickly scan the code to follow