
Click on the above “Beginner’s Visual Learning” to choose to add star or pin.
Heavyweight content delivered first time

With the emergence of e-commerce and online websites, the application of image retrieval in our daily lives has been increasing.
Companies like Amazon, Alibaba, and Myntra have been heavily utilizing image retrieval technology. Of course, image retrieval only comes into play when conventional information retrieval techniques fail.
Background
The fundamental nature of image retrieval is to find images from a collection or database based on the features of the query image.
In most cases, these features are simple visual similarities between images. In a more complex scenario, these features may involve the stylistic similarities or even complementarity between two images.
Since the raw form of an image does not reflect these features in pixel-based data, we need to transform this pixel data into a latent space where the representation of the images reflects these features.
Generally speaking, in latent space, any two similar images are close to each other, while different images are far apart. This is the fundamental rule we use to train our model. Once we do this, the retrieval part simply needs to search the latent space to pick the nearest images in the latent space representation of the given query image. Most of the time, this is done with the help of nearest neighbor search.
Therefore, we can divide our approach into two parts:
-
Image Representation
-
Search
We will tackle both parts using the Oxford 102 Flowers dataset.
You can download and read about the dataset here:
https://www.tensorflow.org/datasets/catalog/oxford_flowers102
Image Representation
We will use something called a Siamese model, which is not a brand new model itself but rather a technique for training models. Most of the time, this is used with triplet loss. The basic component of this technique is the triplet.
A triplet consists of 3 independent data samples, such as A (anchor), B (positive), and C (negative); where A and B are similar or have similar features (possibly from the same class), while C is dissimilar to both A and B. These three samples together form a unit of training data—a triplet.
Note: 90% of any image retrieval task is reflected in the Siamese network, triplet loss, and the creation of triplets. If you successfully complete these, the success of the entire effort is more or less guaranteed.
First, we will create this component of the pipeline—the data. Below we will create a custom dataset and data loader in PyTorch that will generate triplets from the dataset.
class TripletData(Dataset):
    def __init__(self, path, transforms, split="train"):

        self.path = path
        self.split = split    # train or valid
        self.cats = 102       # number of categories
        self.transforms = transforms


    def __getitem__(self, idx):

        # our positive class for the triplet
        idx = str(idx%self.cats + 1)

        # choosing our pair of positive images (im1, im2)
        positives = os.listdir(os.path.join(self.path, idx))
        im1, im2 = random.sample(positives, 2)

        # choosing a negative class and negative image (im3)
        negative_cats = [str(x+1) for x in range(self.cats)]
        negative_cats.remove(idx)
        negative_cat = str(random.choice(negative_cats))
        negatives = os.listdir(os.path.join(self.path, negative_cat))

        im3 = random.choice(negatives)

        im1,im2,im3 = os.path.join(self.path, idx, im1), os.path.join(self.path, idx, im2), os.path.join(self.path, negative_cat, im3)

        im1 = self.transforms(Image.open(im1))

        im2 = self.transforms(Image.open(im2))

        im3 = self.transforms(Image.open(im3))

        return [im1, im2, im3]


    # we'll put some value that we want since there can be far too many triplets possible
    # multiples of the number of images/ number of categories is a good choice
    def __len__(self):
        return self.cats*8


# Transforms
train_transforms = transforms.Compose([
    transforms.Resize((224,224)),
    transforms.RandomHorizontalFlip(),
    transforms.ToTensor(),
    transforms.Normalize((0.4914, 0.4822, 0.4465), (0.2023, 0.1994, 0.2010)),
])


val_transforms = transforms.Compose([
    transforms.Resize((224, 224)),
    transforms.ToTensor(),
    transforms.Normalize((0.4914, 0.4822, 0.4465), (0.2023, 0.1994, 0.2010)),
])


# Datasets and Dataloaders
train_data = TripletData(PATH_TRAIN, train_transforms)
val_data = TripletData(PATH_VALID, val_transforms)


train_loader = torch.utils.data.DataLoader(dataset = train_data, batch_size=32, shuffle=True, num_workers=4)

val_loader = torch.utils.data.DataLoader(dataset = val_data, batch_size=32, shuffle=False, num_workers=4)
Now that we have the data, let’s move to the Siamese network.
The Siamese network gives the impression of 2 or 3 models, but it is actually a single model. All these models share weights, meaning there is only one model.
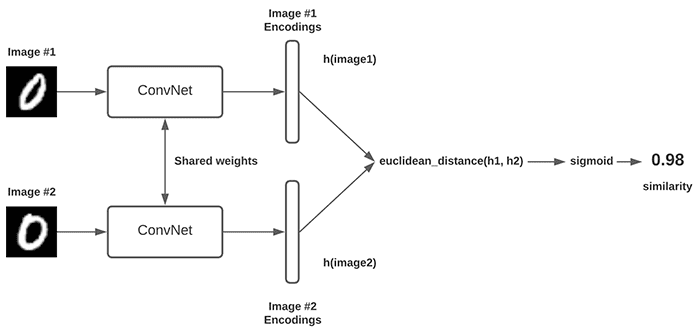
As mentioned earlier, the key factor that ties the entire architecture together is triplet loss. Triplet loss generates a target function that forces the distance between similar input pairs (anchor and positive) to be less than the distance between different input pairs (anchor and negative), while defining a certain threshold.
Next, let’s take a look at triplet loss and the implementation of the training pipeline.
class TripletLoss(nn.Module):
    def __init__(self, margin=1.0):

        super(TripletLoss, self).__init__()
        self.margin = margin


    def calc_euclidean(self, x1, x2):
        return (x1 - x2).pow(2).sum(1)


    # Distances in embedding space is calculated in euclidean
    def forward(self, anchor, positive, negative):

        distance_positive = self.calc_euclidean(anchor, positive)

        distance_negative = self.calc_euclidean(anchor, negative)

        losses = torch.relu(distance_positive - distance_negative + self.margin)

        return losses.mean()


device = 'cuda'

# Our base model
model = models.resnet18().cuda()
optimizer = optim.Adam(model.parameters(), lr=0.001)
triplet_loss = TripletLoss()

# Training
for epoch in range(epochs):

    model.train()
    epoch_loss = 0.0

    for data in tqdm(train_loader):

        optimizer.zero_grad()
        x1,x2,x3 = data
        e1 = model(x1.to(device))
        e2 = model(x2.to(device))
        e3 = model(x3.to(device))

        loss = triplet_loss(e1,e2,e3)
        epoch_loss += loss
        loss.backward()
        optimizer.step()

    print("Train Loss: {}".format(epoch_loss.item()))


class TripletLoss(nn.Module):
    def __init__(self, margin=1.0):

        super(TripletLoss, self).__init__()
        self.margin = margin


    def calc_euclidean(self, x1, x2):
        return (x1 - x2).pow(2).sum(1)


    # Distances in embedding space is calculated in euclidean
    def forward(self, anchor, positive, negative):

        distance_positive = self.calc_euclidean(anchor, positive)

        distance_negative = self.calc_euclidean(anchor, negative)

        losses = torch.relu(distance_positive - distance_negative + self.margin)

        return losses.mean()


device = 'cuda'


# Our base model
model = models.resnet18().cuda()
optimizer = optim.Adam(model.parameters(), lr=0.001)
triplet_loss = TripletLoss()


# Training
for epoch in range(epochs):
    model.train()
    epoch_loss = 0.0
    for data in tqdm(train_loader):

        optimizer.zero_grad()

        x1,x2,x3 = data

        e1 = model(x1.to(device))
        e2 = model(x2.to(device))
        e3 = model(x3.to(device))

        loss = triplet_loss(e1,e2,e3)
        epoch_loss += loss
        loss.backward()
        optimizer.step()

    print("Train Loss: {}".format(epoch_loss.item()))
So far, our model has been trained to convert images into an embedding space. Next, we move to the search part.
Search
We can easily use the nearest neighbor search provided by Scikit Learn. However, we will explore something new and better instead of taking the easy route.
We will use Faiss. This is much faster than nearest neighbors, and this speed difference becomes more apparent when we have a large number of images.
Below we will demonstrate how to search for the nearest images in the stored image representations given a query image.
#!pip install faiss-gpu
import faiss
faiss_index = faiss.IndexFlatL2(1000)   # build the index

# storing the image representations
im_indices = []

with torch.no_grad():
    for f in glob.glob(os.path.join(PATH_TRAIN, '*/*')):

        im = Image.open(f)
        im = im.resize((224,224))
        im = torch.tensor([val_transforms(im).numpy()]).cuda()

        preds = model(im)
        preds = np.array([preds[0].cpu().numpy()])
        faiss_index.add(preds) #add the representation to index
        im_indices.append(f)   #store the image name to find it later on


# Retrieval with a query image
with torch.no_grad():
    for f in os.listdir(PATH_TEST):

        # query/test image
        im = Image.open(os.path.join(PATH_TEST,f))
        im = im.resize((224,224))
        im = torch.tensor([val_transforms(im).numpy()]).cuda()

        test_embed = model(im).cpu().numpy()

        _, I = faiss_index.search(test_embed, 5)
        print("Retrieved Image: {}".format(im_indices[I[0][0]]))
This covers image retrieval based on modern deep learning without making it too complex. Most retrieval problems can be solved with this basic pipeline.
Related Resources:
Notebook link: https://www.kaggle.com/mayukh18/oxford-flowers-image-retrieval-pytorch
Popular benchmark datasets in the image retrieval community: https://paperswithcode.com/task/image-retrieva
Good news!
Beginner's Visual Learning Knowledge Circle
is now open to the public 👇👇👇


Download 1: OpenCV-Contrib Extension Module Chinese Version Tutorial
Reply "Extension Module Chinese Tutorial" in the backend of the "Beginner's Visual Learning" public account to download the first Chinese version of the OpenCV extension module tutorial available online, covering installation of extension modules, SFM algorithms, stereo vision, target tracking, biological vision, super-resolution processing, and more than twenty chapters of content.

Download 2: Python Vision Practical Project 52 Lectures
Reply "Python Vision Practical Project" in the backend of the "Beginner's Visual Learning" public account to download 31 practical vision projects including image segmentation, mask detection, lane line detection, vehicle counting, eyeliner addition, license plate recognition, character recognition, emotion detection, text content extraction, facial recognition, etc., to help quickly learn computer vision.

Download 3: OpenCV Practical Projects 20 Lectures
Reply "OpenCV Practical Projects 20 Lectures" in the backend of the "Beginner's Visual Learning" public account to download 20 practical projects based on OpenCV to advance your OpenCV learning.

Communication Group

Welcome to join the reader group of the public account to communicate with peers. Currently, there are WeChat groups for SLAM, 3D vision, sensors, autonomous driving, computational photography, detection, segmentation, recognition, medical imaging, GAN, algorithm competitions, etc. (will gradually be subdivided). Please scan the WeChat ID below to join the group, and note: "Nickname + School/Company + Research Direction", for example: "Zhang San + Shanghai Jiaotong University + Visual SLAM". Please follow the format, otherwise, you will not be approved. Once added successfully, you will be invited to the relevant WeChat group based on your research direction. Please do not send advertisements in the group, otherwise, you will be removed from the group. Thank you for your understanding ~