
Click on the above “Beginner Learning Vision” to select Star or Pin.
Important content delivered immediately
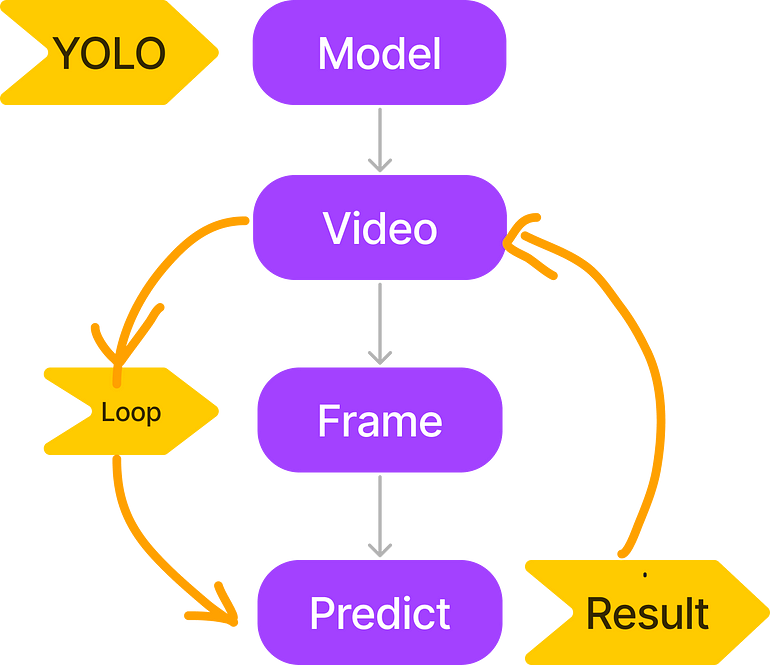
YOLO is a deep learning algorithm used for real-time object detection. You can use pre-trained YOLO models like YOLOv8 or YOLOv9, or train your own model on a custom dataset as needed. In this article, I will guide you on how to use a pre-trained YOLO model for object tracking. This is the simplest tutorial, and we will only handle basic object detection. Full code: https://github.com/sunnykumar1516/YOLO/blob/main Let’s look at the steps involved in object detection.
- We will load the model
- We will load the video
- We will extract each frame from the video one by one
- On each extracted frame, we will apply predictions and display the results using OpenCV. The image below summarizes the steps:
 Step 0: Environment Setup We will need two libraries: ultralytics and opencv; you can install these libraries using the following code.
pip install opencv-python
pip install ultralytics
Import all necessary libraries.
import cv2 as cv
from ultralytics import YOLO
Step 1: Load the Model Loading the model in YOLO is very easy. We can directly use YOLO() from ultralytics and provide the model name. Once you run it, the specified YOLO model will automatically download to the folder where your code is located.
#load the model
model = YOLO('yolov8n.pt')
Step 2: Load the Video We use VideoCapture() from OpenCV to load the video. The input to this function is the path to the video.
path = "../videos/football_test.mp4"  #read video
vs = cv.VideoCapture(path)
Step 3: Extract Frames
path = "../videos/football_test.mp4"  #read video
vs = cv.VideoCapture(path)  #load the model
model = YOLO('yolov8n.pt')
while True:
    (grabbed, frame) = vs.read()
    if not grabbed:
        break
    cv.imshow('image', frame)
    cv.waitKey(500)
Once we load the video, in the next step, we will extract frames from the video one by one. A video is a combination of a series of frames.
- vs = cv.VideoCapture(path): pointer containing the video.
- vs.read(): allows us to read the video frame by frame. Once we call the read function on vs, it will return the current video frame iteratively.
Each extracted frame is displayed using cv.imshow(‘image’, frame).Step 4: Apply Predictions
results = model.predict(frame, stream=False)path = "../videos/football_test.mp4" #read video
vs = cv.VideoCapture(path) #load the model
model = YOLO('yolov8n.pt')
while True:
(grabbed, frame) = vs.read()
if not grabbed:
break
results = model.predict(frame, stream=False)
cv.imshow('image', frame)
cv.waitKey(500)model.predict() is the method used to make predictions on each frame. The prediction results are stored in the results variable. In the while loop, we extract each frame from the video one by one and make predictions on each frame. In simple terms, I am trying to detect objects in each frame of the video.Step 5: Draw Bounding Boxes To draw bounding boxes, I created a function that takes the input image, data (containing prediction results), detected class names, and returns the image with bounding boxes around detected objects. drawBox(data, image, name): data is the prediction details, image is the frame, and name is the detected class name, such as: person, car, etc.
def drawBox(data, image, name):
    x1, y1, x2, y2, conf, id = data
    p1 = (int(x1), int(y1))
    p2 = (int(x2), int(y2))
    cv.rectangle(image, p1, p2, (0, 0, 255), 3)
    cv.putText(image, name, p1, cv.FONT_HERSHEY_SIMPLEX, 3, (0, 0, 255), 3)
    return image
results = model.predict(frame, stream=False)
for result in results:
for data in result.boxes.data.tolist():
#print(data)
id = data[5]
drawBox(data, frame, detection_classes[id])Since the results contain details of all detected objects in a frame, we parse each detected object in the code above. For each detection, we call “drawBox(data, frame, detection_classes[id])” to draw the bounding box around the detection.Step 6: Complete Code Here is what the complete code looks like now. You can also access the complete code here: https://github.com/sunnykumar1516/YOLO/blob/main/ReadVideoApplyYoloV8.py.
import cv2 as cv
from ultralytics import YOLO
def drawBox(data, image, name):
    x1, y1, x2, y2, conf, id = data
    p1 = (int(x1), int(y1))
    p2 = (int(x2), int(y2))
    cv.rectangle(image, p1, p2, (0, 0, 255), 3)
    cv.putText(image, name, p1, cv.FONT_HERSHEY_SIMPLEX, 3, (0, 0, 255), 3)
    return image
detection_classes = []
path = "../videos/football_test.mp4"  #read video
vs = cv.VideoCapture(path)  #load the model
model = YOLO('yolov8n.pt')
while True:
    (grabbed, frame) = vs.read()
    if not grabbed:
        break
    results = model.predict(frame, stream=False)
    detection_classes = results[0].names
    for result in results:
        for data in result.boxes.data.tolist():
            #print(data)
            id = data[5]
            drawBox(data, frame, detection_classes[id])
Conclusion Popular libraries like OpenCV and TensorFlow provide implementations for YOLO object detection and various object tracking algorithms, making it relatively simple to achieve object tracking using YOLO and computer vision techniques.
Download 1: OpenCV-Contrib Extension Module Chinese Version Tutorial
Reply with: Extension Module Chinese Tutorial in the backend of the "Beginner Learning Vision" public account to download the first OpenCV extension module tutorial in Chinese on the internet, covering installation of extension modules, SFM algorithms, stereo vision, object tracking, biological vision, super-resolution processing, and more than twenty chapters of content.

Download 2: Python Vision Practical Project 52 Lectures
Reply with: Python Vision Practical Project in the backend of the "Beginner Learning Vision" public account to download 31 visual practical projects including image segmentation, mask detection, lane line detection, vehicle counting, adding eyeliner, license plate recognition, character recognition, emotion detection, text content extraction, face recognition, etc., to help quickly learn computer vision.

Download 3: OpenCV Practical Project 20 Lectures
Reply with: OpenCV Practical Project 20 Lectures in the backend of the "Beginner Learning Vision" public account to download 20 practical projects based on OpenCV for advanced learning of OpenCV.

Communication Group

Welcome to join the reader group of the public account to communicate with peers. Currently, there are WeChat groups for SLAM, 3D vision, sensors, autonomous driving, computational photography, detection, segmentation, recognition, medical imaging, GAN, algorithm competitions, etc. (which will gradually be subdivided in the future). Please scan the WeChat number below to join the group, and note: "Nickname + School/Company + Research Direction", for example: "Zhang San + Shanghai Jiao Tong University + Visual SLAM". Please follow the format for notes; otherwise, you will not be approved. After successfully adding, you will be invited into the relevant WeChat group based on your research direction. Please do not send advertisements in the group; otherwise, you will be removed from the group. Thank you for your understanding~