 Python Chinese CommunityGlobal Python Chinese Developers’ Spiritual Tribe
In this article, you will learn about
1. How to import datasets using PyTorch
2. How to build a simple deep learning model using PyTorch
3. How to optimize and train the model we built
Note: The version of PyTorch used in this example is 0.4
Introduction
PyTorch is currently a very popular deep learning framework because it possesses the characteristics of Python, making it easy to get started and use, while also having the features of NumPy, thus it is not inferior in performance to any other deep learning framework. Now PyTorch has merged with Caffe2, and the PyTorch 1.0 version, which integrates Caffe2, will receive more attention and focus from professionals this summer. Below we will use PyTorch to implement a handwritten digit recognition model to get a simple introduction to PyTorch.
How to Import Datasets Using PyTorch
Before importing the data, we need to import some packages that will be used later. The code is as follows:
import torch
import torchvision
from torch.autograd import Variable
from torchvision import transforms,datasets
import numpy as np
import matplotlib.pyplot as plt

%matplotlib inline
We can use the built-in torchvision.datasets method in PyTorch to download the handwritten digit dataset. Additionally, this method can conveniently download commonly used datasets like COCO, ImageNet, CIFAR, etc. The code is as follows:
transform = transforms.ToTensor()                            train_dataset = datasets.MNIST(root ="./data",
                               train = True,
                               transform = transform,
                               download = True)

test_dataset = datasets.MNIST(root = "./data",
                              train = False,
                              transform = transform,
                              download = True)

train_data_loader = torch.utils.data.DataLoader(dataset = train_dataset,
                                        batch_size=64,
shuffle = True)
test_data_loader = torch.utils.data.DataLoader(dataset=test_dataset,
batch_size=64,
shuffle = True)
With these pieces of code, we have achieved data loading and preparation. The batch_size specifies the number of data samples loaded at a time, and here the value is 64, meaning we load 64 images into the model at a time. Setting shuffle to True indicates that the input data loaded into the model is randomly shuffled.
How to Build a Simple Deep Learning Model Using PyTorch
After defining the methods for data loading and preparation, we can start building the deep learning model. Here we will use convolutional layers, max pooling layers, and fully connected layers to build a simple convolutional neural network model. The code is as follows:
class Model(torch.nn.Module):

    def __init__(self):
        super(Model, self).__init__()
self.Conv=torch.nn.Sequential(
torch.nn.Conv2d(1,28,kernel_size=3,padding=1,stride=1),
                                        torch.nn.Conv2d(28,64,kernel_size=3,padding=1,stride=1),                              torch.nn.MaxPool2d(kernel_size=2, stride=2),      torch.nn.Conv2d(64,64,kernel_size=3,padding=1,stride=1),                               torch.nn.Conv2d(64,64,kernel_size=3,padding=1,stride=1),                                 torch.nn.MaxPool2d(kernel_size=2, stride=2)
                                       )
        self.Dense = torch.nn.Linear(7*7*64, 10)
    def forward(self, input):
        x = self.Conv(input)
        x = x.view(-1, 7*7*64)
        x = self.Dense(x)
        return x                           ```
The model uses a convolutional neural network structure consisting of 4 convolutional layers, 2 pooling layers, and 1 fully connected layer. Although the structure is simple, this model is more than sufficient for handling the handwritten digit recognition problem. Once the model is built, we can print it out to see the specific model details, as follows:
model = Model()
model = model.cuda()
print(model)
The output is:
Model(
  (Conv): Sequential(
    (0): Conv2d(1, 28, kernel_size=(3, 3), stride=(1, 1), padding=(1, 1))
    (1): Conv2d(28, 64, kernel_size=(3, 3), stride=(1, 1), padding=(1, 1))
    (2): MaxPool2d(kernel_size=2, stride=2, padding=0, dilation=1, ceil_mode=False)
    (3): Conv2d(64, 64, kernel_size=(3, 3), stride=(1, 1), padding=(1, 1))
    (4): Conv2d(64, 64, kernel_size=(3, 3), stride=(1, 1), padding=(1, 1))
    (5): MaxPool2d(kernel_size=2, stride=2, padding=0, dilation=1, ceil_mode=False)
  )
  (Dense): Linear(in_features=3136, out_features=10, bias=True)
)
How to Optimize and Train the Model We Built
The model has been built, and the data loading method has been defined, now we just need to train our model and optimize its internal parameters. The code is as follows:
 epoch_n = 5

loss_f = torch.nn.CrossEntropyLoss()
optimizer = torch.optim.Adam(model.parameters(), lr=0.001)

for epoch in range(epoch_n):

    epoch_loss = 0.0
    epoch_acc = 0.0
    for batch in train_data_loader:
        X_train,y_train = batch
X_train,y_train=Variable(X_train.cuda()),Variable(y_train.cuda())
        y_pred = model(X_train)
        _,pred =torch.max(y_pred, 1)

        optimizer.zero_grad()
        loss = loss_f(y_pred, y_train)

        loss.backward()
        optimizer.step()

        epoch_loss += loss.item()
        epoch_acc += torch.sum(pred == y_train.data)

    epoch_loss = epoch_loss*64/len(train_dataset)
    epoch_acc = epoch_acc.double()/len(train_dataset)
    print("Epoch{}: Loss is:{:.4f},Acc is:{:4f}".format(epoch, epoch_loss, epoch_acc))
We have defined 5 training epochs, so during the entire training process, there will be 5 backward propagations to update the model parameters. The defined optimization function is the Adam method, and the loss function is CrossEntropyLoss (cross-entropy loss). Let’s look at the outputs during the training process, as follows:
Epoch0: Loss is:0.1550,Acc is:0.953250
Epoch1: Loss is:0.0663,Acc is:0.979433
Epoch2: Loss is:0.0525,Acc is:0.984133
Epoch3: Loss is:0.0462,Acc is:0.985567
Epoch4: Loss is:0.0386,Acc is:0.987950
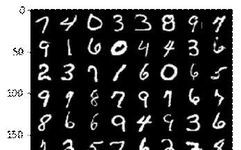
The results are quite good, with the training accuracy approaching 99%, and there is still an upward trend. If we continue training, we could achieve even better performance, but there is also a risk of overfitting. Next, we will use the test set to verify how well the model performs on handwritten digit recognition. We randomly select 64 images from the test set, their true labels and images are shown below:
[ 7,  4,  0,  3,  3,  8,  9,  7,  9,  1,  6,  0,  4,  4,
         3,  6,  2,  3,  7,  1,  6,  0,  6,  5,  9,  9,  8,  7,
         9,  7,  6,  7,  8,  6,  6,  9,  4,  9,  3,  6,  1,  3,
         5,  7,  6,  2,  7,  8,  8,  9,  8,  3,  0,  1,  1,  2,
         8,  8,  5,  3,  3,  1,  1,  4]
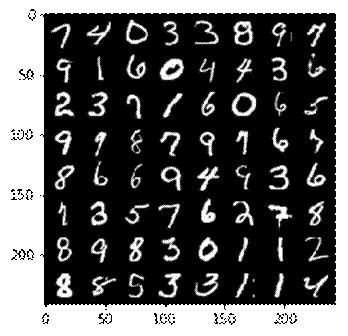
Our trained model’s predicted results are as follows:
[ 7,  4,  0,  3,  3,  8,  9,  7,  9,  1,  6,  0,  4,  4,
         3,  6,  2,  3,  7,  1,  6,  0,  6,  5,  9,  9,  8,  7,
         9,  7,  6,  9,  8,  6,  6,  9,  4,  9,  3,  6,  1,  3,
         5,  7,  6,  2,  7,  8,  8,  9,  8,  3,  0,  1,  1,  2,
         8,  8,  5,  3,  3,  1,  1,  4]
It can be seen that there is only one error in the predicted results, and overall, the accuracy of this test data is still over 98%. The complete code for the testing part is as follows:
X_test,y_test = next(iter(test_data_loader))
print("Test dataset label is:{}".format(y_test))
X = torchvision.utils.make_grid(X_test)
X = X.numpy().transpose(1,2,0)
plt.imshow(X)
X_test = X_test.cuda()
y = model(X_test)
_,y = torch.max(y,1)
print(y)
This article introduces only a simple small case. The entire process is completed using PyTorch and is very straightforward. Of course, when facing more complex problems, we can still follow these three steps to build our basic model.
❈
Author of this article:Tang Jinmin (Guilin Tang), columnist for the Python Chinese Community.Author of the book “Deep Learning with PyTorch Practical Computer Vision”,Zhihu column address:https://zhuanlan.zhihu.com/c_135203221
❈
Appreciate the Author

Recent Popular Articles
Use Python to Understand WeChat Friends Better
How to Make a Cool Program with Python
Use Python to Scrape 100,000 Comments on Eason Chan’s New Song “We” for New Discoveries
Analyze Apple’s Stock Price Data with Python
Python Natural Language Processing Analysis of “The Heaven Sword and Dragon Saber”
Free Practical Training Camp for AI Developers in Shenzhen(Main Venue)
Event Time: May 11, 2018, 13:30-17:00
Event Location: Shenzhen KeXing Science Park International Conference Center, 3rd Floor
Event Address: 15 Keyuan Road, Nanshan District, Shenzhen, Guangdong Province, B4 Building, 3rd Floor
▼ Long press to scan the QR code beloworclickRead the original textto register!