The Canny filter is undoubtedly the most famous and widely used edge detection filter. I will explain step-by-step how to implement the Canny filter for contour detection. Since the Canny filter is a multi-stage filter, it is rarely integrated into deep learning models. Therefore, I will describe the different parts while implementing it using PyTorch. It can be customized with almost no limits, and I allow myself some deviations.
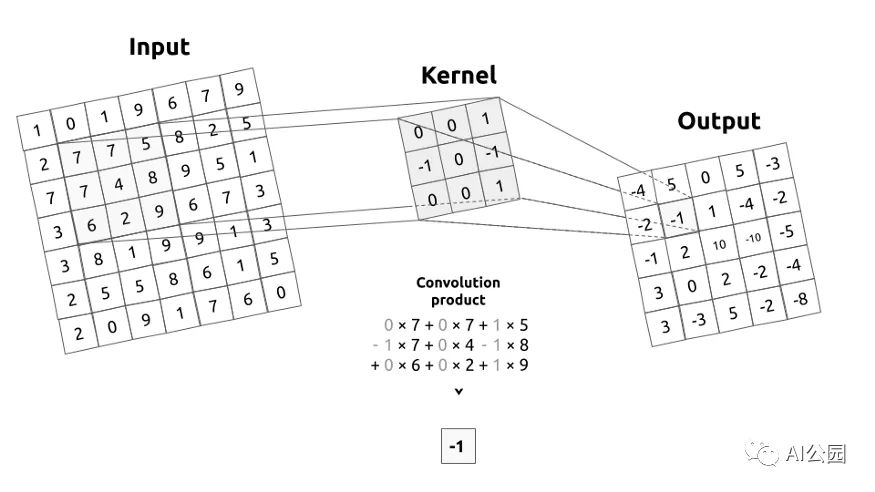
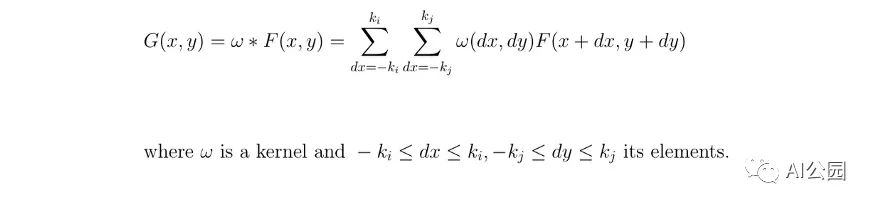
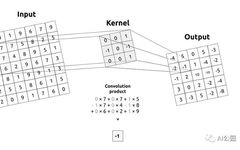
Let me introduce what a convolution matrix, or kernel, is. The convolution matrix describes a filter that we want to apply to the input image. For simplicity, the kernel will move across the entire image from left to right and from top to bottom by applying a convolution. The output of this operation is called image filtering.
Gaussian Filter
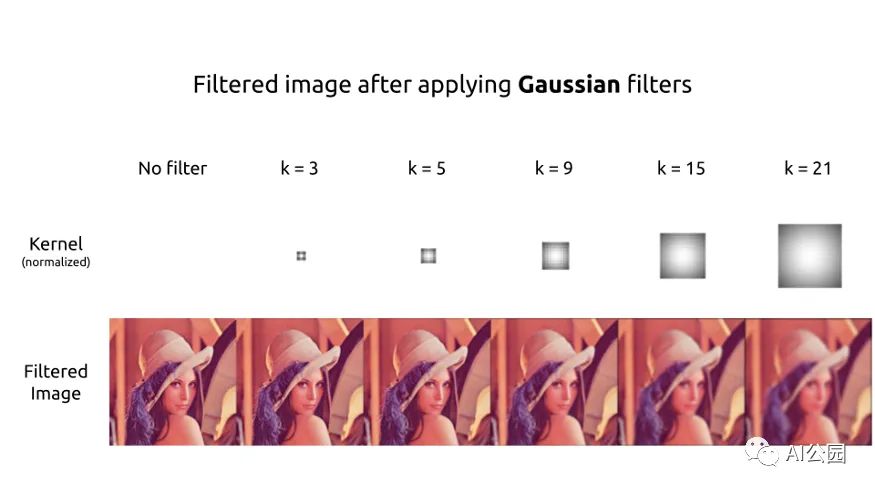
First, we usually eliminate noise in the input image by applying a blurring filter. The choice of this filter depends on you, but we generally use a Gaussian filter.

def get_gaussian_kernel(k=3, mu=0, sigma=1, normalize=True):
    # compute 1 dimension gaussian
    gaussian_1D = np.linspace(-1, 1, k)
    # compute a grid distance from center
    x, y = np.meshgrid(gaussian_1D, gaussian_1D)
    distance = (x ** 2 + y ** 2) ** 0.5

    # compute the 2 dimension gaussian
    gaussian_2D = np.exp(-(distance - mu) ** 2 / (2 * sigma ** 2))
    gaussian_2D = gaussian_2D / (2 * np.pi *sigma **2)

    # normalize part (mathematically)
    if normalize:
        gaussian_2D = gaussian_2D / np.sum(gaussian_2D)
    return gaussian_2D
You can create Gaussian kernels of different sizes, which may be more or less centered or flattened. Obviously, the larger the kernel, the more blurred the output image will be.
Sobel Filtering
To detect edges, a filter must be applied to the image to extract gradients.

def get_sobel_kernel(k=3):
    # get range
    range = np.linspace(-(k // 2), k // 2, k)
    # compute a grid the numerator and the axis-distances
    x, y = np.meshgrid(range, range)
    sobel_2D_numerator = x
    sobel_2D_denominator = (x ** 2 + y ** 2)
    sobel_2D_denominator[:, k // 2] = 1  # avoid division by zero
    sobel_2D = sobel_2D_numerator / sobel_2D_denominator
    return sobel_2D
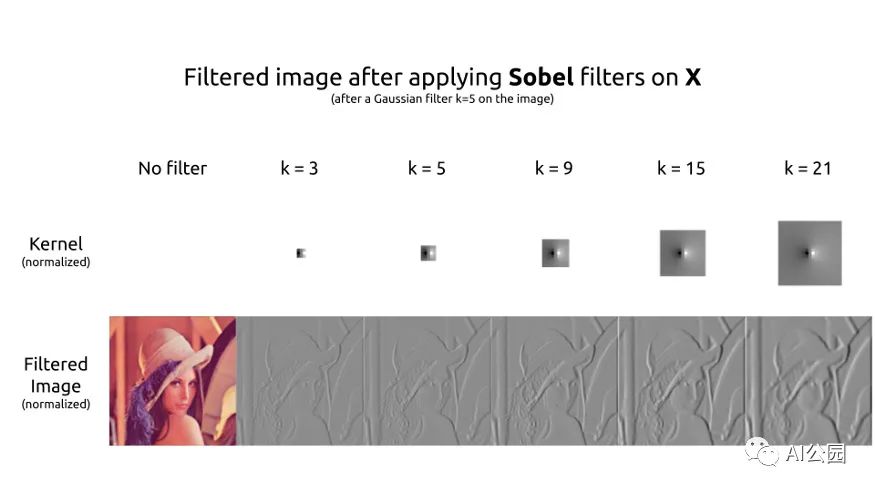
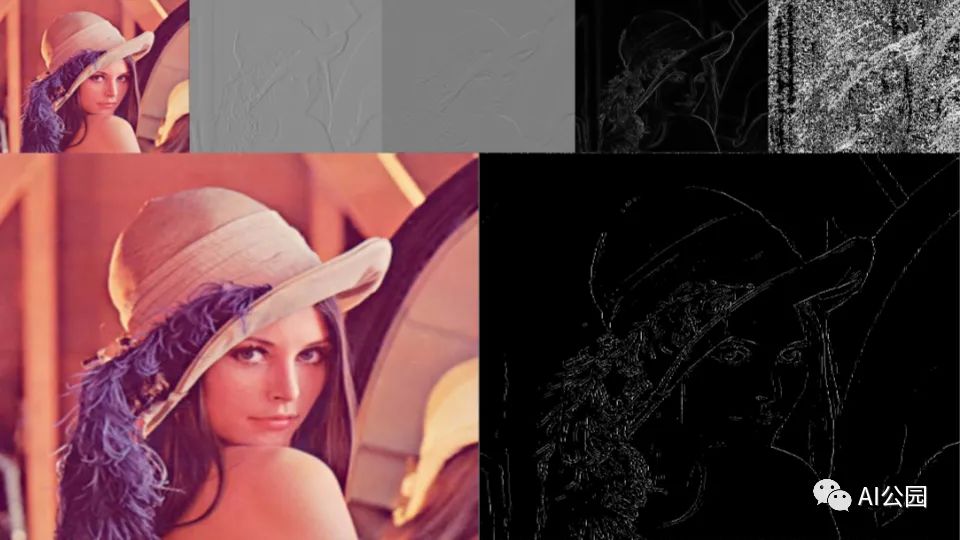
The most commonly used filter is the Sobel filter, which is decomposed into two filters. The first kernel is used to extract the horizontal gradient. Roughly speaking, the brighter the pixel on the right compared to the pixel on the left, the higher the result of the filtered image. The opposite is also true. This can be clearly seen on the left side of Lena’s hat.
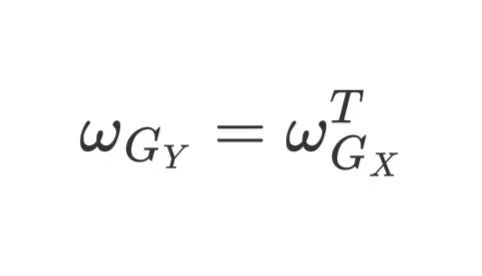
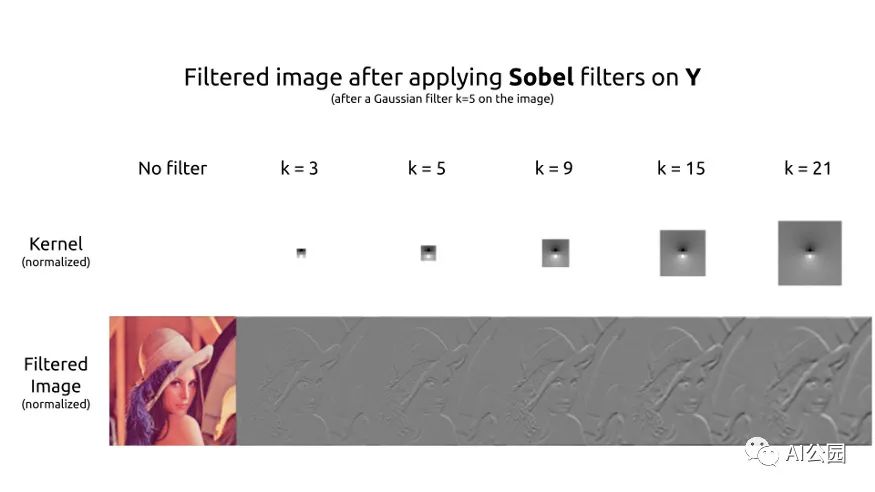
The second kernel is used to extract the vertical gradient. This kernel is the transpose of the first. Both kernels have the same effect but on different axes.
Calculating Gradients
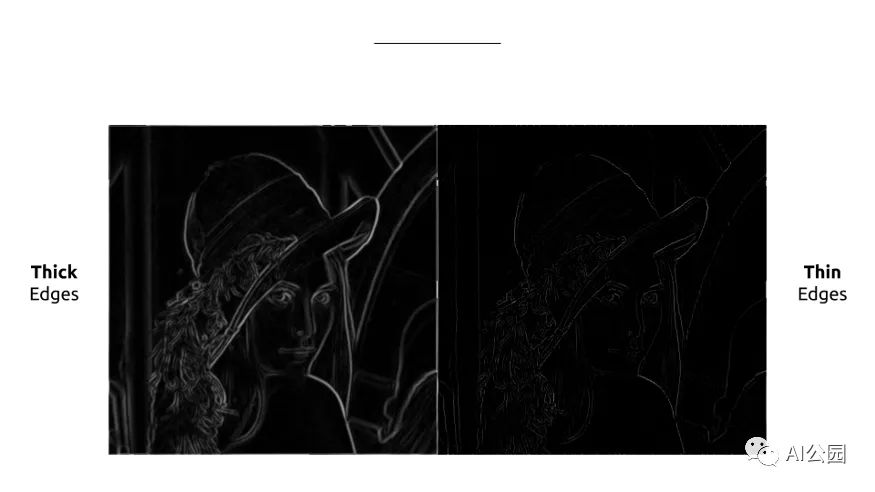
Now that we have gradients in both axes of the image, we need the magnitude of the gradients to detect contours. We can use the absolute value norm or the Euclidean norm.
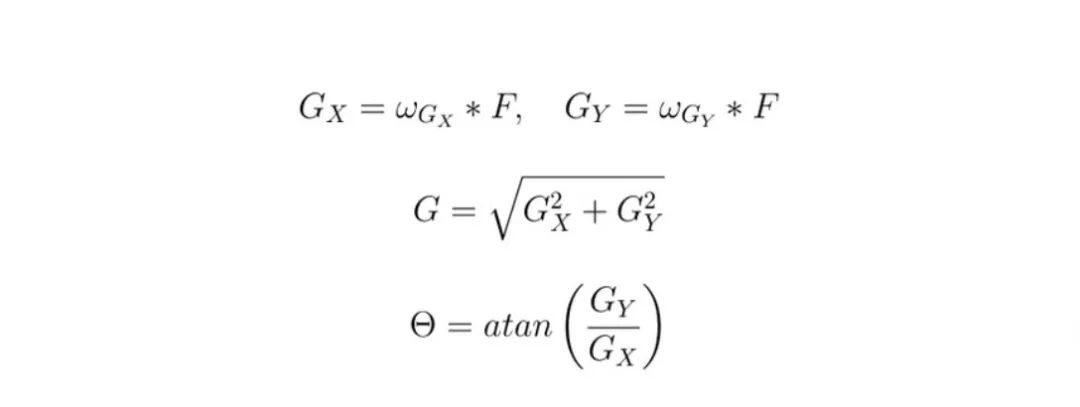
Edges are now perfectly detected using the magnitude of our gradients, but they are quite thick. It would be nice to keep only the thin lines of the contours. Therefore, we also calculate the direction of our gradients, which will be used to maintain these thin lines. In Lena’s image, the gradient is represented by intensity, as the angle of the gradient is very important.
Non-Maximum Suppression
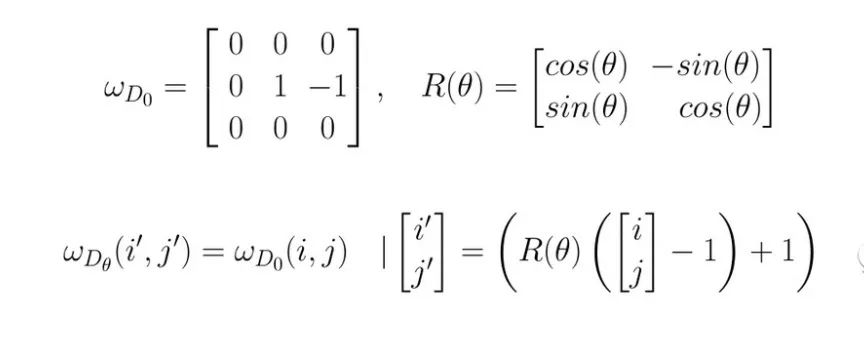
To refine the edges, the non-maximum suppression method can be used. Before that, we need to create a 45° × 45° directional kernel.
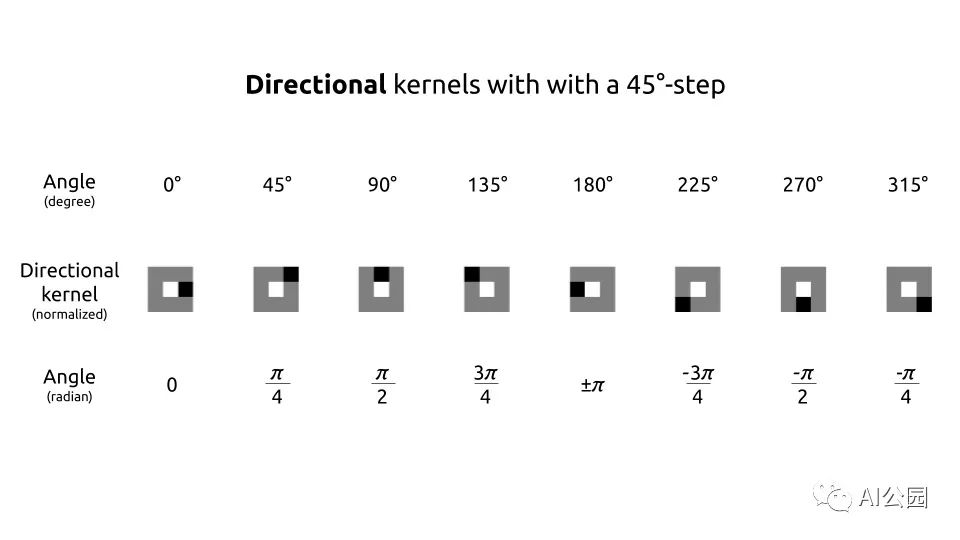
def get_thin_kernels(start=0, end=360, step=45):
        k_thin = 3  # actual size of the directional kernel
        # increase for a while to avoid interpolation when rotating
        k_increased = k_thin + 2

        # get 0° angle directional kernel
        thin_kernel_0 = np.zeros((k_increased, k_increased))
        thin_kernel_0[k_increased // 2, k_increased // 2] = 1
        thin_kernel_0[k_increased // 2, k_increased // 2 + 1:] = -1

        # rotate the 0° angle directional kernel to get the other ones
        thin_kernels = []
        for angle in range(start, end, step):
            (h, w) = thin_kernel_0.shape
            # get the center to not rotate around the (0, 0) coord point
            center = (w // 2, h // 2)
            # apply rotation
            rotation_matrix = cv2.getRotationMatrix2D(center, angle, 1)
            kernel_angle_increased = cv2.warpAffine(thin_kernel_0, rotation_matrix, (w, h), cv2.INTER_NEAREST)

            # get the k=3 kerne
            kernel_angle = kernel_angle_increased[1:-1, 1:-1]
            is_diag = (abs(kernel_angle) == 1)      # because of the interpolation
            kernel_angle = kernel_angle * is_diag   # because of the interpolation
            thin_kernels.append(kernel_angle)
        return thin_kernels
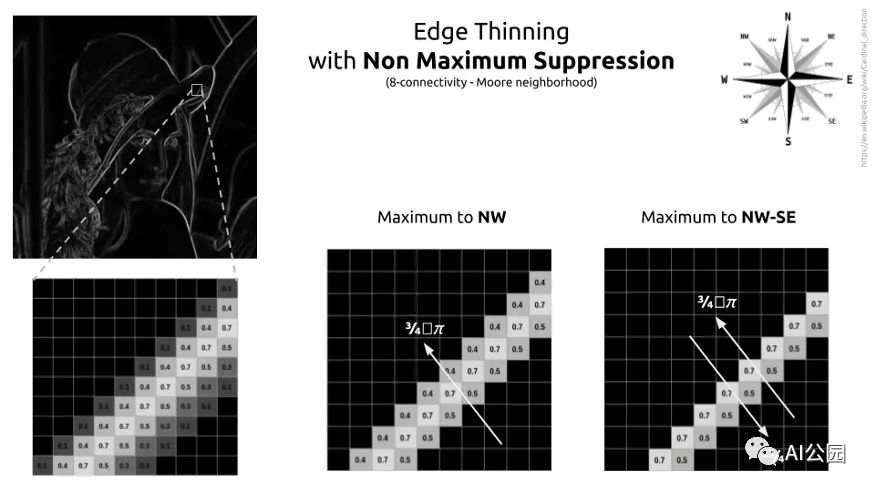
Thus, the process requires checking the 8-neighborhood (also known as Moore’s neighborhood). This concept is straightforward. For each pixel, we will check the direction. We want to see if this pixel is stronger in gradient direction than its neighbors. If so, we will compare it to the neighboring pixel in the opposite direction. If this pixel has maximum strength compared to its bi-directional neighbor, then it is a local maximum. This pixel will be kept. In all other cases, it is not a local maximum, and the pixel is discarded.
Thresholding and Hysteresis
Finally, we just need to apply a threshold. There are three methods to do this:
- Low-High threshold: Set pixels with brightness above the threshold to 1, and others to 0.
- Low-Weak and Weak-High thresholds: We set high-intensity pixels to 1, low-intensity pixels to 0, and those between the two thresholds to 0.5, considering them weak pixels.
- Low-Weak and Weak-High with Hysteresis: Same as above, weak pixels are evaluated with hysteresis and reassigned as high or low.
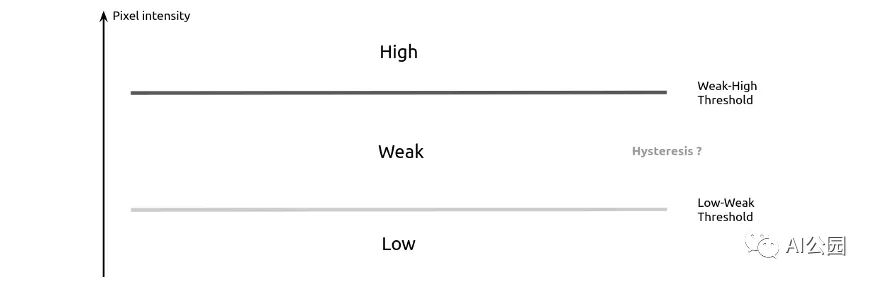
“Hysteresis is the dependence of the state of a system on its history.” — Wikipedia
In our case, hysteresis can be understood as a pixel’s dependency on its neighboring pixels. In the hysteresis step of the Canny filter, we say that if a weak pixel has a high-intensity neighbor among its 8 neighbors, it will be classified as high.
I like to use different methods; I ultimately use a filter to classify weak pixels. If its convolution product is greater than 1, then I classify it as High.

Now Let’s Look at the PyTorch Code
Yes, now we can look at the PyTorch code. Everything is combined into an nn.Module. I cannot guarantee that the implementation will be optimized. Using OpenCV features can speed up processing. However, this implementation at least has the advantage of being flexible, parameterizable, and easily modifiable as needed.
class CannyFilter(nn.Module):
    def __init__(self,
                 k_gaussian=3,
                 mu=0,
                 sigma=1,
                 k_sobel=3,
                 use_cuda=False):
        super(CannyFilter, self).__init__()
        # device
        self.device = 'cuda' if use_cuda else 'cpu'

        # gaussian

        gaussian_2D = get_gaussian_kernel(k_gaussian, mu, sigma)
        self.gaussian_filter = nn.Conv2d(in_channels=1,
                                         out_channels=1,
                                         kernel_size=k_gaussian,
                                         padding=k_gaussian // 2,
                                         bias=False)
        self.gaussian_filter.weight[:] = torch.from_numpy(gaussian_2D)

        # sobel

        sobel_2D = get_sobel_kernel(k_sobel)
        self.sobel_filter_x = nn.Conv2d(in_channels=1,
                                        out_channels=1,
                                        kernel_size=k_sobel,
                                        padding=k_sobel // 2,
                                        bias=False)
        self.sobel_filter_x.weight[:] = torch.from_numpy(sobel_2D)


        self.sobel_filter_y = nn.Conv2d(in_channels=1,
                                        out_channels=1,
                                        kernel_size=k_sobel,
                                        padding=k_sobel // 2,
                                        bias=False)
        self.sobel_filter_y.weight[:] = torch.from_numpy(sobel_2D.T)


        # thin

        thin_kernels = get_thin_kernels()
        directional_kernels = np.stack(thin_kernels)

        self.directional_filter = nn.Conv2d(in_channels=1,
                                            out_channels=8,
                                            kernel_size=thin_kernels[0].shape,
                                            padding=thin_kernels[0].shape[-1] // 2,
                                            bias=False)
        self.directional_filter.weight[:, 0] = torch.from_numpy(directional_kernels)

        # hysteresis

        hysteresis = np.ones((3, 3)) + 0.25
        self.hysteresis = nn.Conv2d(in_channels=1,
                                    out_channels=1,
                                    kernel_size=3,
                                    padding=1,
                                    bias=False)
        self.hysteresis.weight[:] = torch.from_numpy(hysteresis)


    def forward(self, img, low_threshold=None, high_threshold=None, hysteresis=False):
        # set the setps tensors
        B, C, H, W = img.shape
        blurred = torch.zeros((B, C, H, W)).to(self.device)
        grad_x = torch.zeros((B, 1, H, W)).to(self.device)
        grad_y = torch.zeros((B, 1, H, W)).to(self.device)
        grad_magnitude = torch.zeros((B, 1, H, W)).to(self.device)
        grad_orientation = torch.zeros((B, 1, H, W)).to(self.device)

        # gaussian

        for c in range(C):
            blurred[:, c:c+1] = self.gaussian_filter(img[:, c:c+1])

            grad_x = grad_x + self.sobel_filter_x(blurred[:, c:c+1])
            grad_y = grad_y + self.sobel_filter_y(blurred[:, c:c+1])

        # thick edges

        grad_x, grad_y = grad_x / C, grad_y / C
        grad_magnitude = (grad_x ** 2 + grad_y ** 2) ** 0.5
        grad_orientation = torch.atan(grad_y / grad_x)
        grad_orientation = grad_orientation * (360 / np.pi) + 180 # convert to degree
        grad_orientation = torch.round(grad_orientation / 45) * 45  # keep a split by 45

        # thin edges

        directional = self.directional_filter(grad_magnitude)
        # get indices of positive and negative directions
        positive_idx = (grad_orientation / 45) % 8
        negative_idx = ((grad_orientation / 45) + 4) % 8
        thin_edges = grad_magnitude.clone()
        # non maximum suppression direction by direction
        for pos_i in range(4):
            neg_i = pos_i + 4
            # get the oriented grad for the angle
            is_oriented_i = (positive_idx == pos_i) * 1
            is_oriented_i = is_oriented_i + (positive_idx == neg_i) * 1
            pos_directional = directional[:, pos_i]
            neg_directional = directional[:, neg_i]
            selected_direction = torch.stack([pos_directional, neg_directional])

            # get the local maximum pixels for the angle
            is_max = selected_direction.min(dim=0)[0] > 0.0
            is_max = torch.unsqueeze(is_max, dim=1)

            # apply non maximum suppression
            to_remove = (is_max == 0) * 1 * (is_oriented_i) > 0
            thin_edges[to_remove] = 0.0

        # thresholds

        if low_threshold is not None:
            low = thin_edges > low_threshold

            if high_threshold is not None:
                high = thin_edges > high_threshold
                # get black/gray/white only
                thin_edges = low * 0.5 + high * 0.5

                if hysteresis:
                    # get weaks and check if they are high or not
                    weak = (thin_edges == 0.5) * 1
                    weak_is_high = (self.hysteresis(thin_edges) > 1) * weak
                    thin_edges = high * 1 + weak_is_high * 1
            else:
                thin_edges = low * 1


        return blurred, grad_x, grad_y, grad_magnitude, grad_orientation, thin_edges
Original link: https://towardsdatascience.com/implement-canny-edge-detection-from-scratch-with-pytorch-a1cccfa58bed