This Article Covers
The main contents of this article include:
-
What is Hugging Face and what does it offer -
Using Hugging Face models (Transformers library) -
Using Hugging Face datasets (Datasets library)
Introduction to Hugging Face
Similar to GitHub, Hugging Face is a hub (community). It can be considered the GitHub of the machine learning world. Hugging Face provides users with the following main functionalities:
-
Git repositories allow you to manage code versions and open-source code. The model repository allows you to manage model versions and open-source models, with usage similar to GitHub. -
Hugging Face provides many models for different machine learning tasks, stored in the model repository. -
Hugging Face has many public datasets. Hugging Face is most famous in the NLP field, with most of its models based on Transformers. For ease of use, Hugging Face also offers the following projects: -
Transformers: Transformers provides thousands of pre-trained models for different tasks, such as text, audio, and CV domains. This project is the core of Hugging Face, and learning Hugging Face is essentially learning how to use this project. -
Datasets: A lightweight dataset framework with two main functions: ① Downloading and preprocessing commonly used public datasets with a single line of code; ② A fast and easy-to-use data preprocessing library. -
Accelerate: Helps PyTorch users easily implement multi-GPU/TPU/fp16. -
Spaces: Provides many fun deep learning applications to try out.
Explanation of Hugging Face Models
Introduction to Transformers
The Hugging Face Transformer is the core project of Hugging Face, allowing you to do the following:
-
Directly use pre-trained models for inference – provides a large number of pre-trained models for use – use pre-trained models for transfer learning
Installing Transformers
Installing Transformers is very simple; just install it directly.
pip install transformersUsing Transformers for Inference
If your task is a common one, you can likely use the API provided by Transformer directly, which is very simple to use.
from transformers import pipeline

translator = pipeline("translation_en_to_fr")
print(translator("How old are you?"))
[{'translation_text': ' quel âge êtes-vous?'}]For some specific tasks, the official model may not be provided, but you can specify it on the website. When loading the model, you might encounter errors due to missing libraries; in that case, just install the corresponding libraries and restart.
!pip install sentencepiecetranslator = pipeline("translation_en_to_zh", model='Helsinki-NLP/opus-mt-en-zh')
translator("I'm learning deep learning.")[{'translation_text': '我在学习深思熟虑'}]For more pipelines, please refer to: https://huggingface.co/docs/transformers/v4.21.0/en/main_classes/pipelines
Finding Hugging Face Models
This section will introduce how to find the models you need through Hugging Face.
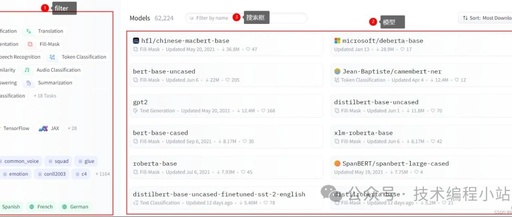
First, we need to visit the official website. Then we will see the following interface:
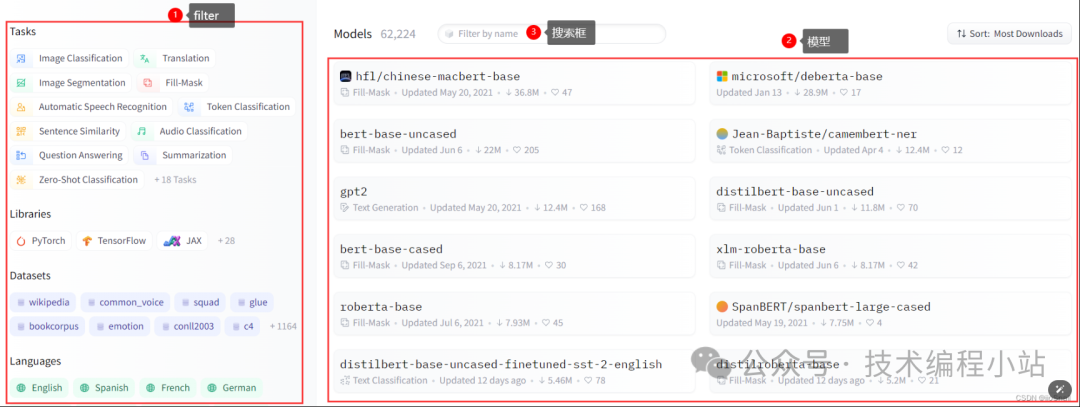
It mainly includes three parts:
-
Filter: Used to filter the models you want. Model List: Displays the available models. Models without a prefix are provided by the official, such as gpt2, while those with a prefix are provided by third parties. Search Box: You can search for models by name using the search box.
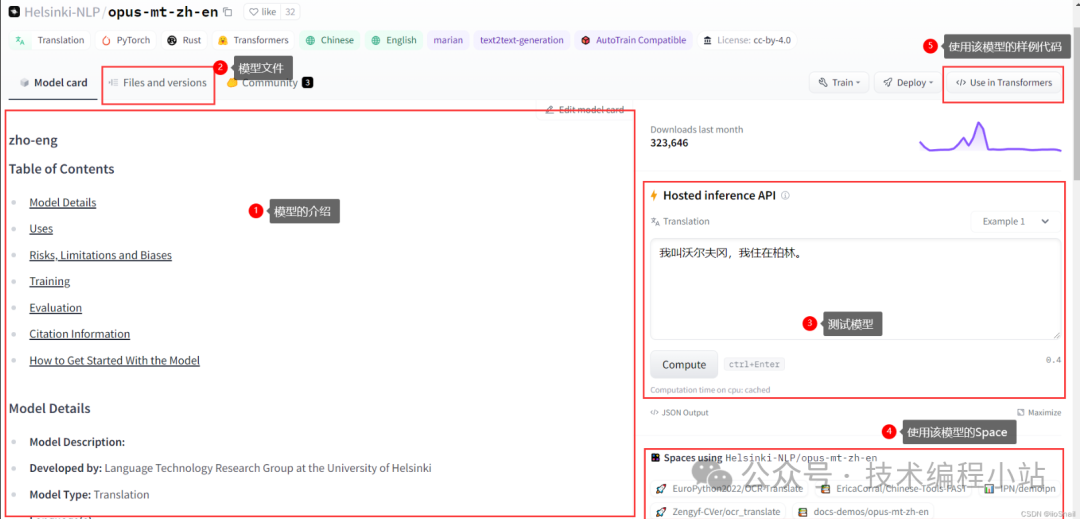
After clicking on your model, you will arrive at the following page:
-
Model Card: We can check the functionalities and performance of the model through this document.
-
Files and Versions: You can download model files from this module, which generally includes model files for various frameworks (TF, Pytorch, etc.) and configuration files, etc., for offline loading.
-
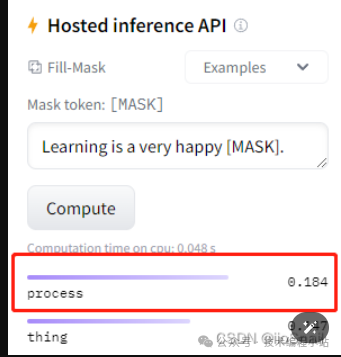
Hosted Inference API: You can directly test your model through this module. Hugging Face also provides an HTTP API for calling, so you don’t need to deploy it locally.
For details, please refer to: https://huggingface.co/docs/api-inference/index
Applications Using This Model: This section shows applications using this model, which you can click to try out.
Use in Transformers: You can directly view how to use this model through this module, simply copy the code into your project.
Using Hugging Face Models
The Transformers project provides several simple APIs to help users use Hugging Face models, collectively referred to as AutoClass(), including:
-
AutoTokenizer: Used for text tokenization -
AutoFeatureExtractor: Used for feature extraction -
AutoProcessor: Used for data processing -
AutoModel: Used for loading models
They can all be used with: AutoClass.from_pretrain("model_name"), and then you can use it. For example:
from transformers import AutoTokenizer
tokenizer = AutoTokenizer.from_pretrained("bert-base-uncased")
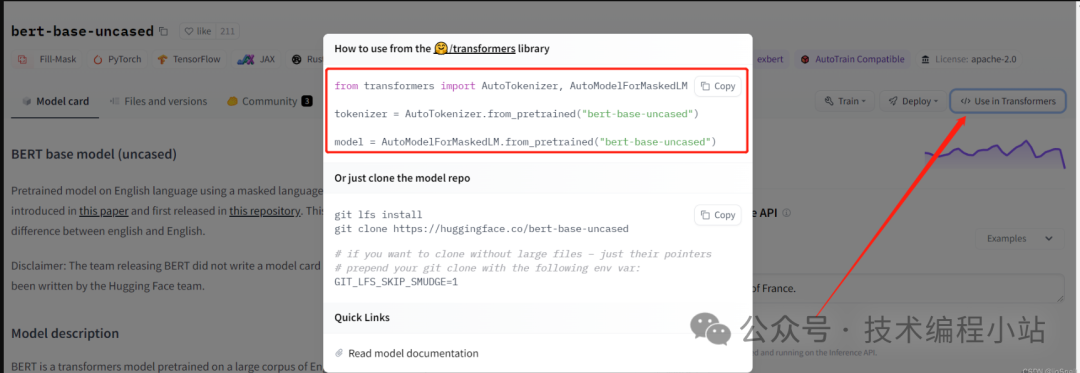
tokenizer("I'm learning deep learning."){'input_ids': [101, 1045, 1005, 1049, 4083, 2784, 4083, 1012, 102], 'token_type_ids': [0, 0, 0, 0, 0, 0, 0, 0, 0], 'attention_mask': [1, 1, 1, 1, 1, 1, 1, 1, 1]}Usually, a model will contain some of the above four functionalities. For example, the bert-base-uncased model contains both “tokenization” and “model” functionalities, which we can check through the Use in Transformers module:
Not all models can use
AutoModel, it depends on the model’s code example.
Transfer Learning
In many cases, the models provided by Hugging Face may not meet our needs, so we still need to train our own models. At this point, we can use the pre-trained models provided by Hugging Face for transfer learning. This section will introduce how to use Hugging Face for transfer learning.
The approach to using Hugging Face models for transfer learning is almost the same as regular transfer learning:
-
First, choose a pre-trained model that is similar to your task, or directly choose a task-agnostic base model. -
Extract the backbone from the original model. -
Then connect your downstream task to build a new model. -
Start training.
Here, I will take the bert-base-uncased model as an example to perform a model parameter update operation, assuming my task is a binary classification sentiment analysis problem.
First, we will try to run this model, copying the sample code from the Use in Transformers section:
from transformers import AutoTokenizer, AutoModelForMaskedLM

tokenizer = AutoTokenizer.from_pretrained("bert-base-uncased")
model = AutoModelForMaskedLM.from_pretrained("bert-base-uncased")
Some weights of the model checkpoint at bert-base-uncased were not used when initializing BertForMaskedLM: ['cls.seq_relationship.weight', 'cls.seq_relationship.bias']
- This IS expected if you are initializing BertForMaskedLM from the checkpoint of a model trained on another task or with another architecture (e.g. initializing a BertForSequenceClassification model from a BertForPreTraining model).
- This IS NOT expected if you are initializing BertForMaskedLM from the checkpoint of a model that you expect to be exactly identical (initializing a BertForSequenceClassification model from a BertForSequenceClassification model).Next, we need to try using this model:
inputs = tokenizer("Learning is a very happy [MASK].", return_tensors='pt')
print(inputs)
{'input_ids': tensor([[ 101, 4083, 2003, 1037, 2200, 3407, 103, 1012, 102]]), 'token_type_ids': tensor([[0, 0, 0, 0, 0, 0, 0, 0, 0]]), 'attention_mask': tensor([[1, 1, 1, 1, 1, 1, 1, 1, 1]])}model(**inputs).logits.argmax(dim=-1)tensor([[1012, 4083, 2003, 1037, 2200, 3407, 2832, 1012, 1012]])Typically, the use of Hugging Face models is divided into two steps: first tokenization (other models may use feature extraction AutoFeatureExtractor, etc.), and then using the result from the first step as the input parameter for the model. Note that the first step usually requires specifying return_tensors='pt' to return tensor type data. We can also use tokenizer? in Jupyter to check its usage.
tokenizer.convert_ids_to_tokens(2832)'process'Here we have obtained the same data as on the page.
After testing the model, we will officially start transfer learning.
The task of bert-base-uncased is Fill-Mask, which is a fill-in-the-blank task, while our task is sentiment classification, so we need to remove the original classifier. Let’s first print the current model:
print(model)BertForMaskedLM(
(bert): BertModel(
。。。略
)
(cls): BertOnlyMLMHead(
。。。略
(decoder): Linear(in_features=768, out_features=30522, bias=True)
)
)From the output, we can see that the bert-base-uncased model consists of two main parts, bert and the final classification layer cls. When performing transfer learning, we definitely want the bert layer, so we can extract the bert layer like this:
print(model.bert)BertModel(
。。。略
)Let’s try using model.bert:
outputs = model.bert(**inputs)
print(outputs)
print(outputs.last_hidden_state.size())
BaseModelOutputWithPoolingAndCrossAttentions(last_hidden_state=tensor([[[ 0.0568, 0.1662, 0.0943, ..., -0.0346, -0.0636, 0.1689],
[-0.0402, 0.0757, 0.1923, ..., -0.0217, -0.0459, 0.0711],
[-0.1038, -0.0372, 0.5063, ..., -0.1587, 0.0475, 0.5513],
...,
[ 0.1763, -0.0111, 0.1922, ..., 0.1891, -0.1079, -0.2163],
[ 0.8013, 0.4953, -0.2258, ..., 0.1501, -0.7685, -0.3709],
[ 0.0572, 0.3405, 0.6527, ..., 0.4695, -0.0455, 0.3055]]],
grad_fn=<NativeLayerNormBackward0>), pooler_output=None, hidden_states=None, past_key_values=None, attentions=None, cross_attentions=None)
torch.Size([1, 9, 768])We can see that we received the hidden layer information output by bert. We can input this hidden layer information into a linear layer for sentiment classification, then compute the loss function and backpropagate to update the parameters. One point to note is that the shape of the returned hidden layer is (1, 9, 768), where 1 is batch_size, 9 is because there are 9 tokens, and 768 is the dimension of the vector corresponding to each token. When using bert for sentiment classification, we usually use the result of the first token (<bos>).
import torch
from torch import nn

# Define the final binary classification linear layer
cls = nn.Sequential(
    nn.Linear(768, 1),
    nn.Sigmoid()
)
# Use the commonly used Binary Cross Entropy Loss for binary classification
criteria = nn.BCELoss()
# Only update parameters for the final linear layer
optimizer = torch.optim.SGD(cls.parameters(), lr=0.1)
# Take the output of the first token (&lt;bos&gt;) of the hidden layer as the input to the cls layer, and compute the loss with the label
loss = criteria(cls(outputs.last_hidden_state[:, 0, :]), torch.FloatTensor([[1]]))
loss.backward()
optimizer.step()
optimizer.zero_grad()Thus, a parameter update is completed. Try applying it to a real project.
Explanation of Hugging Face Datasets
The Datasets library can conveniently access and share datasets, and can also be used to evaluate tasks in NLP, CV, speech, etc.
This section will explain how to use Hugging Face datasets.
Installing the Datasets Library
You can install it directly using pip:
pip install datasetsIf you want to use audio datasets, you need to execute the following command:
pip install datasetsSimilarly, for image datasets:
pip install datasets[vision]Finding Datasets
First, we need to open the page, which displays Hugging Face’s datasets, similar to the Models page. You can filter by tags or names:
You can click on the dataset you are interested in to view the details:
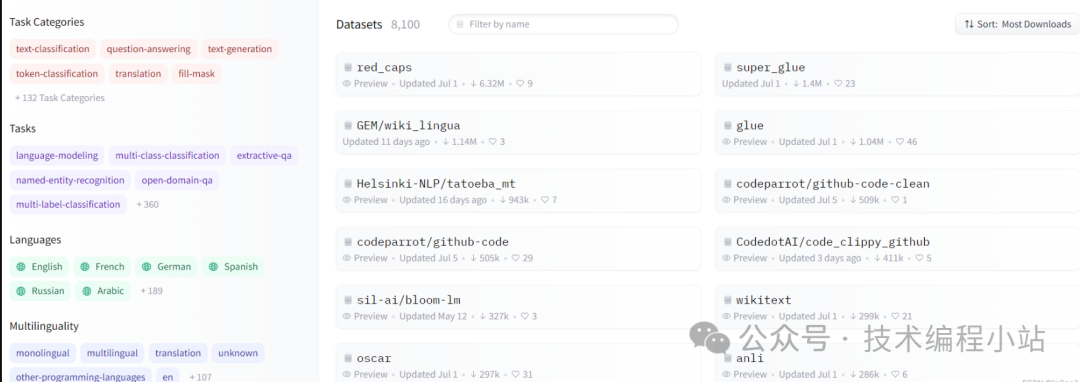
Hugging Face datasets usually include multiple subsets and are divided into train, validation, and test sets. You can preview the subsets you need.
Loading Datasets
Loading Hugging Face datasets only requires the datasets.load_dataset method. The usage is also simple; just fill in the dataset you want to load:
from datasets import load_dataset

dataset = load_dataset("glue")
ConnectionError: Couldn't reach https://raw.githubusercontent.com/huggingface/datasets/2.4.0/datasets/glue/glue.py (ConnectionError(MaxRetryError("HTTPSConnectionPool(host='raw.githubusercontent.com', port=443): Max retries exceeded with url: /huggingface/datasets/2.4.0/datasets/glue/glue.py (Caused by NewConnectionError('<urllib3.connection.HTTPSConnection object at 0x000001D31F86E310&gt;: Failed to establish a new connection: [Errno 11004] getaddrinfo failed'))")))
Hugging Face datasets are hosted on github, so it is probably difficult to download successfully from within China. This is where the
load_datasetmethod for loading local datasets comes in. For information on how to download Hugging Face datasets offline, please refer to the documentation.
Here, after downloading the dataset offline, we will copy it to the current directory, with the directory structure as follows:
-- glue
    -- dummy    # glue dataset subset will be placed in this directory
        -- ax
        -- cola
        ...
    -- dataset_infos.json
    -- glue.py
    -- README.md
Now we will load the local dataset:
dataset = load_dataset(path="./glue", name="cola")
print(dataset)
DatasetDict({
train: Dataset({
features: ['sentence', 'label', 'idx'],
num_rows: 8551
})
validation: Dataset({
features: ['sentence', 'label', 'idx'],
num_rows: 1043
})
test: Dataset({
features: ['sentence', 'label', 'idx'],
num_rows: 1063
})
})For datasets with subsets like this, you must specify the name of the subset you want to load.
You can see that dataset is of type Dict, so you can access the dataset like a dictionary:
dataset['train']Dataset({
features: ['sentence', 'label', 'idx'],
num_rows: 8551
})dataset['train']['sentence'][:5]["Our friends won't buy this analysis, let alone the next one we propose.",
"One more pseudo generalization and I'm giving up.",
"One more pseudo generalization or I'm giving up.",
'The more we study verbs, the crazier they get.',
'Day by day the facts are getting murkier.']dataset['train']['label'][:5][1, 1, 1, 1, 1]That concludes the introduction to datasets; for more content, you will need to explore it yourself when necessary.