This article mainly introduces the configuration of TensorFlow on MacOS 12.x, aiming to help beginner machine learning users on Mac avoid some detours.
In general, configuring the Mac version of TensorFlow only requires three steps: the first step is to set up a virtual environment, it is recommended to choose Miniconda; the second step is to create a conda environment; the third step is to install TensorFlow.
1. Install Miniconda
(1) Download anaconda-clean to remove related configuration files
## Enter in the terminal: conda install anaconda-clean --yes(2) Delete the folders where anaconda, miniconda, and miniforge are located
## Enter in the terminal: rm -rf ~/anaconda3 rm -rf ~/opt/anaconda3 rm -rf ~/miniforge3 rm -rf ~/miniconda3 rm -rf .conda rm -rf .condarc(3) Open .bash_profile, and delete the anaconda path
# Open environment configuration with vim vim .bash_profile # After running, find the following line of code and input dd before the code to delete # export PATH="/Users/your_username/anaconda3/bin:$PATH"
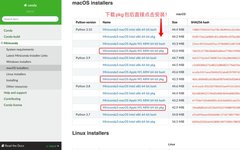
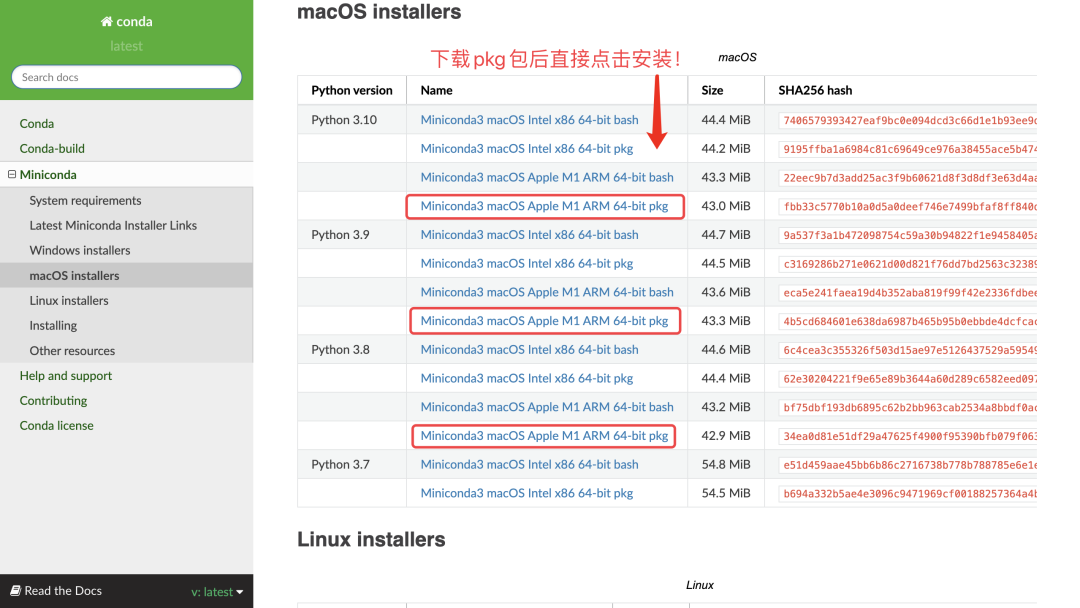
1.2 InstallMiniconda
2. Configure Environment
Create the environment in Miniconda3, stored in the env folder of Miniconda3
# Enter in the terminal: conda create -n ***** python=3.9 # ***** is the name you give to this configuration environment# Enter in the terminal: conda activate ***** # Then close the terminal and reopen it2.3 Miniconda Related Operation Codes
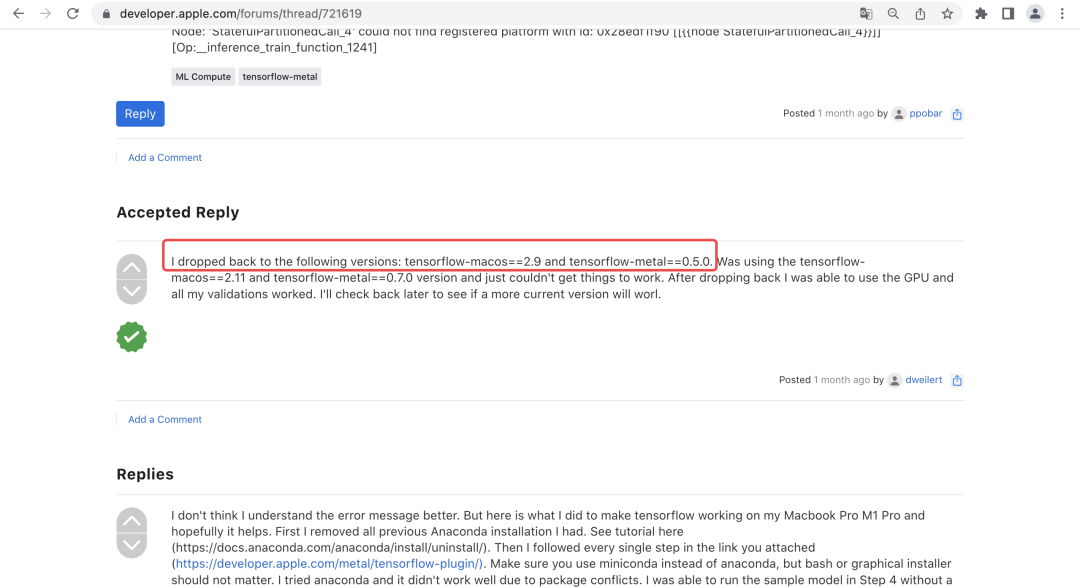
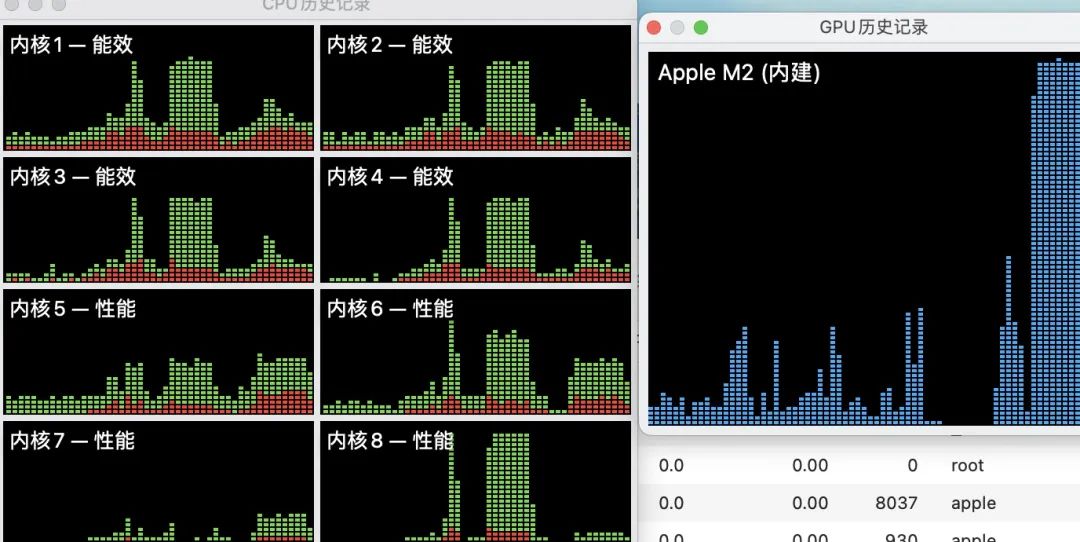
Check the current environments: conda info -e Check conda version: conda -V Check all installed packages: conda list Create a new virtual environment: conda create -n **** python=3.9 (**** is the virtual environment name) Install package: conda install **** (**** is the package name) Switch virtual environment: conda activate **** (**** is the virtual environment name) Exit environment: conda deactivate Delete a virtual environment: conda remove -n **** --all (**** is the virtual environment name)conda install -c apple tensorflow-depsconda activate ***** ## ***** is the name you give to this configuration environment ### 1. Install tensorflow-macos, specify version 2.9, the new version cannot temporarily call GPU python -m pip install tensorflow-macos==2.9.0 -i https://pypi.tuna.tsinghua.edu.cn/simple/ ## If there is a download error, you need to first download torch, then re-download tensorflow-macos # pip install torch -i https://pypi.tuna.tsinghua.edu.cn/simple/ ### 2. Install the Apple official maintained tensorflow-metal python -m pip install tensorflow-metal==0.5.0 -i https://pypi.tuna.tsinghua.edu.cn/simple/ ## 3. Install tools like jupyter conda install jupyter jupyterlab pandas matplotlib numpytensorflow/core/framework/op_kernel.cc:1830] OP_REQUIRES failed at xla_ops.cc:418 : NOT_FOUND: could not find registered platform with id:
Finally, I found the answer on Apple’s feedback platform:Reinstall the old version of the package
tensorflow-macos==2.9 ;
tensorflow-metal==0.5.0 ;
import numpy as np import tensorflow as tf x = np.random.random((10000, 5)) y = np.random.random((10000, 2)) x2 = np.random.random((2000, 5)) y2 = np.random.random((2000, 2)) inp = tf.keras.layers.Input(shape = (5,)) l1 = tf.keras.layers.Dense(256, activation = 'sigmoid')(inp) l1 = tf.keras.layers.Dense(256, activation = 'sigmoid')(l1) l1 = tf.keras.layers.Dense(256, activation = 'sigmoid')(l1) l1 = tf.keras.layers.Dense(256, activation = 'sigmoid')(l1) l1 = tf.keras.layers.Dense(256, activation = 'sigmoid')(l1) o = tf.keras.layers.Dense(2, activation = 'sigmoid')(l1) model = tf.keras.models.Model(inputs = [inp], outputs = [o]) model.compile(optimizer = "Adam", loss = "mse")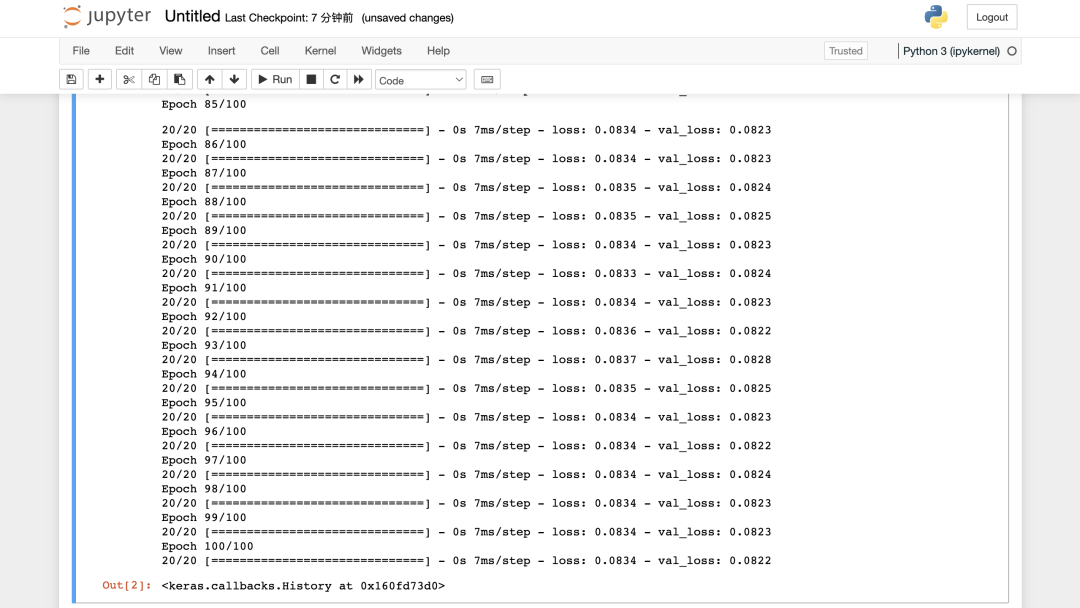
Every complicated problem must have its intricate solution