

Reprinted from | PaperWeekly
©PaperWeekly Original · Author|Li Luoqiu
School|Zhejiang University Master’s Student
Research Direction|Natural Language Processing, Knowledge Graph
Continuing from the previous article, I will record my understanding of the HuggingFace open-source Transformers project code.
This article is based on the Transformers version 4.4.2 (released on March 19, 2021) and analyzes the PyTorch version of BERT related code from the perspective of code structure, specific implementation and principles, and usage, including the following content:
1. BERT Tokenization Model (BertTokenizer)
2. BERT Model (BertModel)
3. 1. BertEmbeddings
2. BertEncoder
3.1. BertLayer
2.1. BertAttention
2.1. BertIntermediate
2. BertOutput
3. BertEmbeddings
4. BertEncoder
3. BERT-based Models
4. BertForPreTraining
5. 1. BertForSequenceClassification
2. BertForMultiChoice
3. BertForTokenClassification
4. BertForQuestionAnswering
5. BERT Training and Optimization
6. BERT Training and Optimization
7. 1. Pre-Training
2. Fine-Tuning
3.1. AdamW
2. Warmup

BERT-based Models
/models/bert/modeling_bert.py, including BERT pre-training models and BERT classification models. The UML diagram is as follows:
▲ Drawing Tool: Pyreverse
First of all, all the following models are based onBertPreTrainedModel, which in turn is based on a larger base classPreTrainedModel. Here, we focus on the functionality ofBertPreTrainedModel:
-
Used to initialize model weights while maintaining some tagged identities inherited from PreTrainedModelor class variables when loading the model.
3.1 BertForPreTraining
As we all know, the BERT pre-training tasks include two:
-
Masked Language Model (MLM): Randomly replace some words in the sentence with [MASK]and then pass the sentence into BERT to encode the information of each word, ultimately using the encoding information of[MASK]to predict the correct word at that position. This task aims to train the model to understand the meaning of words based on context; -
Next Sentence Prediction (NSP): Input sentence pairs A and B into BERT, using
[CLS]encoding information to predict whether B is the next sentence of A. This task aims to train the model to understand the relationship between predicted sentences.
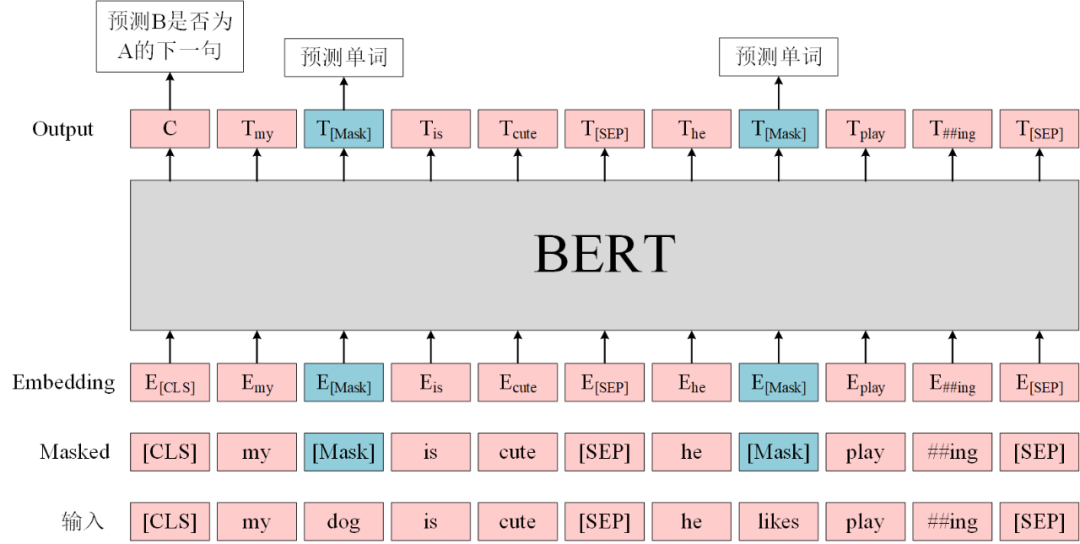
In the code, this model that integrates the two tasks isBertForPreTraining, which contains two components:
class BertForPreTraining(BertPreTrainedModel):
    def __init__(self, config):
        super().__init__(config)

        self.bert = BertModel(config)
        self.cls = BertPreTrainingHeads(config)

        self.init_weights()
# ...BertModel here has been detailed in the previous article (note that the default setting isadd_pooling_layer=True, which extracts the output corresponding to[CLS] for the NSP task), whileBertPreTrainingHeads is responsible for predicting the two tasks:class BertPreTrainingHeads(nn.Module):
def __init__(self, config):
super().__init__()
self.predictions = BertLMPredictionHead(config)
self.seq_relationship = nn.Linear(config.hidden_size, 2)
def forward(self, sequence_output, pooled_output):
prediction_scores = self.predictions(sequence_output)
seq_relationship_score = self.seq_relationship(pooled_output)
return prediction_scores, seq_relationship_score BertPreTrainingHeads wrapsBertLMPredictionHead and a linear layer representing the NSP task. The reason for not encapsulating the NSP task in anotherBertXXXPredictionHead is probably because it is too simple and unnecessary…Supplement: There is indeed a class encapsulating this, but it is called BertOnlyNSPHead, which is not used here…
BertPreTrainingHeads:class BertLMPredictionHead(nn.Module):
def __init__(self, config):
super().__init__()
self.transform = BertPredictionHeadTransform(config)
# The output weights are the same as the input embeddings, but there is
# an output-only bias for each token.
self.decoder = nn.Linear(config.hidden_size, config.vocab_size, bias=False)
self.bias = nn.Parameter(torch.zeros(config.vocab_size))
# Need a link between the two variables so that the bias is correctly resized with `resize_token_embeddings`
self.decoder.bias = self.bias
def forward(self, hidden_states):
hidden_states = self.transform(hidden_states)
hidden_states = self.decoder(hidden_states)
return hidden_statesThis class is used to predict the output at the[MASK] position as a classification output for each word, and note:
-
This class reinitializes a zero vector as the bias for the prediction weights;
-
The output shape of this class is [batch_size, seq_length, vocab_size], which predicts the probability values of what category each word in each sentence belongs to (note that softmax is not applied here); -
Another encapsulated class:
BertPredictionHeadTransform, which is used to perform some linear transformations:
class BertPredictionHeadTransform(nn.Module):
    def __init__(self, config):
        super().__init__()
        self.dense = nn.Linear(config.hidden_size, config.hidden_size)
        if isinstance(config.hidden_act, str):
            self.transform_act_fn = ACT2FN[config.hidden_act]
        else:
            self.transform_act_fn = config.hidden_act
        self.LayerNorm = nn.LayerNorm(config.hidden_size, eps=config.layer_norm_eps)

    def forward(self, hidden_states):
        hidden_states = self.dense(hidden_states)
        hidden_states = self.transform_act_fn(hidden_states)
        hidden_states = self.LayerNorm(hidden_states)
        return hidden_states
Supplement: I feel this layer could be removed? The output shape has not changed. My personal understanding is that it performs a symmetric operation with the pooling layer, passing through a dense layer before connecting to the classifier…
Back toBertForPreTraining, let’s continue to see how the two loss components are processed. Its forward propagation differs fromBertModel by addinglabels andnext_sentence_label as inputs:
-
labels: The shape is[batch_size, seq_length], representing the labels for the MLM task. Note that the words that are not masked are set to -100, only the masked words will have their corresponding id, and the task settings are reversed. -
For example, the original sentence is I want to [MASK] an apple, here I masked the wordeatwhen inputting to the model, and the correspondinglabelis set to[-100, -100, -100, 【eat's corresponding id】, -100, -100]; -
Why set it to -100 instead of something else? Because
torch.nn.CrossEntropyLossdefaults toignore_index=-100, meaning that inputs with labels of 100 will not calculate loss. -
next_sentence_label: This input is simple, just binary classification labels 0 and 1.
 # ...
    def forward(
        self,
        input_ids=None,
        attention_mask=None,
        token_type_ids=None,
        position_ids=None,
        head_mask=None,
        inputs_embeds=None,
        labels=None,
        next_sentence_label=None,
        output_attentions=None,
        output_hidden_states=None,
        return_dict=None,
): ... # ...
total_loss = None
if labels is not None and next_sentence_label is not None:
loss_fct = CrossEntropyLoss()
masked_lm_loss = loss_fct(prediction_scores.view(-1, self.config.vocab_size), labels.view(-1))
next_sentence_loss = loss_fct(seq_relationship_score.view(-1, 2), next_sentence_label.view(-1))
total_loss = masked_lm_loss + next_sentence_loss
# ...-
BertForMaskedLM: Pre-training only for the MLM task; -
Based on BertOnlyMLMHead, which is also another layer encapsulation ofBertLMPredictionHead; -
BertLMHeadModel: The difference from the previous one is that this model runs as a decoder version; -
Also based on BertOnlyMLMHead; -
BertForNextSentencePrediction: Pre-training only for the NSP task. -
Based on BertOnlyNSPHead, which is just a linear layer…
-
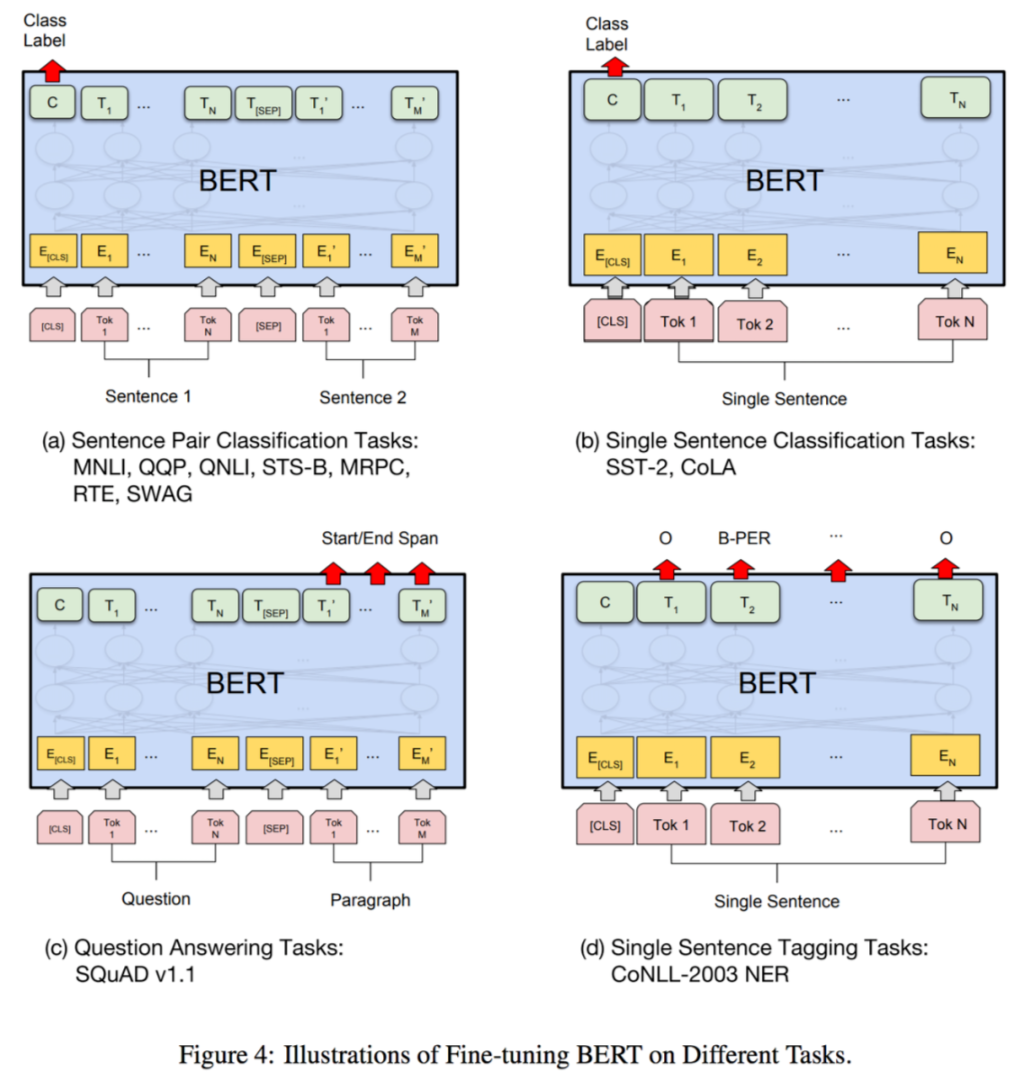
The input for sentence classification is a sentence (pair), and the output is a single classification label.
BertModel (with pooling) followed by a dropout and then a linear layer outputting classification: class BertForSequenceClassification(BertPreTrainedModel):
def __init__(self, config):
super().__init__(config)
self.num_labels = config.num_labels
self.bert = BertModel(config)
self.dropout = nn.Dropout(config.hidden_dropout_prob)
self.classifier = nn.Linear(config.hidden_size, config.num_labels)
self.init_weights()
# ...In forward propagation, similar to the previous pre-training model, it requires passinglabels as input.
-
If initialized with
num_labels=1, it defaults to a regression task using MSELoss; -
Otherwise, it is considered a classification task.
3.3 BertForMultipleChoice
-
The input for multiple-choice tasks is a set of sentences inputted in batches, and the output is a single label for selecting one sentence.
Structurally similar to sentence classification, except the linear layer output dimension is 1, meaning each sample’s multiple sentences’ outputs need to be concatenated as each sample’s predicted score.
-
In practice, the specific operation is to input multiple sentences together in each batch, so the input processed at once is
[batch_size, num_choices]of sentences, thus requiring more GPU memory than sentence classification tasks, so caution is needed during training.
3.4 BertForTokenClassification
-
The input for sequence labeling tasks is a single sentence of text, and the output is the category label corresponding to each token.
BertModel does not include a pooling layer;-
At the same time, the class parameter
_keys_to_ignore_on_load_unexpectedis set to[r"pooler"], meaning that during model loading, no error occurs for unnecessary weights.
3.5 BertForQuestionAnswering
This model is used for question-answering tasks, such as SQuAD tasks.
-
The input for question-answering tasks is a question + (for BERT, only one) answer forming a sentence pair, and the output is the starting and ending positions to indicate the specific text in the answer.
This requires two outputs, predicting the starting position and the ending position, both outputs having the same length as the sentence, selecting the maximum predicted value’s index as the predicted position.
-
For illegal labels exceeding the sentence length, they will be clamped (
torch.clamp_) to a reasonable range.
As a late supplement, let me briefly introduce the ModelOutputclass. It serves as the base class for the outputs of the above models, supporting both dictionary-style access and index-based access, inheriting from Python’s nativeOrderedDictclass.

BERT Training and Optimization
During the pre-training phase, in addition to the well-known 15% and 80% masking ratios, one noteworthy point is parameter sharing.
class PreTrainedModel(nn.Module, ModuleUtilsMixin, GenerationMixin):
    # ...
    def tie_weights(self):
        """
        Tie the weights between the input embeddings and the output embeddings.

        If the :obj:`torchscript` flag is set in the configuration, can't handle parameter sharing so we are cloning
        the weights instead.
        """
        output_embeddings = self.get_output_embeddings()
        if output_embeddings is not None and self.config.tie_word_embeddings:
            self._tie_or_clone_weights(output_embeddings, self.get_input_embeddings())

        if self.config.is_encoder_decoder and self.config.tie_encoder_decoder:
            if hasattr(self, self.base_model_prefix):
                self = getattr(self, self.base_model_prefix)
            self._tie_encoder_decoder_weights(self.encoder, self.decoder, self.base_model_prefix)
    # ...
As for why, it should be because the word_embedding and prediction weights are too large, for example, in bert-base, their size is(30522, 768), reducing training difficulty.
4.2 Fine-Tuning
4.2.1 AdamW
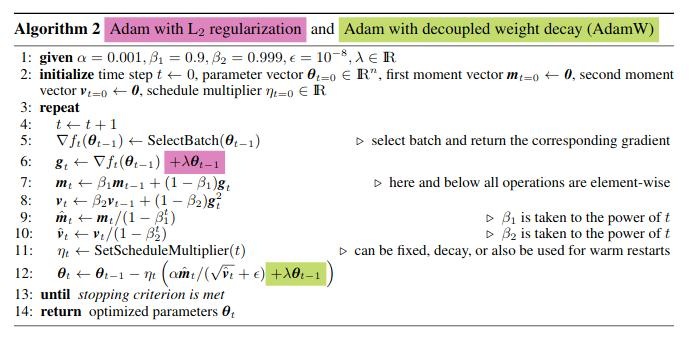
First, let’s introduce BERT’s optimizer: AdamW (Adam Weight Decay Optimizer).
This optimizer comes from the Best Paper of ICLR 2017: “Fixing Weight Decay Regularization in Adam”, which proposed a new method to fix the weight decay error in Adam. The paper pointed out that L2 regularization and weight decay are not equivalent in most cases, only equivalent in the case of SGD optimization; and that most frameworks use weight decay for Adam + L2 regularization, which should not be confused.
For analysis of AdamW, you can refer to:
-
AdamW and Super-convergence is now the fastest way to train neural nets [1]
-
paperplanet: It’s 9102 already, stop using Adam + L2 regularization [2]
-
What highlights are worth paying attention to in ICLR 2018?[3]
By the way, this paper “STABLE WEIGHT DECAY REGULARIZATION” seems to complain that AdamW’s Weight Decay implementation still has issues… Need to sort out optimizer-related content when time allows.
Supplement: I have not found a reasonable answer for why this is done, but I found some related discussions: https://forums.fast.ai/t/is-weight-decay-applied-to-the-bias-term/73212/4forums.fast.ai
# model: a Bert-based-model object
    # learning_rate: default 2e-5 for text classification
    param_optimizer = list(model.named_parameters())
    no_decay = ['bias', 'LayerNorm.bias', 'LayerNorm.weight']
    optimizer_grouped_parameters = [
        {'params': [p for n, p in param_optimizer if not any(
            nd in n for nd in no_decay)], 'weight_decay': 0.01},
        {'params': [p for n, p in param_optimizer if any(
            nd in n for nd in no_decay)], 'weight_decay': 0.0}
    ]
    optimizer = AdamW(optimizer_grouped_parameters,
                      lr=learning_rate)
    # ...
4.2.2 Warmup
Another characteristic of BERT’s training is Warmup, which means:
-
In the early stages of training, use a smaller learning rate (starting from 0), gradually increasing to the normal size (e.g., 2e-5 above) within a certain number of steps (e.g., 1000 steps), avoiding the model from entering local optima too early and overfitting;
-
In the later stages of training, gradually reduce the learning rate to 0, avoiding significant parameter changes during the later training.
In Huggingface’s implementation, various warmup strategies can be used:
TYPE_TO_SCHEDULER_FUNCTION = {
    SchedulerType.LINEAR: get_linear_schedule_with_warmup,
    SchedulerType.COSINE: get_cosine_schedule_with_warmup,
    SchedulerType.COSINE_WITH_RESTARTS: get_cosine_with_hard_restarts_schedule_with_warmup,
    SchedulerType.POLYNOMIAL: get_polynomial_decay_schedule_with_warmup,
    SchedulerType.CONSTANT: get_constant_schedule,
    SchedulerType.CONSTANT_WITH_WARMUP: get_constant_schedule_with_warmup,
}
Specifically:
-
CONSTANT: Keep the learning rate fixed; -
CONSTANT_WITH_WARMUP: Linearly adjust the learning rate at each step; -
LINEAR: The two-stage adjustment mentioned above; -
COSINE: Similar to the two-stage adjustment, but uses a trigonometric function curve for adjustment; -
COSINE_WITH_RESTARTS: Repeats the above COSINE adjustment n times during training; -
POLYNOMIAL: Adjusts in two stages according to an exponential curve.
transformers/optimization.py:-
The most commonly used is get_linear_scheduler_with_warmup, which is the linear two-stage learning rate adjustment scheme…
def get_scheduler(
    name: Union[str, SchedulerType],
    optimizer: Optimizer,
    num_warmup_steps: Optional[int] = None,
    num_training_steps: Optional[int] = None,
): ...
Above is the specific implementation analysis of BERT-related code in the Transformers library (version 4.4.2). Feel free to communicate and discuss with readers.

References


Recommended Reading:
Visual Enhanced Word Vectors: I Am Word Vectors, I Am Awake!

Transformer Grew Up, What About Its Siblings? (Including Super Detailed Knowledge Points of Transformers)

ERICA: A Unified Framework for Enhancing Pre-trained Language Model Understanding of Entities and Relationships
Click the card below to follow the public account “Machine Learning Algorithms and Natural Language Processing” for more information: