Many tutorials online teach how to install the TensorFlow GPU version, but many beginners have computers with average performance and do not have NVIDIA graphics cards. So how can one learn TensorFlow?
This article will guide you step by step to install the TensorFlow CPU version.
1. Preparation
Basic requirements:
You should at least have a basic understanding of Python, mainly the basic syntax and the pip tool;
Familiarity with Windows shell commands; I use PowerShell, which is very handy and quite similar to Linux bash commands, feeling much better than cmd;
Understanding Python virtual environments and knowing how to create them; I use the virtualenv tool, which is simple and practical. Many might also have installed the Anaconda distribution, where the conda command also supports creating virtual environments, but I haven’t used it much yet, as I feel it’s not necessary for now since packages like numpy, pandas, and matplotlib meet my needs, and I don’t use more than 20 packages.
Understanding the release versions of TensorFlow; if you don’t know, you can search for it. Of course, you can also refer to the release history on PyPI:
https://pypi.org/project/tensorflow/1.12.3/#history Among them, version 1.15 is the last release of the 1.x series (the latest update is 1.15.3 from 2020), and since then TensorFlow has entered the 2.x era, which has its own flavor.
2. Installing TensorFlow CPU Version on a Laptop without a Graphics Card
Laptop configuration: Windows 10 64-bit Professional, i7, 16GB. Installing the CPU version of TensorFlow is quite simple; the latest version, TensorFlow 2.6.0, supports Python 3.9.7, and it has been tested to run the official examples perfectly. Of course, if you are installing the GPU version, it is still recommended to download Python 3.6 for potentially better stability, as I was unable to install TensorFlow 2.6 with Python 3.9 on my desktop, although it might also work (details later). I eventually managed to install the GPU version using Python 3.6.
1. Install Anaconda3
Download link:
Anaconda https://www.anaconda.com/products/individual-d
For installation methods, you can refer to the first article I published today on this account.
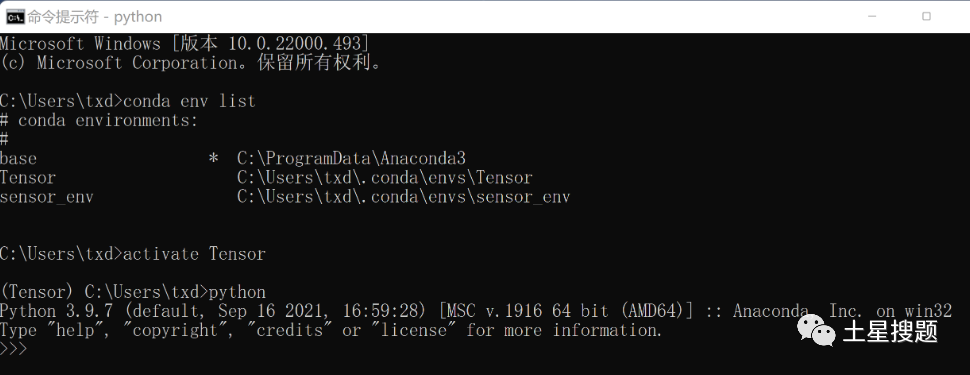
2. Create a New Virtual Environment Named Tensor
conda create -n Tensor python=3This command automatically creates a virtual environment named Tensor with the latest Python version, which is 3.9.7.
After installing Python, run it to check if everything is normal; it should indicate that Python 3.9.7 is installed.
Next, we can download a code editor of our choice, or we can use the built-in Python editor.
3. Install TensorFlow
First, activate the Tensor virtual environment created in the previous step.
activate TensorHere, if you try to install TensorFlow directly, it might fail due to network issues, so we first configure pip to use the Tsinghua source:
pip config set global.index-url https://pypi.tuna.tsinghua.edu.cn/simpleAlternatively, we can directly download the corresponding version of TensorFlow locally for installation. The download link is on the official website.
Python 3.9 (CPU only):
https://storage.googleapis.com/tensorflow/windows/cpu/tensorflow_cpu-2.6.0-cp39-cp39-win_amd64.whl
Then use the installation command to install it locally (make sure the file is in the current directory of the CMD window):
pip install tensorflow_cpu-2.6.0-cp39-cp39-win_amd64.whlInstall TensorFlow:
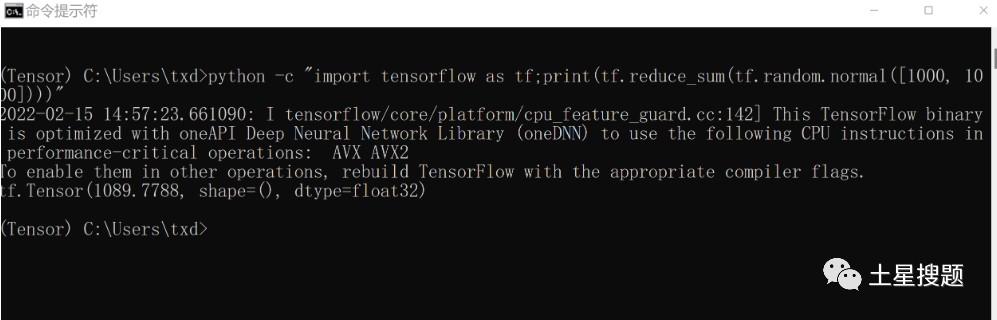
pip install tensorflowAfter installation, run a piece of Tensor code to test:
python -c "import tensorflow as tf;print(tf.reduce_sum(tf.random.normal([1000, 1000])))"If you followed the steps above, there is a high probability that you will encounter an error here!
Error message: Cannot register 2 metrics with the same name: /tensorflow
/api/keras/optimize
However, you don’t need to worry at all; this is caused by a Keras version issue. Use the command conda list to check the packages in the current Tensor virtual environment and find the Keras version. The solution is to reinstall Keras version 2.6.
pip install keras==2.6.0After installation, rerun the TensorFlow test code. If you see the output below, congratulations, you have successfully installed it and can happily start learning!
Bonus: Free share of the PDF version of “Complete Machine Learning Interview Questions”. How to get it: Follow this public account and reply to the auto-reply message to obtain it. Reply with “decompression code” to get the decompression password!