
Click the above“Beginner Learning Vision” to choose to addStar or “Top”
Heavyweight content delivered first time
Author: Léo Fillioux
Translated by: ronghuaiyang
Introduction
This article analyzes two recent papers using attention mechanisms for segmentation and provides a simple implementation in PyTorch.
Starting from natural language processing to the recent tasks in computer vision, the attention mechanism has been one of the hottest areas in deep learning research. In this article, we will focus on how attention impacts the latest architectures for medical image segmentation. To this end, we will describe the architectures introduced in the two recent papers and try to provide some intuition about the methods mentioned in these papers, hoping it gives you some ideas to apply the attention mechanism to your own problems. We will also see a simple implementation in PyTorch.
The differences between medical image segmentation and natural image segmentation are mainly twofold:
- Most medical images are very similar because they are taken in standardized settings, meaning there is almost no variation in the direction, position, pixel range, etc.
- There is often a significant imbalance between positive sample pixels (or voxels) and negative sample pixels, for example, when trying to segment tumors.
Note: Of course, the code and explanations are simplifications of the complex architectures described in the papers, mainly aimed at providing an intuition about what was done and a good idea, rather than explaining every detail.
1. Attention UNet
UNet is the main architecture used for segmentation, and most of the recent advances in segmentation have used this architecture as a backbone. In this article, the authors propose a method to apply the attention mechanism to the standard UNet.
1.1. What Method Was Proposed
This structure uses the standard UNet as a backbone and does not change the contracting path. What changes is the expanding path; more specifically, the attention mechanism is integrated into the skip connections.
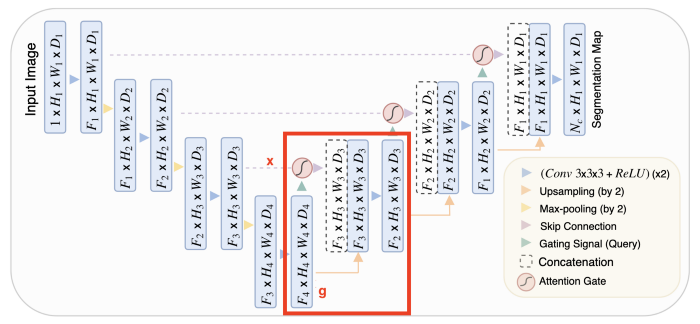
To explain how the block in the expanding path works, let’s denote the input from the previous block as g, and the skip connection from the expanding path as x. The following equations describe how this module works.

The upsample block is very simple, while the ConvBlock is just a sequence of two (convolution + batch norm + ReLU) blocks. The only thing that needs explanation is the attention.
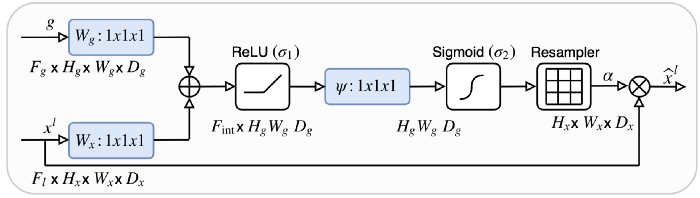
- x and g are both sent to a 1×1 convolution to make them the same number of channels without changing the size
- After the upsampling operation (with the same size), they are added and passed through ReLU
- Through another 1×1 convolution and a sigmoid, we obtain an importance score from 0 to 1 assigned to each part of the feature map
- This attention map is then multiplied by the skip input to produce the final output of this attention block
1.2. Why This Is Effective
In UNet, the contracting path can be viewed as the encoder, while the expanding path is the decoder. The interesting part of UNet is that the skip connections allow for the direct use of features extracted by the encoder during the decoding phase. This way, when “reconstructing” the mask of the image, the network learns to use these features because the features of the contracting path are connected to those of the expanding path.
Applying an attention block before this connection allows the network to place more weight on features relevant to the skip connection. It enables direct connections to focus on specific parts of the input rather than every feature of the input.
Multiplying the attention distribution by the skip connection feature map retains only the important parts. This attention distribution is extracted from the so-called query (input) and value (skip connection). The attention operation allows for selectively choosing the information contained in the values. This selection is based on the query.
In summary: The input and skip connection are used to determine which parts of the skip connection to focus on. Then, we use this subset of the skip connection, along with the input from the standard expanding path.
1.3. Brief Implementation
The code below defines the attention block (simplified version) and the “up-block” for the UNet expanding path. The “down-block” is the same as the original UNet.
class AttentionBlock(nn.Module):
    def __init__(self, in_channels_x, in_channels_g, int_channels):
        super(AttentionBlock, self).__init__()
        self.Wx = nn.Sequential(nn.Conv2d(in_channels_x, int_channels, kernel_size = 1),
                                nn.BatchNorm2d(int_channels))
        self.Wg = nn.Sequential(nn.Conv2d(in_channels_g, int_channels, kernel_size = 1),
                                nn.BatchNorm2d(int_channels))
        self.psi = nn.Sequential(nn.Conv2d(int_channels, 1, kernel_size = 1),
                                 nn.BatchNorm2d(1),
                                 nn.Sigmoid())

    def forward(self, x, g):
        # apply the Wx to the skip connection
        x1 = self.Wx(x)
        # after applying Wg to the input, upsample to the size of the skip connection
        g1 = nn.functional.interpolate(self.Wg(g), x1.shape[2:], mode = 'bilinear', align_corners = False)
        out = self.psi(nn.ReLU()(x1 + g1))
        out = nn.Sigmoid()(out)
        return out*x

class AttentionUpBlock(nn.Module):
    def __init__(self, in_channels, out_channels):
        super(AttentionUpBlock, self).__init__()
        self.upsample = nn.ConvTranspose2d(in_channels, out_channels, kernel_size = 2, stride = 2)
        self.attention = AttentionBlock(out_channels, in_channels, int(out_channels / 2))
        self.conv_bn1 = ConvBatchNorm(in_channels+out_channels, out_channels)
        self.conv_bn2 = ConvBatchNorm(out_channels, out_channels)

    def forward(self, x, x_skip):
        # note : x_skip is the skip connection and x is the input from the previous block
        # apply the attention block to the skip connection, using x as context
        x_attention = self.attention(x_skip, x)
        # upsample x to have the same size as the attention map
        x = nn.functional.interpolate(x, x_skip.shape[2:], mode = 'bilinear', align_corners = False)
        # stack their channels to feed to both convolution blocks
        x = torch.cat((x_attention, x), dim = 1)
        x = self.conv_bn1(x)
        return self.conv_bn2(x)
Note: ConvBatchNorm is a sequence consisting of Conv2d, BatchNorm2d, and ReLU activation function.
2. Multi-scale Guided Attention
The second architecture we will discuss is more original than the first. It does not rely on the UNet architecture but instead relies on feature extraction followed by a guided attention block.
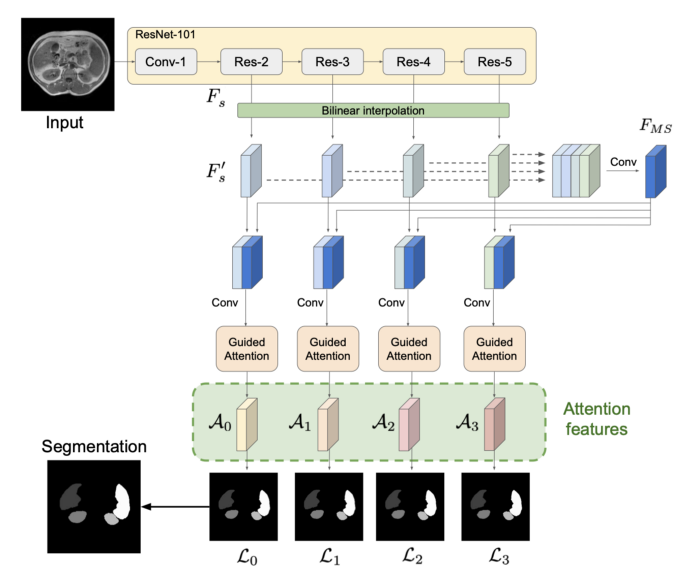
The first part is to extract features from the image. To do this, we input the image into a pre-trained ResNet to extract feature maps at four different levels. This is interesting because low-level features often appear in the early stages of the network, while high-level features often appear in the later stages, so we will be able to access a variety of scale features. Using bilinear interpolation to upsample all the feature maps to the largest one. This gives us four feature maps of the same size, which are concatenated and sent into a convolution block. The output of this convolutional block (multi-scale feature map) is connected to each of the four feature maps, providing the input to our attention blocks, which is a bit more complex than before.
2.1. What Was Proposed
The guided attention block relies on position and channel attention modules, and we start with an overall description.
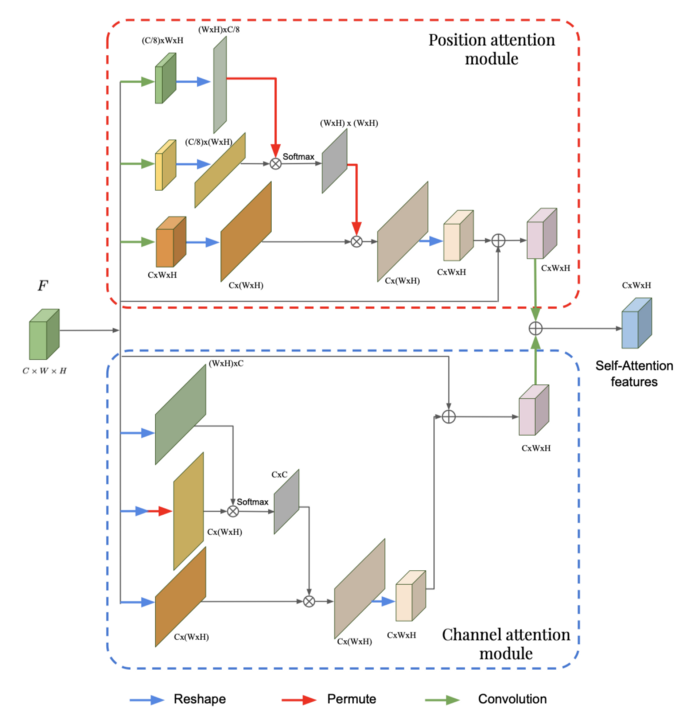
Block diagram of position and channel attention modules
We will try to understand what happens in these modules, but we will not detail every operation in the two modules (which can be understood through the code sections below).
These two blocks are actually very similar, with the only difference being whether information is extracted from the channels or the positions. Performing convolutions before flattening makes positions more important, as the number of channels is reduced during the convolution process. In the channel attention module, during the reshaping process, the original number of channels is preserved, giving more weight to the channels.
In each block, it is important to note that the top two branches are responsible for extracting specific attention distributions. For example, in the position attention module, we have a (WH)x(WH) attention distribution, where the *(i, j) element indicates how much positioni influences positionj*. In the channel block, we have a CxC attention distribution that tells us how one channel affects another. In the third branch of each module, this specific attention distribution is multiplied by the transformed input to obtain the attention distribution for the channels or positions. As mentioned in the previous article, in the context of multi-scale features, multiplying the attention distribution by the input extracts the relevant information from the input. The outputs of these two modules are then summed element-wise to give the final self-attention features. Now, let’s see how to use the outputs of these two modules in a global framework.
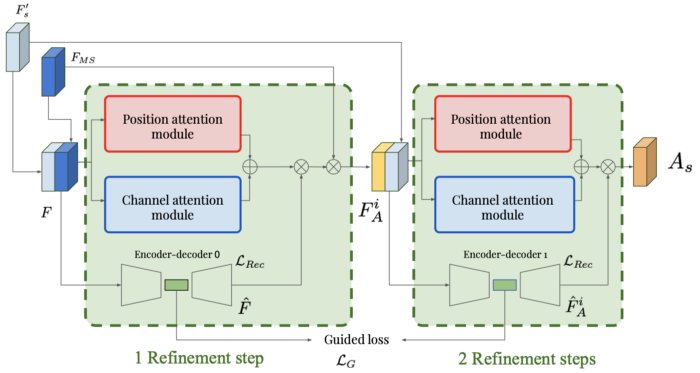
The guided attention establishes a continuous series of multi-refinement steps for each scale (there are four scales in the proposed structure). The input feature map is sent to the position and channel output modules, producing a single feature map. It also passes through an autoencoder that reconstructs the input. In each block, the attention map is generated by multiplying these two outputs. This attention map is then multiplied by the previously generated multi-scale feature map. Thus, the output indicates which parts of specific scales we need to focus on. Then, by concatenating the output of one block with the multi-scale attention map and using it as input for the next block, you can obtain a sequence of such guided attention modules.
The two added losses are necessary to ensure the refinement steps work correctly:
- Standard reconstruction loss to ensure the autoencoder correctly reconstructs the feature map of the input
- Guided loss, which attempts to minimize the distance between the latent representations of the two inputs behind the input

Afterward, each attention feature predicts the mask through a convolution block. To obtain the final prediction result, the four masks need to be averaged, which can be seen as an ensemble of the model under different scale features.
2.2. Why This Is Effective
Since this structure is much more complex than the previous one, it is difficult to understand what is going on behind the attention modules. Below is my understanding of the contribution of each block.
The position attention module attempts to specify where to focus on specific scale features based on the multi-scale representations of the input image. The channel attention module does the same thing by specifying how much attention each channel needs. The specific operations used in any block are aimed at providing an attention distribution for the channel or position information, designating which areas are more important. By combining these two modules, we obtain an attention map that scores every position-channel pair, i.e., every element in the feature map.
The autoencoder is used to ensure that the subsequent representations of the feature map do not completely change between each step. Since the latent space is low-dimensional, it only extracts key information. We do not want this information to change from one refinement step to the next; we only want small adjustments to be made. These will not be seen in the latent representation.
Using a series of guided attention modules can refine the final attention map, gradually eliminating noise and giving more weight to truly important areas.
Integrating several of these multi-scale networks can enable the network to possess both global and local features simultaneously. Then, these features are combined into multi-scale feature maps. Applying attention along with each specific scale to the multi-scale feature maps can better understand which features are more valuable to the final output.
2.3. Brief Implementation
class PositionAttentionModule(nn.Module):
    def __init__(self, in_channels):
        super(PositionAttentionModule, self).__init__()
        self.first_branch_conv = nn.Conv2d(in_channels, int(in_channels/8), kernel_size = 1)
        self.second_branch_conv = nn.Conv2d(in_channels, int(in_channels/8), kernel_size = 1)
        self.third_branch_conv = nn.Conv2d(in_channels, in_channels, kernel_size = 1)
        self.output_conv = nn.Conv2d(in_channels, in_channels, kernel_size = 1)

    def forward(self, F):
        # first branch
        F1 = self.first_branch_conv(F)                  # (C/8, W, H)
        F1 = F1.reshape((F1.size(0), F1.size(1), -1))   # (C/8, W*H)
        F1 = torch.transpose(F1, -2, -1)                # (W*H, C/8)
        # second branch
        F2 = self.second_branch_conv(F)                 # (C/8, W, H)
        F2 = F2.reshape((F2.size(0), F2.size(1), -1))   # (C/8, W*H)
        F2 = nn.Softmax(dim = -1)(torch.matmul(F1, F2)) # (W*H, W*H)
        # third branch
        F3 = self.third_branch_conv(F)                  # (C, W, H)
        F3 = F3.reshape((F3.size(0), F3.size(1), -1))   # (C, W*H)
        F3 = torch.matmul(F3, F2)                       # (C, W*H)
        F3 = F3.reshape(F.shape)                        # (C, W, H)
        return self.output_conv(F3*F)

class ChannelAttentionModule(nn.Module):
    def __init__(self, in_channels):
        super(ChannelAttentionModule, self).__init__()
        self.output_conv = nn.Conv2d(in_channels, in_channels, kernel_size = 1)

    def forward(self, F):
        # first branch
        F1 = F.reshape((F.size(0), F.size(1), -1))      # (C, W*H)
        F1 = torch.transpose(F1, -2, -1)                # (W*H, C)
        # second branch
        F2 = F.reshape((F.size(0), F.size(1), -1))      # (C, W*H)
        F2 = nn.Softmax(dim = -1)(torch.matmul(F2, F1)) # (C, C)
        # third branch
        F3 = F.reshape((F.size(0), F.size(1), -1))      # (C, W*H)
        F3 = torch.matmul(F2, F3)                       # (C, W*H)
        F3 = F3.reshape(F.shape)                        # (C, W, H)
        return self.output_conv(F3*F)

class GuidedAttentionModule(nn.Module):
    def __init__(self, in_channels_F, in_channels_Fms):
        super(GuidedAttentionModule, self).__init__()
        in_channels = in_channels_F + in_channels_Fms
        self.pam = PositionAttentionModule(in_channels)
        self.cam = ChannelAttentionModule(in_channels)
        self.encoder = nn.Sequential(nn.Conv2d(in_channels, 2*in_channels, kernel_size = 3),
                                     nn.BatchNorm2d(2*in_channels),
                                     nn.Conv2d(2*in_channels, 4*in_channels, kernel_size = 3),
                                     nn.BatchNorm2d(4*in_channels),
                                     nn.ReLU())
        self.decoder = nn.Sequential(nn.ConvTranspose2d(4*in_channels, 2*in_channels, kernel_size = 3),
                                     nn.BatchNorm2d(2*in_channels),
                                     nn.ConvTranspose2d(2*in_channels, in_channels, kernel_size = 3),
                                     nn.BatchNorm2d(in_channels),
                                     nn.ReLU())
        self.attention_map_conv = nn.Sequential(nn.Conv2d(in_channels, in_channels_Fms, kernel_size = 1),
                                                nn.BatchNorm2d(in_channels_Fms),
                                                nn.ReLU())

    def forward(self, F, F_ms):
        F = torch.cat((F, F_ms), dim = 1)         # concatenate the extracted feature map with the multi scale feature map
        F_pcam = self.pam(F) + self.cam(F)        # sum the outputs of the position and channel attention modules
        F_latent = self.encoder(F)                # latent-space representation, used for the guided loss
        F_reconstructed = self.decoder(F_latent)  # output of the autoencoder, used for the reconstruction loss
        F_output = self.attention_map_conv(F_reconstructed * F_pcam)
        F_output = F_output * F_ms
        return F_output, F_reconstructed, F_latent
Key Points
So, what can we take away from these articles? Attention can be seen as a mechanism that helps to point out features that need to be focused on based on the context of the network.
In UNet, considering which features to focus on from the contracting path based on the features extracted in the expanding path helps make the skip connections more meaningful, i.e., passing relevant information instead of every extracted feature. In the second article, considering the current scale we are dealing with, we should focus on which multi-scale features.
This concept can be applied to many problems, and I believe looking at more examples helps better understand how attention adapts to different issues.
Download 1: OpenCV-Contrib Extension Module Chinese Version Tutorial

Reply with "Extension Module Chinese Tutorial" in the backend of the "Beginner Learning Vision" public account to download the first OpenCV extension module tutorial in Chinese, covering installation, SFM algorithms, stereo vision, object tracking, biological vision, super-resolution processing, and more than twenty chapters of content.

Download 2: Python Vision Practical Project 52 Lectures

Reply with "Python Vision Practical Project" in the backend of the "Beginner Learning Vision" public account to download 31 visual practical projects including image segmentation, mask detection, lane line detection, vehicle counting, eyeliner application, license plate recognition, character recognition, emotion detection, text content extraction, facial recognition, etc., to help quickly learn computer vision.

Download 3: OpenCV Practical Project 20 Lectures

Reply with "OpenCV Practical Project 20 Lectures" in the backend of the "Beginner Learning Vision" public account to download 20 practical projects based on OpenCV, achieving advanced learning of OpenCV.

Communication Group

Welcome to join the reader group of the public account to communicate with peers. Currently, there are WeChat groups for SLAM, 3D vision, sensors, autonomous driving, computational photography, detection, segmentation, recognition, medical imaging, GAN, algorithm competitions, etc. (will gradually be subdivided in the future). Please scan the WeChat number below to join the group, and note: "Nickname + School/Company + Research Direction", for example: "Zhang San + Shanghai Jiaotong University + Visual SLAM". Please follow the format, otherwise, it will not be approved. After successful addition, you will be invited to related WeChat groups based on your research direction. Please do not send advertisements in the group, otherwise you will be asked to leave the group. Thank you for your understanding~