
Click the above “CVer” to add it as a “star” or “pin”.
Heavyweight content delivered at the first moment.
Author: Monstarrrr
https://zhuanlan.zhihu.com/p/100459760
This article is authorized by the author and may not be reproduced without permission.
It’s the last day of 2019, and I finally filled a gap I wanted to understand for a long time. It’s about how to customize an extension in PyTorch, mainly focusing on C++ extensions.
First, why do we need extensions? Python can call C++ libraries, right? At first, I also thought this was unnecessary. But after delving deeper, I found it was indeed necessary. For example, calling always uses someone else’s work, but extensions are about creating something of your own with the help of others.
The C++ extension in PyTorch and the C/C++ extension in Python are quite similar in principle, both aiming to extend their respective functionalities, and of course to make the program run more efficiently. The difference lies in that the implementation steps for the PyTorch C++ extension are somewhat simplified compared to the Python C/C++ extension.
Here, I will illustrate by implementing a custom layer for a neural network:
Let’s first discuss the basic process:
-
Use C++ to write the custom layer functionality, mainly including forward propagation and backward propagation, as well as content related to pybind11.
-
Write the setup.py script, and use Python’s setuptools to compile and load the C++ code.
-
Compile and install, then call the C++ extension interface in Python.
Pybind11 is a library in Python that is mainly responsible for communication between Python and C++11.
Now let’s take a look at how to complete a simple operation layer step by step, using z=2x+y as an example.
Step 1: Write the header file, which we will call test.h
/*test.h*/
#include <torch/extension.h>
#include <vector>
// forward propagation
torch::Tensor Test_forward_cpu(const torch::Tensor& inputA, const torch::Tensor& inputB);
// backward propagation
std::vector<torch::Tensor> Test_backward_cpu(const torch::Tensor& gradOutput);
This includes an important header file <torch/extension.h>.
This header file contains many important modules, such as pybind11 for interaction between Python and C++11, and a series of definitions and operations related to Tensor, as the basic data unit in PyTorch is Tensor.
After writing the header file, we need to start writing the source file, test.cpp.
/*test.cpp*/
#include "test.h"
// part1:forward propagation
torch::Tensor Test_forward_cpu(const torch::Tensor& x, const torch::Tensor& y)
{
    AT_ASSERTM(x.sizes() == y.sizes());
    torch::Tensor z = torch::zeros(x.sizes());
    z = 2 * x + y;
    return z;
}

//part2:backward propagation
std::vector<torch::Tensor> Test_backward_cpu(const torch::Tensor& gradOutput)
{
    torch::Tensor gradOutputX = 2 * gradOutput * torch::ones(gradOutput.sizes());
    torch::Tensor gradOutputY = gradOutput * torch::ones(gradOutput.sizes());
    return {gradOutputX, gradOutputY};
}

// part3:pybind11 (Binding Python with C++11, note that the names forward and backward will be the method names referenced in Python later)
PYBIND11_MODULE(TORCH_EXTENSION_NAME, m){
    m.def("forward", &Test_forward_cpu, "Test forward");
    m.def("backward", &Test_backward_cpu, "Test backward");
}
The source file cpp contains three parts: the first part is the forward function, the second part is the backward function, and the third part is the interaction between PyTorch and C++.
At this point, the C++ part of the work is complete. This is our first step: using C++ to write the custom layer functionality, mainly including forward propagation, backward propagation, and the content of pybind11.
The next task is for PyTorch to recognize and use this extension.
Step 2: Write setup.py, this file is mainly used to compile C++ files and establish link relationships.
Now the file directory structure is as follows:
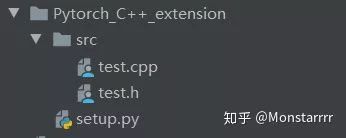
The content of setup.py is as follows:
from setuptools import setup
import os
import glob
from torch.utils.cpp_extension import BuildExtension, CppExtension

# Header file directory
include_dirs = os.path.dirname(os.path.abspath(__file__))
# Source code directory
source_file = glob.glob(os.path.join(working_dirs, 'src', '*.cpp'))

setup(
    name='test_cpp',  # Module name
    ext_modules=[CppExtension('test_cpp', sources=source_file, include_dirs=[include_dirs])],
    cmdclass={
        'build_ext': BuildExtension
    }
)
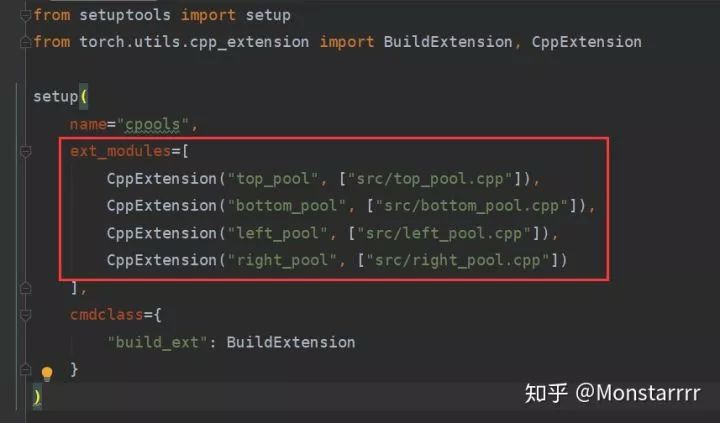
This part is basically a fixed format, and the place that needs to be modified for different issues is the ext_modules parameter, which can contain multiple CppExtension modules in the list according to actual needs, meaning that multiple C++ files can be compiled simultaneously.
For example, like this:
After completing setup.py, execute python setup.py install in the terminal.
NOTE: It is recommended to install the extension in your personal virtual environment.
This step actually includes build + install, which first compiles and links the dynamic link library, then installs the constructed files in package form in the centralized storage location of the package in the current development environment, thus generating a complete package, similar to other packages like numpy, torch.
After executing this step, the following items are generated:
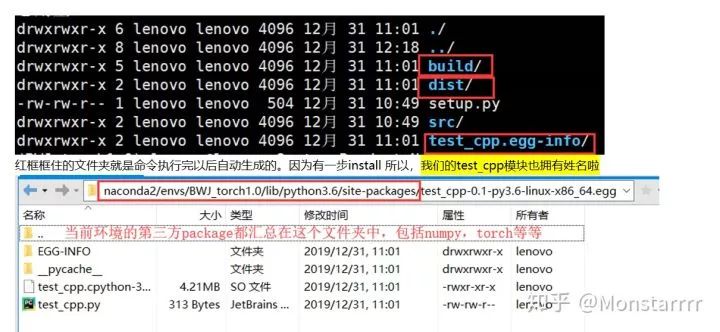
Thus, our second step of “writing the setup.py script and using Python’s setuptools to compile and load the C++ code” is also complete.
NOTE: At this point, if you enter import test_cpp in the Python console, you will get an error like:
undefined symbol: _ZTIN3c1021AutogradMetaInterfaceE
The reason is that it has not been encapsulated yet, and it is temporarily still invisible.
Now for the final step: encapsulating and calling this extension. First, create a new file test.py in the same directory as setup.py.
The content is as follows:
from torch.autograd import Function
import torch
import test_cpp


class _TestFunction(Function):
    @staticmethod
    def forward(ctx, x, y):
        """
        It must accept a context ctx as the first argument, followed by any
        number of arguments (tensors or other types).
        The context can be used to store tensors that can then be retrieved
        during the backward pass."
        return test_cpp.forward(x, y)

    @staticmethod
    def backward(ctx, gradOutput):
        gradX, gradY = test_cpp.backward(gradOutput)
        return gradX, gradY

# Encapsulate into a module (Module)
class Test(torch.nn.Module):
    def __init__(self):
        super(Test, self).__init__()

    def forward(self, inputA, inputB):
        return _TestFunction.apply(inputA, inputB)
This is a template for an extension function interface in PyTorch’s autograd. Basically, all layers’ forward and backward propagation in PyTorch are written this way.
Regarding the details of backward propagation in PyTorch, there are two points to note. First, the forward function must have a ctx variable, which is necessary as it stores some variables useful for backward propagation (since some functions require results from the forward computation for differentiation). The backward function also has a ctx parameter, which can retrieve variables saved from the forward function. The second point to note is that the outputs of backward are the gradients concerning the variables, and their number must match the inputs in forward; this is a mandatory requirement. If some variables do not require differentiation, just return None.
Once everything is ready, you can start using it. However, before that, you need to ensure that the gradients calculated in your backward propagation layer are correct. PyTorch provides a torch.autograd.gradcheck() function to check if the calculated gradients are reasonable. This check is done by comparing the error between numerically calculated gradients and analytical expressions to determine if the gradient calculation is correct:
Numerical calculation of gradients: 
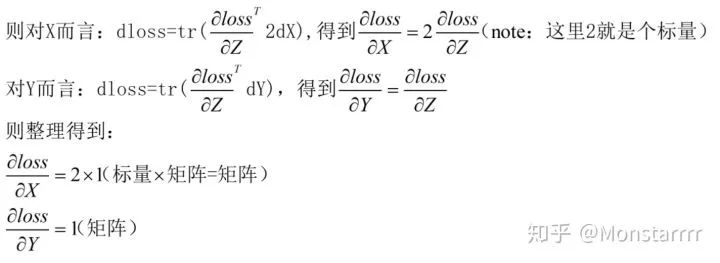
The analytical method for gradients is obtained through derivative formulas. For example: 
Once this check is correct, you can happily use this module. This means you have fully completed a PyTorch C++ extension.
To summarize: First, write the C++ source code, using a Torch library <torch/extension.h>. This library specifies how to write C++ extensions using this library, with the basic data format being Tensor types, not general int/char/float types. You need to write a forward function and a backward function in the C++ source code, and finally use PYBIND11 to facilitate communication between C++11 and Python. After that, write the setup.py file, using Python’s setuptools along with PyTorch’s BuildExtension and CppExtension tools for compilation preparation. Then type python setup.py install in the command line (use build or install as needed; if you do not want your package installed in the system path, i.e., site-package, use the build command; otherwise, use the install command). After compilation, you also need to use torch.autograd.Function to turn this extension into a function for easy calling when constructing networks. Finally, use Function.apply(*args) in the appropriate places. This way, a customized module is completed, meaning a complete PyTorch C++ extension is achieved (without users feeling that this code is an extension in C++, but as a novice in algorithms, understanding these processes is still necessary, as it is part of the problem, including how to write new layers in new networks. After all, seeing more without hands-on experience always feels lacking).
Finally, one more thing about differentiation: there’s no need to elaborate on scalar-to-scalar differentiation, here we mainly discuss scalar-to-vector/matrix differentiation.
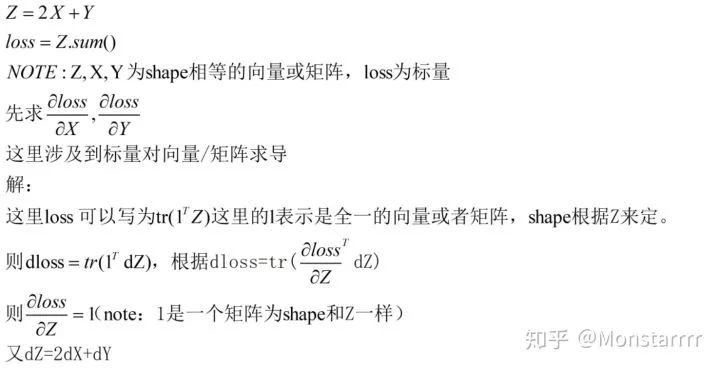
The method for scalar-to-matrix differentiation used here can be referenced in the article, which is well written.
Long-Qi-Guixia: Matrix Differentiation Techniques (Part 1)zhuanlan.zhihu.com
###########################END########################
The text ends here. Finally, on the last day of 2019, I filled this gap. 2019 had regrets, losses, tears, and joys.
I hope to make further progress in 2020, never stop, never give up. Wish everyone good luck in the New Year~
All your lights are red, but I’m green to go.
Big news! The CVer-PyTorch group has been established.
Scan the code to add the CVer assistant, to apply to join the CVer large group and sub-direction groups, which already cover:Object Detection, Image Segmentation, Object Tracking, Face Detection & Recognition, OCR, Pose Estimation, Super Resolution, SLAM, Medical Imaging, Re-ID, GAN, NAS, Depth Estimation, Autonomous Driving, Reinforcement Learning, Lane Detection, Model Pruning & Compression, Denoising, Dehazing, Deraining, Style Transfer, Remote Sensing Images, Action Recognition, Video Understanding, Image Fusion, Image Retrievaland other groups.
Be sure to note:Research direction + Location + School/Company + Nickname(e.g., PyTorch + Shanghai + SJTU + Kaka), according to the format noted, it can be approved faster and invited to join the group.

▲ Long press to join the group

▲ Long press to follow us
Please give me a “like”!