
Click the above “Beginner’s Visual Learning”, select to add a star mark or “pin”
Important content delivered promptly
Author: Li Zuxian, Datawhale University Group Member, Shenzhen University

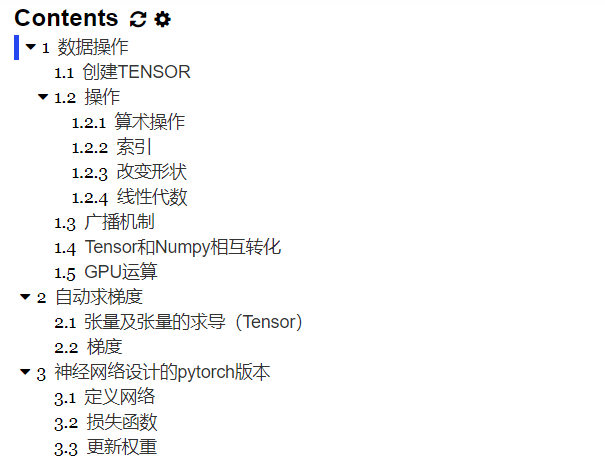
1. Data Operations
import torch# Create an uninitialized Tensor
x = torch.empty(5,3)
print(x)
# Create a randomly initialized Tensor
x = torch.rand(5,3)
print(x)
# Create a Tensor filled with zeros
x = torch.zeros(5,3,dtype=torch.long)
print(x)
# Create a Tensor based on data
x = torch.tensor([5.5,3])
print(x)
# Modify the original Tensor to a Tensor filled with ones
x = x.new_ones(5,3,dtype=torch.float64)
print(x)
# Change data type
x = torch.rand_like(x,dtype=torch.float64)
print(x)
# Get the shape of the Tensor
print(x.size())
print(x.shape)
# Note: The returned torch.Size is actually a tuple, supporting all tuple operations.

All these creation methods can specify the data type dtype and storage device (cpu/gpu) when creating.
1.2.1 Arithmetic Operations
In PyTorch, the same operation may have many forms. Below is an example using addition.
# Form 1:
y = torch.rand(5,3)
print(x+y)
# Form 2
print(torch.add(x,y))
# You can also specify the output
result = torch.empty(5, 3)
torch.add(x, y, out=result)
print(result)
# Form 3
y.add_(x)
print(y)
We can also use indexing operations similar to NumPy to access parts of the Tensor. Note that: the results obtained by indexing share memory with the original data, meaning if one is modified, the other will change as well.
y = x[0,:]
y += 1
print(y)
print(x[0,:])  # Check if x has changed
1.2.3 Changing Shape
Note that view() returns a new tensor that shares memory with the original tensor (actually the same tensor), meaning that modifying one will also change the other. (As the name suggests, view only changes the perspective of observing this tensor)
y = x.view(15)
z = x.view(-1,5)  # -1 indicates that this dimension can be inferred from the other dimensions
print(x.size(),y.size(),z.size())
x += 1
print(x)
print(y)
So what if we want to return a truly new copy (i.e., not sharing memory)? Pytorch also provides a reshape() function that can change the shape, but this function does not guarantee a copy is returned, so it is not recommended to use. It is recommended to first use clone to create a copy and then use view.
x_cp = x.clone().view(15)
x -= 1
print(x)
print(x_cp)
Another commonly used function is item(), which can convert a scalar Tensor into a Python number.
number: x = torch.randn(1)
print(x)
print(x.item())
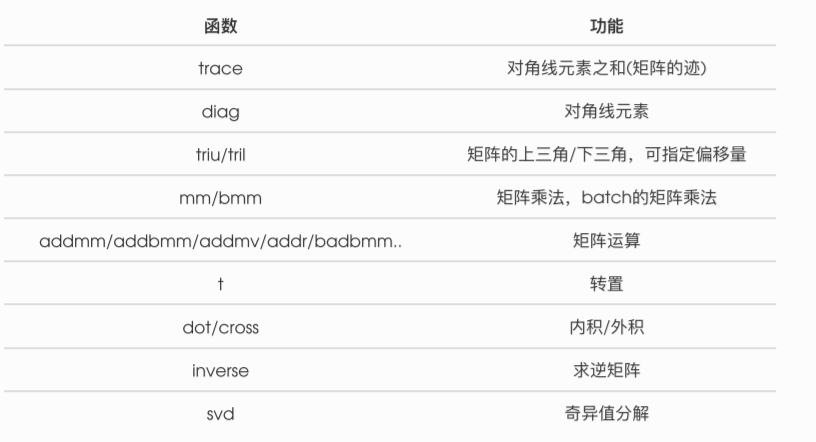
1.2.4 Linear Algebra
1.3 Broadcasting Mechanism
Previously, we saw how to perform element-wise operations on two tensors of the same shape. When performing element-wise operations on two tensors of different shapes, broadcasting may occur: elements are appropriately copied to make the two tensors the same shape before performing element-wise operations. For example:
x = torch.arange(1,3).view(1,2)
print(x)
y = torch.arange(1,4).view(3,1)
print(y)
print(x+y)
1.4 Conversion between Tensor and Numpy
We can easily use numpy() and from_numpy() to convert between Tensor and NumPy arrays. However, one point to note is: the tensors produced by these two functions share the same memory as the NumPy arrays (so the conversion between them is fast), and changing one will also change the other!!!
a = torch.ones(5)
b = a.numpy()
print(a,b)
a += 1
print(a,b)
b += 1
print(a,b)
Use from_numpy() to convert a NumPy array into a Tensor:
import numpy as np
a = np.ones(5)
b = torch.from_numpy(a)
print(a,b)
a += 1
print(a,b)
b += 1
print(a,b)
1.5 GPU Computation
# let us run this cell only if CUDA is available
# We will use ``torch.device`` objects to move tensors in and out of GPU
if torch.cuda.is_available():
    device = torch.device("cuda")          # a CUDA device object
    y = torch.ones_like(x, device=device)  # directly create a tensor on GPU
    x = x.to(device)                       # or just use strings ``.to("cuda")``
    z = x + y
    print(z)
    print(z.to("cpu", torch.double))       # ``.to`` can also change dtype together!
2. Automatic Gradient (Very Important)

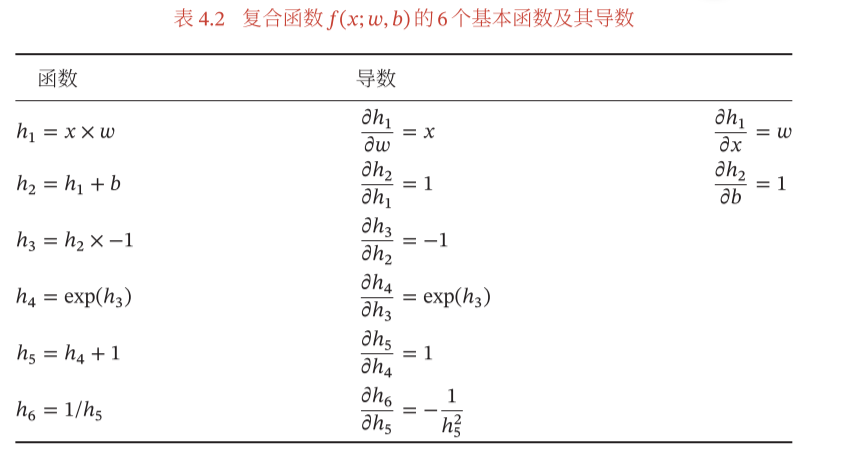
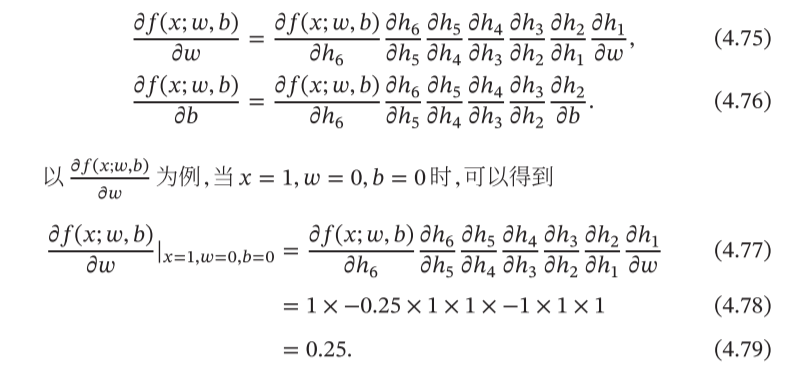
 the derivative. Our approach is to decompose it into a series of operations using the chain rule:
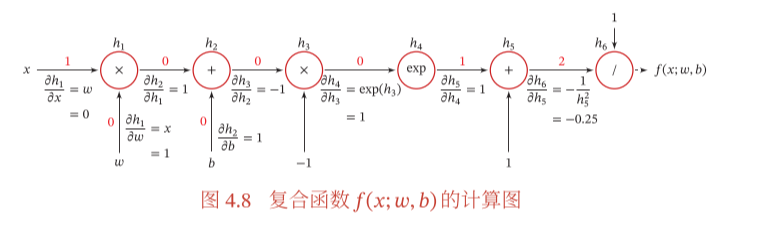
2.1 Tensors and Tensor Derivatives
# Add requires_grad=True parameter to track function gradients
x = torch.ones(2,2,requires_grad=True)
print(x)
print(x.grad_fn)
# Perform operations
y = x + 2
print(y)
print(y.grad_fn)  # Created an addition operation <AddBackward0 object at 0x0000017AF2F86EF0>
Such tensors created directly are called leaf nodes, and the corresponding grad_fn for leaf nodes is None.
print(x.is_leaf,y.is_leaf)
# More complex operations
z = y * y * 3
out = z.mean()
print(z,out)
a = torch.randn(2,2)    # By default, requires_grad = False in case of missing

a = ((a*3)/(a-1))
print(a.requires_grad)  # False
a.requires_grad_(True)
print(a.requires_grad)
b = (a*a).sum()
print(b.grad_fn)
Now let’s perform backpropagation: since out contains a single scalar, out.backward() is equivalent to out.backward(torch.tensor(1.)).
out.backward()
print(x.grad)
# Perform backpropagation again, note that gradients accumulate
out2 = x.sum()
out2.backward()
print(x.grad)
out3 = x.sum()
x.grad.data.zero_()
out3.backward()
print(x.grad)

-
Define a neural network with some learnable parameters (or weights)
-
Iterate through the input dataset
-
Process the input through the network
-
Calculate the loss (how far the output is from the correct one)
-
Backpropagate the gradients to the network parameters
-
Usually, use a simple update rule to update the network weights: weight = weight – learning_rate * gradient
import torch
import torch.nn as nn
import torch.nn.functional as F
class Net(nn.Module):
def __init__(self):
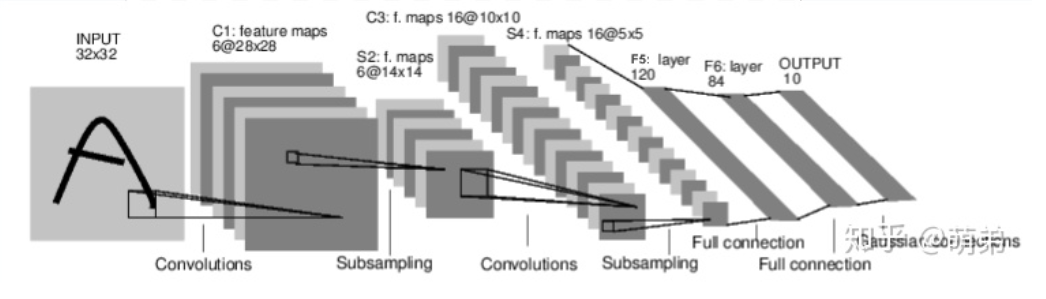
super(Net,self).__init__() # 1 input image channel, 6 output channels, 3x3 square convolution # kernel
self.conv1 = nn.Conv2d(1,6,3)
self.conv2 = nn.Conv2d(6,16,3) # an affine operation: y = Wx + b
self.fc1 = nn.Linear(16*6*6,120) # 6*6 from image dimension
self.fc2 = nn.Linear(120,84)
self.fc3 = nn.Linear(84,10)
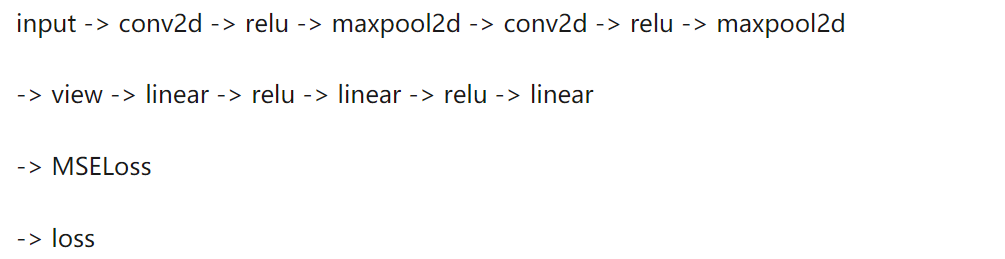
def forward(self,x):
# Max pooling over a (2, 2) window
x = F.max_pool2d(F.relu(self.conv1(x)),(2,2)) # CLASS
torch.nn.MaxPool2d(kernel_size, stride=None, padding=0, dilation=1, return_indices=False, ceil_mode=False)
x = F.max_pool2d(F.relu(self.conv2(x)),2)
x = x.view(-1,self.num_flat_features(x))
x = F.relu(self.fc1(x))
x = F.relu(self.fc2(x))
x = self.fc3(x)
return x
def num_flat_features(self,x):
size = x.size()[1:] # all dimensions except the batch dimension
num_features = 1
for s in size:
num_features *= s
print(num_features)
return num_features
net = Net()
print(net)
# The model's learnable parameters are returned by net.parameters()
params = list(net.parameters())
print(len(params))
print(params[0].size())  # conv1's .weight
# Try a 32x32 random input
input = torch.randn(1,1,32,32)
out = net(input)
print(out)
# Zero the gradient buffers of all parameters and backpropagators:
net.zero_grad()
out.backward(torch.randn(1,10))output = net(input)
target = torch.randn(10) # a dummy target, for example
target = target.view(-1,1) # # make it the same shape as output
criterion = nn.MSELoss()
loss = criterion(output,target)
print(loss)
# If loss uses .grad_fn property to backtrack, you can view the network structure
print(loss.grad_fn)  # MSELoss
print(loss.grad_fn.next_functions[0][0])  # Linear
print(loss.grad_fn.next_functions[0][0].next_functions[0][0])  # ReLU
weight = weight – learning_rate * gradient
import torch.optim as optim
#  create your optimizer
optimizer = optim.SGD(net.parameters(),lr = 0.01)
# in your training loop:
optimizer.zero_grad()  # zero the gradient buffers
output = net(input)
loss = criterion(output,target)
loss.backward()
optimizer.step()
576
4. Conclusion
Regarding Pytorch project practice, Alibaba Tianchi provides a Pytorch version of the practical tutorial in the “Zero-based Introduction to NLP” learning competition for reference (read the original text to jump directly):
Good news!
Beginner's Visual Learning Knowledge Circle
is now open to the public👇👇👇


Download 1: OpenCV-Contrib Extension Module Chinese Version Tutorial
Reply to "Extension Module Chinese Tutorial" in the background of the "Beginner's Visual Learning" public account to download the first OpenCV extension module tutorial in the network, covering the installation of extension modules, SFM algorithms, stereo vision, target tracking, biological vision, super-resolution processing, and more than twenty chapters of content.

Download 2: 52 Lectures on Python Visual Practical Projects
Reply to "Python Visual Practical Projects" in the background of the "Beginner's Visual Learning" public account to download 31 visual practical projects including image segmentation, mask detection, lane detection, vehicle counting, eyeliner addition, license plate recognition, character recognition, emotion detection, text content extraction, face recognition, etc., to help quickly learn computer vision.

Download 3: 20 Lectures on OpenCV Practical Projects
Reply to "20 Lectures on OpenCV Practical Projects" in the background of the "Beginner's Visual Learning" public account to download 20 practical projects based on OpenCV to achieve advanced learning of OpenCV.

Group Chat

Welcome to join the public account reader group to communicate with peers. Currently, there are WeChat groups on SLAM, 3D vision, sensors, autonomous driving, computational photography, detection, segmentation, recognition, medical imaging, GAN, algorithm competition, etc. (will gradually be subdivided in the future). Please scan the WeChat ID below to join the group, with the note: “Nickname + School/Company + Research Direction”, for example: “Zhang San + Shanghai Jiao Tong University + Visual SLAM”. Please follow the format for notes, otherwise, it will not be approved. After successful addition, you will be invited to the relevant WeChat group based on your research direction. Please do not send advertisements in the group, otherwise, you will be removed from the group. Thank you for your understanding~