
Today’s Technology News
Recently, the Minnesota prosecutor announced that Liu Qiangdong was not guilty and would not prosecute the case. Liu Qiangdong also issued a sincere apology, mentioning that his actions on the day of the incident caused great harm to his family, especially to his wife. He has already confessed the facts to her and hopes she can accept his most sincere apology, and he will do his utmost to make up for the trauma this incident has caused to the family and take on the responsibility of being a husband again. At the same time, every colleague at JD has been working under the pressure of public opinion, and he feels very guilty towards them. Moving forward, he will work even harder to improve the company’s development with the employees.
Author’s Introduction
A new week has begun, and I am happy to meet everyone again! Tonight is Christmas Eve, and I hope everyone does not have to work overtime today, wishing everyone peace throughout the year.
This article comes from goldze‘s submission, sharing a component-based development solution that I believe will be helpful to everyone!
goldze ‘s GitHub:
https://github.com/goldze
Introduction
Regarding componentization in Android, I believe everyone is familiar with it. There are numerous articles discussing componentization online, but there are very few componentization solutions based on the MVVM pattern. Combining my own research and exploration, I would like to share a component-based development solution based on the MVVMHabit framework (https://github.com/goldze/MVVMHabit) for Android Databinding. The article is written in a relatively simple and basic manner, without lengthy one-sided technical discussions, aiming to enable developers who have learned this solution to quickly get started with building MVVM componentized projects.
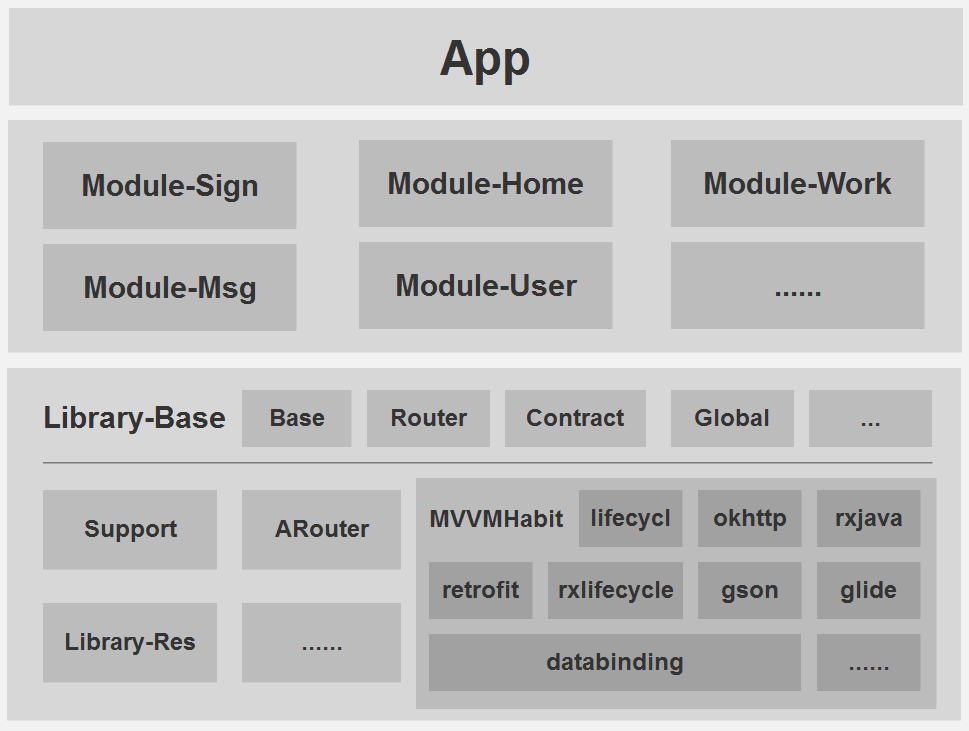
Overall Architecture
Brief Discussion
Advantages of MVVM
Those familiar with frontend development will know MVVM very well. This pattern is currently very popular in web frontend development, with frameworks like Vue, Angular, and React all implementing the MVVM design pattern. In Android development, MVVM is not the only architectural pattern; the most commonly used might be the MVC pattern (which is often not an ideal implementation). The MVP pattern is quite popular and is very similar to MVVM to some extent. However, MVVM further improves development efficiency and has the ability for data binding. Speaking of Android MVVM, it naturally leads us to Google’s Databinding, which provides perfect binding between XML and Java, similar to the binding between HTML and JS. Although MVVM on Android is not yet very popular, I believe it is a trend. With the heat of web frontend MVVM, mobile frontend should also rise.
Component-Based Development
Code is dead, but products are alive. In daily development, various frequently changing requirements bring considerable trouble to development. To keep the code as “alive” as possible, design patterns have emerged. However, having design patterns alone still makes it difficult to meet the demands of product BT.
For simple small projects, most adopt a single project for independent development. Since the project is not large, the compilation speed and maintenance costs are within an acceptable range. However, for a well-done App product, such a multi-person collaboration and single project App architecture will inevitably affect development efficiency and increase project maintenance costs. Each developer must be familiar with so much code, making it difficult to collaborate on development, and Android projects can become very sluggish when compiling code. Also, due to severe code coupling in a single project, every modification requires recompilation and testing, which is very time-consuming. Most importantly, unit testing such code is nearly impossible, thus necessitating a more flexible architecture to replace the past single project architecture.
Using a component-based architectural solution, high cohesion, low coupling, and clear code boundaries allow each component to be split off and run independently. All components are hosted within the App, loading various separated components, each compiling their own modules, which is beneficial for collaborative development in teams.
MVVM Pattern + Componentization
Theory alone is useless; let’s discuss something practical. Here, I want to mention two important frameworks.
-
MVVMHabit: A rapid development library based on Google’s latest AAC architecture and the MVVM design pattern, integrating mainstream modules like OkHttp, RxJava, Retrofit, and Glide to meet daily development needs. Using this framework allows for the rapid development of high-quality, maintainable Android applications.
-
ARouter: A framework developed by Alibaba to assist in the componentization transformation of Android Apps—supporting inter-module routing, communication, and decoupling.
MVVMHabit + ARouter: MVVM pattern + componentization solution, where the former is the design pattern and the latter is the architectural solution. Using both together complements each other. With these two frameworks supporting, development can be done quickly and efficiently.
Project Setup

Create Project
First, create the most basic framework in the project, then gradually associate it.
1. Create Host
Setting up a componentized project is similar to a single project; first, create a conventional project using Android Studio.
File->New->New Project…
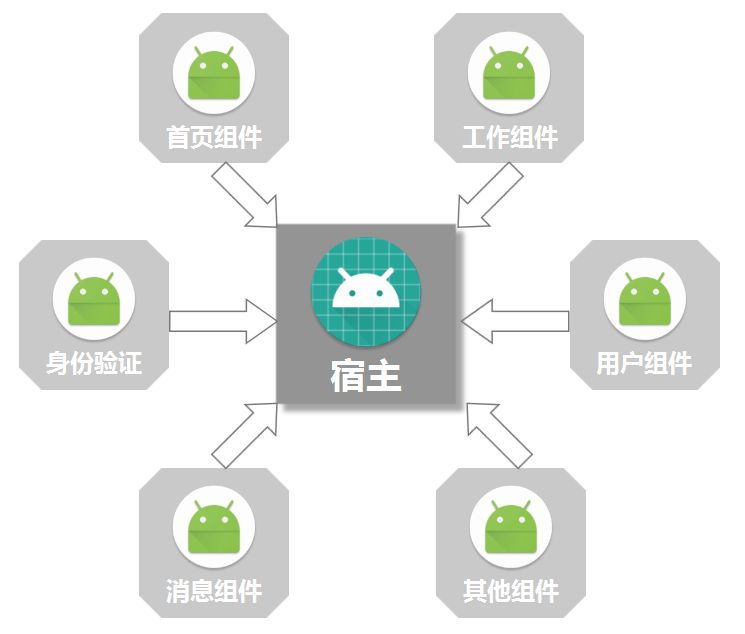
This created project will be defined as the “Host” (most people use this term), or it can also be called a shell project. It has no layout and no activity; its responsibility is to combine the components developed separately into one and package it into a usable APK.
The host project mainly contains two things: one is AndroidManifest.xml: configuring application, launch page, etc.; the other is build.gradle: responsible for configuring build/packaging parameters and dependencies for sub-modules.
2. Create Components
Components are essentially modules, but these modules are somewhat special; during the merging and packaging process, it is a library: apply plugin: ‘com.android.library’, while during independent compilation and running, it is an application: apply plugin: ‘com.android.application’.
File->New->New Module->Android Library…
It can generally be named module-xxx (component name)
3. Create Libraries
In addition to business components, two basic libraries also need to be created: library-base and library-res.
-
library-base: Stores some public methods, common constants, and contract classes for component communication. It is depended upon by all upper-level components and relies on common resource libraries, image selection libraries, routing libraries, etc. This avoids components directly depending on various common libraries, serving as the core library of the entire componentization.
-
library-res: To alleviate the pressure on the base library, a separate public resource library is created, which is depended upon by the base library, mainly storing public data related to resources, such as images, styles, animations, colors, etc.
4. Prepare Third-Party Frameworks
Two third-party frameworks need to be prepared, namely MVVMHabit and ARouter mentioned earlier.
MVVMHabit:
allprojects {<br/> repositories {<br/> ...<br/> google()<br/> jcenter()<br/> maven { url 'https://jitpack.io' }<br/> }<br/>}<br/>dependencies {<br/> ...<br/> implementation 'com.github.goldze:MVVMHabit:?'<br/>}<br/>ARouter:
defaultConfig {<br/> ...<br/> javaCompileOptions {<br/> annotationProcessorOptions {<br/> arguments = [AROUTER_MODULE_NAME: project.getName()]<br/> }<br/> }<br/>}<br/>dependencies {<br/> api 'com.alibaba:arouter-api:?'<br/> annotationProcessor 'com.alibaba:arouter-compiler:?'<br/>}<br/>Component Separation
Componentization is actually a separation–combination process. Separation involves breaking down the product prototype, while combination involves assembling the code modules. Upon receiving the requirements, do not rush to start; first, separate the product prototype into sub-prototypes, develop them separately, and then package the completed sub-business modules into a complete APK.
The most common example is the design of the bottom tab.
Through componentization, the project can be roughly divided according to business into: Home Module, Work Module, Message Module, User Module. Of course, it can be further divided, for example, the user module can be split into an identity verification module. The finer the split, the easier it is to reuse.
So when creating the components above, the following component modules can be created: module-home, module-work, module-msg, module-user, module-sign.
Component Configuration
Gradle is the cornerstone of componentization. To successfully build a componentized project, one must have a solid understanding of Gradle (Android has left its mark with Gradle).
1. Dependency Relationships
Once the project is created, they need to be linked together. The dependency relationships are shown in the diagram below:
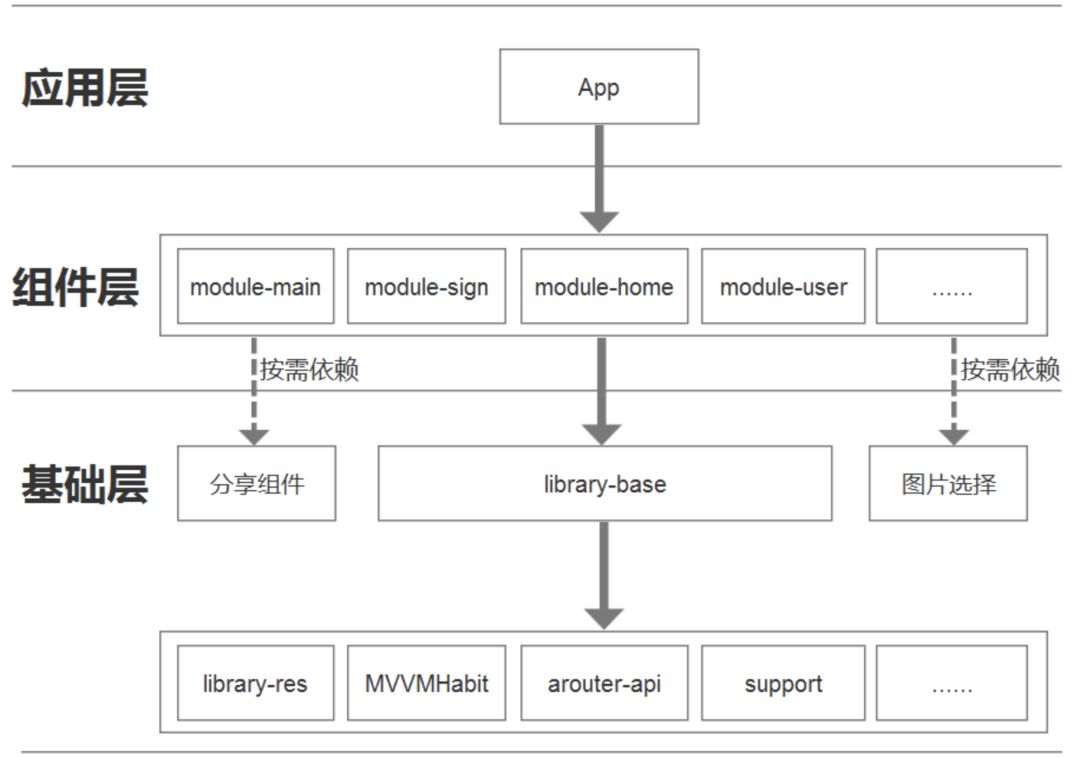
The host depends on the business components
dependencies {<br/> // Main business module<br/> implementation project(':module-main')<br/> // Identity verification module<br/> implementation project(':module-sign')<br/> // Home module<br/> implementation project(':module-home')<br/> // Work module<br/> implementation project(':module-work')<br/> // Message module<br/> implementation project(':module-msg')<br/> // User module<br/> implementation project(':module-user')<br/>}<br/>The business components depend on the library-base
dependencies {<br/> // Component depends on the base library<br/> api project(':library-base')<br/> // Optionally depend on third-party components<br/>}<br/>The library-base depends on the common libraries
dependencies {<br/> // Support-related libraries<br/> api rootProject.ext.support["design"]<br/> api rootProject.ext.support["appcompat-v7"]<br/> // library-res<br/> api project(':library-res')<br/> // MVVMHabit framework<br/> api rootProject.ext.dependencies.MVVMHabit<br/> // ARouter framework<br/> api rootProject.ext.dependencies["arouter-api"]<br/> // Other common libraries, such as image selection, sharing, push notifications, etc.<br/>}<br/>2. Enable DataBinding
The Android MVVM pattern relies on DataBinding, which needs to be enabled in each component, including the host App.
android {<br/> // Enable DataBinding<br/> dataBinding {<br/> enabled true<br/> }<br/>}<br/>3. Mode Switch
A global variable is needed to control whether the current running project is in isolated mode or merged mode. This is defined in gradle.properties:
isBuildModule=false<br/>When isBuildModule is true, each component can run independently; when false, all components can be integrated into the host App.
4. Debug Switch
In the component’s build.gradle, dynamically switch between library and application.
if (isBuildModule.toBoolean()) {<br/> // Run as an independent App application<br/> apply plugin: 'com.android.application'<br/>} else {<br/> // Run as a component<br/> apply plugin: 'com.android.library'<br/>}<br/>When isBuildModule is true, it is an application with its own package name.
android {<br/> defaultConfig {<br/> // If it is an independent module, use the current component's package name<br/> if (isBuildModule.toBoolean()) {<br/> applicationId 组件的包名<br/> }<br/> }<br/>}<br/>5. Manifest Configuration
Each component configures its own AndroidManifest.xml, and the application tag does not need to add attributes or specify the activity’s intent-filter. During merging and packaging, Gradle will merge each component’s AndroidManifest into the host App.
<manifest xmlns:android="http://schemas.android.com/apk/res/android"<br/> package="com.goldze.main"><br/> <application><br/> ...<br/> </application><br/></manifest><br/>When the component runs independently, it requires a separate AndroidManifest.xml for debugging. You can create an alone/AndroidManifest.xml in the src/main folder. Configure the application tag attributes and specify the launching activity.
<manifest xmlns:android="http://schemas.android.com/apk/res/android"<br/> package="com.goldze.main"><br/> <application<br/> ...<br/> ><br/> <activity <br/> ...<br/> ><br/> <intent-filter><br/> ...<br/> </intent-filter><br/> </activity><br/> </application><br/></manifest><br/>And configure it in build.gradle
android {<br/> sourceSets {<br/> main {<br/> ...<br/> if (isBuildModule.toBoolean()) {<br/> // Run independently<br/> manifest.srcFile 'src/main/alone/AndroidManifest.xml'<br/> } else {<br/> // Merge into host<br/> manifest.srcFile 'src/main/AndroidManifest.xml'<br/> resources {<br/> // In the formal version, exclude all debugging files in the alone folder<br/> exclude 'src/main/alone/*'<br/> }<br/> }<br/> }<br/> }<br/>}<br/>6. Unified Resources
In the component’s build.gradle, configure the unified resource prefix.
android {<br/> // Unified resource prefix, standardizing resource references<br/> resourcePrefix "组件名_"<br/>}<br/>You can extract the common parts of each component’s build.gradle into a module.build.gradle.
if (isBuildModule.toBoolean()) {<br/> // Run as an independent App application<br/> apply plugin: 'com.android.application'<br/>} else {<br/> // Run as a component<br/> apply plugin: 'com.android.library'<br/>}<br/>android {<br/> ...<br/> defaultConfig {<br/> ...<br/> // Alibaba routing framework configuration<br/> javaCompileOptions {<br/> annotationProcessorOptions {<br/> arguments = [AROUTER_MODULE_NAME: project.getName()]<br/> }<br/> }<br/> }<br/> sourceSets {<br/> main {<br/> if (isBuildModule.toBoolean()) {<br/> // Run independently<br/> manifest.srcFile 'src/main/alone/AndroidManifest.xml'<br/> } else {<br/> // Merge into host<br/> manifest.srcFile 'src/main/AndroidManifest.xml'<br/> resources {<br/> // In the formal version, exclude all debugging files in the alone folder<br/> exclude 'src/main/alone/*'<br/> }<br/> }<br/> }<br/> }<br/> buildTypes {<br/> ...<br/> }<br/> dataBinding {<br/> enabled true<br/> }<br/>}<br/>Each component can import module.build.gradle.
apply from: "../module.build.gradle"<br/>android {<br/> defaultConfig {<br/> // If it is an independent module, use the current component's package name<br/> if (isBuildModule.toBoolean()) {<br/> applicationId 组件的包名<br/> }<br/> }<br/> // Unified resource prefix, standardizing resource references<br/> resourcePrefix "组件名_"<br/>}<br/>dependencies {<br/> ...<br/>}<br/>Completion
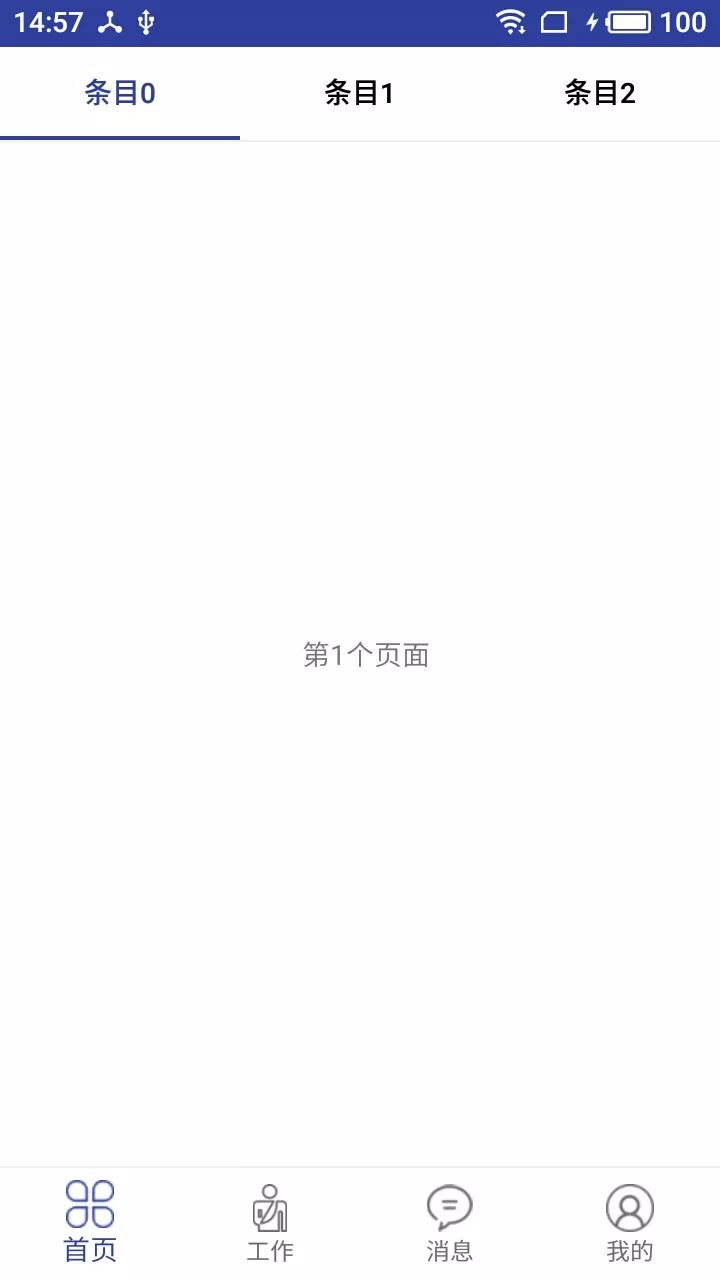
The running effect is as follows:
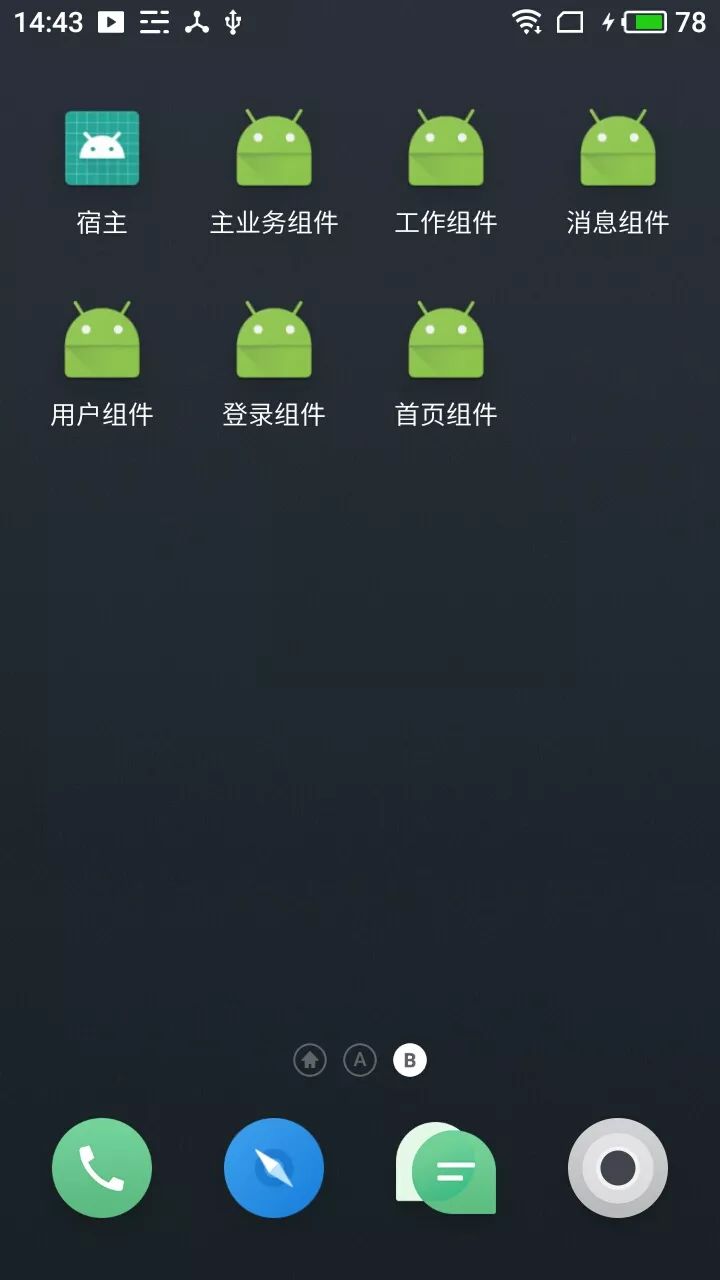
So far, a basic componentized project has been set up.
Feasibility Plan
Component Initialization
When components are running independently, that is during the debugging phase, they have a separate manifest, allowing for the specification of the Application class for initialization. However, when components are merged, there can only be one Application, which exists within the host App. How should components be initialized?
1. Reflection
Reflection is one method to solve component initialization.
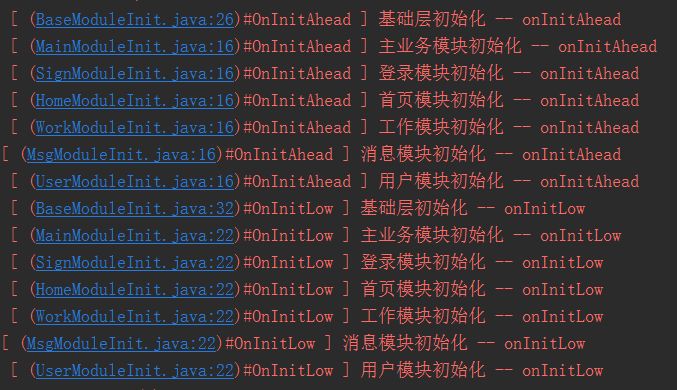
Define a singleton class ModuleLifecycleConfig under library-base, which mainly includes two public methods: initModuleAhead (initialize first) and initModuleLow (initialize later).
Why define two initialization methods here?
With more components, there will inevitably be issues regarding the order of initialization. Some third-party libraries that components depend on need to be initialized early, while others can be initialized later. For example, ARouter’s init method is recommended to be initialized as early as possible, so it can be written in the library-base initialization class’s onInitAhead method for early initialization.
@Override<br/>public boolean onInitAhead(Application application) {<br/> KLog.init(true);<br/> // Initialize Alibaba routing framework<br/> if (BuildConfig.DEBUG) {<br/> ARouter.openLog(); // Print logs<br/> ARouter.openDebug(); // Enable debug mode (must be enabled if running in InstantRun mode! The online version should be turned off, otherwise there are security risks)<br/> }<br/> ARouter.init(application); // As early as possible, recommended to initialize in Application<br/> return false;<br/>}<br/>Then define a component lifecycle management class ModuleLifecycleReflexs, where the full path of the component initialization class name is registered and dynamically called via reflection.
Note: The Module class initialized in the component cannot be obfuscated
2. Initialization Interface
Define an IModuleInit interface for dynamic configuration of Application. Components that need to be initialized implement this interface and are uniformly initialized in the host app’s Application.
public interface IModuleInit {<br/> // Prior initialization<br/> boolean onInitAhead(Application application);<br/><br/> // Later initialization<br/> boolean onInitLow(Application application);<br/>}<br/>3. Initialization Implementation
With both the reflection class and interface defined, create an initialization class in each component that implements the IModuleInit interface. Finally, call the initialization methods in the host’s Application.
@Override<br/>public void onCreate() {<br/> super.onCreate();<br/> // Initialize component (earlier)<br/> ModuleLifecycleConfig.getInstance().initModuleAhead(this);<br/> //....<br/> // Initialize component (later)<br/> ModuleLifecycleConfig.getInstance().initModuleLow(this);<br/>}<br/>This will achieve the effect of component initialization.
Small Optimization: When components run independently, the host App will not execute the onCreate method, but the component business still needs initialization for separate debugging. The conventional approach is to define an Application separately in each component, which can be cumbersome. With the above initialization methods, we can define a DebugApplication in library-base, where the code under the debug package does not participate in compilation, only serving for initializing data when running as an independent module. Finally, remember to specify DebugApplication in the component’s debug version alone/AndroidManifest.
Inter-Component Communication
Components are completely uncoupled; however, in actual development, there will definitely be situations where business overlaps occur. How can we achieve uncoupled communication between components?
1. ARouter
ARouter is the core of the entire componentization because it has a powerful routing mechanism. ARouter is depended upon in library-base, and all components depend on library-base, so it can be seen as a bridge for communication between components.
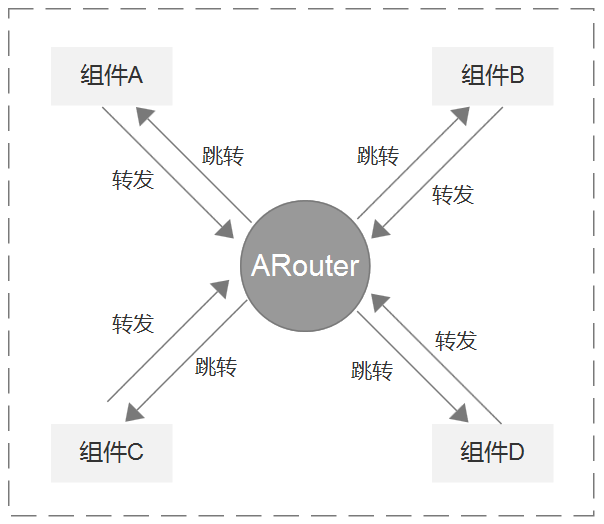
To jump from component A to component B:
ARouter.getInstance()<br/> .build(router_url)<br/> .withString(key, value)<br/> .navigation();<br/>To receive the parameters passed in component B:
@Autowired(name = key)<br/>String value;<br/>More ARouter usage:
https://github.com/alibaba/ARouter/blob/master/README_CN.md
2. Event Bus (RxBus)
MVVMHabit provides RxBus, which can serve as a global event communication tool.
When component B needs to return data to component A, it can call:
_Login _login = new _Login();<br/>RxBus.getDefault().post(_login);<br/>In component A, register to receive (register before calling):
subscribe = RxBus.getDefault().toObservable(_Login.class)<br/> .subscribe(new Consumer<_Login>() {<br/> @Override<br/> public void accept(_Login l) throws Exception {<br/> // Refresh data after successful login<br/> initData();<br/> // Unregister<br/> RxSubscriptions.remove(subscribe);<br/> }<br/> });<br/>RxSubscriptions.add(subscribe);<br/>Base Specification
library-base has two main functions: one is to depend on common base jars or third-party frameworks, and the other is to store some public static attributes and methods. Below are some basic common class specifications.
1. Config
In the config package of base, uniformly store global configuration files, such as component lifecycle initialization classes: ModuleLifecycleConfig, ModuleLifecycleReflexs, network ROOT_URL, SD card file read/write directories, etc.
2. Contract
RxBus component communication must go through the base layer for unified specification. Therefore, you can define the contract classes for RxBus in the contract package, writing good comments to facilitate use by other component developers.
3. Global
Mainly stores global keys, such as IntentKeyGlobal: storing key names for passing parameters during page jumps between components; SPKeyGlobal: globally storing SharedPreferences keys. Internal keys within a single component can be defined separately in that component.
4. Router
ARouter routing @Route annotations can have one or two RouterPath classes extracted, for example, defining a RouterActivityPath:
public class RouterActivityPath {<br/> /**<br/> * Main business component<br/> */<br/> public static class Main {<br/> private static final String MAIN = "/main";<br/> /* Main business interface */<br/> public static final String PAGER_MAIN = MAIN +"/Main";<br/> }<br/>}<br/>Routing paths for activities are uniformly defined in this class, using static inner classes to define paths for each component.
Conclusion

It is necessary to summarize
Project componentization is akin to manufacturing, similar to the vast majority of industrial products in everyday life. For example, automobiles are assembled from crucial parts like engines, wheels, and transmissions. Similarly, our app is connected by various components to form a complete executable software. Its essence lies in these three points: independence, completeness, and free combination. Moreover, componentization is not even a human invention; it is a pattern that has long existed in nature. Think about how complex the human body is, which is undoubtedly no less complex than the Windows operating system. However, aside from a few crucial organs, we can survive even if many parts are damaged or missing. This speaks to the miracle of componentization.
When writing software, it is crucial to focus on architecture. Do not wait until the code becomes increasingly messy and unmanageable before considering restructuring. Componentization is an excellent solution for isolating each business module; even if one component encounters an issue, there is no need to debug the entire project as in a single project. Coupled with the MVVM design pattern, our specific projects become lighter, easier to assemble, and compile faster, not only improving work efficiency but also enhancing our understanding of mobile application development. The componentization framework is versatile, especially suitable for medium to large projects with frequent business module iterations, making it a great solution.
The evolution of Android architecture goes from modularization to componentization and then to pluginization. We aim to continuously improve component development standards, enrich component functionality, and further refine large-grained business components to achieve more singular cohesion in component functions, while facilitating the transition to a future pluginization framework based on existing componentization frameworks.