

Author: PRATEEK JOSHI
Translator: Han Guojun
Proofreader: Li Hao
This article is approximately 3500 words, and is recommended to be read in 15 minutes.
This article will introduce the principles of ELMo and how it differs from traditional word embeddings, followed by practical demonstrations of its effectiveness.
Introduction
I am dedicated to researching issues related to Natural Language Processing (NLP). Each NLP problem presents a unique challenge and reflects how complex, beautiful, and intricate human language is.
However, one major headache for NLP practitioners is that machines cannot understand the true meaning of sentences. Yes, I am referring to the context issue in natural language processing. Traditional NLP techniques and architectures perform well on basic tasks, but their effectiveness declines when we try to incorporate context as a variable.
Over the past 18 months, the landscape of the NLP field has changed significantly, with NLP models such as Google’s BERT and Zalando’s Flair able to analyze sentences and grasp contextual information.
ELMo Model
Understanding contextual meaning is a significant breakthrough in the field of NLP, thanks to ELMo (Embeddings from Language Models), which is a state-of-the-art NLP architecture developed by AllenNLP. By the end of this article, you will be a loyal fan of ELMo just like me.
In this article, we will explore ELMo (Embeddings from Language Models) and build an exciting NLP model using it on a real dataset with Python.
Note: This article assumes you are familiar with various word embeddings and LSTM (Long Short-Term Memory) structures. You can refer to the following articles for more information on these topics:
-
An Intuitive Understanding of Word Embeddings
(https://www.analyticsvidhya.com/blog/2017/06/word-embeddings-count-word2veec/?utm_medium=ELMoNLParticle&utm_source=blog )
-
Essentials of Deep Learning: Introduction to Long Short Term Memory
(https://www.analyticsvidhya.com/blog/2017/12/fundamentals-of-deep-learning-introduction-to-lstm/?utm_medium=ELMoNLParticle&utm_source=blog )
Table of Contents
1. What is ELMo?
2. Understanding How ELMo Works
3. How Does ELMo Differ from Other Word Embeddings?
4. Applying the ELMo Model for Text Classification in Python:
-
Understanding the Problem Statement
-
Dataset Introduction
-
Importing Libraries
-
Importing and Checking Data
-
Text Cleaning and Preprocessing
-
Brief Introduction to TensorFlow Hub
-
Preparing ELMo Model Vectors
-
Building and Evaluating the Model
5. What Else Can We Do with ELMo?
6. Conclusion
1. What is ELMo?
The ELMo we mentioned is not a character from Sesame Street, which is also a typical example that highlights the importance of contextual meaning.

ELMo is a new way to represent vocabulary in word vectors or word embeddings. These word embedding methods can effectively generate state-of-the-art results in several NLP problems:
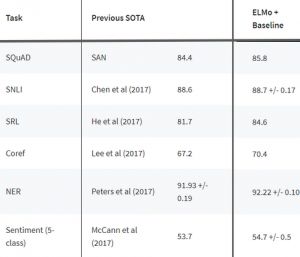
NLP researchers worldwide have begun using ELMo for NLP problems in both academic and applied fields. I recommend checking out the initial paper on ELMo (https://arxiv.org/pdf/1802.05365.pdf). Generally, I do not suggest reading academic papers because they tend to be long and complex, but this paper is different; it explains the principles and design process of ELMo well.
2. Understanding How ELMo Works
Before we get into practice, let’s intuitively understand how ELMo operates. Why is this step important?
Imagine the following scenario: You have successfully downloaded the ELMo Python code from GitHub and built a model on your text dataset, but you only get mediocre results, so you need to improve. If you don’t understand the architecture of ELMo, how will you know what to improve? If you haven’t studied it, how do you know which parameters need adjustment?
This mindset applies to all machine learning algorithms; you don’t need to understand their derivation process, but you must have enough knowledge to manipulate and improve your model.
Now, let’s return to how ELMo works.
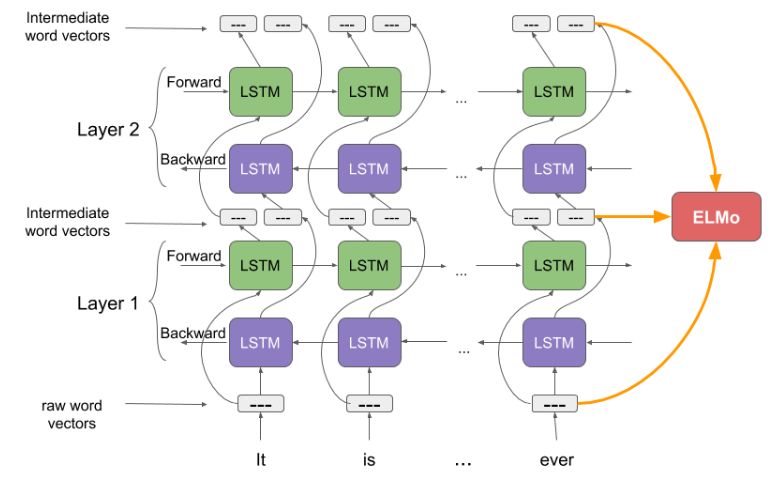
As I mentioned earlier, ELMo’s word vectors are calculated on a two-layer bidirectional language model (biLM). This model consists of two stacked layers, each with a forward pass and a backward pass iteration.
-
The structure in the above image uses a character-level convolutional neural network (CNN) to convert words in the text into raw word vectors.
-
These raw word vectors are input into the first layer of the bidirectional language model.
-
The forward iteration includes information about the word and some preceding words or context.
-
The backward iteration includes information about the words that follow.
-
The information from both iterations forms the intermediate word vectors.
-
These intermediate word vectors are input into the next layer of the model.
-
The final representation (ELMo) is the weighted sum of the raw word vectors and the two intermediate word vectors.
Because the input metric of the bidirectional language model is characters rather than vocabulary, the model can capture the internal structural information of words. For example, for “beauty” and “beautiful,” even without understanding the context of these two words, the bidirectional language model can recognize a certain degree of correlation between them.
3. How Does ELMo Differ from Other Word Embeddings?
Unlike traditional word embeddings like word2vec or GLoVe, the vector corresponding to each word in ELMo is actually a function of the entire sentence containing that word. Therefore, the same word will have different word vectors in different contexts.
You might ask: How does this difference help me in dealing with NLP problems? Let me clarify with an example:
We have the following two sentences:
-
I read the book yesterday.
-
Can you read the letter now?
Take a moment to consider the difference between these two sentences; the verb “read” in the first sentence is in the past tense, while “read” in the second sentence is in the present tense, which is a case of polysemy.
How Intricate and Complex Language Is
Traditional word embeddings generate the same vector for the word “read” in both sentences, so these architectures cannot distinguish between polysemous words; they cannot recognize the context of words.
In contrast, ELMo’s word vectors can effectively solve this problem. The ELMo model calculates word embeddings by inputting the entire sentence into the equation. Therefore, the “read” in the two sentences above will have different ELMo vectors.
4. Implementation: Applying the ELMo Model for Text Classification in Python
Now comes the part you have been looking forward to—implementing ELMo in Python! Let’s go step by step:
Understanding the Problem Statement
The first step in addressing a data science problem is to clarify the problem statement, which will serve as the foundation for your subsequent actions.
For this article, we have the following problem statement:
Sentiment analysis has always been a key issue in the NLP field. This time we collected tweets from consumers about several companies that produce and sell high-tech products like mobile phones and computers on Twitter. Our task is to determine whether these tweets contain negative evaluations.
This is clearly a binary text classification task that requires us to predict sentiment from the extracted tweets.
Dataset Introduction
We have split the dataset:
-
There are 7920 tweets in the training set.
-
There are 1953 tweets in the test set.
You can download the dataset from here:
https://datahack.analyticsvidhya.com/contest/linguipedia-codefest-natural-language-processing-1/#data_dictionary
Note: Most of the profanity in the dataset has been replaced with “$&@*#”, but some tweets may still contain some profanity.
Alright, let’s open our favorite Python IDE and start coding!
Importing Libraries
Import the libraries we will use:
import pandas as pd
import numpy as np
import spacy
from tqdm import tqdm
import re
import time
import pickle
pd.set_option(‘display.max_colwidth’, 200)
Importing and Checking Data
# read data
train = pd.read_csv(“train_2kmZucJ.csv”)
test = pd.read_csv(“test_oJQbWVk.csv”)
train.shape, test.shape
Output:
((7920, 3), (1953, 2))
There are 7920 tweets in the training set and 1953 tweets in the test set. Next, let’s check the category distribution in the training set:
train[‘label’].value_counts(normalize = True)
Output:
0 0.744192
1 0.255808
Name: label, dtype: float64
Here, 1 represents negative tweets, and 0 represents non-negative tweets.
Now let’s take a look at the first five rows of the training set:
train.head()

We have three columns of data: the “tweet” column is the independent variable, and the “label” column is the target variable.
Text Cleaning and Preprocessing
Ideally, we would have a tidy and structured dataset, but it is still quite challenging in the NLP field.
We need to spend some time cleaning the data to prepare for model building. Extracting features from cleaned text will become easier, and the features may even contain more information. You will find that the higher the quality of your data, the better your model’s performance will be.
So let’s clean the existing dataset first.
We can see that some tweets contain URL links, which do not help sentiment analysis, so we need to remove them.
# remove URL’s from train and test
train[‘clean_tweet’] = train[‘tweet’].apply(lambda x: re.sub(r’http\S+’, ”, x))
test[‘clean_tweet’] = test[‘tweet’].apply(lambda x: re.sub(r’http\S+’, ”, x))
We use regular expressions (Regular Expression) to remove URLs.
Note: You can learn about regular expressions from here:
https://www.analyticsvidhya.com/blog/2015/06/regular-expression-python/regular-expressions-python?utm_medium=ELMoNLParticle&utm_source=blog
Now we will do some routine data cleaning:
# remove punctuation marks
punctuation = ‘”!#$%&()*+-/:;<=>?@[\]^_`{|}~’
train[‘clean_tweet’] = train[‘clean_tweet’].apply(lambda x: ”.join(ch for ch in x if ch not in set(punctuation)))
test[‘clean_tweet’] = test[‘clean_tweet’].apply(lambda x: ”.join(ch for ch in x if ch not in set(punctuation)))
# convert text to lowercase
train[‘clean_tweet’] = train[‘clean_tweet’].str.lower()
test[‘clean_tweet’] = test[‘clean_tweet’].str.lower()
# remove numbers
train[‘clean_tweet’] = train[‘clean_tweet’].str.replace(“[0-9]”, ” “)
test[‘clean_tweet’] = test[‘clean_tweet’].str.replace(“[0-9]”, ” “)
# remove whitespaces
train[‘clean_tweet’] = train[‘clean_tweet’].apply(lambda x:’ ‘.join(x.split()))
test[‘clean_tweet’] = test[‘clean_tweet’].apply(lambda x: ‘ ‘.join(x.split()))
Next, we will normalize the text, which will simplify words into their base forms. For instance, “produces”, “production”, and “producing” will become “product”. Generally speaking, the various forms of the same word are not important; we only need their base forms.
We will use the popular spaCy library for normalization:
# import spaCy’s language model
nlp = spacy.load(‘en’, disable=[‘parser’, ‘ner’])
# function to lemmatize text
def lemmatization(texts):
output = []
for i in texts:
s = [token.lemma_ for token in nlp(i)]
output.append(‘ ‘.join(s))
return output
Classifying in the test and training sets (Lemmatize):
train[‘clean_tweet’] = lemmatization(train[‘clean_tweet’])
test[‘clean_tweet’] = lemmatization(test[‘clean_tweet’])
Now let’s compare the original tweets with the cleaned tweets:
train.sample(10)
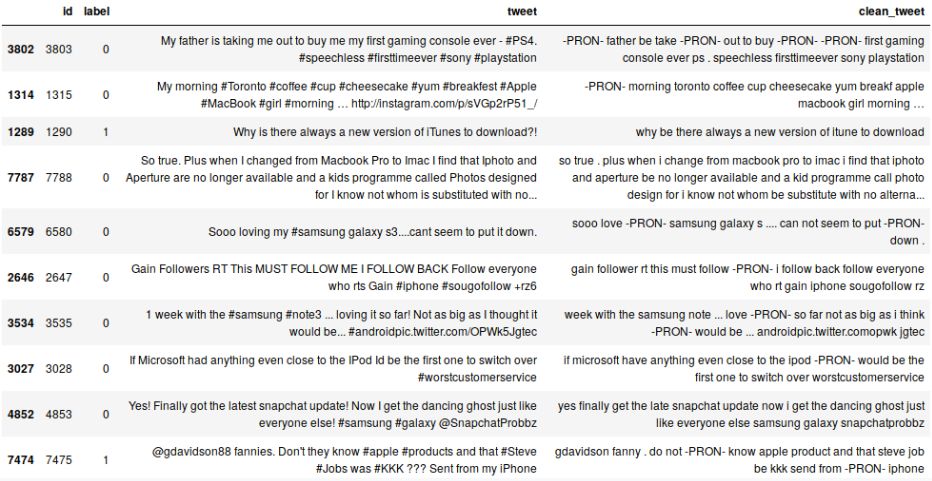
Carefully examine the comparison of the two columns of tweets in the image above; the cleaned tweets have become clearer and easier to understand.
However, there is still much that can be done in the text cleaning step, and I encourage everyone to further explore the data to discover areas for improvement in the text.
Brief Introduction to TensorFlow Hub
Wait, what does TensorFlow have to do with our tutorial?
TensorFlow Hub is a library that allows for transfer learning, supporting the use of various machine learning models for different tasks. ELMo is one example, which is why we need to use TensorFlow Hub in our implementation.

We first need to install TensorFlow Hub; you must install or upgrade to version 1.7 or higher to use it:
$ pip install “tensorflow>=1.7.0”
$ pip install tensorflow-hub
Preparing ELMo Model Vectors
Now we need to import the pre-trained ELMo model. Note that this model is over 350 MB in size, so it may take some time to download.
import tensorflow_hub as hub
import tensorflow as tf
elmo = hub.Module(“https://tfhub.dev/google/elmo/2”, trainable=True)
I will first show you how to generate ELMo vectors for a sentence; you just need to input a column of strings into elmo:
# just a random sentence
x = [“Roasted ants are a popular snack in Columbia”]
# Extract ELMo features
embeddings = elmo(x, signature=”default”, as_dict=True)[“elmo”]
embeddings.shape
Output:
TensorShape([Dimension(1), Dimension(8), Dimension(1024)])
This output is a three-dimensional tensor (1, 8, 1024):
-
The first dimension represents the number of training samples, which in this case is 1;
-
The second dimension represents the maximum length of the input list; since we are currently inputting only one string, the second dimension is the length of that string, which is 8;
-
The third dimension equals the length of the ELMo vector.
Each word in the input has an ELMo vector of length 1024.
Let’s start extracting ELMo vectors for the cleaned tweets in the test and training sets. To get the ELMo vector for the entire tweet, we need to take the average of the vectors for each word in the tweet.
We can achieve this by defining a function:
def elmo_vectors(x):
embeddings = elmo(x.tolist(), signature=”default”, as_dict=True)[“elmo”]
with tf.Session() as sess:
sess.run(tf.global_variables_initializer())
sess.run(tf.tables_initializer())
# return average of ELMo features
return sess.run(tf.reduce_mean(embeddings,1))
If you use the code above to process all the tweets at once, you may exhaust all your memory. We can avoid this problem by splitting the training and testing sets into batches of 100 samples each and passing them sequentially to the elmo_vectors() function.
I choose to store these samples in a list:
list_train = [train[i:i+100] for i in range(0,train.shape[0],100)]
list_test = [test[i:i+100] for i in range(0,test.shape[0],100)]
Now let’s iterate over these samples and extract the ELMo vectors, which will take a while:
# Extract ELMo embeddings
elmo_train = [elmo_vectors(x[‘clean_tweet’]) for x in list_train]
elmo_test = [elmo_vectors(x[‘clean_tweet’]) for x in list_test]
Once we have all the vectors, we can concatenate them into an array:
elmo_train_new = np.concatenate(elmo_train, axis = 0)
elmo_test_new = np.concatenate(elmo_test, axis = 0)
I recommend saving these arrays, as we will need a long time to obtain their ELMo vectors. We can save them as pickle files:
# save elmo_train_new
pickle_out = open(“elmo_train_03032019.pickle”,”wb”)
pickle.dump(elmo_train_new, pickle_out)
pickle_out.close()
# save elmo_test_new
pickle_out = open(“elmo_test_03032019.pickle”,”wb”)
pickle.dump(elmo_test_new, pickle_out)
pickle_out.close()
Then use the following code to reload them:
# load elmo_train_new
pickle_in = open(“elmo_train_03032019.pickle”, “rb”)
elmo_train_new = pickle.load(pickle_in)
# load elmo_train_new
pickle_in = open(“elmo_test_03032019.pickle”, “rb”)
elmo_test_new = pickle.load(pickle_in)
Building and Evaluating the Model
Let’s build an NLP model using ELMo!
We can use the ELMo vectors from the training set to build a classification model. Then, we will use that model to make predictions on the test set. But before we do this, we need to split elmo_train_new into training and validation sets to evaluate our model.
from sklearn.model_selection import train_test_split
xtrain, xvalid, ytrain, yvalid = train_test_split(elmo_train_new, train[‘label’], random_state=42, test_size=0.2)
Since our goal is to set a baseline score, we will build a simple logistic regression model using the ELMo vectors as features:
from sklearn.linear_model import LogisticRegression
from sklearn.metrics import f1_score
lreg = LogisticRegression()
lreg.fit(xtrain, ytrain)
It’s time to make predictions! First, on the validation set:
preds_valid = lreg.predict(xvalid)
We use the F1 metric to evaluate our model since it is the official evaluation metric for the competition:
f1_score(yvalid, preds_valid)
Output: 0.789976
The F1 score on the validation set is quite good; next, we make predictions on the test set:
# make predictions on test set
preds_test = lreg.predict(elmo_test_new)
Prepare the submission file to upload to the competition page:
# prepare submission dataframe
sub = pd.DataFrame({‘id’:test[‘id’], ‘label’:preds_test})
# write predictions to a CSV file
sub.to_csv(“sub_lreg.csv”, index=False)
The public leaderboard shows that our prediction results achieved a score of 0.875672, which can be considered very good since we only performed relatively basic preprocessing and used a very simple model. It is foreseeable that if we used more advanced techniques, we would achieve better scores; everyone can try this and let me know the results!
5. What Else Can We Do with ELMo?
We have just witnessed how efficient ELMo is in text recognition, and if paired with a more complex model, it will undoubtedly perform even better. The application of ELMo is not limited to text classification; it can be used whenever you need to vectorize text data.
Here are some NLP problems that can be addressed using ELMo:
-
Machine Translation
-
Language Modeling
-
Text Summarization
-
Named Entity Recognition
-
Question-Answering Systems
6. Conclusion
ELMo is undoubtedly a significant advancement in NLP and will continue to trend. Given the rapid pace of progress in NLP research, other new state-of-the-art word embeddings, such as Google BERT and Zalando’s Flair, have emerged in recent months. It can be said that an exciting era for NLP practitioners has arrived!
I strongly recommend you use ELMo on other datasets and personally experience the performance improvement process. If you have any questions or wish to share your experiences with me and the community, please do so in the comments section below. If you are just starting in the field of NLP, you should also check out the following NLP-related resources:
-
Natural Language Processing (NLP) course
(https://courses.analyticsvidhya.com/courses/natural-language-processing-nlp?utm_medium=ELMoNLParticle&utm_source=blog )
-
Certified Program: Natural Language Processing (NLP) for Beginners
(https://courses.analyticsvidhya.com/bundles/nlp-combo?utm_medium=ELMoNLParticle&utm_source=blog )
You can also read this article through the Analytics Vidhya Android app.
Original Title: A Step-by-Step NLP Guide to Learn ELMo for Extracting Features from Text
Original Link: https://www.analyticsvidhya.com/blog/2019/03/learn-to-use-elmo-to-extract-features-from-text/
Edited by: Wang Jing
Proofread by: Lin Yilin
Translator’s Profile

Han Guojun, graduated from the School of Information at Renmin University of China, currently a second-year master’s student in Data Science at the University of Melbourne. Interested in mining the information behind data, hoping to meet like-minded friends to learn deeply and continuously improve.
Translation Team Recruitment Information
Job Content: Requires attention to detail to translate selected foreign articles into fluent Chinese. If you are a data science/statistics/computer major studying abroad, or working in related fields, or confident in your foreign language skills, you are welcome to join the translation team.
What You Will Get: Regular translation training to improve volunteers’ translation skills, enhance awareness of cutting-edge data science, and overseas friends can keep in touch with domestic technology application development. The THU Data Team’s background provides good development opportunities for volunteers.
Other Benefits: Data scientists from well-known companies, students from prestigious universities such as Peking University and Tsinghua University, and overseas students will become your partners in the translation team.
Click on the end of the article “Read the Original” to join the Data Team~
Reprint Notice
If you need to reprint, please prominently indicate the author and source at the beginning of the article (reprinted from: Data Team ID: datapi), and place a prominent QR code for Data Team at the end of the article. For articles with original identification, please send [Article Name – Waiting for Authorization Public Account Name and ID] to the contact email to apply for whitelist authorization and edit according to requirements.
After publishing, please feedback the link to the contact email (see below). Unauthorized reprints and adaptations will be pursued legally.

Click “Read the Original” to embrace the organization