
Author|Jack Chih-Hsu Lin
Source|AI Park Compiled by|ronghuaiyang
18 PyTorch tips you should know.
Why Should You Read This Article?
The training/inference process of deep learning models involves many steps. With limited time and resources, the faster each iteration is, the quicker the overall model’s prediction performance will be. I have gathered several PyTorch tips to maximize memory efficiency and minimize runtime. To better utilize these tips, we also need to understand how and why they are effective.
I first provide a complete list and some code snippets so that you can start optimizing your scripts. Then I will go through them in detail one by one. For each tip, I also provide code snippets and comments to indicate whether it is device type (CPU/GPU) or model type specific.
List:
-
Data Loading
1. Put data on SSD
2.
<span>Dataloader(dataset, num_workers=4*num_GPU)</span>3.
<span>Dataloader(dataset, pin_memory=True)</span> -
Data Operations
4. Create directly on the device
<span>torch.Tensor</span>, do not create on one device and move to another device5. Avoid unnecessary data transfer between CPU and GPU
6. Use
<span>torch.from_numpy(numpy_array)</span>or<span>torch.as_tensor(others)</span>7. Use
<span>tensor.to(non_blocking=True)</span>when data transfer operations can overlap.8. Use PyTorch JIT to fuse element operations into a single kernel.
-
Model Structure
9. When using mixed precision FP16, set sizes to multiples of 8 for all different architecture designs
-
Training
10. Set batch size to multiples of 8 to maximize GPU memory usage
11. Use mixed precision during the forward pass (not during the backward)
12. Set gradients to
<span>None</span>before optimizer updates weights,<span>model.zero_grad(set_to_none=True)</span>13. Gradient accumulation: update weights every x batches to simulate a larger batch size effect
-
Inference/Validation
14. Disable gradient calculation
-
CNN Specific
15.
<span>torch.backends.cudnn.benchmark = True</span>16. Use channels_last memory format for 4D NCHW Tensors
17. Remove bias from convolutional layers before batch normalization
-
Distributed
18. Use
<span>DistributedDataParallel</span>instead of<span>DataParallel</span>
Code Snippets for 7, 11, 12, 13
# Combining the tips No.7, 11, 12, 13: nonblocking, AMP, setting
# gradients as None, and larger effective batch size
model.train()

# Reset the gradients to None
optimizer.zero_grad(set_to_none=True)
scaler = GradScaler()
for i, (features, target) in enumerate(dataloader):
    # these two calls are nonblocking and overlapping
    features = features.to('cuda:0', non_blocking=True)
    target = target.to('cuda:0', non_blocking=True)

    # Forward pass with mixed precision
    with torch.cuda.amp.autocast(): # autocast as a context manager
        output = model(features)
        loss = criterion(output, target)

    # Backward pass without mixed precision
    # It's not recommended to use mixed precision for backward pass
    # Because we need more precise loss
    scaler.scale(loss).backward()

    # Only update weights every other 2 iterations
    # Effective batch size is doubled
    if (i+1) % 2 == 0 or (i+1) == len(dataloader):
        # scaler.step() first unscales the gradients .
        # If these gradients contain infs or NaNs,
        # optimizer.step() is skipped.
        scaler.step(optimizer)

        # If optimizer.step() was skipped,
        # scaling factor is reduced by the backoff_factor
        # in GradScaler()
        scaler.update()

        # Reset the gradients to None
        optimizer.zero_grad(set_to_none=True)
Guiding Principles
In general, you can optimize time and memory usage through 3 key points. First, minimize I/O (input/output) as much as possible, making the model pipeline more focused on computation rather than I/O (bandwidth or memory limitations). This way, we can leverage GPUs and other dedicated hardware to accelerate these computations. Second, overlap processes as much as possible to save time. Third, maximize memory usage efficiency to save memory. Then, saving memory can enable larger batch sizes, which in turn saves more time. Having more time helps accelerate the model development cycle and leads to better model performance.
1. Move Data to SSD
Some machines have different hard drives, such as HHD and SSD. It is recommended to move the data used in the project to SSD (or a hard drive with better I/O) for faster speeds.
2. Asynchronous Processing During Data Loading and Augmentation
<span>num_workers=0</span> makes data loading wait until training is complete or the previous process is done. Setting <span>num_workers</span> >0 is expected to speed things up, especially for large data I/O and augmentation. Specifically for GPUs, experiments have found that <span>num_workers = 4*num_GPU</span> yields the best performance. That is, you can also test the optimal <span>num_workers</span> for your machine. Note that high <span>num_workers</span> will incur significant memory overhead, which is expected since more copies of data are being processed in memory simultaneously.
Dataloader(dataset, num_workers=4*num_GPU)
3. Use Pinned Memory to Reduce Data Transfer
4. Create Tensors Directly on the Device
Whenever you need a <span>torch.Tensor</span>, try to create it directly on the device you will use them on. Do not create data using native Python or NumPy and then convert it to <span>torch.Tensor</span>. In most cases, if you are going to use them on the GPU, create them directly on the GPU.
# Random numbers between 0 and 1
# Same as np.random.rand([10,5])
tensor = torch.rand([10, 5], device=torch.device('cuda:0'))

# Random numbers from normal distribution with mean 0 and variance 1
# Same as np.random.randn([10,5])
tensor = torch.randn([10, 5], device=torch.device('cuda:0'))
The only syntax difference is that random number generation in NumPy requires an additional random, for example:<span>np.random.rand()</span> vs <span>torch.rand()</span>. Many other functions also have corresponding functions in NumPy:
torch.empty(), torch.zeros(), torch.full(), torch.ones(), torch.eye(), torch.randint(), torch.rand(), torch.randn()
5. Avoid Data Transfer Between CPU and GPU
As I mentioned in the guiding principles, we want to minimize I/O as much as possible. Pay attention to the following commands:
# BAD! AVOID THEM IF UNNECESSARY!
print(cuda_tensor)
cuda_tensor.cpu()
cuda_tensor.to_device('cpu')
cpu_tensor.cuda()
cpu_tensor.to_device('cuda')
cuda_tensor.item()
cuda_tensor.numpy()
cuda_tensor.nonzero()
cuda_tensor.tolist()

# Python control flow which depends on operation results of CUDA tensors
if (cuda_tensor != 0).all():
    run_func()
6. Use <span>torch.from_numpy(numpy_array)</span> and <span>torch.as_tensor(others)</span> Instead of <span>torch.tensor</span>
<span>torch.tensor()</span>will copy data
If both the source and target devices are CPU, <span>torch.from_numpy</span> and <span>torch.as_tensor</span> will not create a data copy. If the source data is a NumPy array, using <span>torch.from_numpy(numpy_array)</span> will be faster. If the source data is a tensor with the same data type and device type, then <span>torch.as_tensor(others)</span> can avoid copying data. <span>others</span> can be a Python <span>list</span>, <span>tuple</span>, or <span>torch.tensor</span>. If the source and target devices are different, we can use the next tip.
torch.from_numpy(numpy_array)
torch.as_tensor(others)
7. Use <span>tensor.to(non_blocking=True)</span> When Data Transfers Overlap
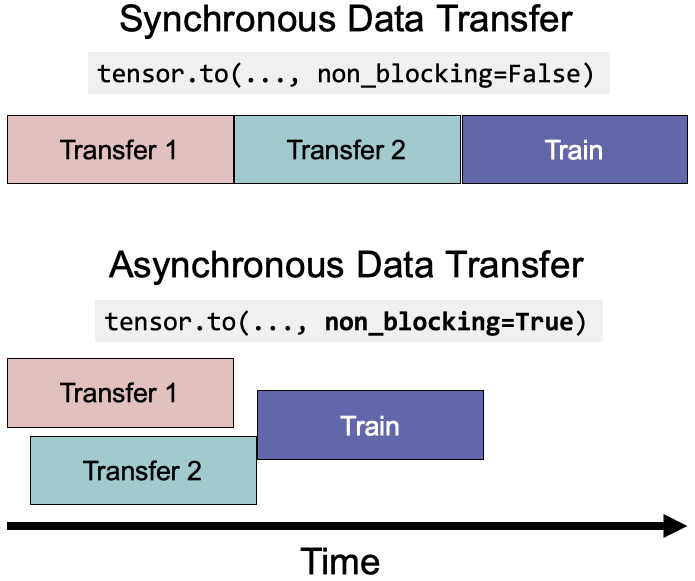
Essentially, <span>non_blocking=True</span> allows asynchronous data transfers to reduce execution time.
for features, target in loader:
    # these two calls are nonblocking and overlapping
    features = features.to('cuda:0', non_blocking=True)
    target = target.to('cuda:0', non_blocking=True)

    # This is a synchronization point
    # It will wait for previous two lines
    output = model(features)
8. Use PyTorch JIT to Fuse Element Operations Into a Single Kernel
Element operations include common mathematical operations, which are usually memory-bound. PyTorch JIT will automatically fuse adjacent element operations into a single kernel to save multiple memory read/write operations. For example, by fusing 5 kernels into 1, the <span>gelu</span> function can be accelerated by 4 times.
@torch.jit.script # JIT decorator
def fused_gelu(x):
    return x * 0.5 * (1.0 + torch.erf(x / 1.41421))
9 & 10. Set Image Size and Batch Size to Multiples of 8 When Using Mixed Precision FP16 for All Different Architecture Designs
To maximize GPU computational efficiency, it is best to ensure that different architecture designs (including input/output sizes/dimensions/channels of neural networks and batch size) are multiples of 8 or even larger powers of 2 (like 64, 128, and a maximum of 256). This is because when the dimensions of the matrices align with powers of 2, Nvidia GPUs’ Tensor Cores achieve optimal performance in matrix multiplication.
Matrix multiplication is the most commonly used operation and can be a bottleneck, so it is the best way to ensure that the dimensions of tensors/matrices/vectors are divisible by powers of 2 (e.g., 8, 64, 128, up to 256).
These experiments show that setting output dimensions and batch size to multiples of 8, such as (33712, 4088, 4096) compared to 33708, batch size 4084 or 4095 which are not divisible by 8 can accelerate computation by 1.3 to 4 times. The magnitude of acceleration depends on the type of process (e.g., forward pass or gradient computation) and the cuBLAS version. Especially if you are using NLP, remember to check the output dimensions, which is often the vocabulary size.
Using multiples greater than 256 does not provide more benefits but does not harm either. These settings depend on the cuBLAS and cuDNN versions and GPU architecture. You can find specific tensor core requirements for matrix dimensions in the documentation. Since currently PyTorch AMP mostly uses FP16, and FP16 requires multiples of 8, it is generally recommended to use multiples of 8. If you have more advanced GPUs like the A100, you can choose multiples of 64. If you are using AMD GPUs, you may need to check AMD’s documentation.
Besides setting batch size to multiples of 8, we also maximize the batch size until it reaches the GPU memory limit. This way, we can complete one epoch in less time.
11. Use Mixed Precision in Forward and Not in Backward
Some operations do not require the precision of float64 or float32. Therefore, setting operations to lower precision can save memory and execution time. For various applications, Nvidia reports that mixed precision with Tensor Cores can speed up computations by 3.5 to 25 times.
It is worth noting that generally, the larger the matrix, the higher the mixed precision acceleration. In larger neural networks (such as BERT), experiments show that mixed precision can accelerate training by 2.75 times and reduce memory usage by 37%. Newer GPU devices with Volta, Turing, Ampere, or Hopper architectures (e.g., T4, V100, RTX 2060, 2070, 2080, 2080 Ti, A100, RTX 3090, RTX 3080, and RTX 3070) can benefit more from mixed precision as they have Tensor Core architecture, which has special optimizations compared to CUDA cores.
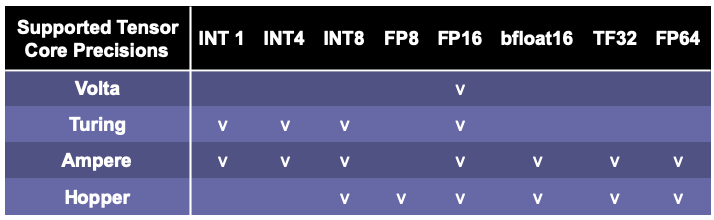
It is worth mentioning that the H100 with Hopper architecture is expected to be released in Q3 2022, supporting FP8 (float8). PyTorch AMP may support FP8 (currently v1.11.0 does not support FP8).
In practice, you need to find an optimal point between model precision performance and speed performance. I have previously found that mixed precision may reduce model precision, depending on the algorithm, data, and problem.
Using Automatic Mixed Precision (AMP) makes it easy to leverage mixed precision in PyTorch. The default floating-point type in PyTorch is float32. AMP will save memory and time by using float16 for a set of operations (e.g., <span>matmul</span>, <span>linear</span>, <span>conv2d</span>). AMP will automatically cast some operations (e.g., <span>mse_loss</span>, <span>softmax</span>, etc.) to float32. Some operations (e.g., <span>add</span>) can operate on the widest input types. For example, if one variable is float32 and another variable is float16, the addition result will be float32.
<span>autocast</span> automatically applies precision to different operations. Since loss and gradients are computed at float16 precision, when they are too small, gradients may “underflow” and become zero. <span>GradScaler</span> prevents underflow by multiplying the loss by a scaling factor, computes gradients based on the scaled loss, and then unscales gradients before the optimizer updates weights. If the scaling factor is too large or too small, leading to <span>inf</span> or <span>NaN</span>, the scaling factor will be updated in the next iteration.
scaler = GradScaler()
for features, target in data:
    # Forward pass with mixed precision
    with torch.cuda.amp.autocast(): # autocast as a context manager
        output = model(features)
        loss = criterion(output, target)

    # Backward pass without mixed precision
    # It's not recommended to use mixed precision for backward pass
    # Because we need more precise loss
    scaler.scale(loss).backward()

    # scaler.step() first unscales the gradients .
    # If these gradients contain infs or NaNs,
    # optimizer.step() is skipped.
    scaler.step(optimizer)

    # If optimizer.step() was skipped,
    # scaling factor is reduced by the backoff_factor in GradScaler()
    scaler.update()
You can also use <span>autocast</span> as a decorator for the forward pass function.
class AutocastModel(nn.Module):
    ...
    @autocast() # autocast as a decorator
    def forward(self, input):
        x = self.model(input)
        return x
12. Set Gradients to None Before Optimizer Updates Weights
By using <span>model.zero_grad()</span> or <span>optimizer.zero_grad()</span>, it will execute <span>memset</span> on all parameters, and update gradients through read/write operations. However, setting gradients to <span>None</span> will not execute <span>memset</span>, and will update gradients using “write-only” operations. Thus, setting gradients to <span>None</span> is faster.
# Reset gradients before each step of optimizer
for param in model.parameters():
    param.grad = None

# or (PyTorch >= 1.7)
model.zero_grad(set_to_none=True)

# or (PyTorch >= 1.7)
optimizer.zero_grad(set_to_none=True)
13. Gradient Accumulation: Update Gradients Every x Batches to Simulate Large Batch Size
This tip is about accumulating gradients from more data samples so that the estimate of gradients is more accurate, and weight updates are closer to local/global minima. This is more helpful when the batch size is small (due to smaller GPU memory limitations or larger data amounts per sample).
for i, (features, target) in enumerate(dataloader):
    # Forward pass
    output = model(features)
    loss = criterion(output, target)

    # Backward pass
    loss.backward()

    # Only update weights every other 2 iterations
    # Effective batch size is doubled
    if (i+1) % 2 == 0 or (i+1) == len(dataloader):
        # Update weights
        optimizer.step()
        # Reset the gradients to None
        optimizer.zero_grad(set_to_none=True)
14. Disable Gradient Calculation During Inference and Validation
In fact, if only calculating the model’s output, gradient calculation is not necessary for inference and validation steps. PyTorch uses an intermediate memory buffer to handle operations involving <span>requires_grad=True</span> variables. Therefore, if we know that no operations involving gradients are needed, we can save additional resources by disabling gradient calculation for inference/validation.
# torch.no_grad() as a context manager:
    with torch.no_grad():
    output = model(input)

# torch.no_grad() as a function decorator:
@torch.no_grad()
def validation(model, input):
    output = model(input)
return output
15. Set <span>torch.backends.cudnn.benchmark = True</span> Before Training Loop to Accelerate Computation
Setting <span>torch.backends.cudnn.benchmark = True</span> before the training loop can accelerate computation. Since the performance of cuDNN algorithms for computing convolutions of different kernel sizes varies, the auto-tuner can run a benchmark to find the best algorithm. It is recommended to enable this setting when your input sizes do not change frequently. If input sizes change frequently, the auto-tuner will need to benchmark too often, which may hurt performance. It can improve forward and backward propagation speeds by 1.27x to 1.70x.
torch.backends.cudnn.benchmark = True
16. Use Channels Last Memory Format for 4D NCHW Tensors
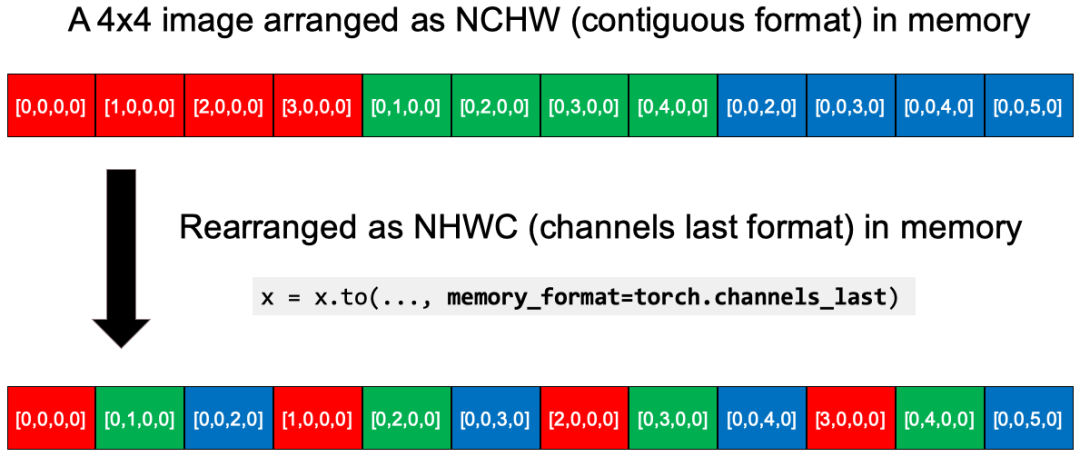
Using <span>channels_last</span> memory format saves images in a pixel-wise manner as the most memory-efficient format. The original 4D NCHW tensor is stored in memory in the order of each channel (Red/Green/Blue). After conversion, <span>x = x.to(memory_format=torch.channels_last)</span>, the data is reorganized in memory to NHWC (<span>channels_last</span> format). You can see that each pixel of the RGB layers is closer. It is reported that this NHWC format used with FP16 AMP can achieve acceleration of 8% to 35%.
Currently, it is still in beta testing and only supports 4D NCHW tensors and a set of models (e.g., <span>alexnet</span>, <span>mnasnet</span> family, <span>mobilenet_v2</span>, <span>resnet</span> family, <span>shufflenet_v2</span>, <span>squeezenet1</span>, <span>vgg</span> family). But I can assure you that this will become a standard optimization.
N, C, H, W = 10, 3, 32, 32

x = torch.rand(N, C, H, W)

# Stride is the gap between one element to the next one
# in a dimension.
print(x.stride())

# (3072, 1024, 32, 1)# Convert the tensor to NHWC in memory
x2 = x.to(memory_format=torch.channels_last)

print(x2.shape)  # (10, 3, 32, 32) as dimensions order preserved
print(x2.stride())  # (3072, 1, 96, 3), which are smaller
print((x==x2).all()) # True because the values were not changed
17. Disable Bias in Convolutional Layers Before Batch Normalization
This is feasible because mathematically, bias can be offset by the mean subtraction of batch normalization. We can save model parameters and runtime memory.
nn.Conv2d(..., bias=False)
18. Use <span>DistributedDataParallel</span> Instead of <span>DataParallel</span>
For multi-GPU, always prefer to use <span>DistributedDataParallel</span> over <span>DataParallel</span>, even with a single node, because <span>DistributedDataParallel</span> applies to multi-process and creates a process for each GPU, thus bypassing the Python Global Interpreter Lock (GIL) and improving speed.
Conclusion
In this article, I have listed a checklist and provided code snippets for 18 PyTorch tips. Then, I explained how they work and why in different aspects, including data loading, data operations, model architecture , training, inference, CNN specific optimizations, and distributed computing. Once you deeply understand how they work, you may find general principles applicable to deep learning modeling in any deep learning framework.

Technical Group Invitation


Scan the QR code to add assistant WeChat
—End—
Recommended for you
The Revenge of ViT: Meta AI Proposes a New Baseline for ViT Training
5 Things I Learned in a Year at MIT AI Lab
Thinking丨What Does It Mean to Have the Implementation Ability of an Algorithm Engineer?
How Many Variants of the Transformer Model Are There? Check Out This Comprehensive Review
Various Attention Mechanisms Implemented in PyTorch