Introduction
Creating precise machine learning models capable of identifying and locating multiple objects in a single image remains a core challenge in computer vision. However, with recent advancements in deep learning, object detection applications are easier to develop than ever before. The TensorFlow Object Detection API is an open-source framework built on top of TensorFlow that allows for easy construction, training, and deployment of object detection models.
What is Object Detection?
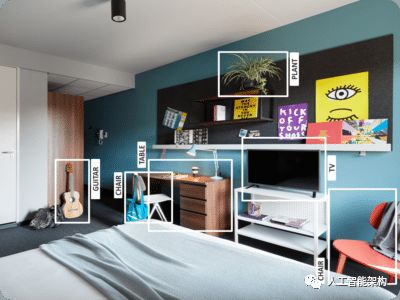
Object detection is the process of finding instances of real-world objects (such as cars, bicycles, televisions, flowers, and humans) in still images or videos. It allows for the identification, localization, and detection of multiple objects in an image, enabling better understanding of the entire image. It is commonly used in applications such as image retrieval, security, surveillance, and advanced driver-assistance systems (ADAS).
Object detection can be accomplished through various methods:
-
Feature-based Object Detection
-
Viola-Jones Object Detection
-
SVM Classification with HOG Features
-
Deep Learning Object Detection
In this object detection tutorial, we will focus on deep learning object detection, as TensorFlow uses deep learning for computation.
Applications of Object Detection
Facial Recognition
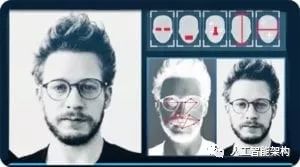
A group of researchers at Facebook developed a deep learning facial recognition system called “DeepFace” that can recognize faces in digital images with very limited input. Google uses its own facial recognition system in Google Photos, which automatically isolates all photos based on the people in them. Facial recognition involves various components, such as eyes, nose, mouth, and eyebrows.
People Counting

Object detection can also be used for people counting. It is used to analyze foot traffic in malls and tourist attractions during holidays. This is a very important application, as this functionality can be used for various purposes during crowd gatherings.
Industrial Quality Inspection

Object detection is also used in industrial processes to identify products. Visually inspecting for specific objects is a fundamental task involved in multiple industrial processes such as sorting, quality management, and packaging.
Inventory management can be quite tricky as items are hard to track in real-time. Automated object counting and localization can improve inventory accuracy.
Self-Driving Cars
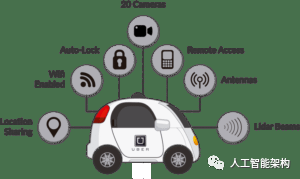
Self-driving cars are the trend of the future, combining various technologies to perceive the surrounding environment, including radar, laser, GPS, ranging, and computer vision.
Advanced control systems interpret sensory information to identify appropriate navigation paths and obstacles, and once the image sensors detect any biological signs in its path, it will stop automatically, a situation that occurs very quickly, making the leap forward in autonomous driving.
Security

Object detection plays a crucial role in security. Whether it’s Apple’s facial ID or retinal scans used in all sci-fi movies.
Governments also use it to match with existing databases to find any criminals or detect vehicles of robbers.
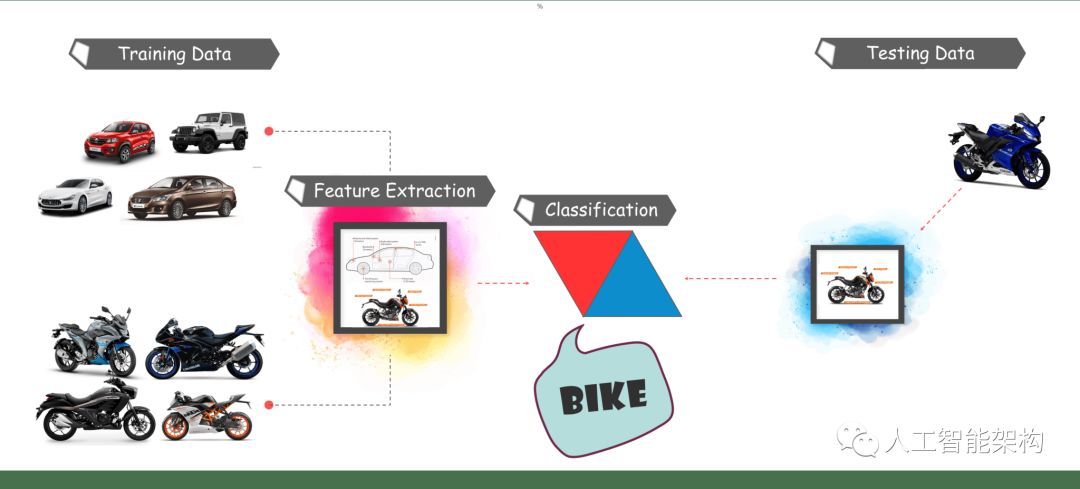
Object Detection Workflow
Each object detection algorithm works differently, but they all operate on the same principle.
Feature Extraction: They extract features from the input image and use these features to determine the category of the image. Through MatLab, OpenCV, Viola-Jones, or deep learning.
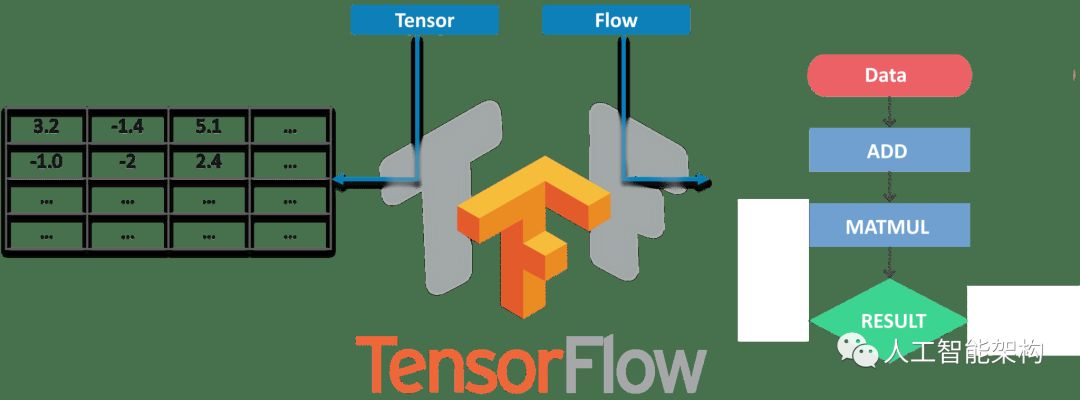
What is TensorFlow?
TensorFlow is Google’s open-source machine learning framework for data flow programming across a range of tasks. The nodes in the graph represent mathematical operations, while the edges of the graph represent multidimensional data arrays that communicate between them.
Object Detection Tutorial
Prerequisites
Before the demonstration, take a look at what needs to be prepared:
-
Python
-
TensorFlow
-
TensorBoard
-
Protobuf v3.4 or higher
Setting Up the Environment
To download TensorFlow and TensorFlow GPU, you can use pip or conda commands:
1# For CPU
2pip install tensorflow
3# For GPU
4pip install tensorflow-gpu
For other libraries, you can also use pip or conda to install, as shown below:
1pip install --user Cython
2pip install --user contextlib2
3pip install --user pillow
4pip install --user lxml
5pip install --user jupyter
6pip install --user matplotlib
Next, we have Protobuf: Protocol Buffers, which is Google’s extensible method for serializing structured data. It can be thought of as XML but smaller, faster, and simpler.
For simplicity, we will keep the “models” and “protobuf” under a folder named “Tensorflow”. Next, we need to enter the TensorFlow folder and run the protobuf using the command:
1"path_of_protobuf's bin"./bin/protoc object_detection/protos/
To check if it is valid, you can go to models> object_detection> protos folder, where you should see that each proto file has created a python file.
Main Code

After setting up the environment, navigate to the directory and create a new python file. You can use Spyder or Jupyter to write the code.
First, import all the libraries.
 1import numpy as np
 2import os
 3import six.moves.urllib as urllib
 4import sys
 5import tarfile
 6import tensorflow as tf
 7import zipfile
 8from collections import defaultdict
 9from io import StringIO
10from matplotlib import pyplot as plt
11from PIL import Image
12sys.path.append("..")
13from object_detection.utils import ops as utils_ops
14from utils import label_map_util
15from utils import visualization_utils as vis_util
Next, we will download the model trained on the COCO dataset. COCO stands for Common Objects in Context, and this dataset contains around 330K labeled images. Choosing the model is very important as it requires a trade-off between speed and accuracy. You must choose the right model based on your needs and system memory.
“models> research> object_detection> g3doc> detection_model_zoo” contains all models with different speeds and accuracies.
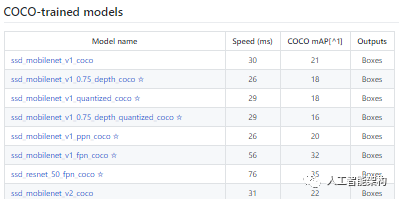
Next, we provide the required model and frozen inference graph generated by TensorFlow.
1MODEL_NAME = 'ssd_mobilenet_v1_coco_2017_11_17'
2MODEL_FILE = MODEL_NAME + '.tar.gz'
3DOWNLOAD_BASE = 'http://download.tensorflow.org/models/object_detection/'
4PATH_TO_CKPT = MODEL_NAME + '/frozen_inference_graph.pb'
5PATH_TO_LABELS = os.path.join('data', 'mscoco_label_map.pbtxt')
6NUM_CLASSES = 90
This code will download the model from the internet and extract the frozen inference graph of that model.
 1opener = urllib.request.URLopener()
 2opener.retrieve(DOWNLOAD_BASE + MODEL_FILE, MODEL_FILE)
 3tar_file = tarfile.open(MODEL_FILE)
 4for file in tar_file.getmembers():
 5  file_name = os.path.basename(file.name)
 6  if 'frozen_inference_graph.pb' in file_name:
 7    tar_file.extract(file, os.getcwd())
 8detection_graph = tf.Graph()
 9with detection_graph.as_default():
10  od_graph_def = tf.GraphDef()
11  with tf.gfile.GFile(PATH_TO_CKPT, 'rb') as fid:
12    serialized_graph = fid.read()
13    od_graph_def.ParseFromString(serialized_graph)
14    tf.import_graph_def(od_graph_def, name='')
Next, we will load all the labels
1label_map = label_map_util.load_labelmap(PATH_TO_LABELS)
2categories = label_map_util.convert_label_map_to_categories(label_map, max_num_classes=NUM_CLASSES, use_display_name=True)
3category_index = label_map_util.create_category_index(categories)
Now we will convert the image data into a NumPy array for processing
1def load_image_into_numpy_array(image):
2  (im_width, im_height) = image.size
3  return np.array(image.getdata()).reshape(
4      (im_height, im_width, 3)).astype(np.uint8)
Here we define the image path for testing purposes, where for i (1 to n+1), there is a naming convention of “image[i]”, n is the number of images provided.
1PATH_TO_TEST_IMAGES_DIR = 'test_images'
2TEST_IMAGE_PATHS = [ os.path.join(PATH_TO_TEST_IMAGES_DIR, 'image{}.jpg'.format(i)) for i in range(1, 8) ]
This code runs inference on a single image, where it detects objects, draws boxes, and provides the class and score for that specific object.
 1def run_inference_for_single_image(image, graph):
 2  with graph.as_default():
 3    with tf.Session() as sess:
 4    # Get handles to input and output tensors
 5      ops = tf.get_default_graph().get_operations()
 6      all_tensor_names = {output.name for op in ops for output in op.outputs}
 7      tensor_dict = {}
 8      for key in [
 9          'num_detections', 'detection_boxes', 'detection_scores',
10          'detection_classes', 'detection_masks'
11     ]:
12        tensor_name = key + ':0'
13        if tensor_name in all_tensor_names:
14          tensor_dict[key] = tf.get_default_graph().get_tensor_by_name(
15            tensor_name)
16      if 'detection_masks' in tensor_dict:
17        # The following processing is only for single image
18        detection_boxes = tf.squeeze(tensor_dict['detection_boxes'], [0])
19        detection_masks = tf.squeeze(tensor_dict['detection_masks'], [0])
20        # Reframe is required to translate mask from box coordinates to image coordinates and fit the image size.
21        real_num_detection = tf.cast(tensor_dict['num_detections'][0], tf.int32)
22        detection_boxes = tf.slice(detection_boxes, [0, 0], [real_num_detection, -1])
23        detection_masks = tf.slice(detection_masks, [0, 0, 0], [real_num_detection, -1, -1])
24        detection_masks_reframed = utils_ops.reframe_box_masks_to_image_masks(
25            detection_masks, detection_boxes, image.shape[0], image.shape[1])
26        detection_masks_reframed = tf.cast(
27            tf.greater(detection_masks_reframed, 0.5), tf.uint8)
28        # Follow the convention by adding back the batch dimension
29        tensor_dict['detection_masks'] = tf.expand_dims(
30            detection_masks_reframed, 0)
31        image_tensor = tf.get_default_graph().get_tensor_by_name('image_tensor:0')
32        # Run inference
33        output_dict = sess.run(tensor_dict,
34            feed_dict={image_tensor: np.expand_dims(image, 0)})
35        # all outputs are float32 numpy arrays, so convert types as appropriate
36        output_dict['num_detections'] = int(output_dict['num_detections'][0])
37        output_dict['detection_classes'] = output_dict[
38          'detection_classes'][0].astype(np.uint8)
39        output_dict['detection_boxes'] = output_dict['detection_boxes'][0]
40        output_dict['detection_scores'] = output_dict['detection_scores'][0]
41        if 'detection_masks' in output_dict:
42          output_dict['detection_masks'] = output_dict['detection_masks'][0]
43return output_dict
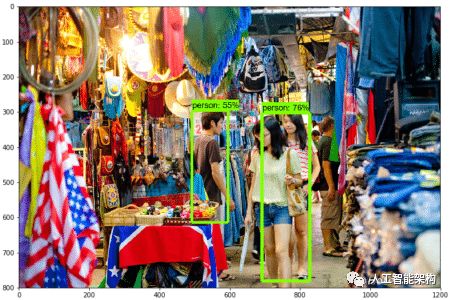
Our final loop will call all the functions defined above, performing inference on all input images one by one, providing us with the output of the images where objects are detected with labels and percentage/scores similar to the training data.
 1for image_path in TEST_IMAGE_PATHS:
 2  image = Image.open(image_path)
 3  # the array based representation of the image will be used later in order to prepare the
 4  # result image with boxes and labels on it.
 5  image_np = load_image_into_numpy_array(image)
 6  # Expand dimensions since the model expects images to have shape: [1, None, None, 3]
 7  image_np_expanded = np.expand_dims(image_np, axis=0)
 8  # Actual detection.
 9  output_dict = run_inference_for_single_image(image_np, detection_graph)
10  # Visualization of the results of a detection.
11  vis_util.visualize_boxes_and_labels_on_image_array(
12      image_np,
13      output_dict['detection_boxes'],
14      output_dict['detection_classes'],
15      output_dict['detection_scores'],
16      category_index,
17      instance_masks=output_dict.get('detection_masks'),
18      use_normalized_coordinates=True,
19      line_thickness=8)
20plt.figure(figsize=IMAGE_SIZE)
21plt.imshow(image_np)

Now, let’s see how to detect objects in real-time video.
Real-Time Object Detection with TensorFlow
For this demonstration, we will use the same code but adjust a few things to use OpenCV and the camera module for real-time feedback from the webcam to detect objects.
Add the OpenCV library and the camera for capturing images by simply adding the following lines to the import library section.
1import cv2
2cap = cv2.VideoCapture(0)
We do not need to load images from the directory and convert them to NumPy arrays as OpenCV will handle that for us.
1for image_path in TEST_IMAGE_PATHS:
2image = Image.open(image_path)
3# the array based representation of the image will be used later in order to prepare the
4# result image with boxes and labels on it.
5image_np = load_image_into_numpy_array(image)
With this:
1while True:
2ret, image_np = cap.read()
We will not use matplotlib for displaying the final image; we will use OpenCV instead.
1cv2.imshow('object detection', cv2.resize(image_np, (800,600)))
2if cv2.waitKey(25) & 0xFF == ord('q'):
3  cv2.destroyAllWindows()
4  break
OpenCV will open a new window named “Object_Detection” with a size of “800*600” using the previously initialized camera object. The camera will wait for 25ms to display the image; otherwise, it will close the window.
All changes made to the final code:
 1import numpy as np
 2import os
 3import six.moves.urllib as urllib
 4import sys
 5import tarfile
 6import tensorflow as tf
 7import zipfile
 8from collections import defaultdict
 9from io import StringIO
10from matplotlib import pyplot as plt
11from PIL import Image
12import cv2
13cap = cv2.VideoCapture(0)
14sys.path.append("..")
15from utils import label_map_util
16from utils import visualization_utils as vis_util
17MODEL_NAME = 'ssd_mobilenet_v1_coco_11_06_2017'
18MODEL_FILE = MODEL_NAME + '.tar.gz'
19DOWNLOAD_BASE = 'http://download.tensorflow.org/models/object_detection/'
20# Path to frozen detection graph. This is the actual model that is used for the object detection.
21PATH_TO_CKPT = MODEL_NAME + '/frozen_inference_graph.pb'
22# List of the strings that is used to add correct label for each box.
23PATH_TO_LABELS = os.path.join('data', 'mscoco_label_map.pbtxt')
24NUM_CLASSES = 90
25opener = urllib.request.URLopener()
26opener.retrieve(DOWNLOAD_BASE + MODEL_FILE, MODEL_FILE)
27tar_file = tarfile.open(MODEL_FILE)
28for file in tar_file.getmembers():
29  file_name = os.path.basename(file.name)
30  if 'frozen_inference_graph.pb' in file_name:
31    tar_file.extract(file, os.getcwd())
32detection_graph = tf.Graph()
33with detection_graph.as_default():
34  od_graph_def = tf.GraphDef()
35  with tf.gfile.GFile(PATH_TO_CKPT, 'rb') as fid:
36    serialized_graph = fid.read()
37    od_graph_def.ParseFromString(serialized_graph)
38    tf.import_graph_def(od_graph_def, name='')
39label_map = label_map_util.load_labelmap(PATH_TO_LABELS)
40categories = label_map_util.convert_label_map_to_categories(label_map, max_num_classes=NUM_CLASSES, use_display_name=True)
41category_index = label_map_util.create_category_index(categories)
42with detection_graph.as_default():
43  with tf.Session(graph=detection_graph) as sess:
44    while True:
45    ret, image_np = cap.read()
46    # Expand dimensions since the model expects images to have shape: [1, None, None, 3]
47    image_np_expanded = np.expand_dims(image_np, axis=0)
48    image_tensor = detection_graph.get_tensor_by_name('image_tensor:0')
49    # Each box represents a part of the image where a particular object was detected.
50    boxes = detection_graph.get_tensor_by_name('detection_boxes:0')
51    # Each score represent how level of confidence for each of the objects.
52    # Score is shown on the result image, together with the class label.
53    scores = detection_graph.get_tensor_by_name('detection_scores:0')
54    classes = detection_graph.get_tensor_by_name('detection_classes:0')
55    num_detections = detection_graph.get_tensor_by_name('num_detections:0')
56    # Actual detection.
57    (boxes, scores, classes, num_detections) = sess.run(
58      [boxes, scores, classes, num_detections],
59      feed_dict={image_tensor: image_np_expanded})
60    # Visualization of the results of a detection.
61    vis_util.visualize_boxes_and_labels_on_image_array(
62        image_np,
63        np.squeeze(boxes),
64        np.squeeze(classes).astype(np.int32),
65        np.squeeze(scores),
66        category_index,
67        use_normalized_coordinates=True,
68        line_thickness=8)
69    cv2.imshow('object detection', cv2.resize(image_np, (800,600)))
70    if cv2.waitKey(25) & 0xFF == ord('q'):
71      cv2.destroyAllWindows()
72      break
Conclusion
I hope you enjoyed this article and now understand the powerful capabilities of TensorFlow, as well as how easy it is to detect objects in images and real-time videos. The key to mastering a technology is to practice hands-on.
Long press to subscribe for more exciting content ▼