
” Click the above “GameLook” ↑↑↑, Subscribe to WeChat “
As the capabilities of generative AI technology improve, more and more peers are focusing on enhancing research and development efficiency through AI models. There are many popular AI models in the industry, such as the drawing tool Midjourney, the versatile Stable Diffusion, and OpenAI’s recently iterated DALL-E 2. Except for the latter which has a limited user base, both of the former have many developers trying them out.
However, for R&D teams, despite Midjourney’s powerful features and no need for local installation, it has high hardware performance requirements, and even the same command may yield different results each time. In contrast, Stable Diffusion, which is feature-rich, open-source, fast in operation, and has low energy and memory consumption, has become a more ideal choice.
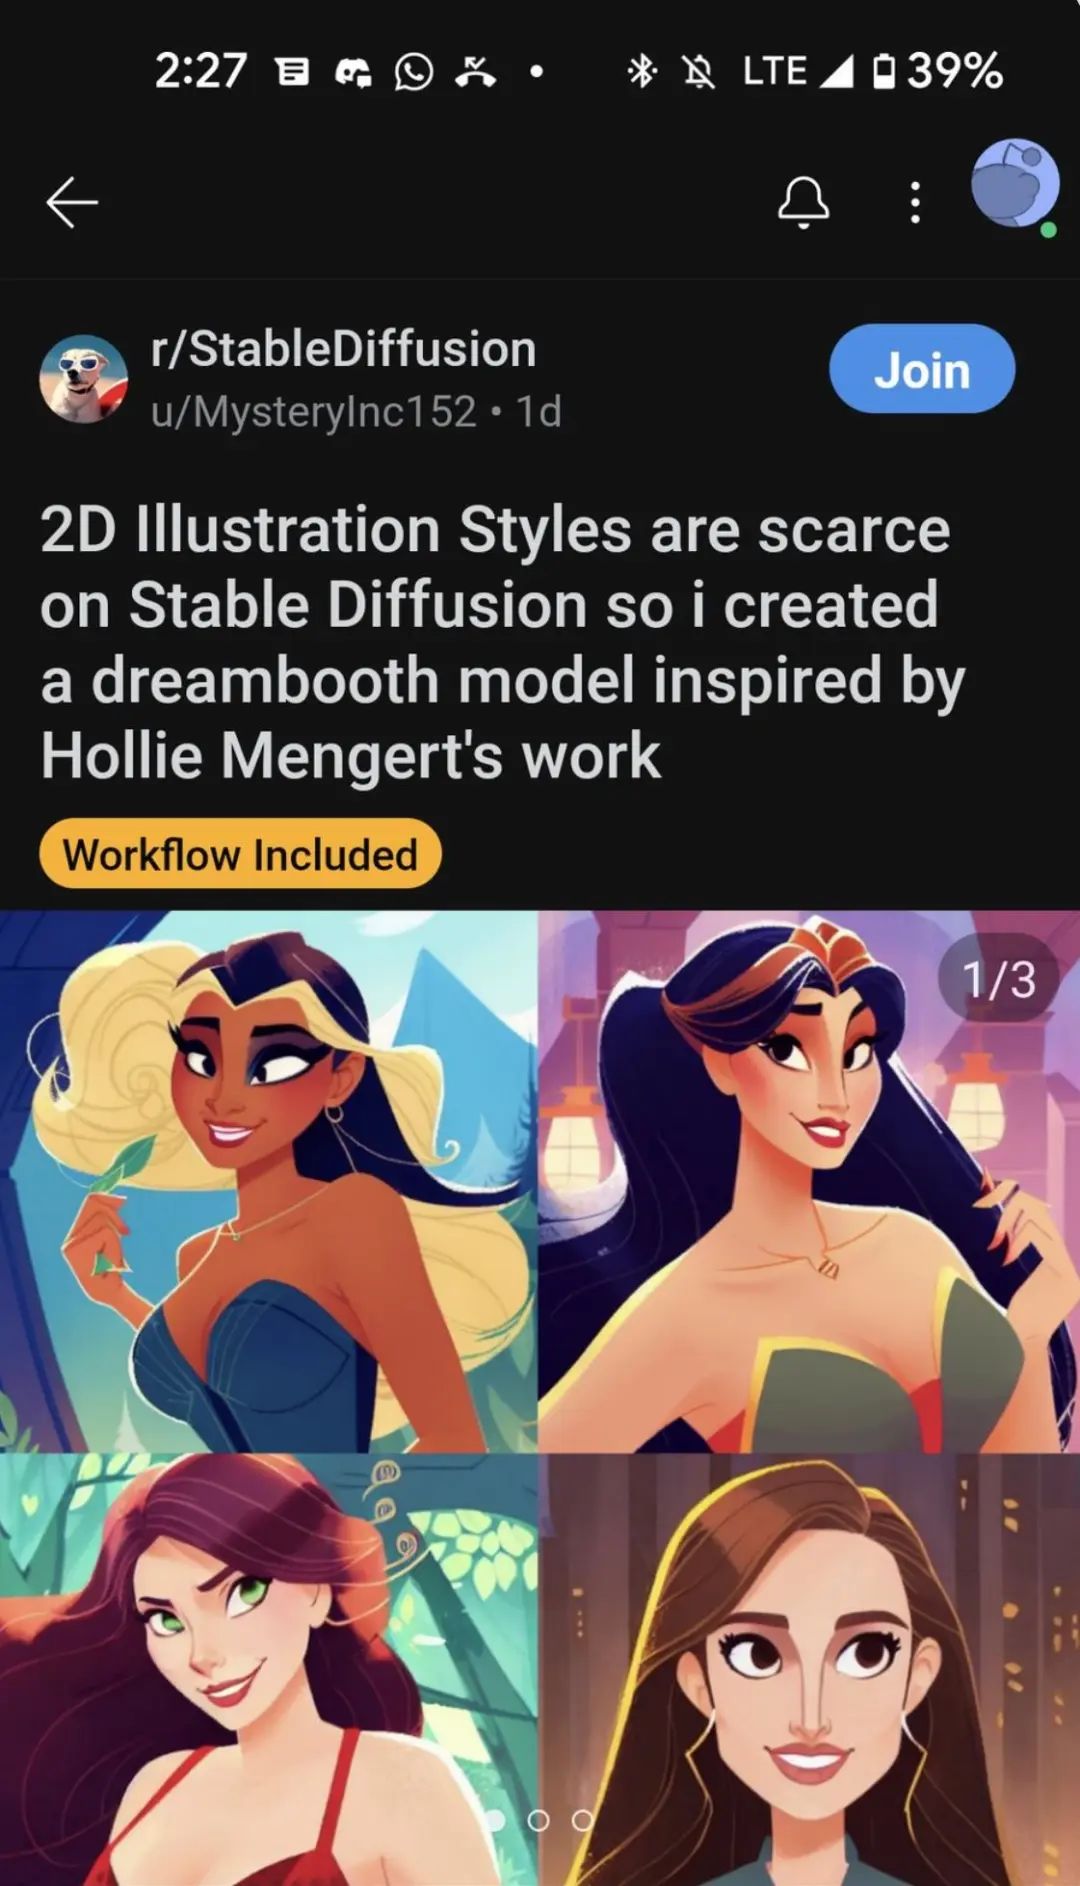
Recently, someone even trained an AI using Stable Diffusion and Dreambooth that can imitate the style of human illustrators with just 32 works, producing art pieces identical to the illustrator Hollie Mengert’s style.
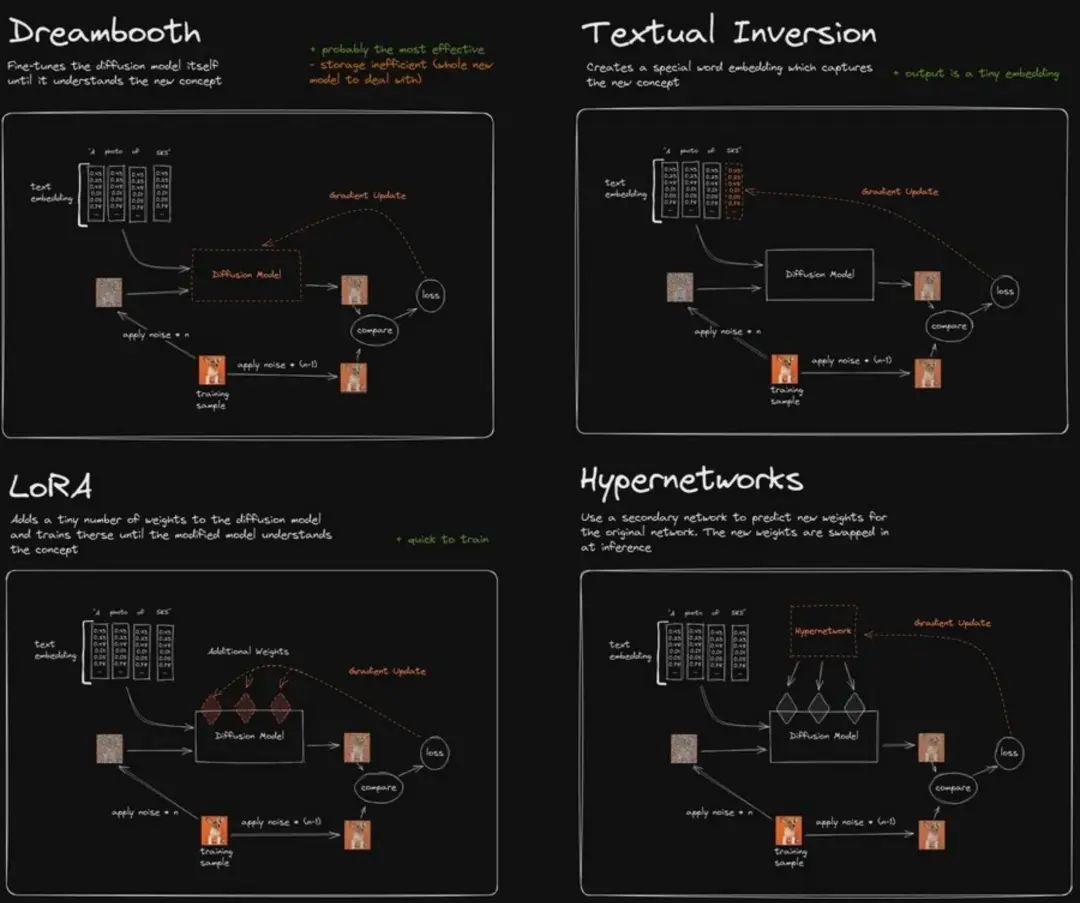
Currently, there are four main methods for training Stable Diffusion models: Dreambooth, Textual Inversion, LoRA, and Hypernetworks. So, what are the characteristics of these models? Which one is more suitable for developers?
Four Main AI Models for Stable Diffusion Training
Dreambooth
1. What is DreamBooth?
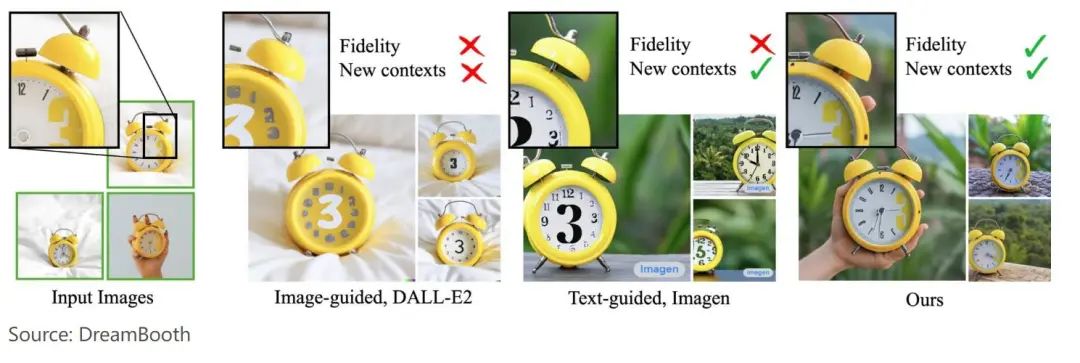
DreamBooth is a theme-driven AI generation model launched by Google, which can fine-tune text-to-image diffusion models or new image results. Dreambooth can accomplish some tasks that other diffusion models cannot or are not good at, such as DALL-E 2, Midjourney, and Stable Diffusion, which lack contextualization of themes.
Dreambooth has the capability to produce personalized results, including those generated by text-to-image models and any image input by the user.
2. How does Dreambooth work?
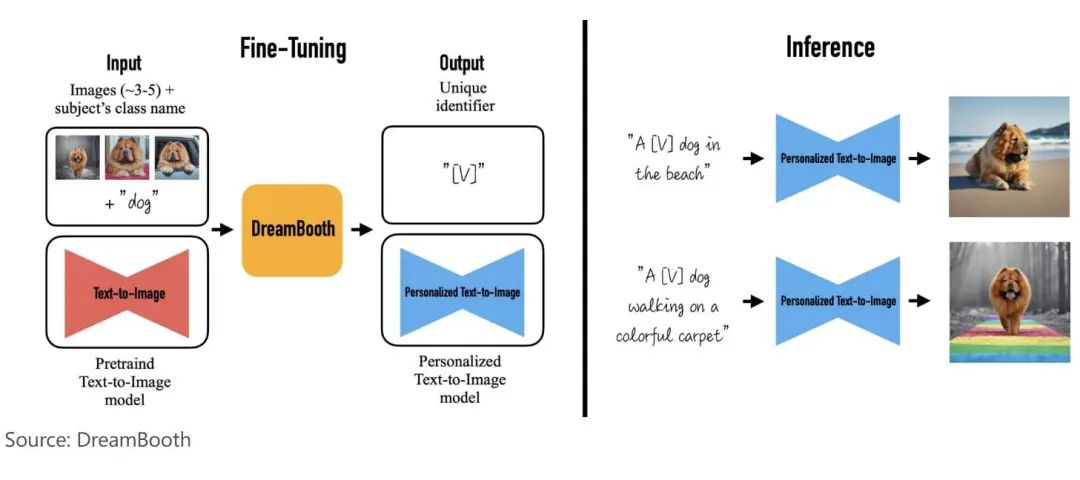
With just a few images as input (usually 3-5), Dreambooth can generate theme-based personalized images with different backgrounds, assisted by the adjusted Imagen and some other diffusion models. Once there are image inputs, the adjusted Imagen and other diffusion models find unique identifiers and associate them with the theme. During inference, the unique identifier is used to synthesize the theme in different contexts.
3. How to use it:
1) Prepare input images: If you want to turn yourself into AI art, prepare at least five clear photos and upload them to the Colab notebook according to the following steps. The more input photos, the better; if the number is low, the code itself will generate some input images for training.
Since there is no limit on the number of uploaded images, you can input any number of images. Take some medium-sized photos and full-size photos from different angles and lighting, and do not upload poorly lit or too dark photos. Of course, you can also train Dreambooth with celebrity photos.
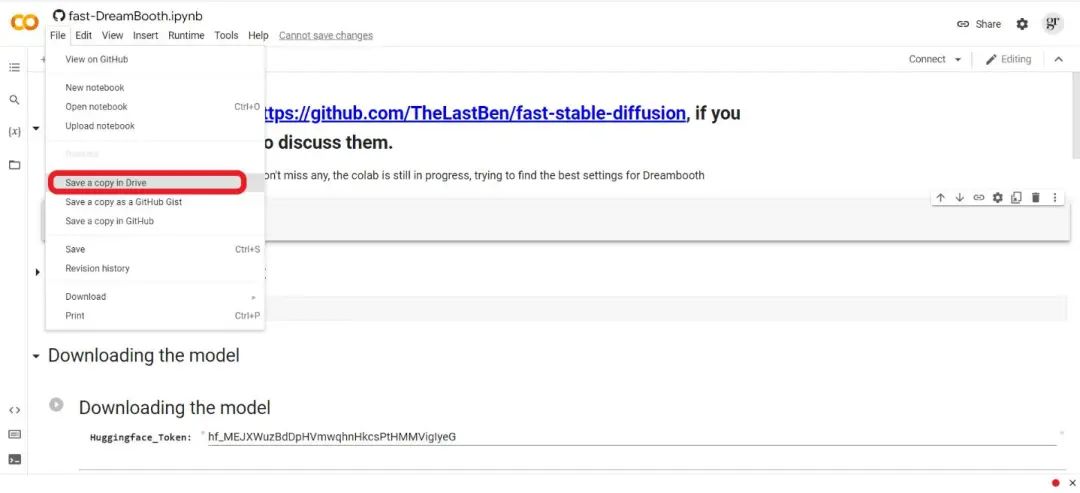
2) Go to Google Colab Notebook: Currently, there are three Colab Notebooks that can run Dreambooth with Stable Diffusion: Hugging Face, ShivamShirao, and TheLastBen.
Considering speed and pf VRAM usage, we will temporarily use TheLastBen Colab notebook for training and generating images. Open TheLastBen Colab notebook on your computer, click “File” and “Save a copy in Drive”.
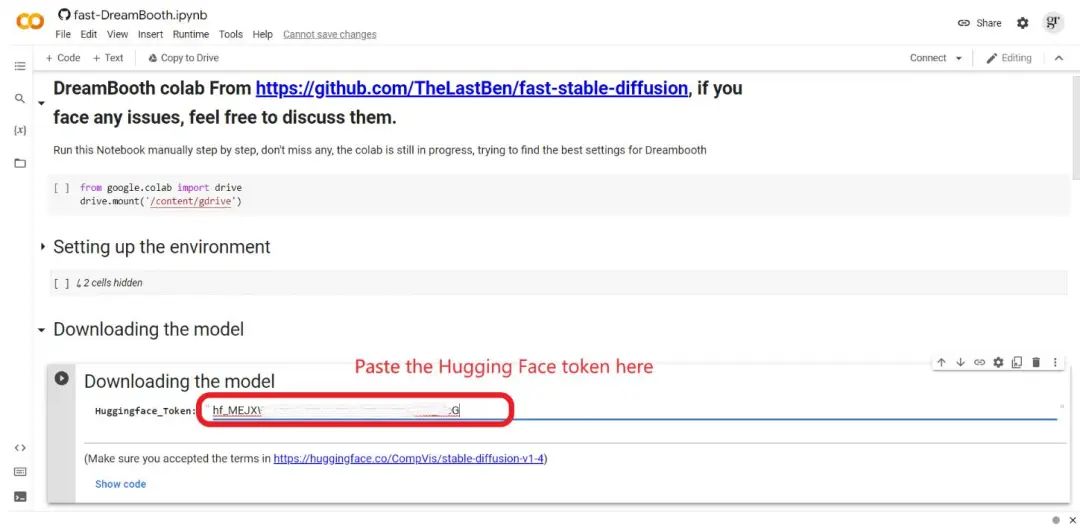
3) Obtain access token from Hugging Face: To use any Google Colab related to Dreambooth, you need to obtain an access token from Hugging Face.
Go to the Hugging Face website and register with your email address. Using a corporate email can help you find colleagues and join teams. Then, click on the “Profile icon” to enter the settings page, click “Access Token”, and then click “New Token” to create your access token.
When creating the token, you must choose the “Write” role; however, you can name the token whatever you like. Using a name related to the platform you want to access is a good practice, and here the platform is the Colab notebook. Finally, copy the token you created.

4) Run the Colab notebook: After opening the copied TheLastBen’s Colab notebook, click the Hugging Face link in the “Downloading the model” section, accept the terms, and then click “Access repository”.

Now, you can see the “Huggingface_Token” area under “Downloading the model”. Paste the token you copied in step three. Then you need to run each cell one by one, starting with the first cell and waiting for the green check mark before moving on to the next cell.
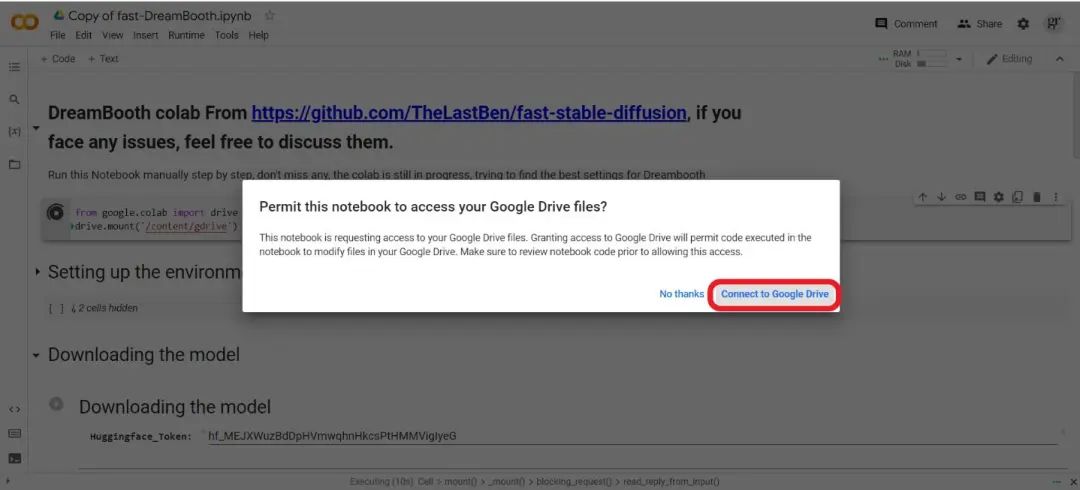
After running the first cell, you will see a permission request from Colab to connect to your Google Drive files; click “Connect to Google Drive”.
Before running the “Setting up” cell, make sure to input the theme name, instance name, and mention the number of images you want to train or upload.
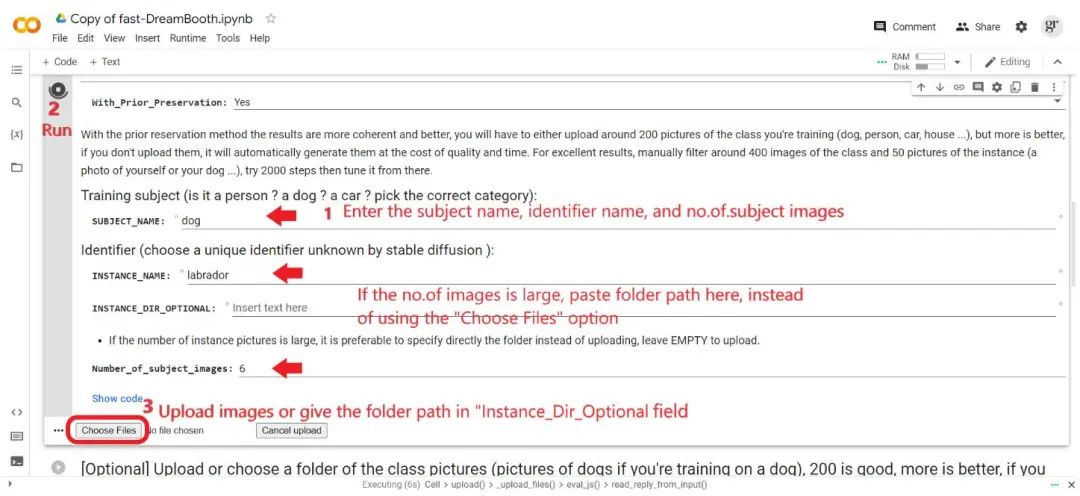
Then start running this cell, click the “Choose files” button. If the number of uploaded images is small, you can click this button; if the number is large, mention the folder URL in the “Instance_DIR_Optional” area.
Set the seventh cell as optional, then run the eighth cell “Start Dreambooth”; the last cell will take 30 to 90 minutes to complete.
5) Check the output images in Google Drive: Finally, check the AI-generated images in your Google Drive.

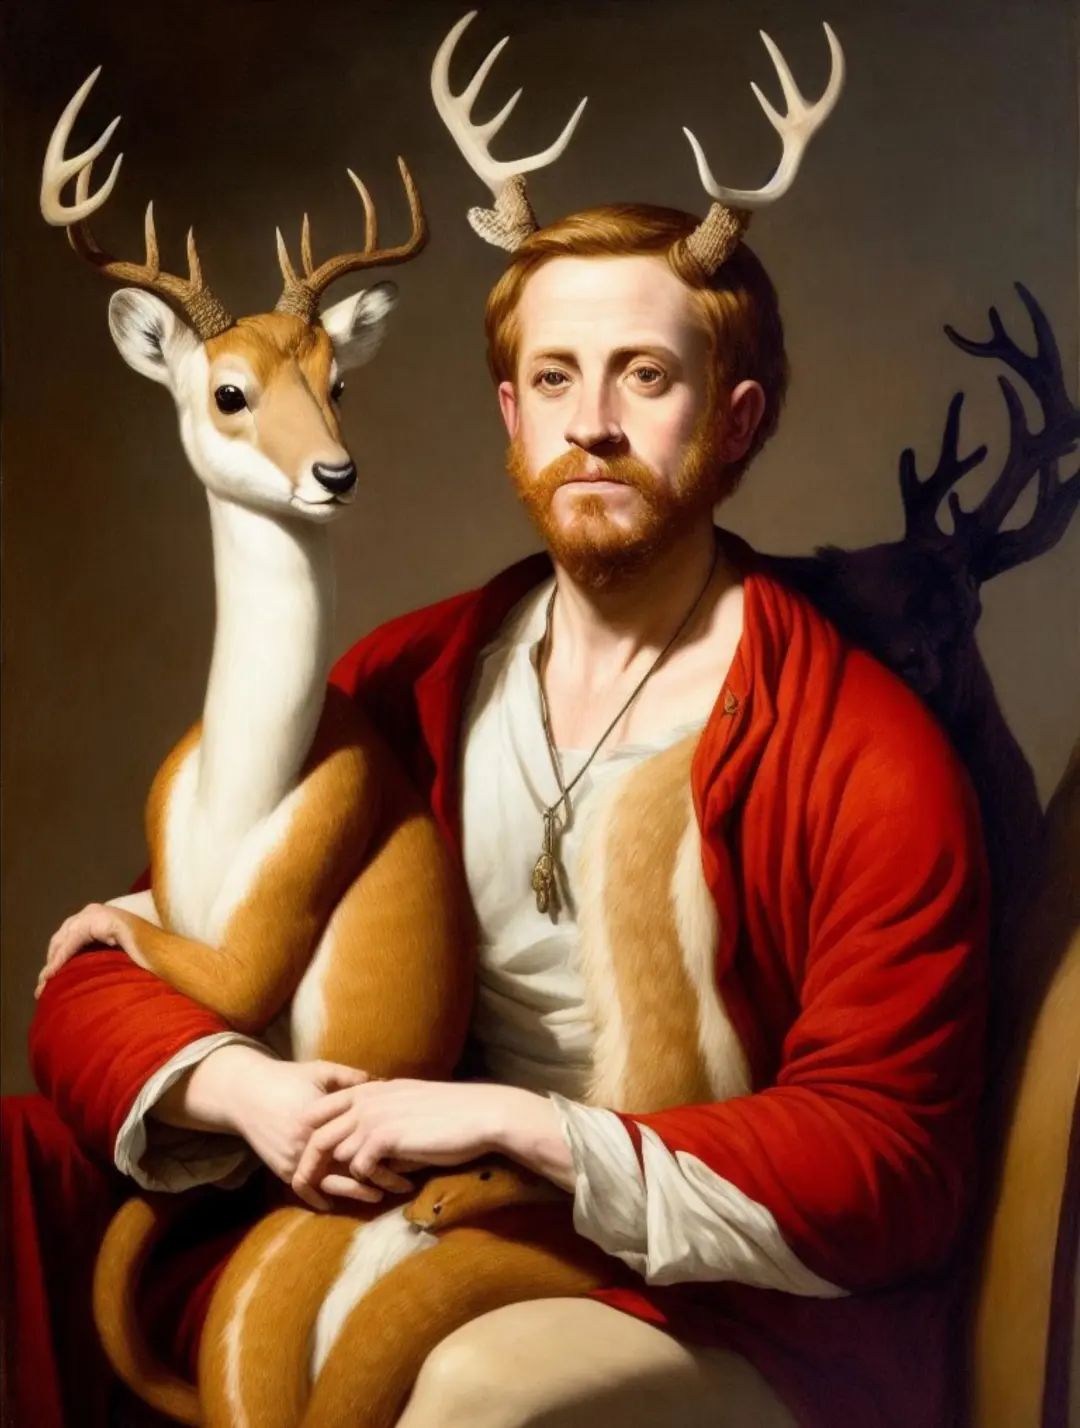

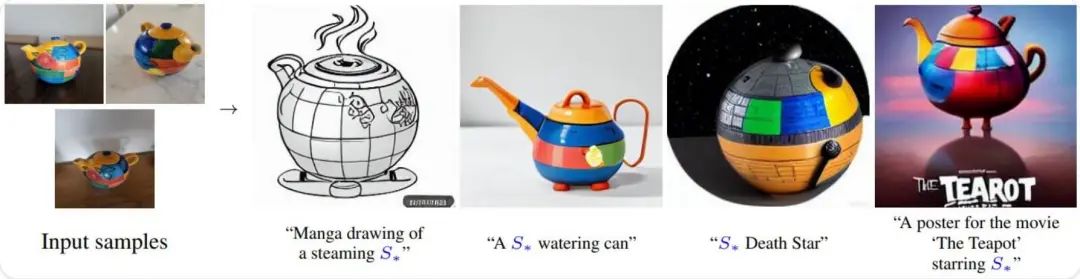
Images generated by users using Dreambooth
Textual Inversion
Textual Inversion is a technique for capturing new concepts from a small number of example images, which can then be used to control the text-to-image pipeline. It does this by learning new “words” in the embedding space of the text encoder in the pipeline. These special words can then be used in text prompts for fine-grained control over the generated images.
1. How does it work?
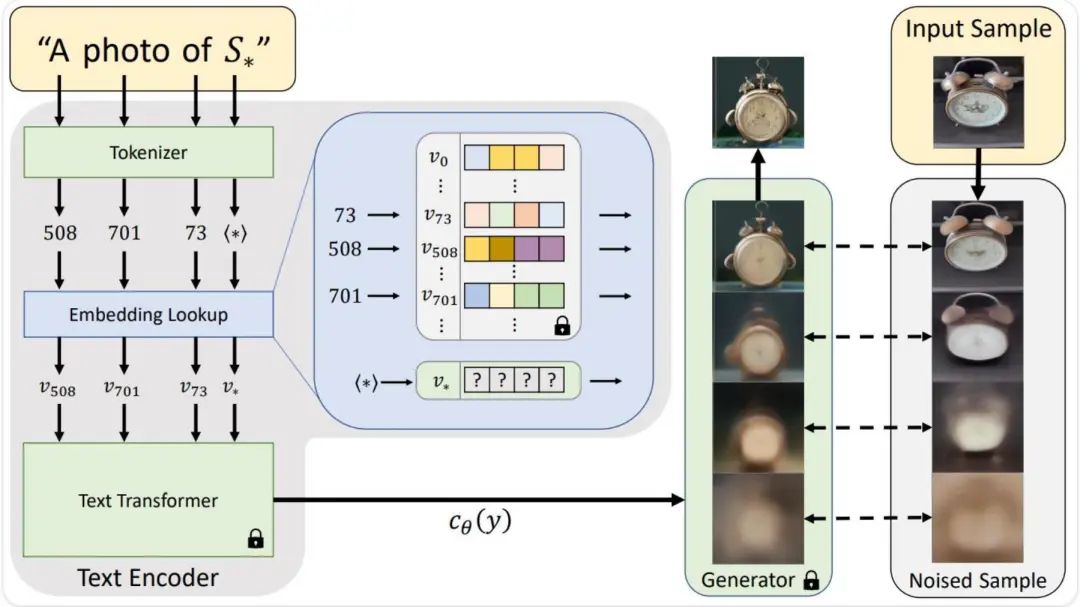
Before a text instruction is used for the diffusion model, it must first be processed into a numerical representation, which typically involves tokenizing the text, converting each token into an embedding, and then embedding it through the model (usually a transformer), whose output will be used as a condition for the diffusion model.
Textual Inversion learns a new flag embedding (i.e., V* in the above image). An instruction (including the flag to be mapped to this new embedding) is combined with a noisy version of one or more training images as input to the generator model, which attempts to predict the denoised version of the image. The embedding is optimized based on the model’s performance on this task, with better embeddings capturing the objects or styles shown in the training images providing more useful information to the diffusion model, thus reducing denoising loss. After many steps (usually thousands) and various instructions with image variants, the learned embedding should capture the essence of the new concept.
In addition to using your own trained concepts, the new Stable Diffusion public concept library also has community-created textual inversion training models that you can use. Over time, more examples will be added, making it a very useful resource.
2. Example: Running Locally
Here, the textual_inversion.py script demonstrates how to implement the training process and adapt it for Stable Diffusion.
Before running the script, ensure to install the training dependencies for the library
pip install diffusers[training] accelerate transformers
Then initialize an Accelerate environment with accelerate config
3. Cat Toy Example
Before downloading or using weights, you need to accept the model’s license. In this case, we use v1-4, so you need to access its card, read the license, and check to agree to the license.
You must be a registered user of Hugging Face Hub and obtain an access token for the code to work. Run the following command to verify your token:
huggingface-cli login
Download three or four images as training data, and then train using the following code:
export MODEL_NAME=”runwayml/stable-diffusion-v1-5″ export DATA_DIR=”path-to-dir-containing-images”
accelerate launch textual_inversion.py \–pretrained_model_name_or_path=$MODEL_NAME \–train_data_dir=$DATA_DIR \–learnable_property=”object” \–placeholder_token=”” –initializer_token=”toy” \–resolution=512 \–train_batch_size=1 \–gradient_accumulation_steps=4 \–max_train_steps=3000 \–learning_rate=5.0e-04 –scale_lr \–lr_scheduler=”constant” \–lr_warmup_steps=0 \–output_dir=”textual_inversion_cat”
Running a full training on a V100 GPU takes about an hour.
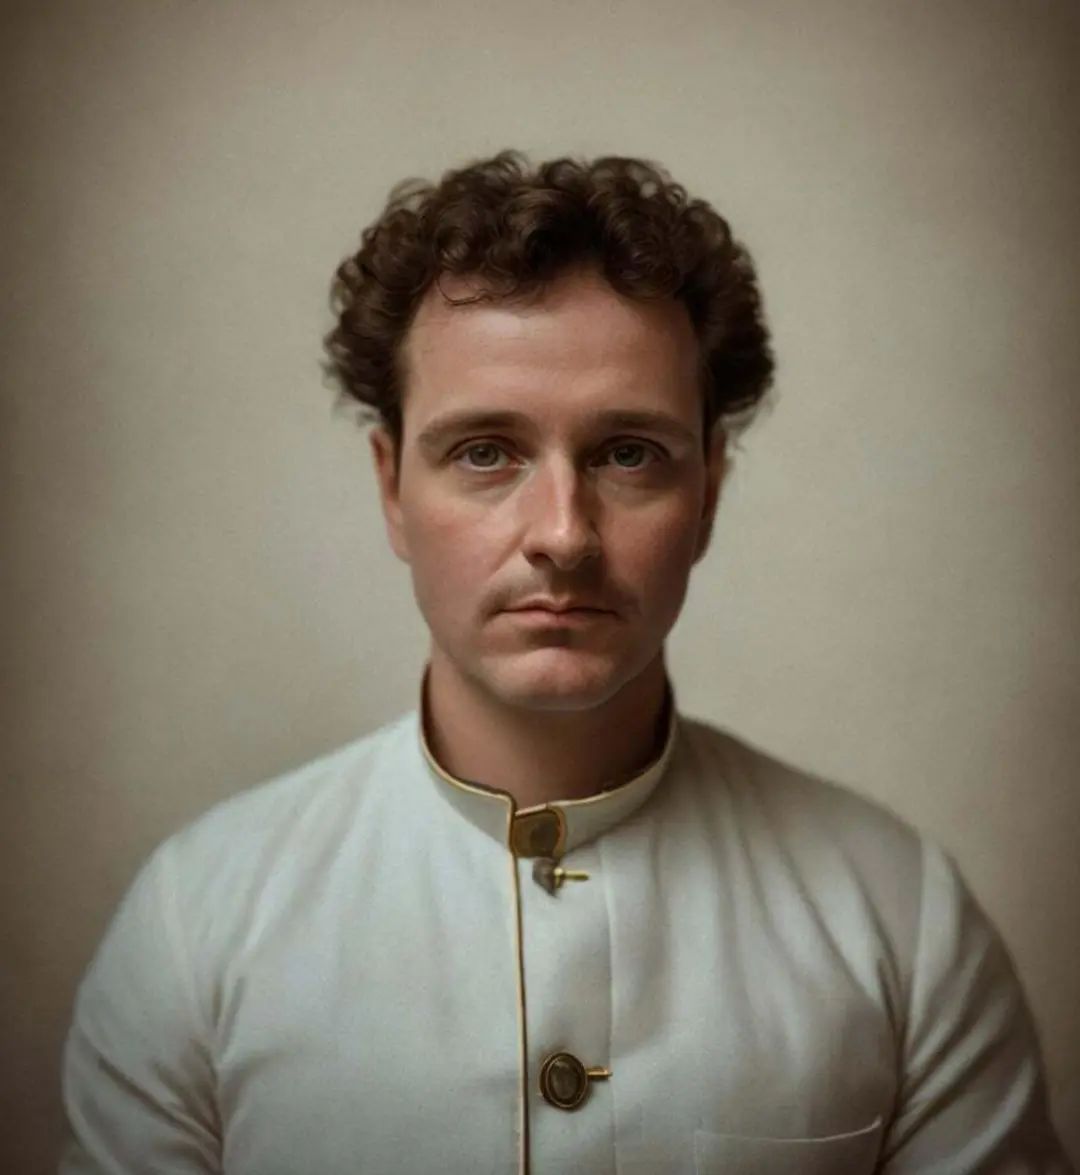
Images of Napoleon trained by users using Textual Inversion
Inference: Once a model has been trained with the above instructions, inference using StableDiffusionPipeline is quite simple. Ensure to include the placeholder_token in your instructions.
from diffusers import StableDiffusionPipeline
model_id = “path-to-your-trained-model” pipe = StableDiffusionPipeline.from_pretrained(model_id, torch_dtype=torch.float16).to(“cuda”)
prompt = “A backpack”
image = pipe(prompt, num_inference_steps=50, guidance_scale=7.5).images[0]
image.save(“cat-backpack.png”)
LoRA
LoRA stands for Low-Rank Adaptation, which is a low-order adaptation of large language models.
LoRA reduces the number of trainable parameters by learning rank-decomposition matrices while freezing the original weights. This greatly reduces the storage requirements of large language models for specific tasks and enables efficient task switching during deployment without incurring inference latency. LoRA also outperforms several other adaptive methods, such as adapters, prefix tuning, and fine-tuning.
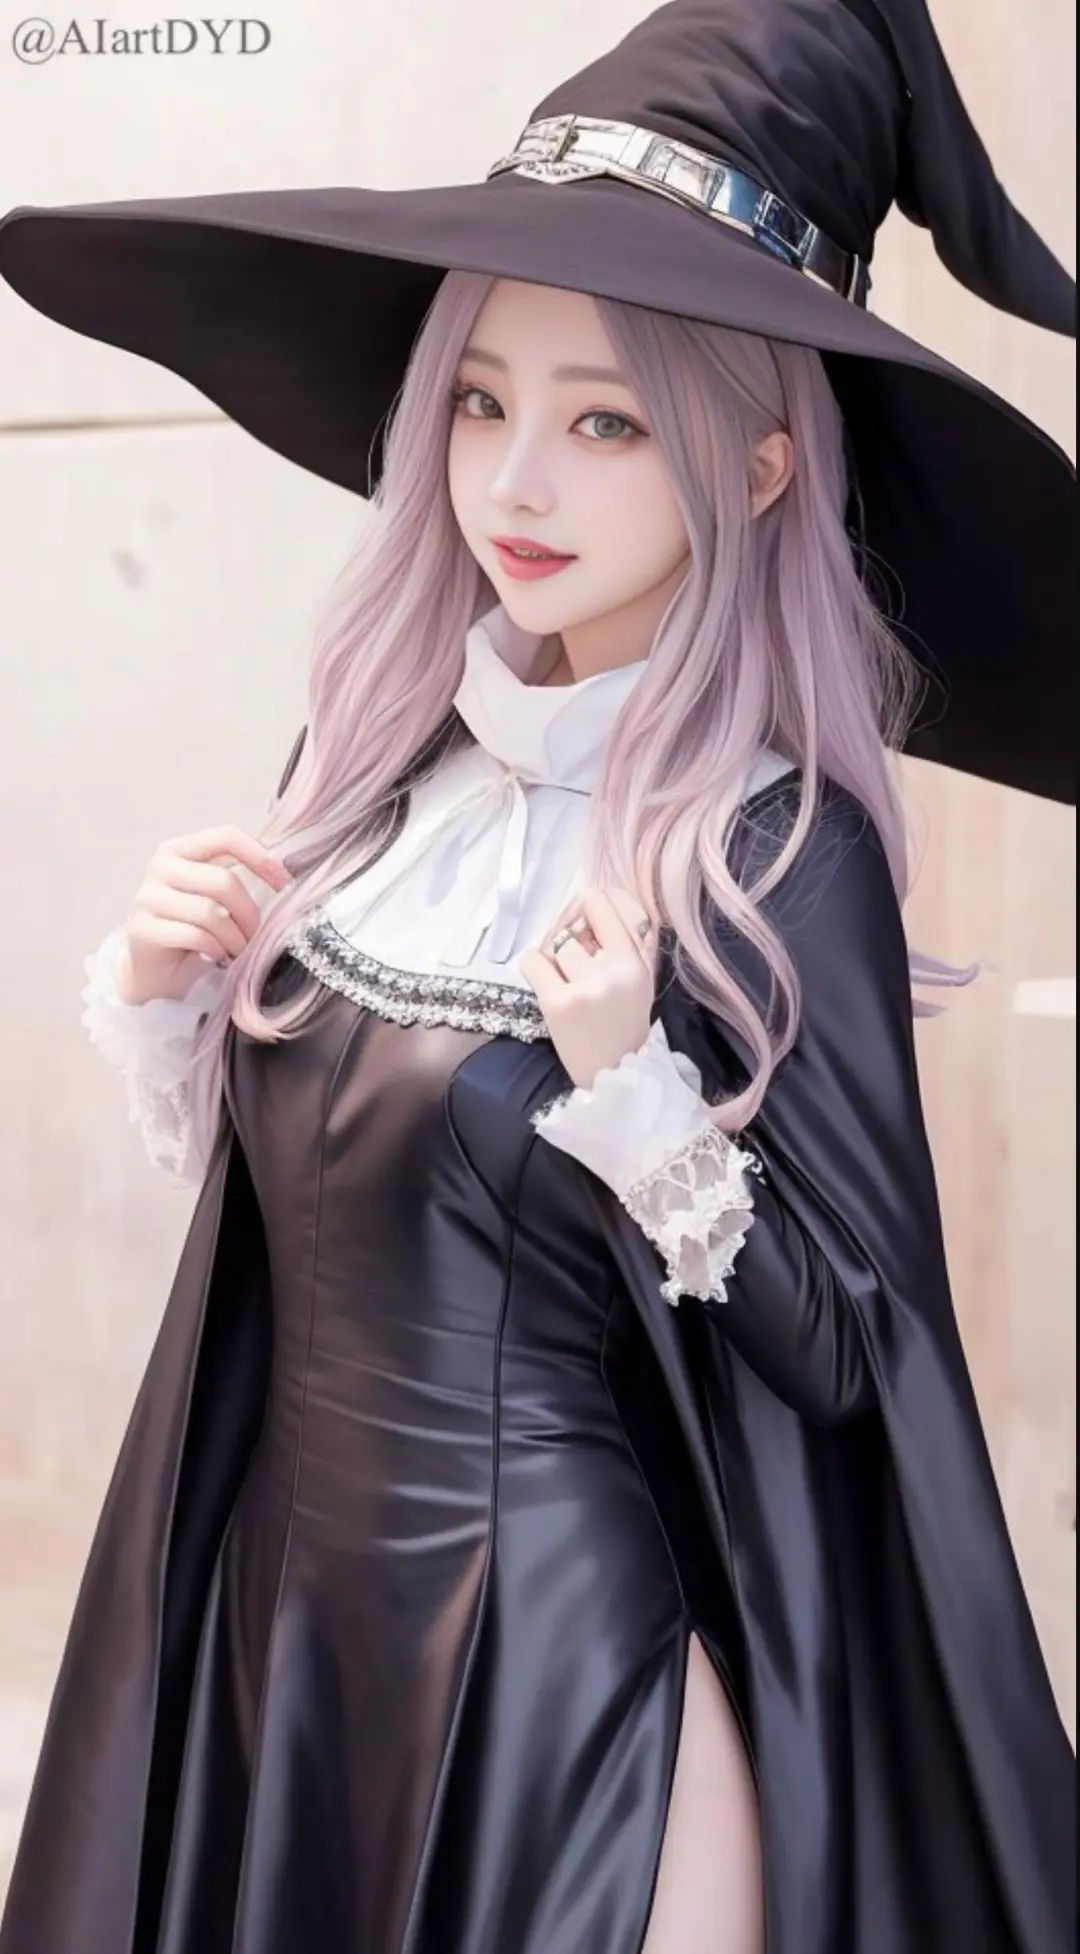
Images of witches generated by users using LoRA
Quick Start:
1) Installing loratlib is very simple:
pip install loralib # Alternatively # pip install git+https://github.com/microsoft/LoRA
2) You can choose to adjust by replacing certain layers with corresponding layers implemented in loralib, currently only supporting nn.Linear, nn.Embedding, and nn.Conv2d. For cases where a single nn.Linear represents multiple layers, we also support MergedLinear, as in some implementations of attention qkv mapping.
# ===== Before =====# layer = nn.Linear(in_features, out_features)
# ===== After ======import loralib as lora # Add a pair of low-rank adaptation matrices with rank r=16 layer = lora.Linear(in_features, out_features, r=16)
3) Before starting training, only mark LoRA parameters as trainable
import loralib as lora model = BigModel() # This sets requires_grad to False for all parameters without the string “lora_” in their names lora.mark_only_lora_as_trainable(model) # Training loop for batch in dataloader:…
4) When saving a checkpoint, generate a state_dict that only contains LoRA parameters.
# ===== Before =====# torch.save(model.state_dict(), checkpoint_path) # ===== After ===== torch.save(lora.lora_state_dict(model), checkpoint_path)
5) When using load_state_dict to load a checkpoint, ensure to set strict=False.
# Load the pretrained checkpoint first model.load_state_dict(torch.load(‘ckpt_pretrained.pt’), strict=False) # Then load the LoRA checkpoint model.load_state_dict(torch.load(‘ckpt_lora.pt’), strict=False)
Then training can proceed normally.
Hypernetwork
1. What is Hypernetwork?
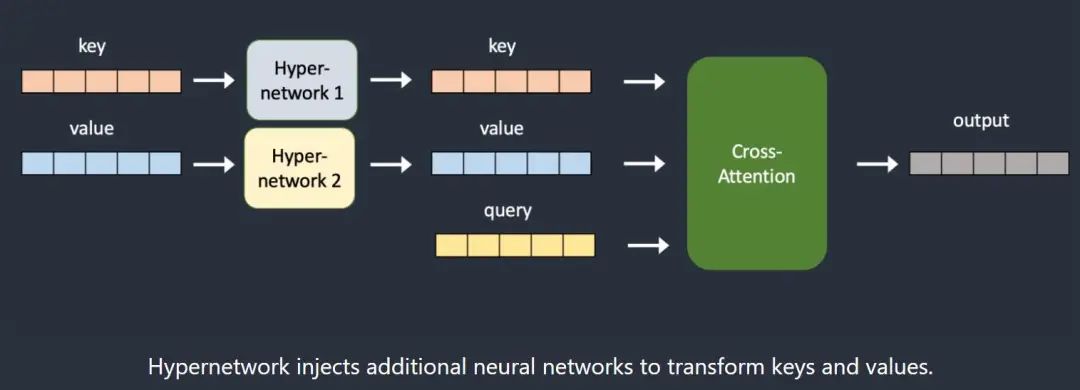
Hypernetwork is a fine-tuning technique originally developed by Novel AI; it is a small neural network connected to the Stable Diffusion model, used to modify its style. It is the most critical part of the Stable Diffusion model: the noise predictor’s cross-attention module.

Hypernetwork is usually a simple neural network: a fully connected linear network with dropout and activation, just like what you learned in a neural network introductory course. They hijack the cross-attention module by inserting two networks to transform the key and query vectors. Compare the original model architecture with the hijacked model architecture below:
During training, the Stable Diffusion model is locked, but the attached Hypernetwork can be changed. Because Hypernetwork is relatively small, training is very fast and requires limited resources, and it can be trained on the most ordinary computers.
Fast training and relatively small file size are the main attractions of Hypernetwork.
It is important to note that this is not the same as hypernetworks in traditional machine learning, which are networks that generate weights for other networks, different from those in 2016.
Hypernetwork files are usually under 200MB and cannot work independently; they need to generate images alongside a checkpoint model.
Hypernetwork is similar to LoRA; both are small and only modify the cross-attention module. The difference is that the latter modifies by changing weights, while Hypernetwork changes the cross-attention module by inserting an additional network. LoRA is a data storage method that does not define the training process, while Hypernetwork can define training.
2. How to use Hypernetwork
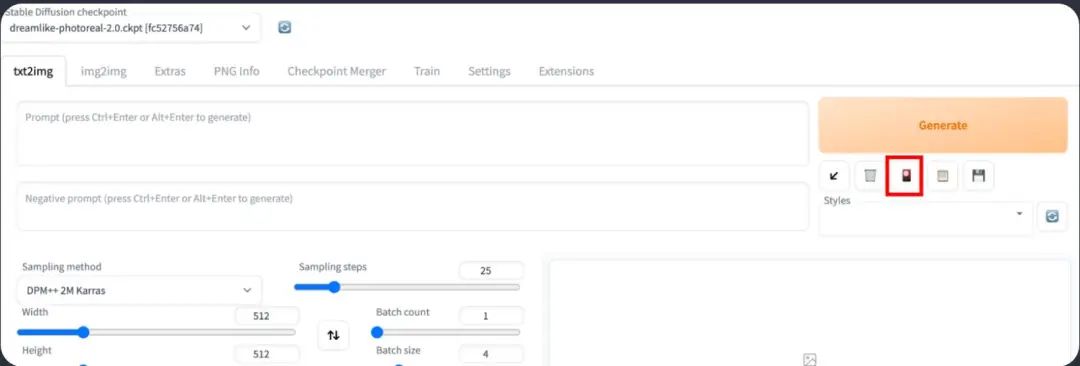
This section introduces how to use Hypernetwork in the AUTOMATIC1111 Stable Diffusion GUI, which you can use on Windows, Mac, or Google Colab.
1) Install a Hypernetwork model: To install a Hypernetwork model in the AUTOMATIC1111 webui, place the model file in the following folder:
stable-diffusion-webui/models/hypernetworks
2) Use a Hypernetwork model: To use Hypernetwork, put the following phrase in the instruction:
<hypernet:filename:multiplier>
filename is the name of the Hypernetwork file, excluding the extension (e.g., .pt, .bin, etc.).
multiplier is the weight applied to this Hypernetwork model; the default value is 1, and setting it to 0 disables the model.
How to determine the correct filename? You need to click the model button under the “Generate” button, rather than writing down this phrase.
Click the Hypernetwork tab to see the list of installed Hypernetworks; click the one you want to use, and the hypernet phrase will be inserted into the instruction.
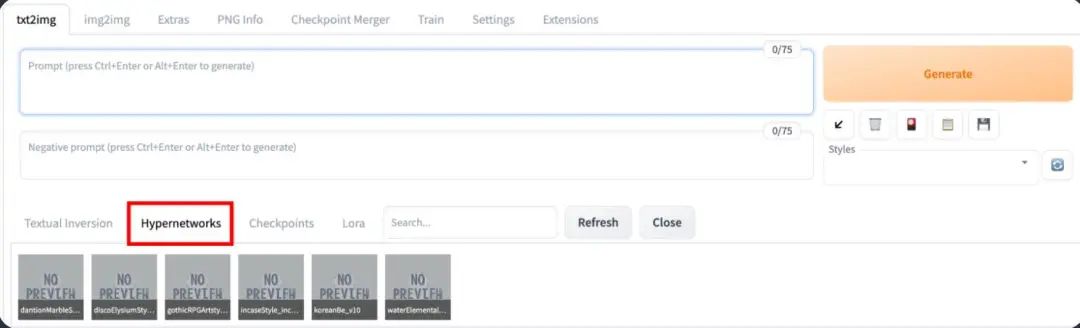
It is important to note that the hypernet phrase is not treated as part of the instruction; it merely indicates which hypernetwork to use. After the Hypernetwork is applied, this phrase will be removed, so you cannot use instruction syntax like [keyword1:keyword2:0.5] on them.
3) Test and generate art with the model: To have a higher success rate in obtaining the expected artistic style, you can initially use it with a trained model. But don’t stop there; some Hypernetworks require specific instructions or only apply to certain themes, so be sure to check the instruction examples on the model page to see what works best.
A suggestion here is: if you find the images a bit too saturated, it may be because you need to adjust the multiplier, which is easy to fix. Sometimes Stable Diffusion interferes with color saturation to achieve the goal, but lowering the multiplier can restore balance.

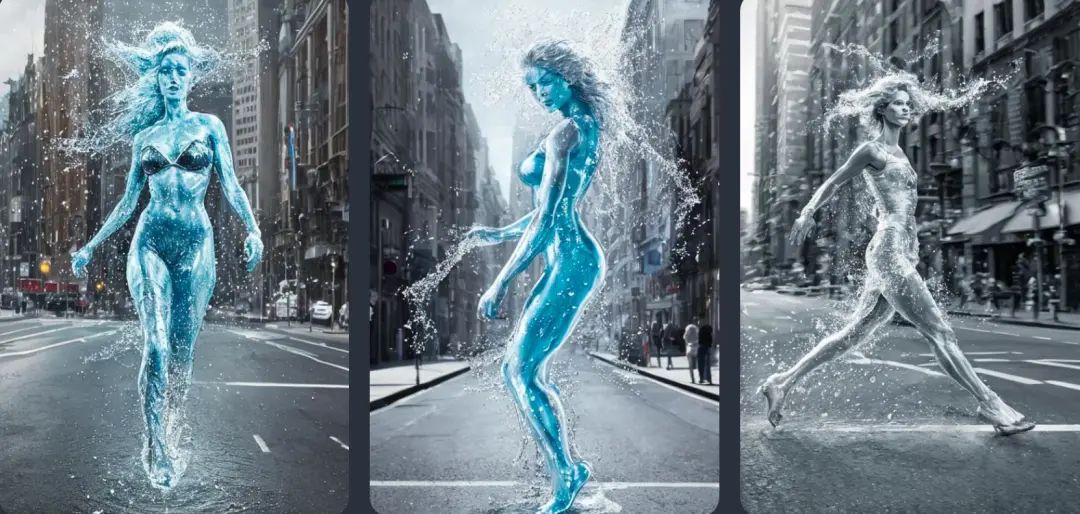
Images generated using Hypernetwork
Which one should you use?
Regarding which method to use, a developer conducted an in-depth comparison of the four models, discussing the differences between them and comparing their advantages and disadvantages.
Here is the complete content interpreted by Gamelook:
Between LoRA, Dreambooth, Textual Inversion, and Hypernetworks, which one should you use? To answer this question, I read all the papers and understood what people liked and disliked about these models. I made a table and a nice infographic, then answered this question.
For each model, we need to answer two questions: What is the method, and how does it work? Based on their respective advantages and disadvantages, what are the trade-offs they make?
All four methods work in a similar way, but let’s start with Dreambooth, as it may be the most straightforward. Its method actually involves changing the structure of the model itself. In Dreambooth, you have two inputs: the first is the concept you want to train; here we give an example of a photo of a Corgi (柯基狗), and in real life, you may have five or more images to train; the other is this sentence, which contains the unique identifier, in this case, SKS.
The whole idea of Dreambooth is that you teach the model to associate this unique identifier SKS with the concept Corgi. Furthermore, this involves converting this sentence into a text embedding, where each word is represented by a vector (a string of numbers, like floating-point numbers). Each word has a unique vector, and each vector contains some semantic information related to that word.
We won’t delve deeply into embeddings here, but simply put, some vectors contain art-related information, some are related to photos, and some are very random.
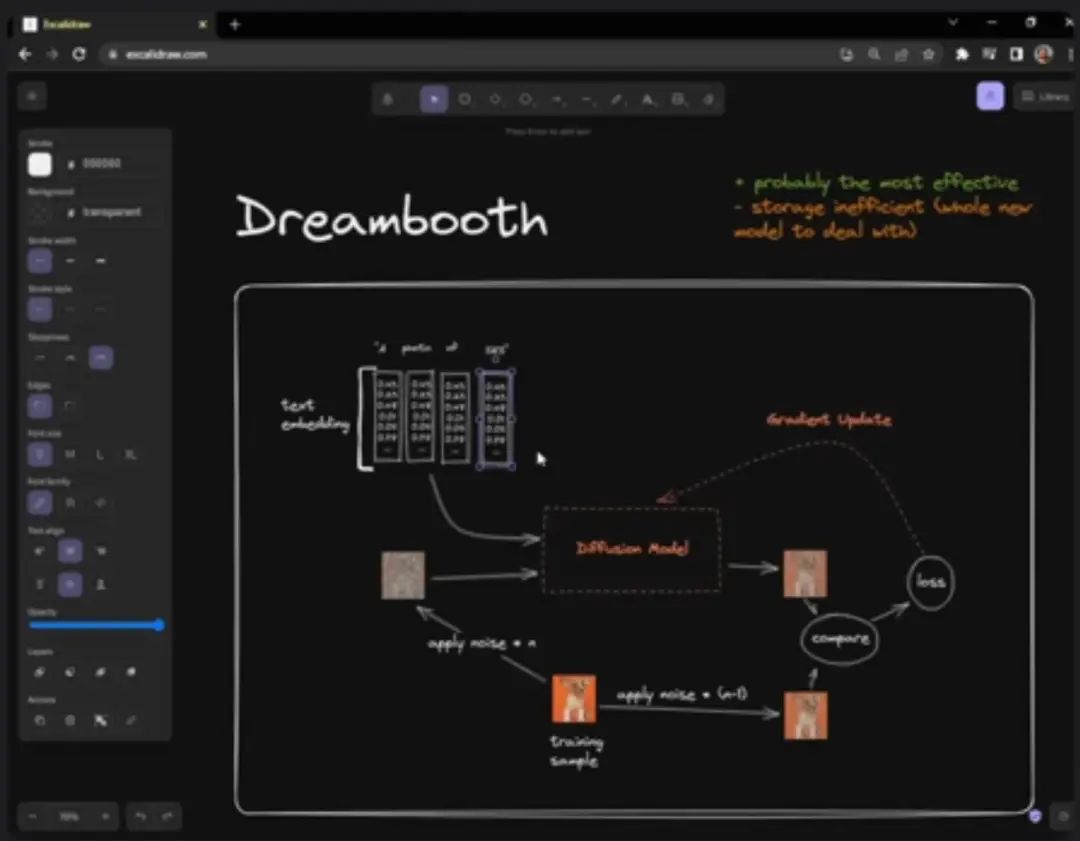
Our method is to enter the text embedding and then apply a large amount of noise to the sample images, followed by applying a small amount of noise. For example, we might apply 10 steps of noise to the input image and 9 steps to another; we let the model use the one with 10 steps of noise and then output the one with 9 steps. We let Stable Diffusion denoise the image and return it to its original state.
At first, since the model doesn’t know the image you sent, it may perform poorly, producing results that are quite different. Then what you need to do is compare the results with the 9-step noise image that should have been created and perform gradient updates to define what is loss; if the loss is too high, penalize the model, and if the loss is low, reward the model. After repeating this process several times, the model will learn how to handle such instructions.
Thus, you end up with a model: you input a noisy image (SKS) and then transform it into a clean image of a Corgi, which is the final result you will obtain.
This is how Dreambooth works; it takes time to explain, but I hope I made it simple enough so that it will be easier to understand when comparing other techniques. In Dreambooth, you are essentially creating an entirely new model, modifying the internal structure of the initial model until it understands this concept, making it perhaps the most effective training method for training specific concepts in Stable Diffusion.
However, it is not very efficient in terms of storage, as using Dreambooth generates an entirely new model each time. For example, training a Corgi might produce 2GB of data, and training a cat model would require another 2GB of space, making it inconvenient to share such large data. It is possible to train multiple concepts with the same model, but it can sometimes confuse the model; apart from that, Dreambooth is indeed the most effective method.
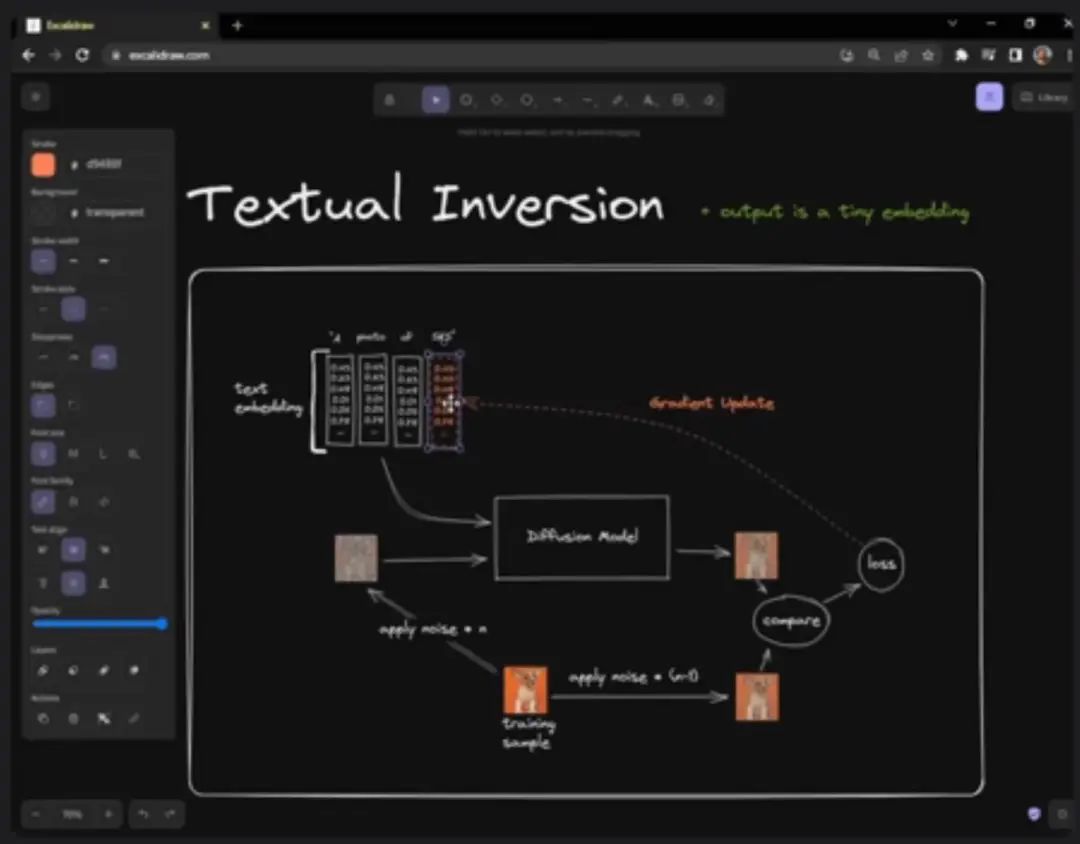
Next, let’s talk about Textual Inversion. At first glance, the setup is almost the same; we still have SKS, still have Corgi, and are still trying to ultimately produce the result of Corgi, still needing to perform denoising work and then compare. The difference is that Textual Inversion does not penalize the model with gradient updates when the results are wrong; instead, it updates a vector to ultimately achieve the desired result.
Interestingly, Dreambooth is a very complex model that can understand thousands of concepts, so it is very smart. For Textual Inversion, we simply created a very specific and perfect vector to tell the model the concept of Corgi, and we found that the results from Textual Inversion are very good.
The advantage of Textual Inversion is that you don’t have to create a new model; it is just a 12KB micro-embedding that you can upload online, and everyone can download and use it in their own models to get the same Corgi.
Then we have LoRA, which stands for Low-rank Adaptation. However, to understand how it works, we need to understand the internals of diffusion models and how they work.

The way today’s neural networks work is to set a series of consecutive layers; in this case, there are three, but in practice, there can be hundreds. You receive input, usually a large numerical matrix, which is passed to the first layer, which performs some calculations on this numerical matrix and produces another matrix. The new matrix is passed to the next layer, resulting in another transformed matrix, and by the last layer, you obtain the output result.
The idea is that as these weights pass through these models, the model learns more and more about the input structure, ultimately fully understanding what the input is and providing you with the desired result. This is the basic operation of neural networks.
So where does LoRA fit into this process? It actually tries to solve the Dreambooth problem, where you attempt to train the model to understand a concept and then create new models iteratively, leading to huge storage usage. LoRA aims to address this issue by allowing the model to understand the concept without making a complete model copy.
Since Stable Diffusion is not a super large model, Dreambooth is still acceptable for you to use. However, LoRA was initially used for large language models, which typically have billions of parameters, so making a copy each time during training is impractical.
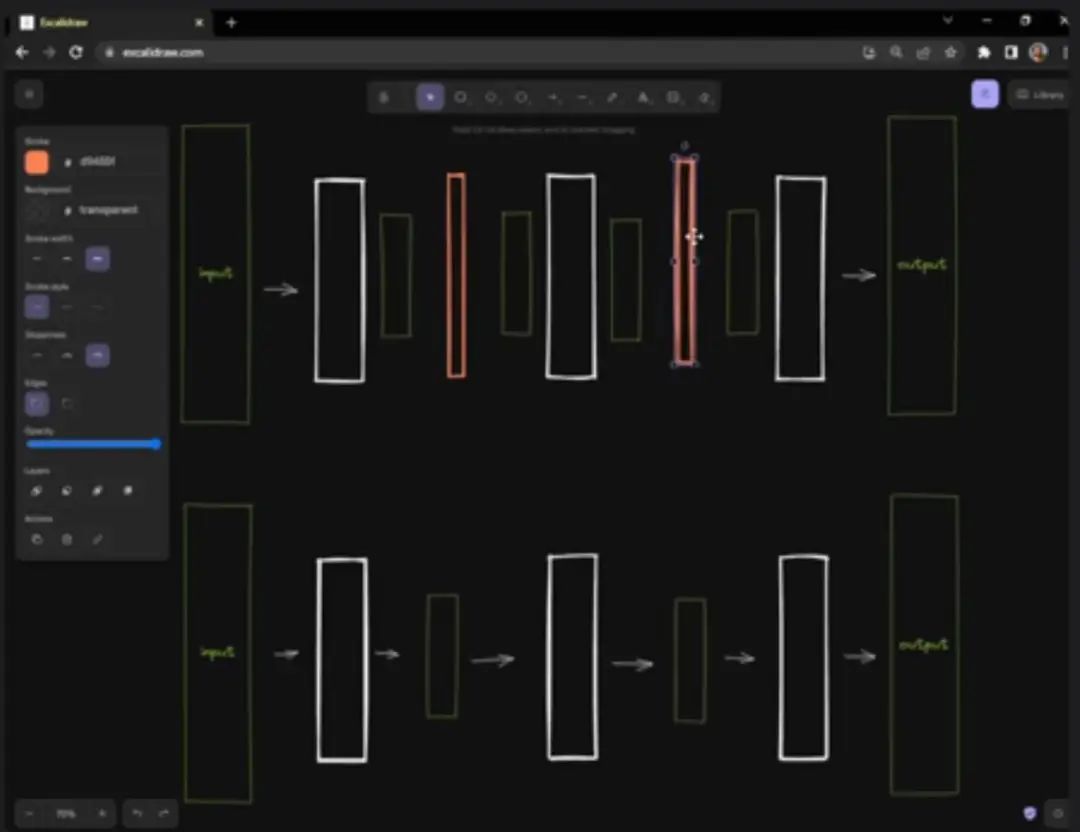
What LoRA does is insert new layers into the model. Initially, the model looks like the one in the image below; now it has two additional layers. The output from the first layer is not directly passed to the second layer but goes to the LoRA layer, which produces a second result, which is then passed to the second layer. These are all small layers; essentially, when LoRA training begins, they do not affect the model at all.
As training progresses, you update these intermediate layers, gradually making these intermediate layers more opinionated. As long as the training is sufficient, it usually achieves results similar to Dreambooth. So its approach is somewhat similar to Dreambooth, but it only updates existing weights, inserts new weights, and updates these new weights until the same effect is achieved.
The training process of LoRA is quite similar to that of Dreambooth, but compared to it, LoRA trains much faster and uses much less memory. LoRA models are small, and you can add them to different models, typically around 150MB in size.
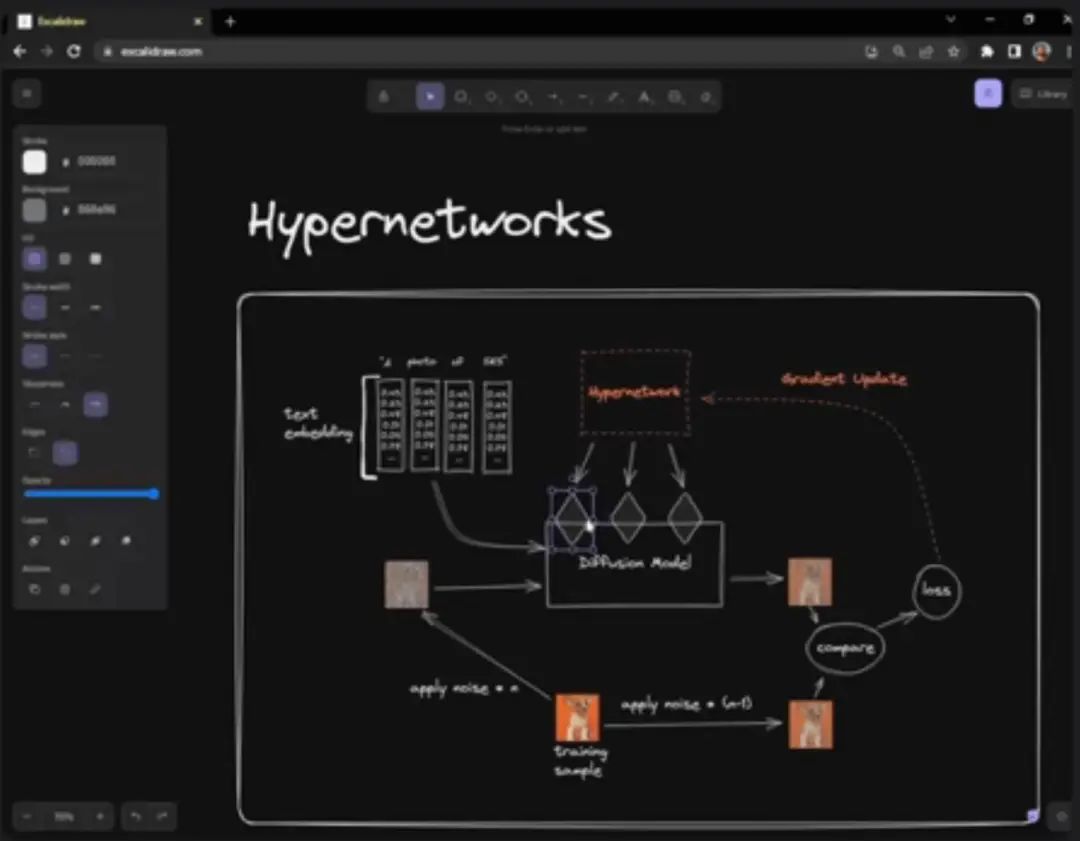
Finally, Hypernetwork is basically the same as LoRA; so far, there hasn’t been an official paper related to it. However, by reading the AUTOMATIC 111 codebase, I found that this is how it operates.
However, this method does not directly update the intermediate layers and optimize them; instead, it has a hypernetwork that outputs intermediate layers, just like the diffusion model outputs numerical matrices and translates them into images. The Hypernetwork outputs multiple numerical matrices, which are then used in the diffusion model as intermediate layers.
It is exactly the same idea as LoRA: insert intermediate layers, continuously update and improve, and ultimately obtain the desired result. The only difference is that you are not directly updating the entire layer and comparing loss; instead, you update a network that learns how to create these layers, and this network continuously updates until it achieves the desired result.
Although there are many related studies on Hypernetwork, my intuition (which may not be correct) is that it is just a worst-case version of LoRA because LoRA has many clever mathematical calculations that make it easy to optimize and train. However, training indirectly through a network, I suspect its efficiency will be much lower, and the results will not be as good. However, it has the same advantage as LoRA, which is taking up only about 150MB of space.

After performing qualitative analysis, let’s look at the quantitative analysis. This table contains important facts from my research on each training technique, such as how much RAM it occupies during training, how long it takes, etc. Surprisingly, the RAM they occupy during training is almost the same, but the training time varies greatly, and the output sizes differ. Textual Inversion occupies the least storage space.
This form contains a lot of data downloaded from civitai, which is all about people’s preferences for different models. By statistics, I found that the most popular model is Dreambooth, which has the highest download count, ratings, and likes. This does not necessarily mean that Dreambooth is the best model, but it indicates that many people are using it, which means there are more related resources.
If I were to teach a model to understand a concept, I would also use Dreambooth because I know it will have better beginner guidance, waste less time browsing forums, and seems to yield better results, given that many people are using it.

In terms of ratings, Dreambooth and Textual Inversion scored the same; from practical communication with people, it seems Dreambooth is slightly better, but from civitai data, people like both models very much. The scores of the other two models are much lower, which is clearly bad news for Hypernetwork. Coupled with the low download volume, Hypernetwork may be the one to avoid unless you have no other choice.
The statistics are also not favorable for LoRA, but it is relatively new, and there are only 11 LoRA models in the statistics, so this data may not fully represent LoRA’s potential.
Overall, perhaps directly using Dreambooth is the best choice. Many people use it, and it has high ratings. Just be aware of two points: first, this model is large, so if storage space is a concern, you can choose Textual Inversion. Of course, LoRA is also a good option, as it has the shortest training time.
····· End ·····
GameLook Daily Game Industry Report
Global Vision / In-Depth Insights
Breaking News / Communication / Cooperation: Please add the editor’s WeChat igamelook
Advertising: Please add QQ: 1772295880
Long press the image below, “Scan the QR code” to subscribe to the WeChat public account

····· For more content, please visit www.gamelook.com.cn ·····
Copyright © GameLook® 2009-2023
If you think it’s goodPlease click here ↓↓↓