
Recently, LlamaIndex launched a new feature called Workflow in its latest version. This feature helps large language model (LLM) applications achieve event-driven architecture, making the code logic clearer and more independent.
This article will take you through a simple practical project to deeply understand this new feature, highlighting its advantages and shortcomings. Without further ado, let’s get started!
Introduction
Why Choose Event-Driven?
In recent years, a large number of large language model (LLM) applications have begun adopting an AI Agent architecture. This architecture aims to more efficiently meet user needs by calling various API interfaces or performing multiple iterations.
However, this trend has also brought new challenges. As the number of APIs that the agent needs to call increases, the program’s response speed gradually slows down, and the code logic becomes more complex, increasing the difficulty of development and maintenance.
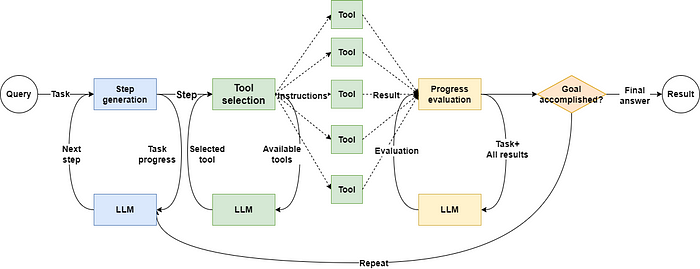
For example, the ReActAgent workflow includes four main steps: “Thought”, “Action”, “Observation”, and “Final Answer”. Completing these steps requires at least three calls to the LLM and one call to an external tool. If the task requires repeated cycles, the number of input/output (I/O) operations will further increase.
Is There a Way to Optimize This Process?
As shown in the above image, in traditional programming modes, all input/output (I/O) operations need to be performed sequentially; that is, the next operation must wait for the previous one to complete before it can start.
Although most mainstream large language models (LLMs) now support real-time result generation through “streaming output”, in actual AI agent applications, we often need to wait for the LLM to generate all results completely before proceeding to the next step or returning the final result.
However, not all I/O operations must be executed in this order. As shown in the following image, they can be executed concurrently:
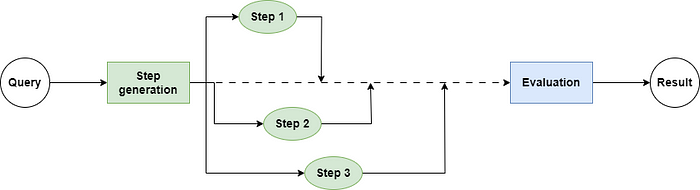
Does this image look familiar? That’s right, Python’s asyncio package can be used to execute I/O intensive tasks concurrently. Currently, most I/O-based APIs, such as LLM clients, also support concurrent execution.
The Workflow of LlamaIndex also adopts the core principles of concurrent programming. However, it is not just a simple encapsulation of the asyncio library; it further introduces an event mechanism. This mechanism allows us to more easily separate different parts of the business process, thereby improving development efficiency.
Now that we understand the basic background, let’s explore the LlamaIndex Workflow step by step through a practical project!
Getting Started
Before diving deeper, let’s familiarize ourselves with the relevant elements and basic principles through a simple code example.
Importing Required Tools
First, we need to import the necessary tools. It is worth noting that the Workflow feature is already integrated into the latest version of LlamaIndex, so no additional installation is required.
from llama_index.core.workflow import ( Event, StartEvent, StopEvent, Workflow, Context, step,)Basic Definition of Events
Since Workflow is an event-driven framework, we need to start by defining events.
To maintain consistency, we can first define a base event class (BaseEvent) to ensure that all events use a unified key payload format when passing information.
class BaseEvent(Event): payload: str | dict | NoneNow let’s define an event: SecondStepEvent
class SecondStepEvent(BaseEvent): ...Starting with a Basic Program
Next, we will write our first Workflow program. This program is a subclass of Workflow and contains two methods:
class SimpleWorkflow(Workflow): @step async def start(self, ev: StartEvent) -> SecondStepEvent: return SecondStepEvent(payload=ev.payload) @step async def second_step(self, ev: SecondStepEvent) -> StopEvent: return StopEvent(result=ev.payload)-
The start method receives a StartEvent and returns a SecondStepEvent.
-
The second_step method receives a SecondStepEvent and returns a StopEvent.
Now we will run the code to observe its actual execution effect.
s_wf = SimpleWorkflow(timeout=10, verbose=True)result = await s_wf.run(payload="hello world")print(result)We have enabled the verbose output option, allowing us to clearly observe the execution process of the code.

Exploring Visualization Tools
LlamaIndex provides a small tool that can visually display the entire workflow, which is very useful.
from llama_index.utils.workflow import draw_all_possible_flows
draw_all_possible_flows(SimpleWorkflow, filename="simple_workflow.html")
Principle Analysis
From the source code, we can see that Workflow manages the workflow internally through Context. Context not only holds the event queue but also maintains a dictionary that records each step.
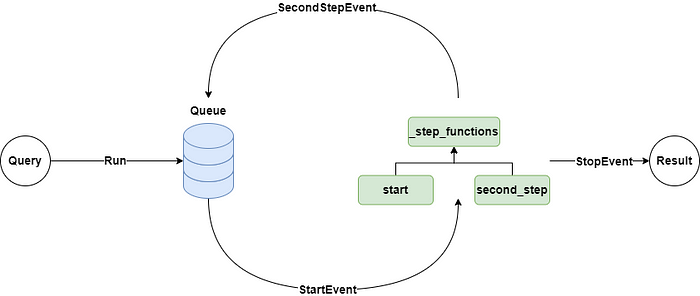
When the Workflow is initialized, the step decorator analyzes the function signatures of each method to determine what events they need to receive and return. The decorator then starts listening to the event queue and stores the methods in the step dictionary.
After starting the Workflow’s run method, it enters a loop called runflow. This loop first adds a StartEvent to the event queue. If a method can handle the StartEvent, it will be triggered for execution and return the corresponding event, which will be placed back in the queue.
Additionally, the step method can directly add events to the queue by calling the Context’s send_event method.
If a StopEvent is detected in runflow, the system will terminate the process and return the final result.
Having understood the basic elements and implementation principles of Workflow, we can further explore its advantages and disadvantages through practical project operations.