Linux | Red Hat Certified | IT Technology | Operations Engineer
👇 Join the 1000-Person Technical Exchange QQ Group and note [Public Account] for faster access

1. Deploying DeepSeek Model on Ubuntu Server
To install and use the DeepSeek model on Ubuntu via Ollama, follow these steps:
1. Install Ollama using the command
Command: curl -sSfL https://ollama.com/install.sh | sh
2. Verify if the installation was successful
After installation, you can verify if Ollama was installed successfully by using the following command:

Download the required model according to your needs: DeepSeek R1
Model Base Model Usage scenarioDeepSeek-R1-Distill-Qwen-1.5B Qwen2.5-Math-1.5B Suitable for mobile devices or resource-constrained terminalsDeepSeek-R1-Distill-Qwen-7B Qwen2.5-Math-7B Suitable for general text generation toolsDeepSeek-R1-Distill-Llama-8B Llama-3.1-8B Suitable for daily text processing in small businessesDeepSeek-R1-Distill-Qwen-14B Qwen2.5-14B Suitable for desktop applicationsDeepSeek-R1-Distill-Qwen-32B Qwen2.5-32B Suitable for specialized knowledge Q&A systemsDeepSeek-R1-Distill-Llama-70B Llama-3.3-70B-Instruct Suitable for high-demand scenarios such as scientific research and academic studies
DeepSeek R1 Computer Configuration Requirements
1.5B: Minimum 4-core CPU, 8GB+ RAM, 3GB+ storage space, GPU optional, if GPU acceleration is selected, 4GB+ video memory, suitable for low-resource device deployment scenarios.
7B: CPU 8 cores or more, 16GB+ RAM, 8GB+ storage, GPU recommended with 8GB+ video memory, suitable for local development and testing scenarios.
8B: Hardware requirements are similar to 7B but slightly higher, suitable for lightweight tasks requiring higher precision.
14B: CPU 12 cores or more, 32GB+ RAM, 15GB+ storage, GPU with 16GB+ video memory, suitable for enterprise-level complex tasks.
32B: CPU 16 cores or more, 64GB+ RAM, 30GB+ storage, GPU with 24GB+ video memory, suitable for high-precision professional tasks.
70B: CPU 32 cores or more, 128GB+ RAM, 70GB+ storage, multiple GPUs required for parallel processing, suitable for research institutions conducting high-complexity generation tasks.
32B model performs excellently in inference benchmark tests, approaching the inference capability of the 70B model but with lower hardware resource requirements.

2. Configure Ollama Service
1. Set Ollama Service Configuration
Set the environment variable OLLAMA_HOST=0.0.0.0 to allow remote access.
Command syntax: sudo vi /etc/systemd/system/ollama.service
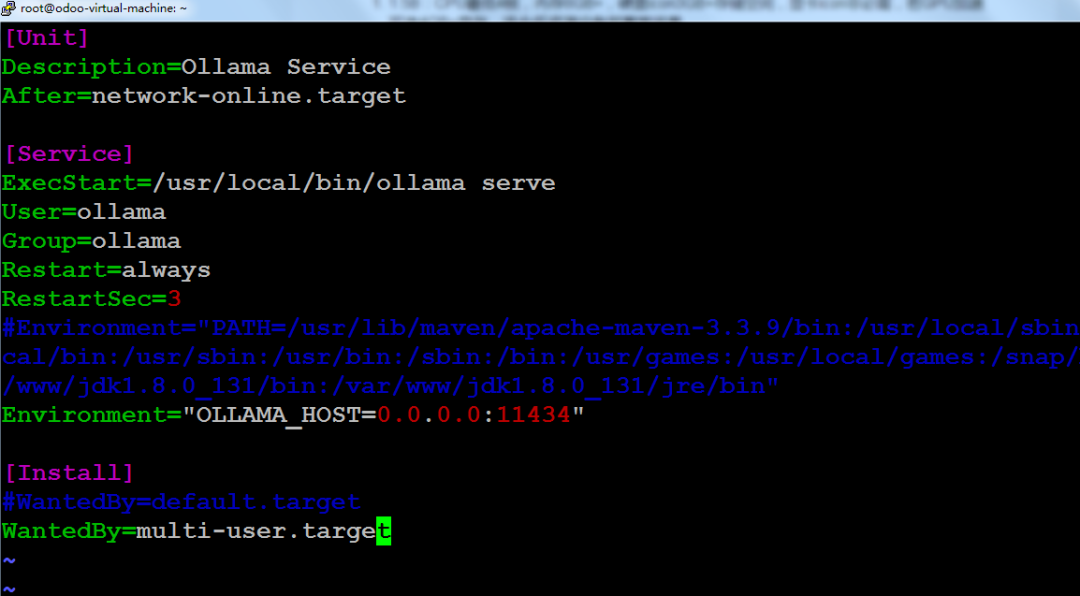
2. Reload and Restart Ollama Service

Command syntax: sudo systemctl daemon-reload sudo systemctl restart ollama
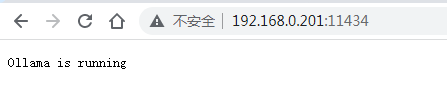
3. Verify if the Ollama Service is Running Normally
Run the following command to ensure the Ollama service is listening on all network interfaces:
Command syntax: sudo netstat -tulpn | grep ollama


3. Install Web UI on Windows
There are three ways to install OpenWebUI on Windows: Docker, Python + Node.js, and integrated package.
Non-Docker Installation Method
Download and install Python 3.11. It is recommended not to include Chinese characters in the installation path, and check the "Add python 3.11 to Path" option. After installation, type python in the command prompt; if the Python version information is displayed, it indicates that the installation was successful.
2. Install Node.js and npm:
Visit the Node.js Chinese website, download and install the latest version of Node.js (e.g., 20.12.2). During installation, npm will be installed automatically. Type npm -v in the command prompt; if the npm version information is displayed, it indicates that the installation was successful.
3. Clone the OpenWebUI Project:
Open a command line tool (such as CMD, PowerShell, or Git Bash) and execute the following command to clone the OpenWebUI project:
git clone https://github.com/open-webui/open-webui.git Navigate to the OpenWebUI project directory
4. Install npm Dependencies:
5. Install Python Dependencies:
pip install -r ./backend/requirements.txt
(The requirements.txt dependency management file I downloaded is in the backend directory, please check the file path)
macOS/Linux: curl -LsSf https://astral.sh/uv/install.sh | sh Windows: powershell -ExecutionPolicy ByPass -c "irm https://astral.sh/uv/install.ps1 | iex"
pip install open-webui To update Open WebUI to the latest version, simply run: pip install --upgrade open-webui
Start the open-webui project with the specified Python version (3.11) and set the project data storage path to C:\open-webui\data (example path), and finally start the web server of the project so that users can access it via the browser.
Windows PowerShell: $env:DATA_DIR="C:\open-webui\data"; uvx --python 3.11 open-webui@latest serve
Access Address: 127.0.0.1:8080
This method installs all necessary dependencies and starts Open WebUI, allowing for simple and efficient setup. After installation, Open WebUI can be accessed at http://localhost:8080.
For future starts, you can use:
For course inquiries, add: HCIE666CCIE
↓ Or scan the QR code below ↓

What technical points and content do you want to see?
You can leave a message below to tell us!


