“ A couple of days ago, Microsoft open-sourced the 14B dense model phi-4, which is called the strongest 14B model available. How strong is the model? What others say doesn’t count; only trying it yourself will tell. However, when you want to get hands-on, you find that most current versions of inference engines are not adapted yet, requiring you to wait for a release. For most people, performing model inference by themselves still presents a bit of a hurdle. This article will introduce how to leverage Xinference to configure it easily through simple operations, without waiting for the official adaptation of various inference engines, allowing you to effortlessly achieve local inference.”
Introduction
Yesterday, I published an article about Xinference + Roo-Cline, landing AI Coding in the intranet.
Yesterday’s theme: Xinference + Roo-Cline: A Private AI Coding Enhancement Solution, Local Security, Improving R&D Efficiency!
A friend asked me a question that was somewhat unrelated to the article’s theme, “How to infer the newly released phi-4?” Thus, this topic was brought up. Next, even if you don’t have a deep technical background, as long as you have a GPU (recommended minimum single card 16GB) or you are using a MAC (minimum 16GB), you can follow along with me step by step to easily infer the phi-4 large model that has not been adapted by the inference engine.
Performance of the Phi-4 Model
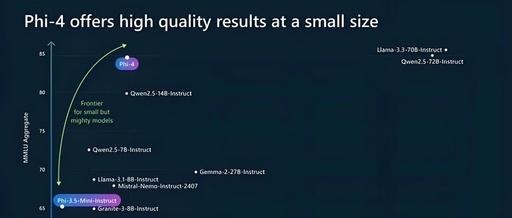
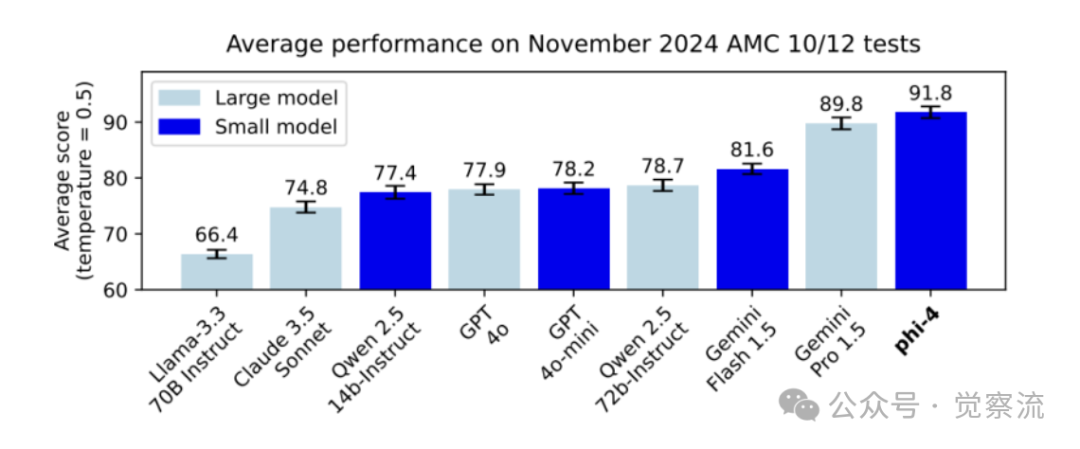
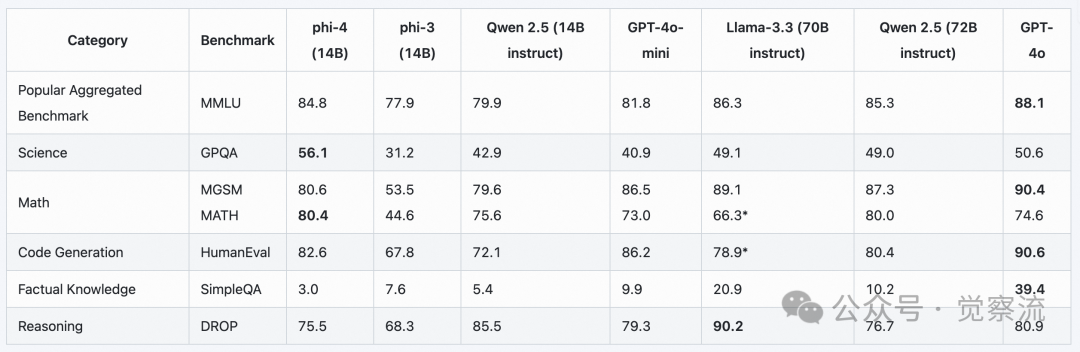
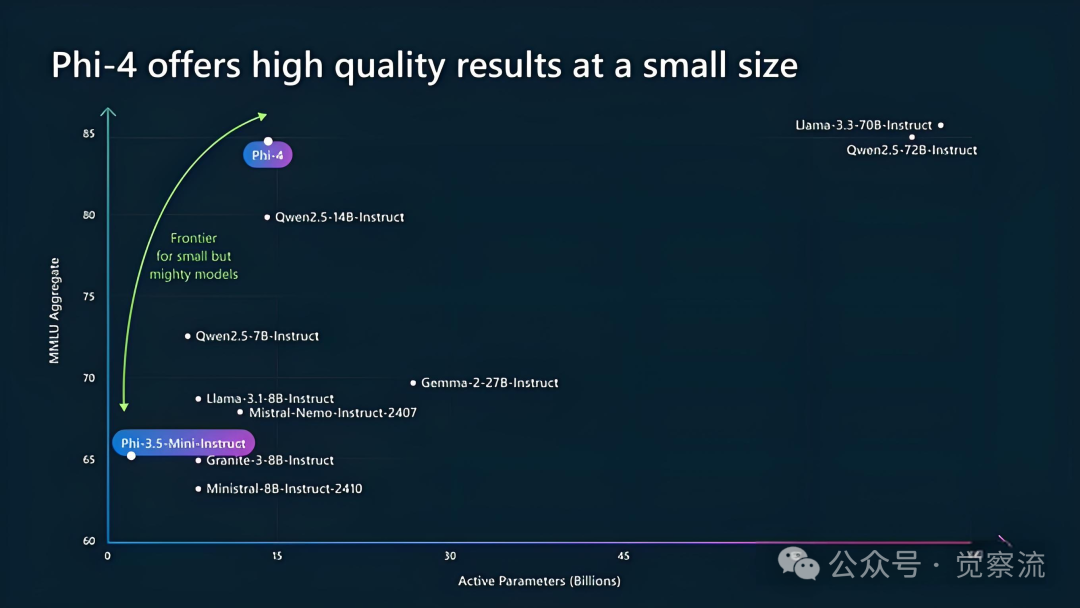
Let’s first briefly understand the performance of this model; below are the benchmarks for phi-4.
I will briefly explain the meaning of the related metrics to help everyone make their own observations.
-
• <span>MMLU</span>: Benchmark test for evaluating the multi-task language understanding capability of large language models. -
• <span>MATH</span>: Challenging competitive math problems. -
• <span>GPQA</span>: Complex, graduate-level scientific questions. -
• <span>DROP</span>: Complex understanding and reasoning. -
• <span>MGSM</span>: Multilingual elementary mathematics. -
• <span>HumanEval</span>: Functional code generation. -
• <span>SimpleQA</span>: Factual answering.
From the above benchmark evaluations, it can be seen that the metrics of phi-4 are indeed impressive.
Using Xinference for Phi-4 Inference
Next, we will leverage the capabilities of Xinference for self-adaptation and custom inference models to achieve inference for models that are not officially adapted.
Installing Xinference
Recommended installation method for Linux
Recommended installation method for Linux
Given the characteristics of AI industrial production-level toolchains, configuring the inference engine on a Linux system will provide a better experience. Below is the fully dependent installation command:
pip install "xinference[all]" -U -i https://pypi.tuna.tsinghua.edu.cn/simple --force-reinstallRecommended installation method for Windows
Since Windows is primarily used for personal PCs rather than industrial production, there are some compatibility issues with toolchains. Below is the more compatible installation command for Windows:
pip install "xinference[transformers]" -U -i https://pypi.tuna.tsinghua.edu.cn/simple --force-reinstallRecommended installation method for Mac
Mac has its own inference framework mlx, and Xinference has already completed integration with mlx, so everyone can easily use mlx for model inference. My daily use device is a Mac, so I chose this method to install Xinference:
pip install "xinference[mlx,transformers]" -U -i https://pypi.tuna.tsinghua.edu.cn/simple --force-reinstallDownloading the Model
# This is a collection that includes the original phi-4 model and the quantized model

https://www.modelscope.cn/collections/phi4-Quantization-2bc1a92926ec42
-
• Windows and Linux systems can download the BF16 model. -
• For Mac systems with 16GB memory, it is recommended to download the MLX-3bit version model; if the memory is above 20GB, you can download MLX-4bit
Registering the Model
After the above two steps, if all goes well, you have installed Xinference, and the phi-4 model has been downloaded. As the phi-4 model has just been open-sourced, Xinference has not yet had time to do official configuration, which gives us a chance to practice defining the model ourselves.
Starting Xinference
Now, execute the command to launch the inference engine console.
xinference-local --host 127.0.0.1 --port 9997Access the browser at http://127.0.0.1:9997
You can select the language as Chinese in the lower left corner. Click on the left menu bar to<span>Register Model</span>, as shown in the image below.
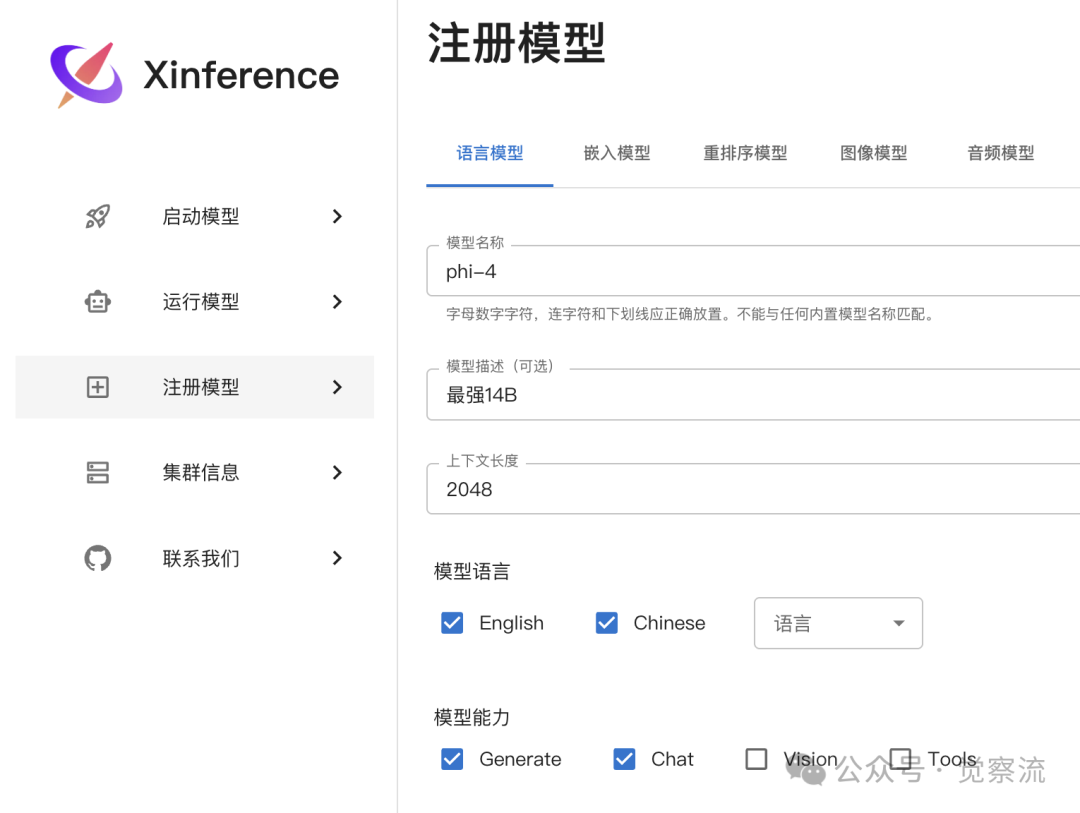
Basic Configuration
First, as shown in the image above, configure some basic information of the model. Then scroll down the page.
As you can see in the image below:
Follow me to configure:
-
1. Model Series, since the engine has not yet adapted, phi-4 is not in the list, here select <span>phi-3-mini-128k-instruct</span>to proceed. -
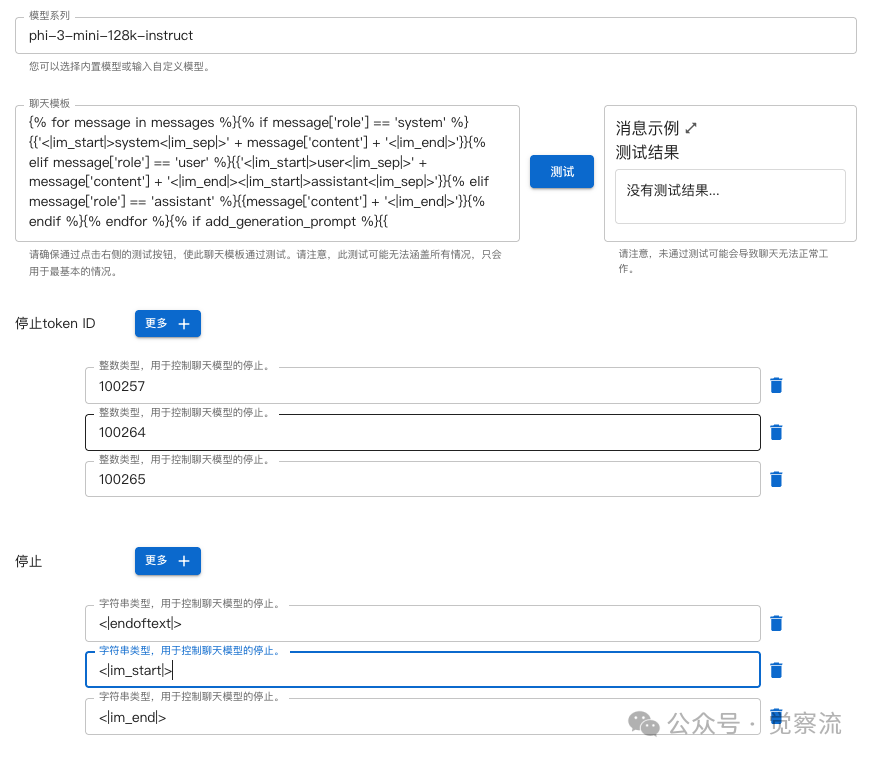
2. Chat Template, this step is very critical as it directly determines whether the inference model’s results can be displayed correctly. You must completely paste and replace the content in the editing bar with the following text.
{% for message in messages %}{% if message['role'] == 'system' %}{{'<|im_start|>system<|im_sep|>' + message['content'] + '<|im_end|>'}}{% elif message['role'] == 'user' %}{{'<|im_start|>user<|im_sep|>' + message['content'] + '<|im_end|><|im_start|>assistant<|im_sep|>'}}{% elif message['role'] == 'assistant' %}{{message['content'] + '<|im_end|>'}}{% endif %}{% endfor %}{% if add_generation_prompt %}{{ '<|im_start|>assistant<|im_sep|>' }}{% else %}{{ '<|endoftext|>' }}{% endif %}-
After completing the above configuration, click the “Test” button. If there is an error, there will be an error message, and you need to check whether the above text is completely pasted; if correct, it will display: -
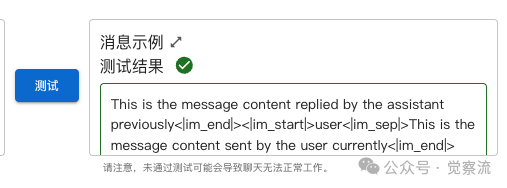
-
3. Stop Token ID (Stop Token ID), fill in the three input boxes in the image: <span>100257</span>,<span>100264</span>,<span>100265</span> -
4. Stop Token (Stop Token), this is a string type, fill in: <span><|endoftext|></span>,<span><|im_start|></span>,<span><|im_end|></span>The Stop Token is also very important; it tells the model when to stop inferring. If configured incorrectly, the model may keep outputting and not stop.

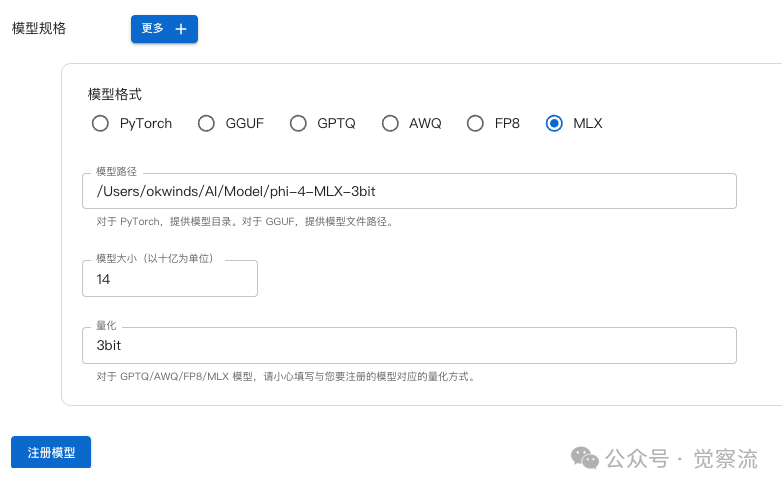
Model Specifications
-
As shown in the image part below, continue to follow me to configure MAC as shown; WIN and Linux select the first option. -
-
-
• Model Path, fill in the path where the model weight files you have downloaded are located on your machine. -
• Model Size, select 14 -
• Quantization For Windows and Linux systems, you do not need to select here; the operation will be done during inference. For MAC systems, I chose the 3bit model here to save memory, so fill in 3bit here. -
After completing the configuration, click the “Register Model” button to complete the initial registration configuration.
-
MAC
At this point, if you are using a Mac system, you can skip the following steps.
-
Windows or Linux
If you are using Windows or Linux systems and your GPU memory is less than 32GB, you need to manually add the online quantization configuration:
Windows: Go to the path under your account folder, usually:
C:\Users\(your account name)\.xinference\model\llmLinux: Go to the path under your account folder, usually:
~/.xinference/model/llm
Find the file phi-4.json and open it to search for “quantizations”; change this configuration section json text, the original content is<span>"quantizations": ["none"]</span>, change it to the highlighted content below<span>"quantizations": ["4-bit", "8-bit", "none"]</span>, thus completing the online quantization part of the model configuration to save memory during inference.

Inference Model
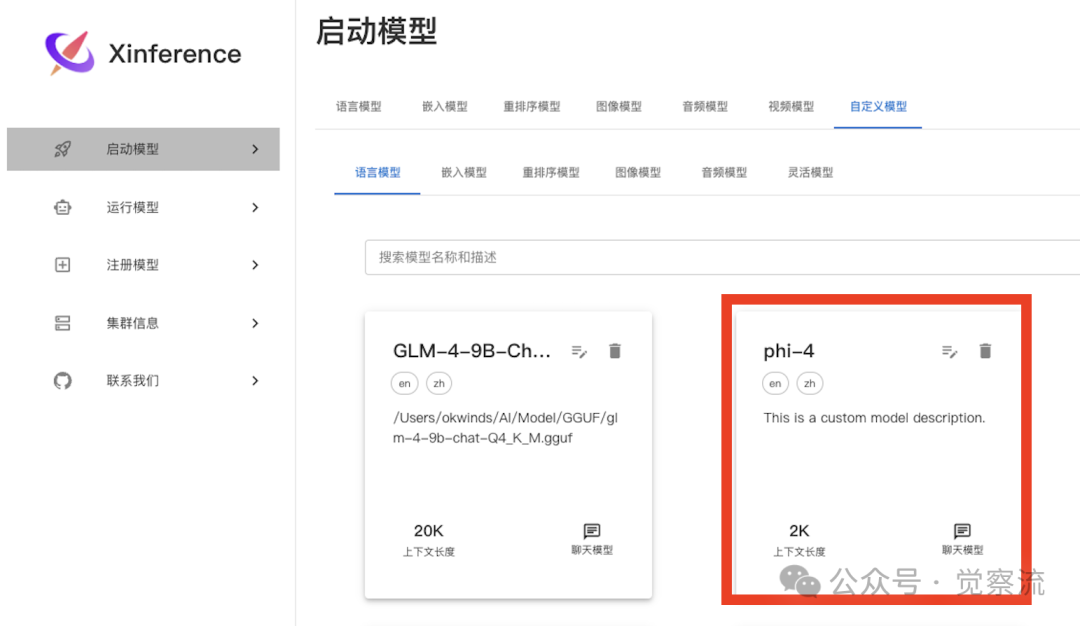
Victory is in sight; after completing the model registration, we go to<span>Start Model</span>, click on<span>Custom Model</span> tab, and find the registered model, as shown in the image below.
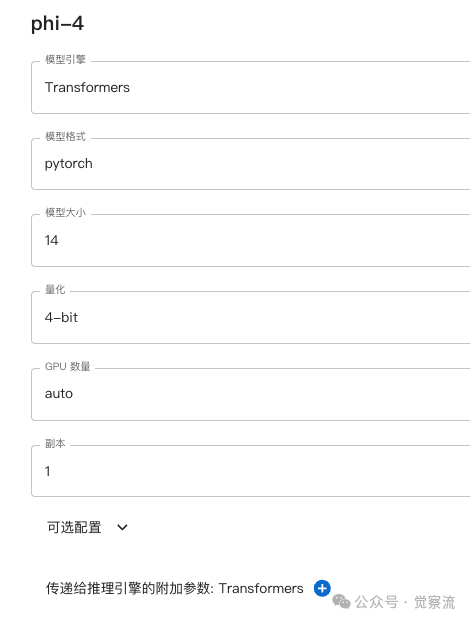
After clicking, configure for Windows and Linux systems as shown in the image below.
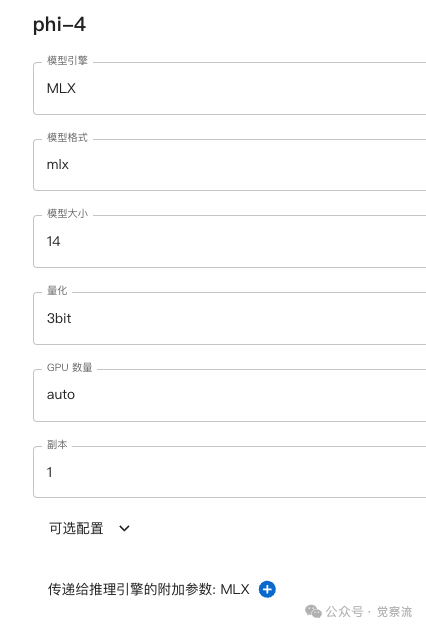
Configure for MAC systems as shown in the image below.
Click the rocket button below to start the model.

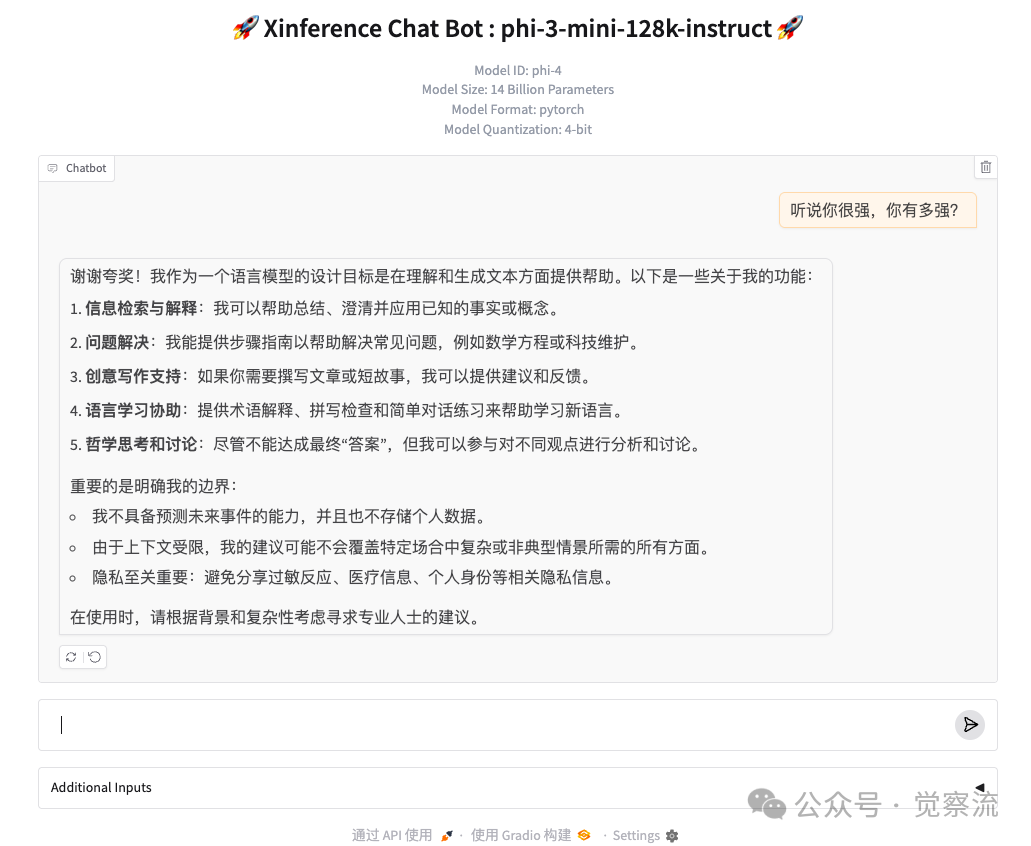
Wait a moment; after the model loads, it will jump to the interface below.
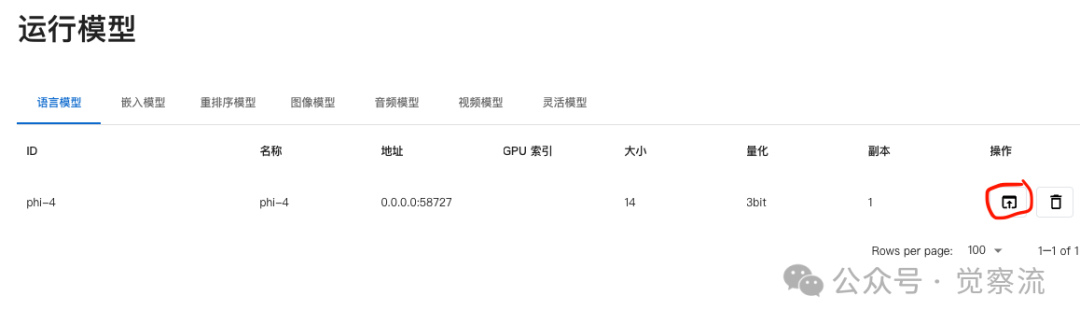
Click the Chat button in the red box to start chatting.
After chatting, remember to click the “trash can” button on the right to clear the model from memory.
Conclusion
This article detailed the method of using Xinference’s custom inference model capabilities, allowing inference of non-adapted models through manual configuration. This approach simplifies the process of writing inference code, enabling us to experience newly released open-source models at any time.
This not only significantly improves the usage and evaluation efficiency of open-source models but also fully demonstrates the high flexibility of Xinference in inference models.
Of course, if the model you are using has been adapted by Xinference, the above configuration process will be greatly simplified, requiring only a few mouse clicks to operate in the graphical interface, making the inference process extremely convenient.
Welcome to like and view and follow。Public account add ⭐️ don’t miss the wonderful
Looking forward to our unexpected encounter. Click 👇🏻 to follow
Please open in the WeChat client