Click on the above “Beginner’s Guide to Vision” to select Star or Top for heavy content delivered first  Author: Xi XiaoyaoFrom: Xi Xiaoyao’s Cute Selling House
 Foreword Although tuning parameters alone is no longer a hot topic in deep learning, if you can’t even tune parameters, you might not even get a taste of the soup. After all, no matter how good your idea is, you need a pretty experimental result to support it, right? If the parameters are not tuned well, even a thoroughbred can be mistaken for a mule. Speaking of tuning parameters, I can’t help but complain about the difficulty of reproducing papers in the industry. I was once very curious about the performance of a paper submitted to AAAI 2018, so I completely followed the settings in the paper for reproduction, only to find that the result was a full 4 percentage points lower than that in the paper! Even more surprisingly, I found that according to the paper’s settings, the model was far from fitting the dataset ╮( ̄▽ ̄”)╭ In the end, unable to grasp the tricks in the paper, I decided to tune it myself! As a result, I ended up tuning to a result that was 0.5 points higher than that in the paper, which was quite embarrassing. We cannot say that some top conference papers have data issues, but we can be sure that explicit or implicit hyperparameters can greatly affect experimental results. These hyperparameters may come from data preprocessing, from the optimization algorithm, from the model itself, or sometimes even from the reasoning phase of the output layer.
 Preparation Before Tuning Alright, back to the point. Before tuning parameters, I strongly recommend completing the following tasks in your code:
- Visualize the loss of each step (batch) during training. If it is a classification task, you can also visualize the accuracy of each batch (for imbalanced data, visualize F1-score).
- Print the training logs to the screen while also writing them to the local disk. It would be even better if you can synchronize this in real-time (in Python, you can easily achieve this using the logging module. One handler outputs to the screen, and another handler outputs to the disk).
- Use the FLAGS module in TensorFlow or the python-fire tool to wrap your training script into a command-line tool.
- Configure the visualization environment for training processes like TensorBoard in your code, at least visualize the training loss curve.
- If using TensorFlow, remember to set GPU memory to grow dynamically (unless you only have one GPU and you are sure that one training task will consume a large portion of the GPU memory).
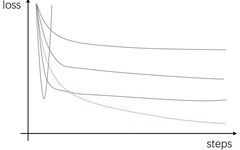
Additionally, remember to turn off L2, Dropout, and other hyperparameters that enhance model generalization during the initial tuning phase, as they can greatly affect the loss curve and interfere with the selection of your important hyperparameters. Then, based on the scale of your task, estimate a reasonable batch size (generally speaking, 64 is a good starting point. For imbalanced datasets, it is advisable to use a larger value, while for smaller datasets with not too small models, it is advisable to use a smaller value). If you lack experience with the random initialization strategy for network parameters (knowledge derived from related task paper experiment details or open-source projects), you can use the He method [1] (when using ReLU activation) or the Xavier method [2] for network parameter initialization. Stage 1: Learning Rate and Num Steps This stage is the easiest. Open TensorBoard and set several possible learning rates according to exponential rules. I generally set the following six groups [1, 0.1, 0.01, 0.001, 0.0001, 0.00001]. If you have multiple GPUs, you can also insert a few more values around the likely learning rates. For instance, I usually like to add [0.03, 0.05, 0.003, 0.005, 0.007, 0.0005] (at least when doing text classification tasks, I often encounter good results). Once these tasks are completed, you can go to TensorBoard to select the optimal learning rate. The selection principle is very simple: choose the learning rate corresponding to the curve that descends quickly and deeply, as shown in the image below, select the pink curve:
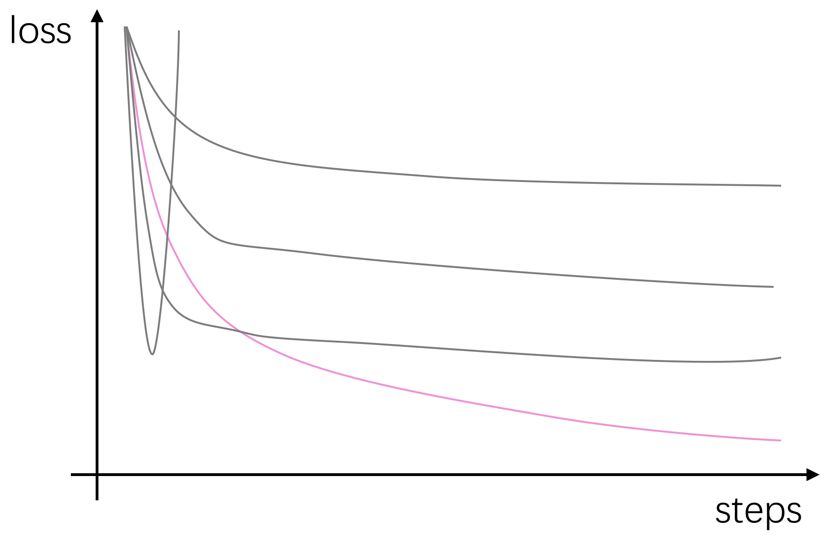 After selecting the learning rate, also observe this curve and choose a step that has basically converged as our total training steps (if the dataset is small, it can also be converted to epoch counts). As shown in the image:
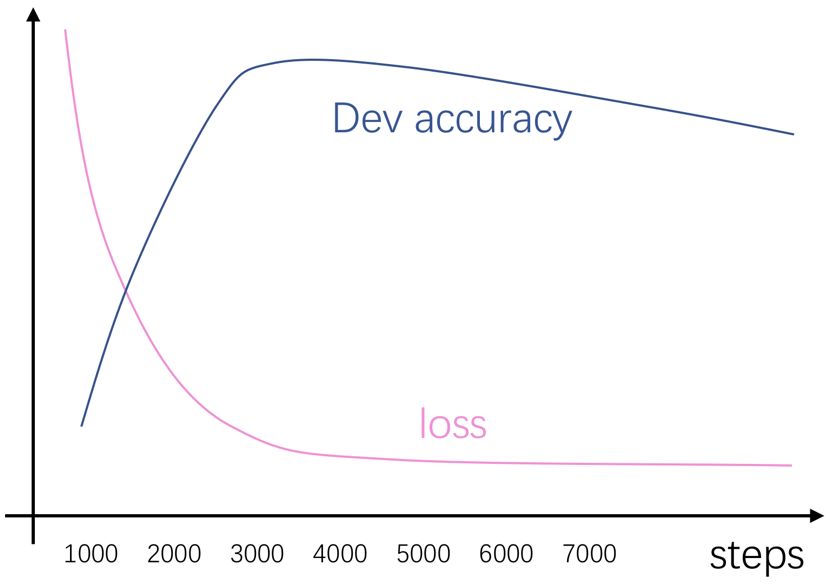 you can see that our model basically converged after 4K steps, so it is safe to choose 6K as our total num_steps (after all, subsequent changes to hyperparameters may delay convergence). Details: If the GPU is limited and the task does not consume too much memory, you can run multiple training tasks on one GPU at the same time (the computation speed of each task will slow down, but the total time to complete all tasks will be greatly reduced). I usually set a learning rate randomly first to determine the approximate memory consumption of each task, and then in the shell script, I run these several tasks in parallel on the GPU (just use & in the shell script to throw it into the background). Of course, if the code uses timestamps, you can add random noise to the timestamps or add a certain time interval between tasks in the shell script to avoid timestamp collisions during training tasks. For Those Who Can’t Afford GPU: There was a time when I only had one usable GPU, but the task scale was so large that each experiment would take up a large portion of the GPU memory and run for a day and a half. However, time was tight, and I couldn’t afford to run dozens of experiments like above to select a learning rate. So what to do? I learned a trick: calculate the ratio of the magnitude of the gradient update vector to the magnitude of the current parameter vector during each update in the code. If this ratio is around
  it indicates that the learning rate is still acceptable. If the magnitude is too small, the network is not updating, and the learning rate needs to be increased. If the magnitude is too large, each update makes too large a change to the network, leading to instability, and the learning rate needs to be decreased. This way, I can roughly estimate a usable learning rate after running just a few batches.
 Stage 2: Batch Size and Momentum Armed with the hyperparameters obtained from the first stage, we arrive at the second stage. If we are using an optimizer like Adam that is “thoughtful,” the momentum term hyperparameters are basically unnecessary. However, both my experience and widespread industry experience suggest that the optimal point found by Adam is often not as good as the quality of hyperparameters tuned by SGD. Therefore, if you want to pursue more extreme performance, you still need to tune momentum. Momentum can accelerate model convergence (reducing the number of iterations) and help the model escape from poor local optima (if you don’t understand, quickly review the momentum SGD formula). The batch size parameter seems to have a similar effect—smaller batch sizes lead to more noise, making it easier to escape local optima, but this also leads to inaccurate gradient estimates, requiring more iterations. Therefore, I generally tune these two parameters together. When tuning both parameters together, you can use traditional grid search or the random search advocated by experts [3]. I think, if you have enough GPUs and time, go for grid search; otherwise, go for random search. In any case, using grid search for these two hyperparameters is not too unreasonable. If you are not familiar with these two strategies, you can refer to the deep learning course by Ng on Coursera, where the lectures on “hyperparameter tuning” are very clear and seem to be publicly available. Additionally, if using grid search and the search range is small, I usually solve it lazily in the shell script:
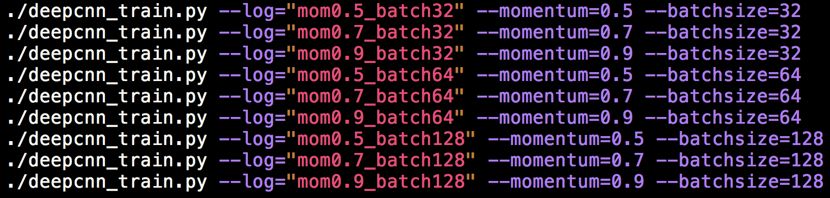 Also, since these two hyperparameters may involve the model’s generalization ability, remember to monitor the loss curve while also monitoring the development set accuracy. If the shapes of the loss curves for two experiments are both good, you can then make a choice based on the development set accuracy (it is generally rare to find a situation where the loss curve shape is poor but the development set accuracy is very high). Additionally, remember! After this stage ends, the optimal loss curve may change significantly; the num_steps determined in the first stage may become overly redundant in this stage, so remember to trim the tail a bit (i.e., reduce num_steps; the basis for reduction is the same as before). Of course, if the batch size decreases significantly, the previous num_steps may not be sufficient for full training, so remember to increase the number of steps.

Stage 3: Learning Rate Decay Strategy Compared to the previous hyperparameters, the learning rate decay strategy is quite mysterious. Sometimes you may find that this hyperparameter seems to have no effect, while at other times it seems to significantly improve your already converged network, leading to lower training loss and higher development set accuracy. This is actually easy to understand; if your model reaches a “plateau” during convergence, then decaying the learning rate may not bring about much change. However, if it bounces around the “edge of a canyon” during convergence, decaying the learning rate may help it take a leap down into the canyon and discover new territory! Of course, this is just our wishful thinking; in the current task, no one knows the terrain in this high-dimensional space. Therefore, it is advisable to use a simple and effective learning rate decay strategy for initial tuning. If it proves useful, you can continue fine-tuning it; if not, then it’s fine. The classic learning rate decay strategy must consider four things: when to start decaying, the magnitude of decay (linear or exponential), the decay rate, and the decay period. Remember the development set accuracy curve we obtained in the previous stage? That’s right! The valley of this curve is a good time to start decaying! The timing for decay is easy to determine; for example, in the above state, the highest development set accuracy is around 3000, so we can start decaying the learning rate from around 2700. As for the magnitude of decay, it seems that people often use exponential decay more. However, for exponential decay, the decay factor is sensitive; if the decay factor is too small, the model often hasn’t trained enough before decaying. If the factor is set too high, the learning rate may take a long time to decrease, leading to little improvement in the performance of the development set. While considering these factors, you must also control the decay interval (i.e., how many steps to decay at a time). If the interval is too small, the peaks of the development set accuracy may become smoother compared to the case of no decay. If the interval is too large, aside from the first decay, subsequent decays may not yield any benefits. However, at the very least, a design principle is that by the step that reaches the original highest development set accuracy point, the learning rate must be reduced to at least half of the initial learning rate (unless your decay interval is really short). It feels super complicated, right? To consider and calculate so many things for learning rate decay seems troublesome. Therefore, I personally prefer to use the following lazy method. This method was learned from the fasttext source code, and I found it quite useful after experimenting, so I’ve been using it ever since. First, there’s no need to calculate when to start decaying; just start linear decay from the first step. Then, if the total number of iterations is 5K and the learning rate is 0.01, we can calculate the decay amount for each step as
  A rough estimate shows that by the 3000th step, the learning rate would be around 0.006, which seems quite reasonable. This way, by the last step, the learning rate will also be reduced to 0. In this scheme, we can recalculate the learning rate at each step, but to prevent floating-point underflow and additional computational overhead (which can be ignored), we usually set a decay interval, such as decaying every 100 steps. Compared to the classic strategy, the decay interval is not as sensitive, so you can set it confidently. Using this lazy method usually does not introduce any difficult-to-tune hyperparameters; as long as you set the num_steps reasonably in the second stage, this lazy version of learning rate decay can often yield good results. Of course, if in the current task you find that this lazy method does not yield much benefit, it may indicate that the terrain is relatively flat and not sensitive to learning rate decay. In this case, I generally do not consider fine-tuning the decay strategy. Conversely, if you find that even this lazy method brings obvious benefits, then carefully compare the development set curves under decay strategy and no decay strategy. If you find that the peaks have shifted significantly, the decay might be too fast, so try delaying the decay timing. However, since there are obvious benefits, fine-tuning according to the classic decay strategy is often worthwhile. As for how to tune the remaining hyperparameters? Just wait for my next article ( ̄∇ ̄)[1] Xavier Glorot and Yoshua Bengio. 2010. Understanding the difficulty of training deep feedforward neural networks. In Proceedings of the Thirteenth International Conference on Artificial Intelligence and Statistics, volume 9 of Proceedings of Machine Learning Research, pages 249–256, Chia Laguna Resort, Sardinia, Italy. PMLR.[2] Kaiming He, Xiangyu Zhang, Shaoqing Ren, and Jian Sun. 2015. Delving deep into rectifiers: Surpassing human-level performance on imagenet classification. CoRR, abs/1502.01852.[3] Bergstra J, Bengio Y. Random search for hyper-parameter optimization[J]. Journal of Machine Learning Research, 2012, 13(Feb): 281-305.
Download 1: OpenCV-Contrib Extension Module Chinese Tutorial

Reply "OpenCV Extension Module Chinese Tutorial" in the background of the "Beginner's Guide to Vision" public account to download the first OpenCV extension module tutorial in Chinese, covering installation of extension modules, SFM algorithms, stereo vision, object tracking, biological vision, super-resolution processing, and more than 20 chapters of content.

Download 2: Python Vision Practical Projects 52 Lectures

Reply "Python Vision Practical Projects" in the background of the "Beginner's Guide to Vision" public account to download 31 practical vision projects including image segmentation, mask detection, lane line detection, vehicle counting, eyeliner application, license plate recognition, character recognition, emotion detection, text content extraction, and facial recognition, to assist in quickly learning computer vision.

Download 3: OpenCV Practical Projects 20 Lectures

Reply "OpenCV Practical Projects 20 Lectures" in the background of the "Beginner's Guide to Vision" public account to download 20 practical projects based on OpenCV, achieving advanced learning in OpenCV.

Discussion Group

Welcome to join the reader group of the public account to communicate with peers. Currently, there are WeChat groups for SLAM, 3D vision, sensors, autonomous driving, computational photography, detection, segmentation, recognition, medical imaging, GAN, algorithm competitions, etc. (will gradually be subdivided in the future). Please scan the WeChat ID below to join the group, and note: "Nickname + School/Company + Research Direction", for example: "Zhang San + Shanghai Jiao Tong University + Vision SLAM". Please follow the format for notes; otherwise, you will not be added. After successfully adding, you will be invited to the relevant WeChat group based on your research direction. Please do not send advertisements in the group; otherwise, you will be removed from the group. Thank you for your understanding~