

Author: Victor Zhou
Translator: Wang Yutong
Proofreader: Wu Jindi
This article will introduce the basics of Recurrent Neural Networks (Vanilla RNNs), how they work, and how to implement them in Python.
https://victorzhou.com/blog/intro-to-neural-networks/

Red represents input, green represents the RNN itself, and blue represents output. Source: Andrej Karpathy
-
Machine translation (e.g., Google Translate) uses a “many-to-many” RNN. The original text sequence is fed into the RNN, and the RNN outputs the translated text.
-
Sentiment analysis (e.g., is this a positive or negative review?) is typically done using a “many-to-one” RNN. The text to be analyzed is fed into the RNN, and the RNN generates a single output classification (e.g., this is a positive review).


-
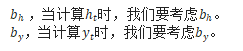
Based on the previous hidden state and the next input, we can obtain the next hidden state.
-
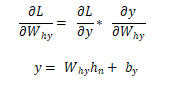
By calculation, we can obtain the next output.
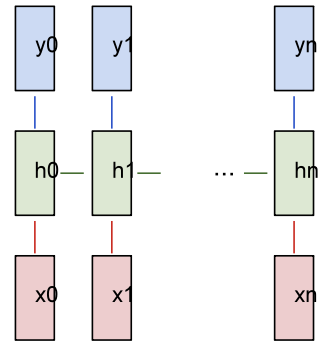
Many-to-many RNN


https://github.com/vzhou842/rnn-from-scratch/blob/master/data.py
|
|
|
|
|
|
|
|
|
|
|
|
|
|
|
|
|
|
|
|
|
|
|
|
|
|
|
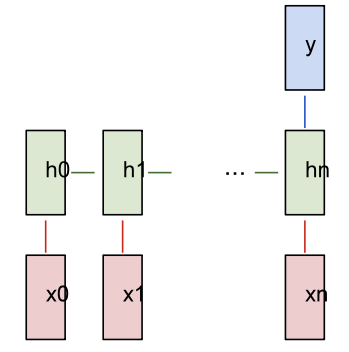
Many-to-one RNN
data.py
train_data = {
‘good’: True,
‘bad’: False,
# … more data
}
test_data = {
‘this is happy’: True,
‘i am good’: True,
# … more data
}
True=positive, False=negative
main.py
from data import train_data, test_data
# Create the vocabulary.
vocab = list(set([w for text in train_data.keys() for w in text.split(‘ ‘)]))
vocab_size = len(vocab)
print(‘%d unique words found’ % vocab_size) # 18 unique words found
main.py
# Assign indices to each word.
word_to_idx = { w: i for i, w in enumerate(vocab) }
idx_to_word = { i: w for i, w in enumerate(vocab) }
print(word_to_idx[‘good’]) # 16 (this may change)
print(idx_to_word[0]) # sad (this may change)
main.py
import numpy as np
def createInputs(text):
”’
Returns an array of one-hot vectors representing the words
in the input text string.
– text is a string
– Each one-hot vector has shape (vocab_size, 1)
”’
inputs = []
for w in text.split(‘ ‘):
v = np.zeros((vocab_size, 1))
v[word_to_idx[w]] = 1
inputs.append(v)
return inputs
rnn.py
import numpy as np
from numpy.random import randn
class RNN:
# A Vanilla Recurrent Neural Network.
def __init__(self, input_size, output_size, hidden_size=64):
# Weights
self.Whh = randn(hidden_size, hidden_size) / 1000
self.Wxh = randn(hidden_size, input_size) / 1000
self.Why = randn(output_size, hidden_size) / 1000
# Biases
self.bh = np.zeros((hidden_size, 1))
self.by = np.zeros((output_size, 1))

rnn.py
class RNN:
# …
def forward(self, inputs):
”’
Perform a forward pass of the RNN using the given inputs.
Returns the final output and hidden state.
– inputs is an array of one hot vectors with shape (input_size, 1).
”’
h = np.zeros((self.Whh.shape[0], 1))
# Perform each step of the RNN
for i, x in enumerate(inputs):
h = np.tanh(self.Wxh @ x + self.Whh @ h + self.bh)
# Compute the output
y = self.Why @ h + self.by
return y, h
main.py
# …
def softmax(xs):
# Applies the Softmax Function to the input array.
return np.exp(xs) / sum(np.exp(xs))
# Initialize our RNN!
rnn = RNN(vocab_size, 2)
inputs = createInputs(‘i am very good’)
out, h = rnn.forward(inputs)
probs = softmax(out)
print(probs) # [[0.50000095], [0.49999905]]
Link:
https://victorzhou.com/blog/softmax/


https://github.com/vzhou842/rnn-from-scratch
rnn.py


main.py
# Loop over each training example
for x, y in train_data.items():
inputs = createInputs(x)
target = int(y)
# Forward
out, _ = rnn.forward(inputs)
probs = softmax(out)
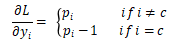
# Build dL/dy
d_L_d_y = probs d_L_d_y[target] -= 1
# Backward
rnn.backprop(d_L_d_y)

rnn.py
class RNN:
# …
def backprop(self, d_y, learn_rate=2e-2):
”’
Perform a backward pass of the RNN.
– d_y (dL/dy) has shape (output_size, 1).
– learn_rate is a float.
”’
n = len(self.last_inputs)
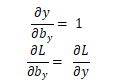
# Calculate dL/dWhy and dL/dby.
d_Why = d_y @ self.last_hs[n].T
d_by = d_y


rnn.py
class RNN:
# …
def backprop(self, d_y, learn_rate=2e-2):
‘’’
Perform a backward pass of the RNN.
– d_y (dL/dy) has shape (output_size, 1).
– learn_rate is a float.
‘’’
n = len(self.last_inputs)
# Calculate dL/dWhy and dL/dby.
D_Why = d_y @ self.last_hs[n].T
d_by = d_y
# Initialize dL/dWhh, dL/dWxh, and dL/dbh to zero.
D_Whh = np.zeros(self.Whh.shape)
d_Wxh = np.zeros(self.Wxh.shape)
d_bh = np.zeros(self.bh.shape)
# Calculate dL/dh for the last h.
d_h = self.Why.T @ d_y
# Backpropagate through time.
For t in reversed(range(n)):
# An intermediate value: dL/dh * (1 – h^2)
temp = ((1 – self.last_hs[t + 1] ** 2) * d_h)
# dL/db = dL/dh * (1 – h^2)
d_bh += temp
# dL/dWhh = dL/dh * (1 – h^2) * h_{t-1}
d_Whh += temp @ self.last_hs[t].T
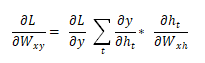
# dL/dWxh = dL/dh * (1 – h^2) * x
d_Wxh += temp @ self.last_inputs[t].T
# Next dL/dh = dL/dh * (1 – h^2) * Whh
d_h = self.Whh @ temp
# Clip to prevent exploding gradients.
For d in [d_Wxh, d_Whh, d_Why, d_bh, d_by]:
np.clip(d, -1, 1, out=d)
# Update weights and biases using gradient descent.
Self.Whh -= learn_rate * d_Whh
self.Wxh -= learn_rate * d_Wxh
self.Why -= learn_rate * d_Why
self.bh -= learn_rate * d_bh
self.by -= learn_rate * d_by
main.py
import random
def processData(data, backprop=True):
”’
Returns the RNN’s loss and accuracy for the given data.
– data is a dictionary mapping text to True or False.
– backprop determines if the backward phase should be run.
”’
items = list(data.items())
random.shuffle(items)
loss = 0
num_correct = 0
for x, y in items:
inputs = createInputs(x)
target = int(y)
# Forward
out, _ = rnn.forward(inputs)
probs = softmax(out)
# Calculate loss / accuracy
loss -= np.log(probs[target])
num_correct += int(np.argmax(probs) == target)
if backprop:
# Build dL/dy
d_L_d_y = probs
d_L_d_y[target] -= 1
# Backward
rnn.backprop(d_L_d_y)
return loss / len(data), num_correct / len(data)
main.py
# Training loop
for epoch in range(1000):
train_loss, train_acc = processData(train_data)
if epoch % 100 == 99:
print(‘— Epoch %d’ % (epoch + 1))
print(‘Train: Loss %.3f | Accuracy: %.3f’ % (train_loss, train_acc))
test_loss, test_acc = processData(test_data, backprop=False)
print(‘Test: Loss %.3f | Accuracy: %.3f’ % (test_loss, test_acc))
— Epoch 100
Train: Loss 0.688 | Accuracy: 0.517
Test: Loss 0.700 | Accuracy: 0.500
— Epoch 200
Train: Loss 0.680 | Accuracy: 0.552
Test: Loss 0.717 | Accuracy: 0.450
— Epoch 300
Train: Loss 0.593 | Accuracy: 0.655
Test: Loss 0.657 | Accuracy: 0.650
— Epoch 400
Train: Loss 0.401 | Accuracy: 0.810
Test: Loss 0.689 | Accuracy: 0.650
— Epoch 500
Train: Loss 0.312 | Accuracy: 0.862
Test: Loss 0.693 | Accuracy: 0.550
— Epoch 600
Train: Loss 0.148 | Accuracy: 0.914
Test: Loss 0.404 | Accuracy: 0.800
— Epoch 700
Train: Loss 0.008 | Accuracy: 1.000
Test: Loss 0.016 | Accuracy: 1.000
— Epoch 800
Train: Loss 0.004 | Accuracy: 1.000
Test: Loss 0.007 | Accuracy: 1.000
— Epoch 900
Train: Loss 0.002 | Accuracy: 1.000
Test: Loss 0.004 | Accuracy: 1.000
— Epoch 1000
Train: Loss 0.002 | Accuracy: 1.000
Test: Loss 0.003 | Accuracy: 1.000
https://github.com/vzhou842/rnn-from-scratch
-
Learn about Long Short-Term Memory networks (LSTMs), which are a more powerful and popular RNN architecture, or the famous variant of LSTMs – Gated Recurrent Units (GRUs).
-
Using proper ML libraries (like Tensorflow, Keras, or PyTorch), you can experiment with larger/better RNNs.
-
Learn about Bidirectional RNNs, which can process sequences in both forward and backward directions, allowing the output layer to gain more information.
-
Experiment with Word embeddings like GloVe or Word2Vec, which can convert words into more useful vector representations.
-
Check out the Natural Language Toolkit (NLTK), a Python library for processing human language data.
Editor: Yu Tengkai
Proofreader: Yang Xuejun
Translator’s Profile

Wang Yutong, a master’s student in statistics at UIUC, undergraduate major in statistics, currently focusing on improving coding skills. In the transition from theory to application, I respect data and continue to evolve.
Translation Team Recruitment Information
Job Content: A meticulous heart is needed to translate selected foreign articles into fluent Chinese. If you are an international student in data science/statistics/computer science, or working overseas in related fields, or confident in your language skills, you are welcome to join our translation team.
What You Get: Regular translation training to improve volunteers’ translation skills, enhance awareness of cutting-edge data science, overseas friends can stay connected with domestic technology application development, and THU Data Team’s industry-university-research background provides good development opportunities for volunteers.
Other Benefits: You will have the opportunity to work with data scientists from renowned companies and students from prestigious universities like Peking University, Tsinghua University, and other overseas institutions.
Click on the end of the article “Read Original” to join the Data Team~


Click on “Read Original” to embrace the organization