Deepfake technology uses deep neural networks to replace a face in a video with another face. This realistic technology has potential for misuse, yet it is becoming increasingly popular.
In this article, I will take a close look at the technology itself by creating my own work to answer: How does Deepfake software work? How difficult is it to use? What will the results be?
I started with a video of “Little Zuck” testifying in Congress and replaced his face with that of Commander Data (Brent Spiner) from Star Trek: The Next Generation. Total cost: $552.
The video is not perfect as it does not fully capture all the details of Mr. Data’s face; upon close observation, some artifacts can be seen at the edges of the face.
However, it is worth noting that a novice like me can produce a video of this level so quickly and at such a low cost. Therefore, in the coming years, Deepfake technology will continue to improve and become cheaper.
Deepfake Requires Significant Computing Power and Data
We call it Deepfake because it uses deep neural networks. Over the past decade, computer scientists have discovered that the more layers of neurons you add, the more powerful the neural network becomes, but to unlock the full potential of these deeper networks requires a lot of data and computing power.
This is how Deepfake works. To create my own Deepfake, I first rented a virtual machine with four powerful graphics cards. Even so, training my Deepfake model took nearly a week.
Then, I needed a bunch of images of Little Zuck and Mr. Data. The final video above is only 38 seconds long, but I needed to collect more material for training.
To do this, I downloaded a bunch of videos featuring their facial expressions: 14 videos of Mr. Data and 9 videos of Little Zuck, including his official speeches, two TV interviews, and even footage of him smoking in his backyard.
I loaded all these clips into iMovie and removed parts that did not feature the faces of Little Zuck or Mr. Data. I also cut down longer sequences because Deepfake software requires not just a large number of images but also a variety of different images. It needs to see a face from different angles, with different expressions, and under different lighting conditions. A video of Little Zuck’s speech that lasts an hour may not provide more value than a five-minute clip of the same speech because it just shows the same angles and expressions under the same lighting conditions repeatedly. Therefore, several hours of footage were ultimately reduced to 9 minutes of Mr. Data and 7 minutes of Little Zuck videos.
Faceswap: End-to-End Deepfake Software
It was time to use Deepfake software. Initially, I tried a program called DeepFaceLab and managed to produce a rough Deepfake video using it.
However, when I posted the video on the SFWdeepfakes subreddit, some suggested I switch to Faceswap because it offers more features, better documentation, and better online support. So, I decided to take their advice.
Faceswap runs on Linux, Windows, and Mac, covering every step of the Deepfake process from importing the initial video to generating the complete Deepfake video. It also comes with detailed tutorials (the tutorial is written by Faceswap developer Matt Tora).
Faceswap requires powerful graphics cards, and my six-year-old MacBook Pro was obviously not up to the task. Therefore, I rented a virtual Linux machine from a cloud provider.
I started with an instance that had an Nvidia K80 GPU and 12GB of graphics memory. After a few days of training, I upgraded to 2 GPU mode, and then again to 4 GPUs. It has 4 Nvidia T4 Tensor Core GPUs, each with 16GB of memory (it also has 48 vCPUs and 192GB of RAM; most of the memory goes unused since training neural networks requires a lot of GPUs).
Over the course of two weeks, I spent $552 on cloud computing. Undoubtedly, I paid a high price for renting computer hardware. Faceswap developer Tora told me that the “best option” for Deepfake hardware currently is at least an Nvidia GTX 1070 or 1080 card with 8GB VRAM, although you can also choose to buy a card for a few hundred dollars. Of course, a single 1080 card cannot train a neural network as quickly as the four GPUs I used, but with a few weeks of waiting, you can achieve similar training results, just a bit slower.
Steps of Faceswap:
1. Extraction: Cut the video into frames, detect faces in each frame, and output aligned cropped images of each face.
2. Training: Use the extracted images to train a Deepfake neural network that can take an image of one face and output an image of another face in the same pose, expression, and lighting.
3. Conversion: In the final step, apply the trained model to a specific video to produce the deepfake effect. The trained model can be applied to any video containing the training subjects.
The manpower and computational resources required for these three steps are completely different.
The extraction software can complete its task in a few minutes, but it may take hours of manual checking to verify the results, as the software marks every face in each extracted image, along with a fair number of false positives. For better results, irrelevant faces and anything the software mistakenly identifies as a face must be manually checked and removed.
In contrast, training requires almost no human supervision. However, it can take days or even weeks of computation to achieve results. I started training my final model on December 7 and ran it until December 13. If I had trained for another week, the quality of my Deepfake might have improved further. If you are working on a personal computer with less powerful GPUs, training the model could take weeks.
The final step, conversion, can produce the Deepfake video file in less than a minute once you have the final model.
How Deepfake Works
Before describing my Faceswap training process, let’s explain the underlying technology.
Autoencoders are at the core of Faceswap and other leading Deepfake software packages. This is a trained neural network that takes an input image and outputs an identical image. This may seem useless, but as we will see, it is a key part of creating Deepfakes.
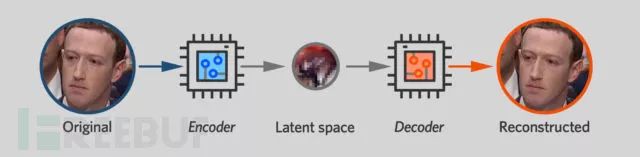
The structure of the autoencoder looks like two funnels glued together at the narrow end. One end of the neural network is the encoder, which takes an image and compresses it into a small number of variables. In the Faceswap model I used, it consists of 1024 32-bit floating-point values. The other end of the neural network is the decoder. It takes this compact form, known as the “latent space,” and attempts to expand it back to the original image.
By artificially limiting how much data the encoder can pass to the decoder, both networks are forced to develop a compact representation for the face.
You can think of the encoder as a lossy compression algorithm — it attempts to capture as much facial information as possible within limited storage space. The latent space must capture important details, such as the direction the object is facing, whether the object’s eyes are open or closed, and whether the object is smiling or frowning.
Crucially, the autoencoder only needs to record the various aspects of a face as it changes over time, not permanent details like eye color or nose shape. For example, if every photo of Little Zuck shows him with blue eyes, then the Zuck decoder network will learn to render his face with blue eyes automatically.
There is no need to clutter the latent space with information that is invariant from one image to another. As we will see, the autoencoder’s distinction between temporary features of a face and permanent features is key to its ability to generate deepfakes.
Every algorithm for training neural networks requires some method to evaluate the network’s performance so that it can be improved. In many cases, one needs to train an optimal model using existing training samples (i.e., known data and its corresponding output), which is called supervised training. But autoencoders are different; they simply replicate their input, so the training software can automatically assess its performance, which is called unsupervised training.
Like any neural network, the autoencoder in Faceswap uses backpropagation for training. The training algorithm inputs a specific image into the neural network and identifies which pixels in the output do not match the input. It then calculates where in the last layer of the neural network the problem occurred and adjusts the parameters of each neuron.
The error then propagates to the second-to-last layer, adjusting the parameters of each neuron again. The error propagates backward in this way until every parameter in the neural networks of the encoder and decoder has been adjusted.
The training algorithm then feeds another image into the network, and the entire process repeats. This process might need to be iterated hundreds of thousands of times to generate the autoencoder.
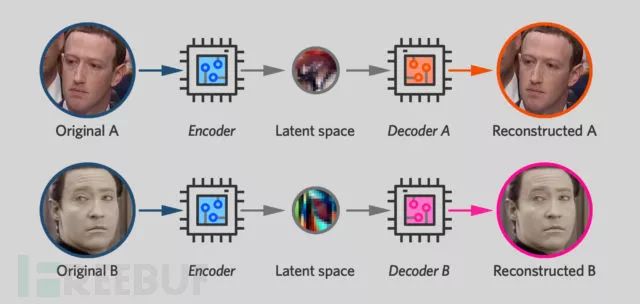
Deepfake software works by training two autoencoders side by side, one for the original face and one for the new face. During training, each autoencoder is shown images of only one person and trained to produce images that closely resemble the original photos.
However, there is one difference: while both networks use the same encoder units, the decoders (the neurons on the right side of the network) remain separate, with each neuron trained to produce different faces. However, the neurons on the left side of the network have shared parameters, which can be modified at any time while training the autoencoder network. When training the Zuck network on Zuck’s face, the encoder for Mr. Data is also modified. Likewise, every time the Mr. Data network is trained on Mr. Data’s face, the Zuck encoder also undergoes these modifications.
Thus, both autoencoders share an encoder that can “read” the faces of either Zuck or Mr. Data.
Whether it is a photo of Zuck or Mr. Data, the goal of the encoder is to represent the head angle or eyebrow position using the same representation. This means that if you compress a face with the encoder, you can expand it with either decoder.
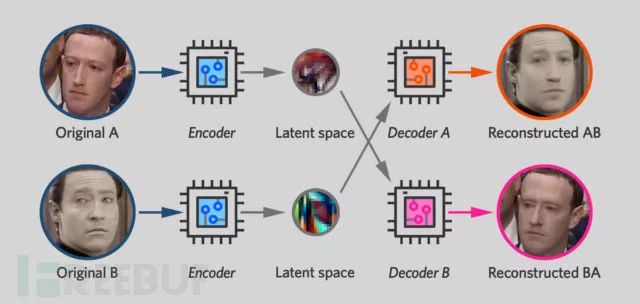
Therefore, once two autoencoders are trained in this way, the steps for creating a Deepfake are straightforward.
As we mentioned earlier, the latent space tends to capture the transient features of the face (expressions, the direction the person is facing, eyebrow position), while permanent features (such as eye color or mouth shape) are produced by the decoder. This means that if you encode an image of Zuck and then decode it using the Data decoder, you will have a face with Mr. Data’s permanent features (e.g., his facial shape) but with Zuck’s expression and orientation.
If this technique is applied to consecutive frames of Zuck’s video, a new video can be obtained where Mr. Data’s face moves in the same way that Zuck does in the original video, including smiling, blinking, and turning his head.
This is reciprocal. When you train a neural network to input Zuck’s photos and output Mr. Data’s photos, you are simultaneously training the network to ingest Mr. Data’s photos and output Zuck’s photos. The video conversion tool in Faceswap includes a “swap model” checkbox that allows users to swap decoders. The result: it does not replace Mr. Data’s face with Zuck’s face but does the opposite, producing a funny video like this:
Training Data
In practice, creating a good video with Deepfake software is not easy.
As previously mentioned, I collected about 7 minutes of video footage of Mr. Data and 9 minutes of video footage of Zuck. Then, I used Faceswap’s extraction tool to cut the videos and obtain cropped images of the two men’s faces. The videos have about 30 frames per second, but I only extracted one-sixth of the images because the diversity of images is more important than the original quantity. Capturing every frame of the video means you would also harvest a lot of very similar images.
At the same time, Faceswap’s extraction tool produced a large number of false positives, even identifying faces in the backgrounds of some shots. Therefore, I spent several hours manually deleting all extracted photos that did not feature the two characters. In the end, I obtained 2598 images of Mr. Data’s face and 2224 images of Zuck’s face.
At this point, I could finally start training my model. Currently, Faceswap comes pre-packaged with 10 different Deepfake algorithms that support different image sizes and different computational requirements. Underneath, there is a “lightweight” model that can handle side 64-pixel face images. It can run on computers with less than 2GB VRAM. Other models can handle side 128, 256, or even 512-pixel images but require more video memory and longer training times.
I started training a model called DFL-SAE, but Faceswap documentation warned that this model suffers from “identity bleed,” where certain features of one face bleed into another. After a day of training, I switched to another model called Villain, which can handle 128-pixel images. Then I waited and waited; after six days of training, it was still ongoing. At this point, the model was already capable of producing very good Deepfakes, but if I had another week of computation time, I might achieve better results.
Faceswap software is meticulously designed for long computation tasks. If you run the training command from the graphical user interface, the GUI will periodically update the preview screen, showing examples of how the software is rendering Data and Zuck. If you prefer to train from the command line, you can do that too. The Faceswap GUI includes a “generate” button that executes the exact command you need to perform.
How good can DeepFakes get?
During training, Faceswap continuously displays the respective numerical scores of the two autoencoders, known as losses. These numbers indicate that the autoencoders for Zuck and Mr. Data can reproduce their photos well. When I stopped training last Friday, these “loss” numbers still seemed to be decreasing.
Of course, what we really care about is how well the Mr. Data decoder can convert Zuck’s face into Mr. Data’s face. We do not know what these “converted images” look like, so we cannot accurately measure the quality of the results. All we can do is keep watching until it looks somewhat normal.
The work displayed in the four training processes above shows the effects of DeepFakes, with the facial details of the characters becoming more lifelike as training progresses.
After three days of training, on December 9, I released the initial video, just like the video in the upper right corner, and the results were harshly criticized: “Overall, it looks terrible and completely unconvincing. I have not seen any of them that does not look fake.”
Indeed, there were many signs. In some frames, the boundary between Mr. Data’s face and Little Zuck’s head was not quite right, and sometimes Little Zuck’s beauty was visible behind Mr. Data’s face. These compositing issues require a lot of manual post-processing, which means going through the video frame by frame and adjusting masks.
However, the more fundamental problem is that the deepfake algorithm seems to struggle with replicating the finest details of a face. For instance, even after nearly a week of training, the face still looks somewhat blurry and lacks detail. The deepfake software also seems unable to render a person’s teeth consistently. Sometimes, the teeth are clearly visible, but a few frames later, the person’s mouth becomes a black void, with no teeth visible.
At higher resolutions, the “face swap” problem becomes increasingly difficult. Autoencoders can reproduce 64 x 64 pixel images well, but reproducing the fine details of 128 x 128 images (let alone 256 pixel or higher resolution images) remains a significant challenge. This may also be one reason why many Deepfakes tend to be relatively wide shots rather than close-ups of someone’s face.
However, in the coming years, researchers are likely to develop technologies that overcome these limitations.
Deepfake software is often mistakenly thought to be based on Generative Adversarial Networks (GANs), but in reality, it is based on autoencoders, not GANs. However, the latest advancements in GAN technology suggest that there is still significant room for improvement in deepfakes.
When GANs were first introduced in 2014, they could only generate blocky low-resolution images. However, recently, researchers have figured out how to design GANs that can generate realistic images of up to 1024 pixels. The specific techniques used in these papers may not apply to Deepfake, but it can be imagined that similar techniques could be developed for autoencoders to perform facial expression transfer.
Conclusion
The proliferation of Deepfake is clearly a concerning issue. The emergence of these software and other digital tools means we must watch videos with a skeptical eye. If we see a video of someone saying something shameful or taking off their clothes, we must consider whether it has been artificially fabricated.
In my experiment, at least for now, Deepfake technology has limitations: it requires a lot of knowledge and effort to produce a completely convincing virtual face. Moreover, it can only swap faces, not hair, arms, or legs, so these factors can be used to identify Deepfake videos.
Of course, in a few years, Deepfake technology will progress. It can be said that the development of Deepfake is inevitable, and creating a user-friendly open-source face-swapping tool will help demystify the technology and educate the public about its capabilities and limitations.
Certainly, there are long-term risks: Deepfakes could completely undermine public trust in video evidence.
*References: arstechnica, compiled by kirazhou, please credit FreeBuf.COM

Recommended Articles