
Are you still troubled by the uneven quality of AI in the country and its poor performance?
Then let’s take a look at Dev Cat AI (3in1).
This is an integrated AI assistant that combines GPT-4, Claude3, and Gemini.
It covers all models of the three AI tools.
Including GPT-4o and Gemini flash
Now you can own them for only ¥68.
The official value is ¥420+.
Send “Dev Cat” in the backend to start using.
Become a member now to enjoy one-on-one private service, ensuring your usage is safeguarded.

The AI coding assistant GitHub Copilot has recently launched Copilot Extensions to enhance its ecosystem. This feature is currently in public testing, allowing developers to create custom extensions integrated with Copilot. In this article, we will introduce the process of creating your first GitHub Copilot extension.
Before we start, you need to have a valid GitHub Copilot subscription to create and use Copilot extensions.
Create Endpoints for Your Copilot Extension
Copilot extensions are essentially GitHub applications with specific endpoints. Let’s set up the project and create these endpoints, which will together form your Copilot extension.
Set Up Your Project
In this article, we are using Hono.js as our web framework, but you can use any web framework or web server of your choice.

Hono is a fast, lightweight web framework built using web standards API.
Regardless of which framework you choose, the core concepts remain the same. The only thing to note is that the only supported languages currently are TypeScript and JavaScript.
-
Create a new Hono project using Hono CLI:
npm create hono@latest -
Follow the prompts to set up your project. This will create a new TypeScript project using the lightweight and fast web framework Hono.js.
-
Install the preview SDK for Copilot extensions and Octokit core package:
npm install @copilot-extensions/preview-sdk @octokit/core -
Check the SDK details here: https://github.com/copilot-extensions/preview-sdk.js.
-
Open your main file (e.g.,
src/index.ts) and start importing the necessary dependencies:import { Hono } from 'hono' import { serve } from '@hono/node-server'; import { Octokit } from "@octokit/core"; import { createAckEvent, createDoneEvent, createErrorsEvent, createTextEvent, getUserMessage, verifyAndParseRequest, } from "@copilot-extensions/preview-sdk"; const app = new Hono();
Implement Endpoints
Now, let’s implement the endpoint that handles requests from GitHub Copilot:
-
Create a root route
/to receive form submissions. This is the endpoint that Copilot will interact with:app.post("/", async (c) => { // ... (we'll fill this in next) }); -
When a message arrives, you need to verify the request and parse the valid payload:
// Identify the user, using the GitHub API token provided in the request headers. const tokenForUser = c.req.header("X-GitHub-Token") ?? ""; const body = await c.req.text(); const signature = c.req.header("github-public-key-signature") ?? ""; const keyID = c.req.header("github-public-key-identifier") ?? ""; const { isValidRequest, payload } = await verifyAndParseRequest( body, signature, keyID, { token: tokenForUser, } ); if (!isValidRequest) { console.error("Request verification failed"); c.header("Content-Type", "text/plain"); c.status(401); c.text("Request could not be verified"); return; } -
After verifying the request, process the message and create a response. Here’s a simple example that greets the user:
c.header("Content-Type", "text/html");
c.header("X-Content-Type-Options", "nosniff");

return stream(c, async (stream) => {
  try {
    // Let GitHub Copilot know we are doing something
    await stream.write(createAckEvent());

    const octokit = new Octokit({ auth: tokenForUser });
    const user = await octokit.request("GET /user");
    const prompt = getUserMessage(payload);

    await stream.write(
      createTextEvent(
        `Welcome ${user.data.login}! It looks like you asked the following question, "${prompt}". `
      )
    );

    await stream.write(
      createTextEvent(
        "This is a GitHub Copilot extension template, so it's up to you to decide what you want to implement to answer prompts."
      )
    );

    await stream.write(createDoneEvent());
  } catch (error) {
    await stream.write(
      createErrorsEvent([
        {
          type: "agent",
          message: error instanceof Error ? error.message : "Unknown error",
          code: "PROCESSING_ERROR",
          identifier: "processing_error",
        },
      ])
    );
  }
});
This example uses the GitHub Octokit package to get the user’s login name. The createTextEvent function is used to create the response that GitHub Copilot will display. Note that we are streaming the response so that we can signal to GitHub Copilot that something is happening, i.e., createAckEvent(). The acknowledgment event will update the Copilot user interface to show a spinning indicator, indicating that something is happening.
Publish Your Extension
To test your Copilot extension, you need to make it publicly accessible:
-
If using Visual Studio Code (VS Code), enable port forwarding. Note that ports are private by default, but for our use case, we need to set it to public.

-
Alternatively, use tools like cloudflared or ngrok to expose a public URL.
In the provided code, the server is set to run on port 3000:
const port = 3000;
console.log(`Server is running on port ${port}`);

serve({
  fetch: app.fetch,
  port,
});
This setup is great for testing, but once you are ready to publish your extension, you will need to deploy the web application (acting as the GitHub application) to a publicly accessible location.
Create a GitHub Application
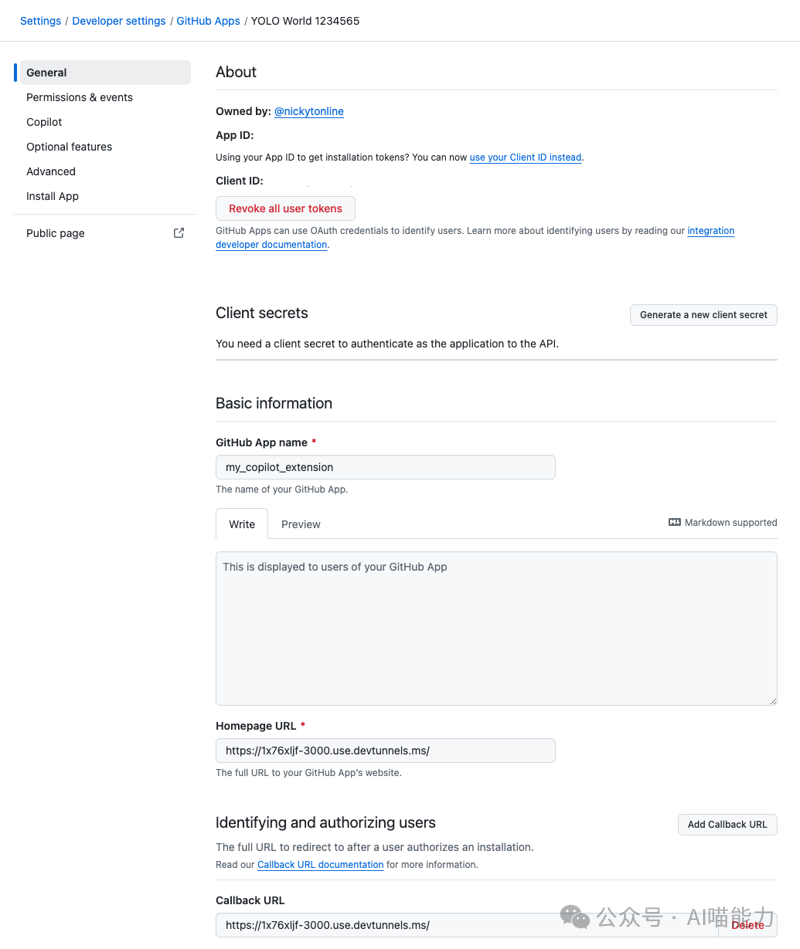
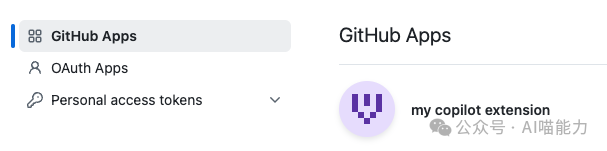
Create a new GitHub application for testing on your personal account. Go to the settings page on GitHub, and click the “Developer settings” link at the bottom left. This will take you to your GitHub applications. You can also navigate directly to your GitHub applications page https://github.com/settings/apps.
General Settings
-
Enter a name for the GitHub App, such as
my copilot extension. -
Enter the URL of the homepage. Currently, this can be the same as the testing URL.
-
Set the callback URL (currently required). This can also be the same as the testing URL. Even if you are not using OAuth, you still need to enter a URL here. You won’t need to do this later.
-
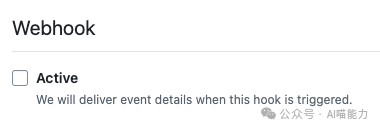
If webhooks are enabled, disable them.
-
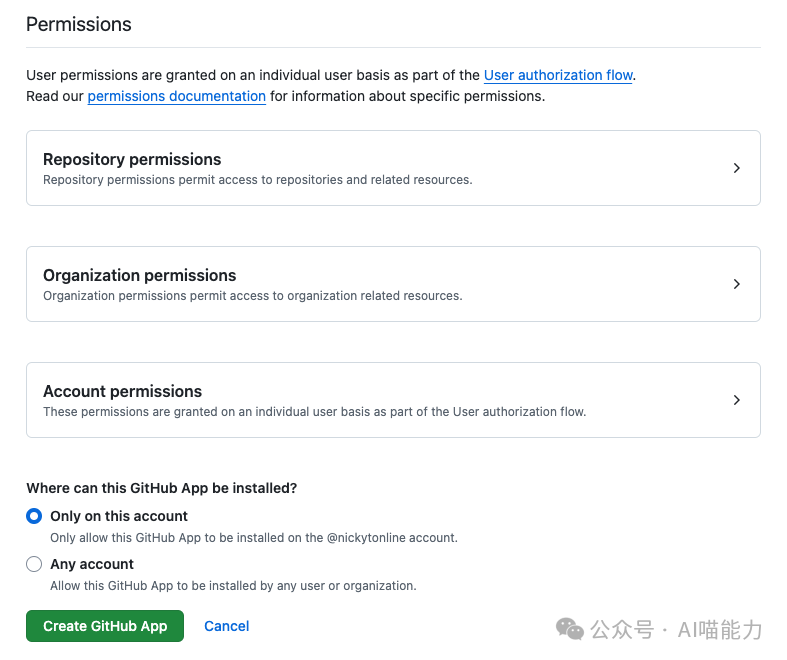
Ensure that the application is initially only accessible to you. When you are ready to publicly release the GitHub Copilot extension, you can enable it for everyone.
-
Click the Create GitHub Application button to create the GitHub application.
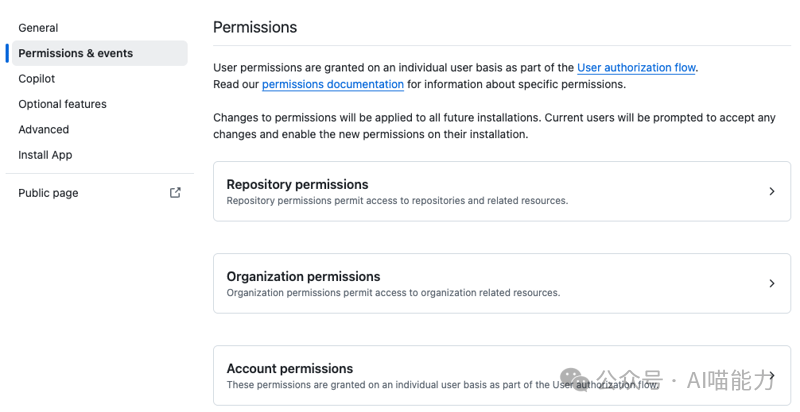
Permissions and Event Settings
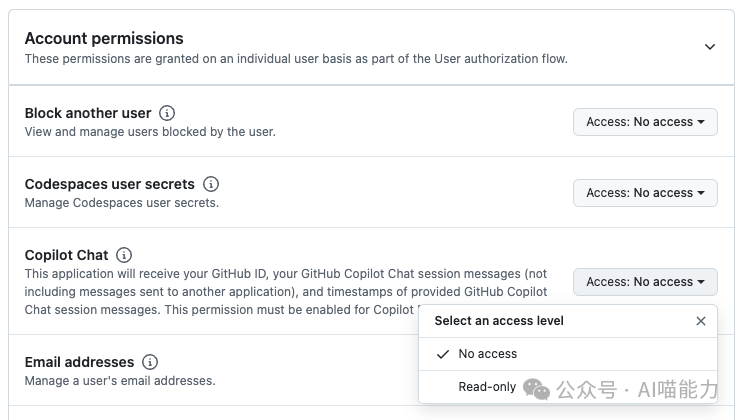
Next, we need to configure the permissions. We want to provide the minimum permissions required for the Copilot extension to function properly.
-
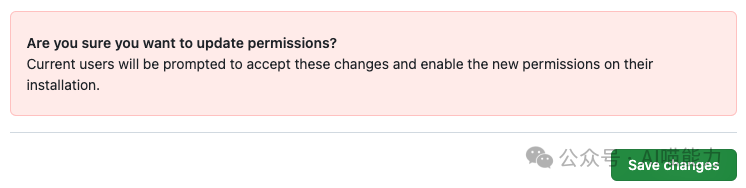
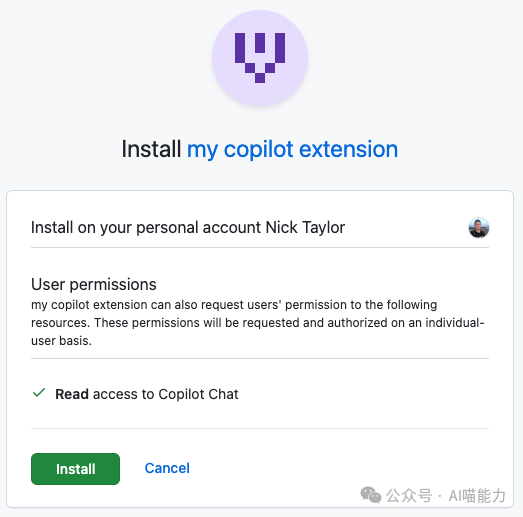
Expand the “Account Permissions” section and set the “Copilot Chat” permission to “read-only”. The default is “no access”.
-
Click “Save Changes”.
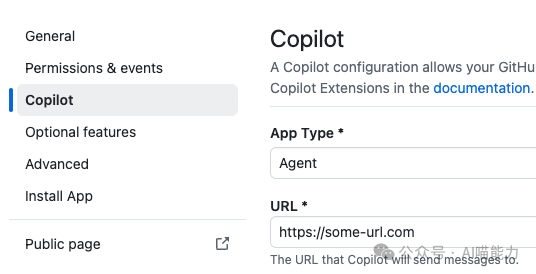
Copilot Settings
-
Set the application type to agent. By default, it is set to disabled.
-
Set the URL to the root directory of the public URL exposed via tunneling/port forwarding.
-
Click save.
Congratulations! You have configured your first Copilot extension!
Install Your Copilot Extension
Before we can use the extension, we must install it.
-
Navigate to your GitHub application in the developer settings.

-
Click the Edit button to edit the application.
-
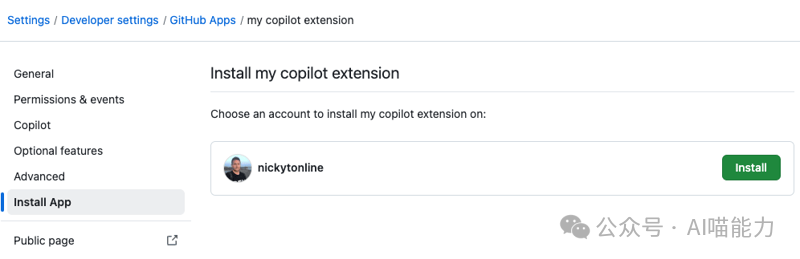
Go to the “Install Application” section of the GitHub application settings.
-
Click the “Install” button to install the application.
-
You will go to an intermediate page to confirm the installation of the GitHub application. Click the “Install” button.
-
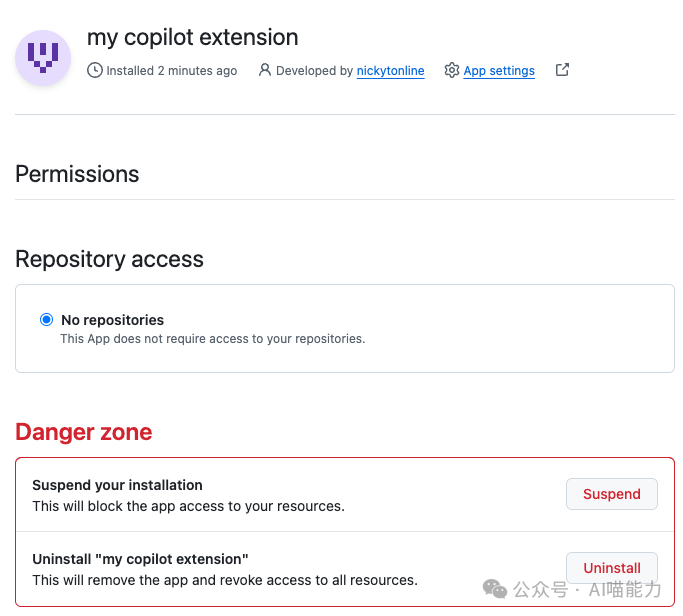
Your Copilot extension has been installed for your GitHub account.
Test Your Extension
You can test your Copilot extension in the following environments:
-
Copilot chat on GitHub.com
-
Copilot chat in VS Code
-
Copilot chat in Visual Studio
For these environments, follow the steps below:
-
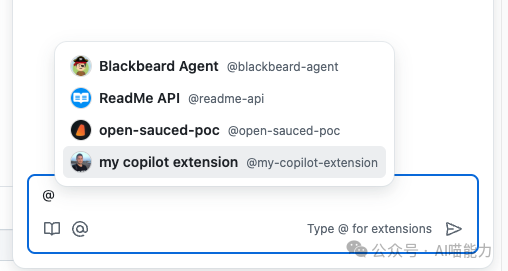
In the GitHub Copilot chat, type “@” to see the available extensions.
-
Your extension should appear as something like “@my-copilot-extension”.
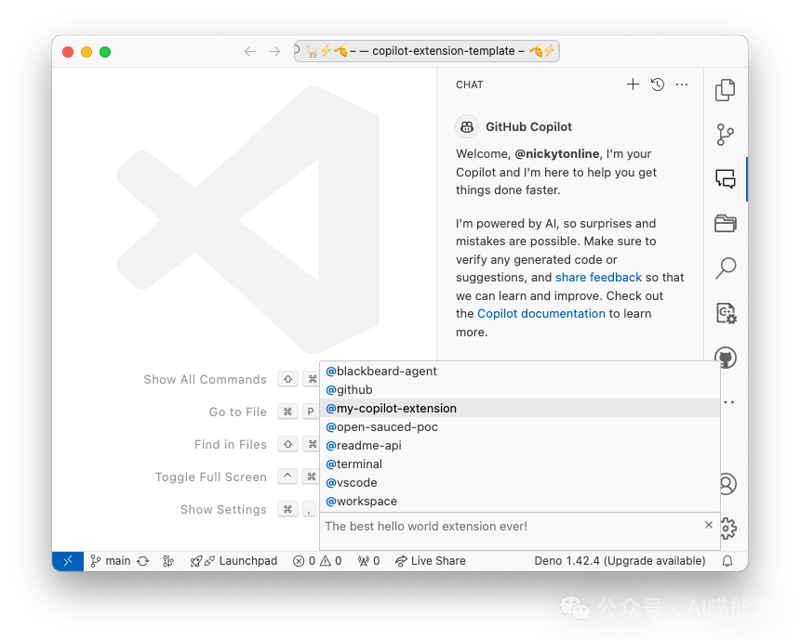
-
Select your host and ask a question or perform an action.
-
The Copilot extension will return “Welcome your_github_username! It looks like you asked the following question, “your_question”. This is a GitHub Copilot extension template, so you can decide what to implement to answer the prompt.
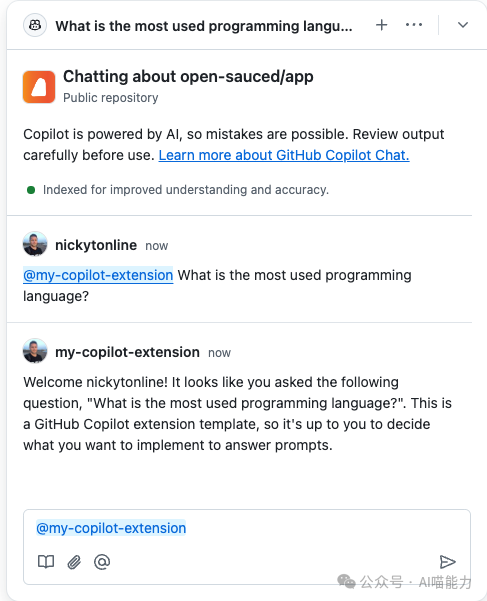
Since this feature has not yet been implemented, it will not answer your specific questions. You can explore the preview SDK here or integrate with third-party services to provide more meaningful responses.

If you found this helpful, don’t rush 😝 hit “Share and View” before you scroll away🫦