

In this extremely detailed Tutorial, we will explore LangGraph — a powerful library for coordinating complex multi-step workflows, suitable for large language models (LLMs) — and apply it to a common e-commerce problem: deciding whether to place or cancel an order based on user queries. By the end of this blog, you will understand how to:
-
1. Set up LangGraph in a Python environment. -
2. Load and manage data (e.g., inventory and customers). -
3. Define nodes (individual tasks in the workflow). -
4. Build a graph of nodes and edges, including conditional branches. -
5. Visualize and test the workflow.
We will proceed step by step, explaining each concept in detail — perfect for beginners and those looking to build dynamic or iterative workflows using LLMs. I will also provide links to datasets for you to try.
Table of Contents
What is LangGraph?
Problem Statement: Order Management
Import Instructions
Data Loading and State Definition
Creating Tools and LLM Integration
Defining Workflow Nodes
Building the Workflow Graph
Visualizing and Testing the Workflow
Conclusion
What is LangGraph?
LangGraph is a library that brings a graph-based approach to LangChain workflows. Traditional pipelines typically move linearly from one step to another, but real-world tasks often require branching, conditional logic, and even loops (retrying failed steps, clarifying user input, etc.).
Main features of LangGraph:
-
• Nodes: Individual tasks or functions (e.g., checking inventory, calculating shipping costs). -
• Edges: Define the flow of data and control between nodes. Can be conditional. -
• Shared State: Each node can return data that updates a global state object, avoiding the need to pass data manually. -
• Tool Integration: Easily integrate external tools or functions for LLM calls. -
• Human-Machine Collaboration (optional): Insert nodes that require human review.
Problem Statement: Order Management
In this scenario, user queries can be about placing a new order or canceling an existing order:
-
• PlaceOrder: Check product availability, calculate shipping costs, and simulate payment. -
• CancelOrder: Extract <span>order_id</span>and mark the order as canceled.
Since we need to branch (decide between “PlaceOrder” and “CancelOrder”), we will use LangGraph to create a conditional flow:
-
1. Classify the query. -
2. If PlaceOrder, move to check inventory, shipping costs, and payment. -
3. If CancelOrder, parse out <span>order_id</span>and call the cancel tool.
Import Instructions
Below is the exact first part of the code you provided, showcasing the imports and environment setup. We added comments after the code to explain each part.
### Import required libraries
import os
import pandas as pd
import random
from langchain_core.tools import tool
from langchain_openai import ChatOpenAI
from langgraph.prebuilt import ToolNode
from langgraph.graph import StateGraph, MessagesState, START, END
from langchain_core.runnables.graph import MermaidDrawMethod
from IPython.display import display, Image
from typing import Literal
from langchain_core.prompts import ChatPromptTemplate
from typing import Dict, TypedDict

### Load environment variables
os.environ["OPENAI_API_KEY"] = ""
langchain_core.tools, langchain_openai, ToolNode, etc.:
-
• <span>tool</span>(a decorator) converts a Python function into a “tool” that can be called by LLMs. -
• <span>ChatOpenAI</span>is our LLM client for interacting with the GPT model. -
• <span>ToolNode</span>is a prebuilt node from<span>langgraph.prebuilt</span>responsible for executing tools. -
• <span>StateGraph</span>,<span>MessagesState</span>,<span>START</span>,<span>END</span>from<span>langgraph.graph</span>— they are crucial for defining our workflow. -
• <span>MermaidDrawMethod</span>helps visualize the workflow as a Mermaid.js chart.
Data Loading and State Definition
Data link:Data
In the next code snippet, we load CSV files (for inventory and customers) and convert them into dictionaries. We also define our state type dictionary.
### Load datasets
inventory_df = pd.read_csv("inventory.csv")
custome...  # Truncated for brevity
CSV to Dictionary:
-
• <span>inventory</span>and<span>customers</span>are dictionaries keyed by<span>item_id</span>or<span>customer_id</span>. This makes operations like<span>inventory[item_51]</span>easy.
State:
-
• A type dictionary so we know what fields to expect. For example, <span>query</span>,<span>category</span>,<span>item_id</span>, etc. -
• <span>category</span>is typically “PlaceOrder” or “CancelOrder”. -
• <span>next_node</span>can store the name of the next node, though we rely on the edges of the graph for transitions. -
• This helps track everything in one object — inventory checks, payment status, etc.
Creating Tools and LLM Integration
Now we define our LLM and tools. The main tool here is <span>cancel_order</span>, which uses the LLM to extract <span>order_id</span> from the query.
@tool
def cancel_order(query: str) -> dict:
    """Simulate order cancelling"""
    order_id = llm.with_structured_output(method='json_mode').invoke(f'Extract order_id from the following text in json format: {query}')['order_id']
    #amount = query.get("amount")

    if not order_id:
        return {"error": "Missing 'order_id'."}

    return {"order_status": "Order stands cancelled"}


### Initialize LLM and bind tools
llm = ChatOpenAI(model="gpt-4o-mini", temperature=0)

tools_2 = [cancel_order]
llm_with_tools_2 = llm.bind_tools(tools_2)
tool_node_2 = ToolNode(tools_2)<span>@tool</span>:
-
• <span>cancel_order</span>function is now a tool that LLM can call if it decides to cancel an order.
Extract <span>order_id</span>:
-
• We call <span>llm.with_structured_output(method='json_mode')</span>to instruct the LLM to return JSON. We then parse out<span>'order_id'</span>.
LLM Initialization:
-
• <span>model="gpt-4o-mini"</span>is the chosen model,<span>temperature=0</span>for deterministic responses.
Binding and <span>ToolNode</span>:
-
• <span>llm.bind_tools(tools_2)</span>connects our LLM to the<span>cancel_order</span>tool. -
• <span>ToolNode</span>is a dedicated node that can automatically handle these bound tools.
Defining Workflow Nodes
We will now start defining nodes one by one.
Model Calling Node
These nodes can call the model
def call_model_2(state: MessagesState):
    """Use the LLM to decide the next step."""
    messages = state["messages"]
    response = llm_with_tools_2.invoke(str(messages))
    return {"messages": [response]}


def call_tools_2(state: MessagesState) -> Literal["tools_2", END]:
    """Route workflow based on tool calls."""
    messages = state["messages"]
    last_message = messages[-1]

    if last_message.tool_calls:
        return "tools_2"
return END-
• <span>call_model_2</span>: Receives the conversation (<span>messages</span>) and passes it to the LLM with tools. If the LLM triggers a tool call, we will detect it in<span>call_tools_2</span>. -
• <span>call_tools_2</span>: Checks if the LLM requested a tool call (<span>tool_calls</span>). If so, we route to<span>"tools_2"</span>, otherwise, we end the workflow.
Classifying Queries
Here, we define a node to classify queries:
def categorize_query(state: MessagesState) -> MessagesState:
    """Categorize user query into PlaceOrder or CancelOrder"""
    prompt = ChatPromptTemplate.from_template(
        "Categorize user query into PlaceOrder or CancelOrder"
        "Respond with either 'PlaceOrder', 'CancelOrder' Query: {state}"
    )

    chain = prompt | ChatOpenAI(temperature=0)
    category = chain.invoke({"state": state}).content

return {"query":state,"category": category}-
• This node uses the LLM to classify the user’s query. The return value sets <span>"category"</span>in the state.
Checking Inventory
def check_inventory(state: MessagesState) -> MessagesState:
    """Check if the requested item is in stock."""

    item_id = llm.with_structured_output(method='json_mode').invoke(f'Extract item_id from the following text in json format: {state}')['item_id']
    quantity = llm.with_structured_output(method='json_mode').invoke(f'Extract quantity from the following text in json format: {state}')['quantity']

    if not item_id or not quantity:
        return {"error": "Missing 'item_id' or 'quantity'."}

    if inventory.get(item_id, {}).get("stock", 0) >= quantity:
        print("IN STOCK")
        return {"status": "In Stock"}
return {"query":state,"order_status": "Out of Stock"}-
• Attempts to parse <span>item_id</span>and<span>quantity</span>from the conversation. -
• Checks <span>inventory[item_id]["stock"]</span>to confirm availability.
Calculating Shipping Costs
We define a node for calculating shipping costs for specific customers
def compute_shipping(state: MessagesState) -> MessagesState:
    """Calculate shipping costs."""
    item_id = llm.with_structured_output(method='json_mode').invoke(f'Extract item_id from the following text in json format: {state}')['item_id']
    quantity = llm.with_structured_output(method='json_mode').invoke(f'Extract quantity from the following text in json format: {state}')['quantity']
    customer_id = llm.with_structured_output(method='json_mode').invoke(f'Extract customer_id from the following text in json format: {state}')['customer_id']
    location = customers[customer_id]['location']

    if not item_id or not quantity or not location:
        return {"error": "Missing 'item_id', 'quantity', or 'location'."}

    weight_per_item = inventory[item_id]["weight"]
    total_weight = weight_per_item * quantity
    rates = {"local": 5, "domestic": 10, "international": 20}
    cost = total_weight * rates.get(location, 10)
    print(cost,location)

return {"query":state,"cost": f"${cost:.2f}"}-
• Retrieves customer_id from the user’s query, then looks up their location in the <span>customers</span>dictionary. -
• Calculates shipping costs based on the weight, quantity of the item, and the user’s location.
Processing Payments
We will define a node for processing payments:
def process_payment(state: State) -> State:
    """Simulate payment processing."""
    cost = llm.with_structured_output(method='json_mode').invoke(f'Extract cost from the following text in json format: {state}')

    if not cost:
        return {"error": "Missing 'amount'."}
    print(f"PAYMENT PROCESSED: {cost} and order successfully placed!")
    payment_outcome = random.choice(["Success", "Failed"])
return {"payment_status": payment_outcome}-
• Uses <span>random.choice</span>to simulate success or failure. -
• In a production system, you would need to integrate with a real payment gateway.
Routing Function
We now define a node for routing queries:
def route_query_1(state: State) -> str:
    """Route the query based on its category."""
    print(state)
    if state["category"] == "PlaceOrder":
        return "PlaceOrder"
    elif state["category"] == "CancelOrder":
return "CancelOrder"-
• Decides the path to follow next: “PlaceOrder” or “CancelOrder”. In LangGraph, we map “PlaceOrder” to the CheckInventory node and “CancelOrder” to the CancelOrder node.
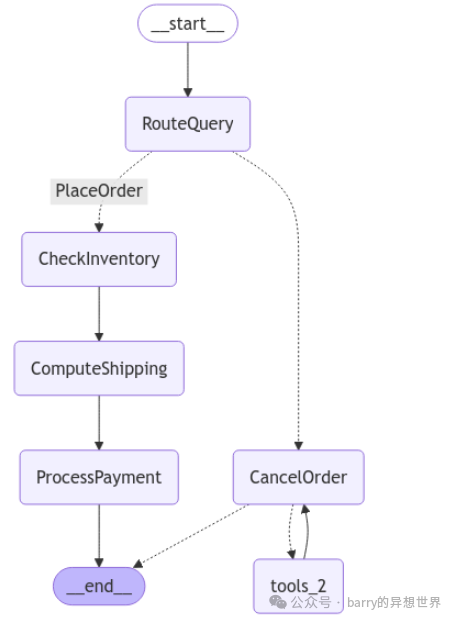
Building the Workflow Graph
Next, we create a <span>StateGraph</span>, add nodes, and define edges and conditional edges.
### Create the workflow
workflow = StateGraph(MessagesState)

# Add nodes
workflow.add_node("RouteQuery", categorize_query)
workflow.add_node("CheckInventory", check_inventory)
workflow.add_node("ComputeShipping", compute_shipping)
workflow.add_node("ProcessPayment", process_payment)

workflow.add_conditional_edges(
    "RouteQuery",
    route_query_1,
    {
        "PlaceOrder": "CheckInventory",
        "CancelOrder": "CancelOrder"
    }
)
workflow.add_node("CancelOrder", call_model_2)
workflow.add_node("tools_2", tool_node_2)


### Define edges

workflow.add_edge(START, "RouteQuery")
workflow.add_edge("CheckInventory", "ComputeShipping")
workflow.add_edge("ComputeShipping", "ProcessPayment")
workflow.add_conditional_edges("CancelOrder", call_tools_2)
workflow.add_edge("tools_2", "CancelOrder")
workflow.add_edge("ProcessPayment", END)<span>StateGraph(MessagesState)</span>:
-
• We specify <span>MessagesState</span>to hold conversation data.
Nodes:
-
• <span>RouteQuery</span>is the entry node for classifying user intent. -
• “CheckInventory”, “ComputeShipping”, and “ProcessPayment” handle the order placement process. -
• “CancelOrder” and “tools_2” handle the order cancellation process.
Conditional Edges:
-
• Calling <span>workflow.add_conditional_edges("RouteQuery", route_query_1, ...)</span>ensures we go to CheckInventory in the case of “PlaceOrder” or to CancelOrder in the case of “CancelOrder”.
Loops:
-
• When the user clicks “Cancel Order”, we check if the LLM triggered a tool call ( <span>call_tools_2</span>). If so, we go to<span>tools_2</span>(<span>ToolNode</span>); after the tool is called, it returns to “CancelOrder”, giving the LLM a chance to produce further actions or end.
End:
-
• “ProcessPayment” leads to <span>END</span>, ending the “PlaceOrder” path.
Visualizing and Testing the Workflow
The next code snippet compiles the workflow into an agent, renders it as a Mermaid graph, and tests it with sample queries.
### Compile the workflow
agent = workflow.compile()
### Visualize the workflow
mermaid_graph = agent.get_graph()
mermaid_png = mermaid_graph.draw_mermaid_png(draw_method=MermaidDrawMethod.API)
display(Image(mermaid_png))
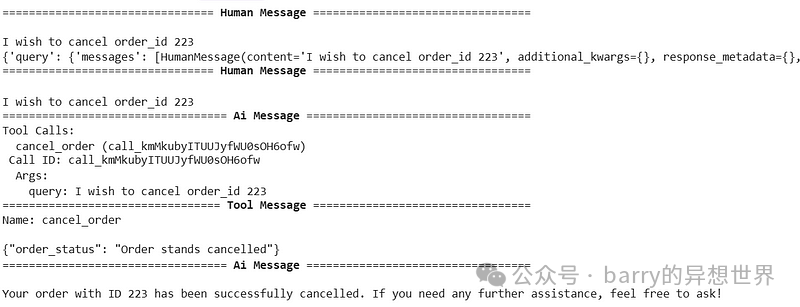
### Query the workflow
user_query = "I wish to cancel order_id 223"
for chunk in agent.stream(
{"messages": [("user", user_query)]},
stream_mode="values",
):
chunk["messages"][-1].pretty_print()
user_query = "customer_id: customer_14 : I wish to place order for item_51 with order quantity as 4 and domestic"
for chunk in agent.stream(
{"messages": [("user", user_query)]},
stream_mode="values",
):
chunk["messages"][-1].pretty_print()Compile:
-
• <span>agent = workflow.compile()</span>converts our node/edge definitions into an executable agent.
Visualize:
-
• We obtain a Mermaid graph ( <span>mermaid_png</span>) that can be displayed in Jupyter notebooks for debugging or demonstration.
Testing Queries:
-
• The first test: “I wish to cancel order_id 223” should route to <span>CancelOrder</span>.
-
• The second test: “customer_id: customer_14 : I wish to place order for item_51…” should route to the order placement workflow.

Conclusion:
By leveraging LangGraph, we built a dynamic branching workflow that decides whether to place or cancel orders based on user intent. We demonstrated:
-
• How to use LLM nodes ( <span>categorize_query</span>) to classify queries. -
• How to bind tools ( <span>cancel_order</span>) and integrate them into the workflow. -
• How to check inventory, calculate shipping costs, and process payments through independent nodes. -
• How to visualize the entire workflow using Mermaid.js.
This approach is scalable: you can add more steps (e.g., address verification, promotional codes) or additional branches (e.g., updating existing orders) without rewriting monolithic scripts. If you need loops to retry failed payments or validate user confirmations, LangGraph can handle that too.