Selected from blog.christianperone
Author:Christian S. Perone
Translated by: Machine Heart
Contributors: Siyuan, Huang Xiaotian, Li Zenan
As a deep learning framework supported by Facebook’s Artificial Intelligence Research (FAIR) team, PyTorch has rapidly become a popular development tool since its launch in January 2017. Its advantages in debugging, compilation, and other aspects have made it widely welcomed by researchers in academia. In this article, researcher Christian S. Perone from the Montreal Institute of Technology will introduce us to the internal architecture of this neural network framework, revealing the true reasons behind PyTorch’s convenience and usability.
Introduction
This article mainly introduces the PyTorch codebase, aiming to provide guidance on PyTorch and its internal architecture design, with the core goal of offering useful help to those who want to understand beyond API knowledge, and presenting new content not covered in previous tutorials. Note: The PyTorch build system requires extensive use of code settings, so I will not repeat other people’s descriptions. If you are interested, please refer to the extended materials provided in the original text.
An Introduction to Python Extension Objects in C/C++
You may know that you can extend Python with C/C++ and develop what are called “extensions.” All the heavy lifting in PyTorch is done in C/C++, not pure Python. To define a new Python object type in C/C++, you need to define a structure similar to the following instance:
// Python object that backs torch.autograd.Variable
struct THPVariable {
    PyObject_HEAD
    torch::autograd::Variable cdata;
    PyObject* backward_hooks;
};
As shown above, there is a macro called PyObject_HEAD at the beginning of the definition, which aims to standardize Python objects and extend to another structure that contains a pointer to the type object and a field with a reference count.
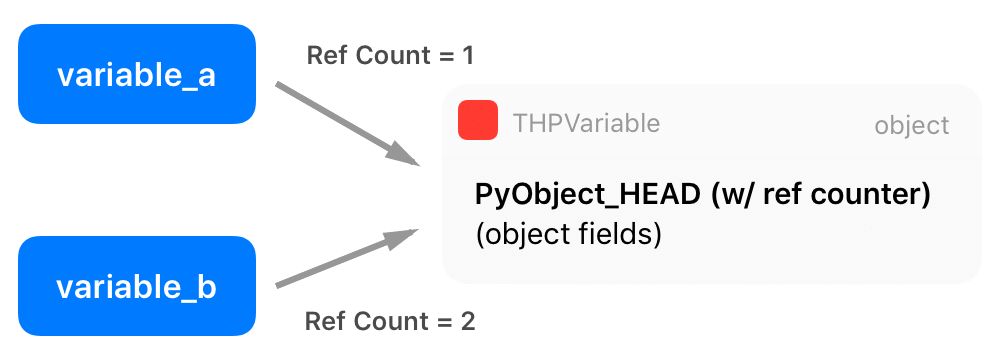
There are two additional macros in the Python API, called Py_INCREF() and Py_DECREF(), which can be used to increase and decrease the reference count of Python objects. Multiple entities can borrow or own references to other objects (thus increasing the reference count), and only when the reference count reaches zero will Python automatically delete that object’s memory. To learn more about Python C/C++ extensions, please refer to: https://docs.python.org/3/extending/newtypes.html.
Interesting fact: Using small integers as indexes, counts, etc., is not common in many applications. To improve efficiency, the official CPython interpreter caches integers from -5 to 256. Because of this, declaring a = 200; b = 200; a is b is true, while declaring a = 300; b = 300; a is b is false.
Zero-Copy PyTorch Tensors to Numpy and Vice Versa
PyTorch has its own tensor representation that separates PyTorch’s internal representation from external representations. However, due to the widespread use of Numpy arrays, especially when data loading sources differ, we indeed need to convert between Numpy and PyTorch tensors. Therefore, PyTorch provides two methods (from_numpy() and numpy()) to convert Numpy arrays to PyTorch arrays and vice versa. If we look at the calling code for converting a Numpy array to a PyTorch tensor, we can gain more insight into PyTorch’s internal representation:
at::Tensor tensor_from_numpy(PyObject* obj) {
  if (!PyArray_Check(obj)) {
    throw TypeError("expected np.ndarray (got %s)", Py_TYPE(obj)->tp_name);
  }

  auto array = (PyArrayObject*)obj;
  int ndim = PyArray_NDIM(array);
  auto sizes = to_aten_shape(ndim, PyArray_DIMS(array));
  auto strides = to_aten_shape(ndim, PyArray_STRIDES(array));
  // NumPy strides use bytes. Torch strides use element counts.
  auto element_size_in_bytes = PyArray_ITEMSIZE(array);
  for (auto& stride : strides) {
    stride /= element_size_in_bytes;
  }

  // (...) - omitted for brevity

  void* data_ptr = PyArray_DATA(array);
  auto& type = CPU(dtype_to_aten(PyArray_TYPE(array)));
  Py_INCREF(obj);
  return type.tensorFromBlob(data_ptr, sizes, strides, [obj](void* data) {
    AutoGIL gil;
    Py_DECREF(obj);
  });
}
Code excerpt from (tensor_numpy.cpp: https://github.com/pytorch/pytorch/blob/master/torch/csrc/utils/tensor_numpy.cpp#L88)
As you can see in this code, PyTorch retrieves all information (array metadata) from the Numpy representation and creates its own tensor. However, as you can see from the annotated line 18, PyTorch retains a pointer to the raw data of the internal Numpy array instead of copying it. This means that PyTorch will own this data and share the same memory area with the Numpy array object.

It is also very important: when the Numpy array object goes out of scope and reaches zero reference count, it will be garbage collected and destroyed, which is why the reference count of the Numpy array object is increased in line 20. After that line, PyTorch will create a new tensor object from this Numpy data blob, and during the creation of this new tensor, PyTorch will pass the memory data pointer, along with the memory size, strides, and the function that will be used for tensor storage later (which we will discuss in the next section), thus allowing Python to handle the memory management of this object and release the data by reducing the Numpy array object’s reference count.
The tensorFromBlob() method will create a new tensor, but only after creating a new “storage” for this tensor. Storage refers to where the data pointer is stored, which is not inside the tensor structure. Tensor storage is exactly what we will discuss in the next section.
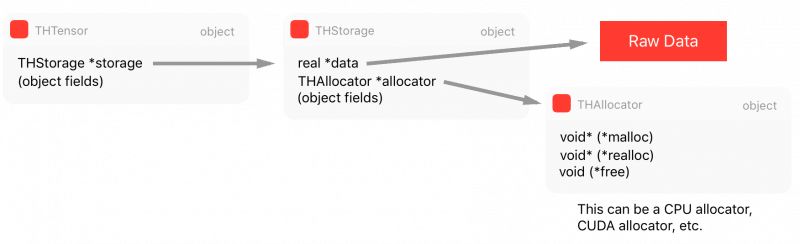
Tensor Storage
The actual raw data of a tensor is not immediately stored in the tensor structure but in a place we call “storage,” which is part of the tensor structure.
As we saw in the previous code in tensor_from_numpy(), it calls the tensorFromBlob() function to create a tensor from the raw data blob. The tensorFromBlob() function internally calls another function called storageFromBlob(), which primarily creates storage based on the type of data. For example, in the case of CPU floating types, it will return a new instance of CPUFloatStorage.
CPUFloatStorage is essentially a wrapper class that contains utility functions, and the actual storage structure is called THFloatStorage:
typedef struct THStorage
{
    real *data;
    ptrdiff_t size;
    int refcount;
    char flag;
    THAllocator *allocator;
    void *allocatorContext;
    struct THStorage *view;
} THStorage;
As shown, THStorage has a pointer to the raw data, the size of the raw data, flags, and a pointer to the allocator, which we will discuss in detail later. It is worth noting that THStorage does not contain metadata on how to interpret the internal data because storage has “no processing information capability” for the content it holds; only tensors know how to “view” the data.
Therefore, you may have realized that multiple tensors can point to the same storage while simply interpreting the data differently. This is why viewing the same number of elements of tensors in different shapes or dimensions can be highly efficient. The following Python code shows that after changing the shape of the tensor, the data pointer in the storage will be shared.
>>> tensor_a = torch.ones((3, 3))
>>> tensor_b = tensor_a.view(9)
>>> tensor_a.storage().data_ptr() == tensor_b.storage().data_ptr()
True
As shown in line seven of the THFloatStorage structure, it has a pointer to the THAllocator structure. This is very important as it provides flexibility for the allocator, which can be used to allocate storage data.
typedef struct THAllocator
{
  void* (*malloc)(void*, ptrdiff_t);
  void* (*realloc)(void*, void*, ptrdiff_t);
  void (*free)(void*, void*);
} THAllocator;
Code excerpt from (THAllocator.h: https://github.com/pytorch/pytorch/blob/master/aten/src/TH/THAllocator.h#L16)
As described above, this structure has three function pointer fields to define the allocator’s meaning: malloc, realloc, and free. For memory allocated for the CPU, these functions are, of course, related to the traditional malloc/realloc/free POSIX functions. However, when we want to allocate storage for the GPU, we eventually use a CUDA allocator such as cudaMallocHost(), which we can see in the following THCudaHostAllocator malloc function.
static void *THCudaHostAllocator_malloc(void* ctx, ptrdiff_t size) {
  void* ptr;
  if (size < 0) THError("Invalid memory size: %ld", size);
  if (size == 0) return NULL;
  THCudaCheck(cudaMallocHost(&ptr, size));
  return ptr;
}
Code excerpt from (THCAllocator.c: https://github.com/pytorch/pytorch/blob/master/aten/src/THC/THCAllocator.c#L3)
As shown, the allocator calls a cudaMallocHost() function. You may have noticed the abbreviated representation patterns in the organization of the version library; it is very important to remember these conventions when browsing the version library, as they are summarized in the PyTorch README file:
-
TH = TorcH
-
THC = TorcH Cuda
-
THCS = TorcH Cuda Sparse
-
THCUNN = TorcH CUda Neural Network
-
THD = TorcH Distributed
-
THNN = TorcH Neural Network
-
THS = TorcH Sparse
This convention also exists in function/class names and other objects, so understanding them is very important. You can find the CPU allocator in the TH code and the CUDA allocator in the THC code. Finally, we can see the main tensor structure THTensor:
typedef struct THTensor
{
    int64_t *size;
    int64_t *stride;
    int nDimension;
    THStorage *storage;
    ptrdiff_t storageOffset;
    int refcount;
    char flag;
} THTensor;
As shown, the main structure of THTensor retains size/strides/dimensions/offsets/etc. for the tensor data, along with the storage THStorage. We can summarize all these structures in the following chart:
Now, if we have a need for multiprocessing and want to share tensor data across multiple different processes, we need a method for shared memory. Otherwise, every time another process needs a tensor or we want to implement Hogwild training to write to the same memory area across all different processes, we would need to create copies between processes, which is very inefficient. Therefore, we will discuss specific storage methods for shared memory in the next section.
Shared Memory
Shared memory can be implemented in many different ways (depending on the supported platform). PyTorch supports some methods, but for simplicity, I will discuss the case using the CPU on MacOS (instead of GPU). Since PyTorch supports various methods of shared memory, this part can be a bit challenging due to the many levels of indirection in the code.
PyTorch provides a wrapper for the Python multiprocessing module, which can be imported from torch.multiprocessing. They made some changes to the implementation in that wrapper to ensure that whenever a Tensor is placed in a queue or shared with other processes, PyTorch can ensure that only one handle of shared memory will be shared, without sharing a complete new copy of the Tensor. Now, many people do not know that the Tensor method in PyTorch is share_memory_(), however, this function just triggers the specific Tensor’s complete reconstruction of saved memory. The execution process of this method is to create a shared memory area that can be used across different processes. Ultimately, this function can call the following function:
static THStorage* THPStorage_(newFilenameStorage)(ptrdiff_t size)
{
  int flags = TH_ALLOCATOR_MAPPED_SHAREDMEM | TH_ALLOCATOR_MAPPED_EXCLUSIVE;
  std::string handle = THPStorage_(__newHandle)();
  auto ctx = libshm_context_new(NULL, handle.c_str(), flags);
  return THStorage_(newWithAllocator)(size, &THManagedSharedAllocator, (void*)ctx);
}
As shown, this function uses a special allocator THManagedSharedAllocator to create another storage. It first defines some flags, then creates a string handle formatted as /torch_[process id]_[random number], and finally creates new storage using the special THManagedSharedAllocator. This allocator has a function pointer to PyTorch’s internal library libshm, which implements communication called Unix Domain Socket to share the memory handle of a specific region. This allocator is actually a special case of a “smart allocator” because it contains communication control logic units and uses another allocator called THRefcountedMapAllocator, which will create a city-level shared memory area and call mmp() to map that area into the process’s virtual address space.
Now we can assign tensors allocated to another process to one process by manually exchanging shared memory handles, as shown in the following Python example:
>>> import torch
>>> tensor_a = torch.ones((5, 5))
>>> tensor_a

 1  1  1  1  1
 1  1  1  1  1
 1  1  1  1  1
 1  1  1  1  1
 1  1  1  1  1
[torch.FloatTensor of size 5x5]

>>> tensor_a.is_shared()
False
>>> tensor_a = tensor_a.share_memory_()
>>> tensor_a.is_shared()
True
>>> tensor_a_storage = tensor_a.storage()
>>> tensor_a_storage._share_filename_()
(b'/var/tmp/tmp.0.yowqlr', b'/torch_31258_1218748506', 25)
In this code, executing process A, we create a 5×5 tensor filled with 1s. After this, we share it and print the tuple of the Unix Domain Socket address and handle. Now we can access this memory area from another process B:
Process B executes the code:
>>> import torch
>>> tensor_a = torch.Tensor()
>>> tuple_info = (b'/var/tmp/tmp.0.yowqlr', b'/torch_31258_1218748506', 25)
>>> storage = torch.Storage._new_shared_filename(*tuple_info)
>>> tensor_a = torch.Tensor(storage).view((5, 5))

 1  1  1  1  1
 1  1  1  1  1
 1  1  1  1  1
 1  1  1  1  1
 1  1  1  1  1
[torch.FloatTensor of size 5x5]
As you can see, using the Unix Domain Socket address and the handle’s tuple information, we can access the tensor storage content of another process. If you change the tensor in process B, you will see that the changes will also reflect in process A, as the tensors share the same storage area.
DLPack: The Hope of Deep Learning Framework Babel
Now let’s take a look at some of the latest content in the PyTorch codebase—DLPack (https://github.com/dmlc/dlpack). DLPack is an open standard for memory tensor structures that allows tensor data to be exchanged between frameworks. Interestingly, this memory representation is standardized—very similar to the memory representation methods already used by most frameworks, which allows us to share across frameworks without needing to copy data at all. Given that we currently do not have tools for internal communication, DLPack is a remarkable creation.
It will undoubtedly help us solve the “island-like” tensor representations that exist today in frameworks like MXNet and PyTorch and allow developers to operate freely between multiple deep learning frameworks, enjoying the advantages that standardization brings to frameworks.
The core structure of DLPack, DLTensor, is very simple, as follows:
/*!
 * \brief Plain C Tensor object, does not manage memory.
 */
typedef struct {
  /*!
   * \brief The opaque data pointer points to the allocated data.
   *  This will be CUDA device pointer or cl_mem handle in OpenCL.
   *  This pointer is always aligns to 256 bytes as in CUDA.
   */
  void* data;
  /*! \brief The device context of the tensor */
  DLContext ctx;
  /*! \brief Number of dimensions */
  int ndim;
  /*! \brief The data type of the pointer*/
  DLDataType dtype;
  /*! \brief The shape of the tensor */
  int64_t* shape;
  /*!
   * \brief strides of the tensor,
   *  can be NULL, indicating tensor is compact.
   */
  int64_t* strides;
  /*! \brief The offset in bytes to the beginning pointer to data */
  uint64_t byte_offset;
} DLTensor;
Code from https://github.com/dmlc/dlpack/blob/master/include/dlpack/dlpack.h
As you can see, there is an opaque data pointer to the allocated data, as well as shape/strides/offset/GPU or CPU, and other metadata that DLTensor points to.
There is also a managed version called DLManagedTensor, in which frameworks can provide an environment and a “deleter” function, which can notify other frameworks when they no longer need resources from borrowed tensors.
In PyTorch, if you want to convert to DLTensor format or from DLTensor format, you can find C/C++ methods, or even Python methods to do this:
import torch
from torch.utils import dlpack

t = torch.ones((5, 5))
dl = dlpack.to_dlpack(t)
This Python function calls the toDLPack function from ATen, as shown below:
DLManagedTensor* toDLPack(const Tensor& src) {
  ATenDLMTensor * atDLMTensor(new ATenDLMTensor);
  atDLMTensor->handle = src;
  atDLMTensor->tensor.manager_ctx = atDLMTensor;
  atDLMTensor->tensor.deleter = &deleter;
  atDLMTensor->tensor.dl_tensor.data = src.data_ptr();
  int64_t device_id = 0;
  if (src.type().is_cuda()) {
    device_id = src.get_device();
  }
  atDLMTensor->tensor.dl_tensor.ctx = getDLContext(src.type(), device_id);
  atDLMTensor->tensor.dl_tensor.ndim = src.dim();
  atDLMTensor->tensor.dl_tensor.dtype = getDLDataType(src.type());
  atDLMTensor->tensor.dl_tensor.shape = const_cast<int64_t*>(src.sizes().data());
  atDLMTensor->tensor.dl_tensor.strides = const_cast<int64_t*>(src.strides().data());
  atDLMTensor->tensor.dl_tensor.byte_offset = 0;
  return &(atDLMTensor->tensor);
}
As shown, this is a very simple conversion that can convert the PyTorch format of metadata to DLPack format and point the pointer to the internal tensor’s data representation.
We all hope that more deep learning frameworks can learn this standard, which will benefit the entire ecosystem. I hope this article can be helpful to you.
Original link: http://blog.christianperone.com/2018/03/pytorch-internal-architecture-tour/
Click to read the original text, from technical to product experience Sogou Machine Translation