Click the above “Beginner’s Guide to Computer Vision”, select “star” or “pin”
Heavyweight content delivered promptly
Author: Rédigé par Gabriel Guerin
Translated by: ronghuaiyang Source: AI Park
In some cases, collecting data from various scenes can be challenging. This article presents a method.
Deep learning models require a significant amount of data to achieve good results, and the same goes for object detection models.
To train a YOLOv5 model to automatically detect your favorite toys, you need to take thousands of pictures of your toys in different contexts, and for each image, you need to annotate the location of the toy in the image.
This is very time-consuming.
This article proposes a method to automatically generate object detection datasets using image segmentation and stable diffusion.
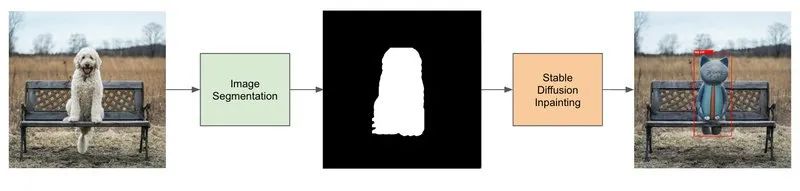
The pipeline for generating object detection datasets consists of four steps:
-
Find a dataset that contains instances of the same object you want to recognize (e.g., a dog dataset). -
Use image segmentation to generate a mask for the dog. -
Fine-tune the Stable Diffusion image inpainting model. -
Use the Stable Diffusion image inpainting model and the generated mask to generate data.
Image Segmentation: Generating Mask Images
The Stable Diffusion image inpainting pipeline requires an input prompt, an image, and a mask image. The model will generate new images only from the white pixel areas of the mask image.
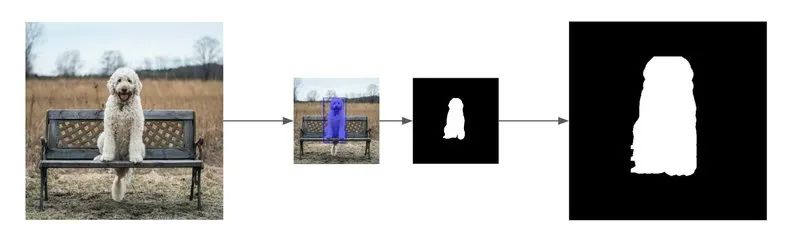
The PixelLib library helps us perform image segmentation with just a few lines of code. In this example, we will use the PointRend model to detect dogs. Below is the code for image segmentation.
import pixellib
from pixellib.torchbackend.instance import instanceSegmentation

ins = instanceSegmentation()
ins.load_model("pointrend_resnet50.pkl")
target_classes = ins.select_target_classes(dog=True)
results, output = ins.segmentImage(
  "dog.jpg",
  show_bboxes=True,
  segment_target_classes=target_classes,
  output_image_name="mask_image.jpg"
)<span>segmentImage</span> function returns a tuple:
-
<span>results</span>: A dictionary containing the fields ‘boxes’, ‘class_ids’, ‘class_names’, ‘object_counts’, ‘scores’, ‘masks’, and ‘extracted_objects’. -
<span>output</span>: The original image mixed with the mask image. If<span>show_bboxes</span>is set to<span>True</span>, bounding boxes will also be included.
Generating Mask Images
The generated mask only contains white and black pixels, and our mask will be slightly larger than the original image of the dog to give Stable Diffusion enough space for inpainting. To achieve this effect, we translate the mask 10 pixels to the left, right, up, and down.
from PIL import Image
import numpy as np

width, height = 512, 512
image=Image.open("dog.jpg")

# Store the mask of dogs found by the PointRend model
mask_image = np.zeros(image.size)
for idx, mask in enumerate(results["masks"].transpose()):
  if results["class_names"][idx] == "dog":
    mask_image += mask


# Create a mask image bigger than the original segmented image
mask_image += np.roll(mask_image, 10, axis=[0, 0]) # Translate the mask 10 pixels to the left
mask_image += np.roll(mask_image, -10, axis=[0, 0]) # Translate the mask 10 pixels to the right
mask_image += np.roll(mask_image, 10, axis=[1, 1]) # Translate the mask 10 pixels to the bottom
mask_image += np.roll(mask_image, -10, axis=[1, 1]) # Translate the mask 10 pixels to the top


# Set non-black pixels to white pixels
mask_image = np.clip(mask_image, 0, 1).transpose() * 255
# Save the mask image
mask_image = Image.fromarray(np.uint8(mask_image)).resize((width, height))
mask_image.save("mask_image.jpg")Now, we have the original image of the dog and its corresponding mask.
Fine-tuning the Stable Diffusion Image Inpainting Pipeline
Dreambooth is a technique for fine-tuning Stable Diffusion. We can teach the model new concepts with just a few photos, and we are preparing to use this technique to fine-tune the image inpainting model.The script <span>train_dreambooth_inpaint.py</span> demonstrates how to fine-tune the Stable Diffusion model on your own dataset.
Hardware Resources Required for Fine-tuning
You can use<span>gradient_checkpointing</span> and <span>mixed_precision</span> to fine-tune the model on a single 24GB GPU. For larger <span>batch_size</span> and faster training, at least a 30GB GPU is required.
Installing Dependencies
Before running the script, ensure these dependencies are installed:
pip install git+https://github.com/huggingface/diffusers.git
pip install -U -r requirements.txt
And initialize the acceleration environment:
accelerate configYou need to register as a user on Hugging Face Hub, and you also need a token to use this code. Run the command below to authorize your token:
huggingface-cli loginFine-tuning Samples
Tuning hyperparameters is crucial when running these computation-intensive trainings. You need to try different parameters on the machine running the training. The recommended parameters are as follows:
$ accelerate launch train_dreambooth_inpaint.py \
  --pretrained_model_name_or_path="runwayml/stable-diffusion-inpainting"  \
  --instance_data_dir="dog_images" \
  --output_dir="stable-diffusion-inpainting-toy-cat" \
  --instance_prompt="a photo of a toy cat" \
  --resolution=512 \
  --train_batch_size=1 \
  --learning_rate=5e-6 \   \
  --lr_scheduler="constant" \   \
  --lr_warmup_steps=0 \   \
  --max_train_steps=400 \
  --gradient_accumulation_steps=2 \
  --gradient_checkpointing \
  --train_text_encoder
Running the Stable Diffusion Image Inpainting Pipeline
Stable Diffusion image inpainting is a text-to-image diffusion model that uses a masked image and text input to generate realistic images. This functionality is implemented using https://github.com/huggingface/diffusers.
from PIL import Image
from diffusers import StableDiffusionInpaintPipeline
# Image and Mask
image = Image.open("dog.jpg")
mask_image = Image.open("mask_image.jpg")
# Inpainting model
pipe = StableDiffusionInpaintPipeline.from_pretrained(
"stable-diffusion-inpainting-toy-cat",
torch_dtype=torch.float16,
)
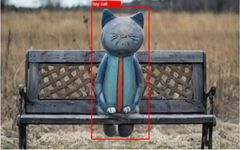
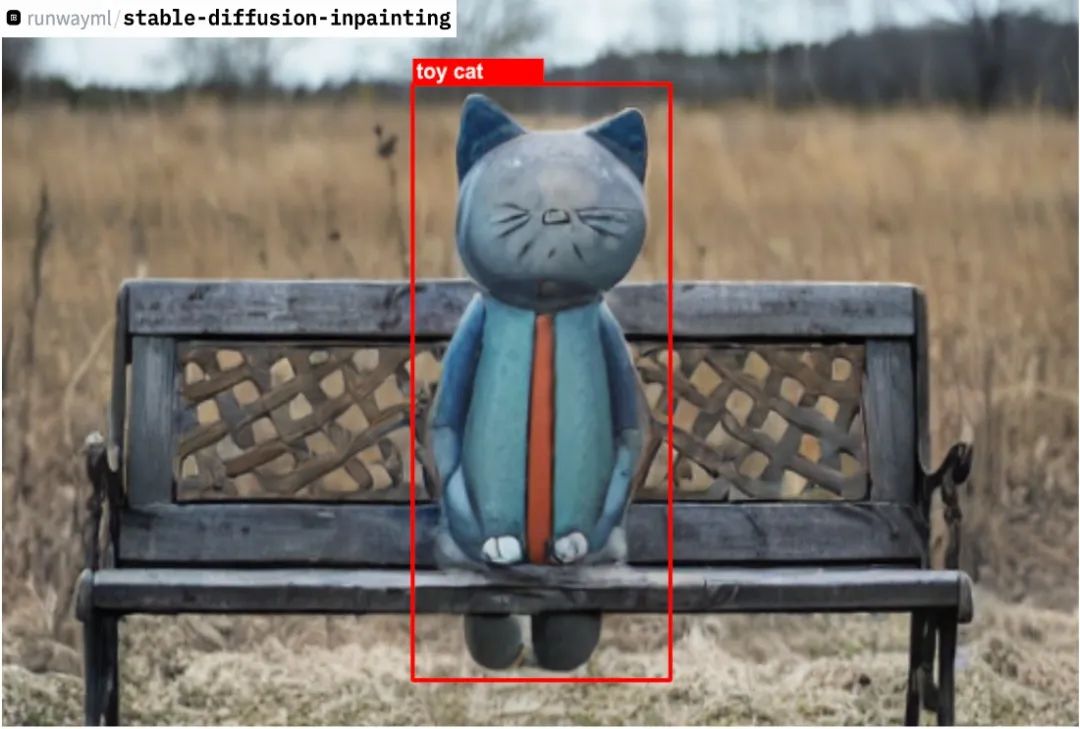
image = pipe(prompt="a toy cat", image=image, mask_image=mask_image).images[0]Running Stable Diffusion image inpainting with the fine-tuned model.
Conclusion
To summarize:
-
Use PixelLib for image segmentation to obtain the image mask. -
Fine-tune the <span>runwayml/stable-diffusion-inpainting</span>model to enable it to learn the new toy cat type. -
Run the fine-tuned model and the generated mask on the dog image using <span>StableDiffusionInpaintPipeline</span>.
Final Results
After completing all steps, we generated a new image where the toy cat replaced the original dog’s position, allowing both images to use the same bounding box.

We can now generate new images for all images in the dataset.
Limitations
Stable Diffusion does not always produce good results, and the dataset generated still requires cleaning.
This pipeline is very computationally intensive; fine-tuning Stable Diffusion requires a 24GB memory GPU, and inference also requires a GPU.
This method of constructing datasets is useful when images in the dataset are hard to obtain, for example, if you need to detect forest fires, it is better to use this method than to set fires in the forest. However, for ordinary scenes, data annotation is still the standard approach.

Original article in English: https://www.sicara.fr/blog-technique/dataset-generation-fine-tune-stable-diffusion-inpainting
Download 1: OpenCV-Contrib Extension Module Chinese Version Tutorial

Reply with "OpenCV Extension Module Chinese Tutorial" in the backend of the “Beginner's Guide to Computer Vision” public account to download the first Chinese version of the OpenCV extension module tutorial, covering installation of extension modules, SFM algorithms, stereo vision, object tracking, biological vision, super-resolution processing, and more than twenty chapters of content.

Download 2: Python Visual Practical Project 52 Lectures

Reply with "Python Visual Practical Project" in the backend of the “Beginner's Guide to Computer Vision” public account to download 31 visual practical projects including image segmentation, mask detection, lane line detection, vehicle counting, eyeliner addition, license plate recognition, character recognition, emotion detection, text content extraction, and face recognition, to help you quickly learn computer vision.

Download 3: OpenCV Practical Project 20 Lectures

Reply with "OpenCV Practical Project 20 Lectures" in the backend of the “Beginner's Guide to Computer Vision” public account to download 20 practical projects based on OpenCV, achieving advanced learning in OpenCV.

Group Chat

Welcome to join the public account reader group to communicate with peers. Currently, there are WeChat groups for SLAM, 3D vision, sensors, autonomous driving, computational photography, detection, segmentation, recognition, medical imaging, GAN, algorithm competitions, etc. (which will be gradually subdivided in the future). Please scan the WeChat number below to join the group, and note: "Nickname + School/Company + Research Direction", for example: "Zhang San + Shanghai Jiao Tong University + Visual SLAM". Please follow the format for remarks, otherwise, it will not be approved. After successful addition, you will be invited to join the relevant WeChat group based on your research direction. Please do not send advertisements in the group, otherwise, you will be removed from the group. Thank you for your understanding~