

Retrieval-Augmented Generation (RAG) is a technology that combines retrieval and generation, effectively addressing some issues of large language models (LLMs), such as hallucinations and knowledge limitations. With the development of RAG technology, vector technologies involved in RAG have gained attention, and vector databases are gradually being understood by everyone. Some established database vendors have also expressed support for vector retrieval, such as Elasticsearch, which has recently added support for vector retrieval in its latest versions. This article will introduce the deployment of related embedding models in Elasticsearch and how to use Elasticsearch for document indexing and retrieval within the LLM framework LlamaIndex.
Introduction to RAG
When using LLMs, we often encounter situations where, when our questions exceed the knowledge range of the LLM, it either explains that the question is beyond its knowledge scope (this is the knowledge limitation of LLMs) or it confidently makes up some answers (this is what we call LLM hallucination).
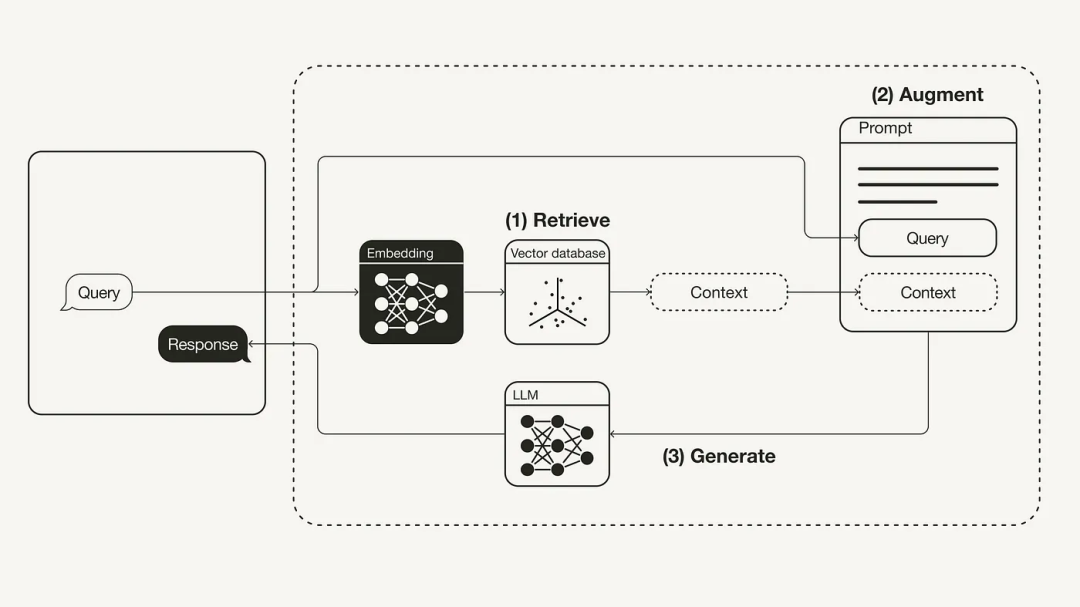
To address these issues of LLMs, the RAG (Retrieval-Augmented Generation) technology has emerged. The main principle of RAG is to vectorize documents for storage, retrieve relevant documents through vector searches when questions are posed, and then send the documents as context along with the questions to the LLM, allowing it to generate answers. With the support of relevant documents, the LLM will reference these documents in content generation, effectively solving the hallucination problem of LLMs. At the same time, RAG allows LLMs to quickly access the latest information. Typically, to update LLMs with new information, they need to be retrained, which can be costly whether through pre-training or fine-tuning. RAG only requires the latest documents to be added to the database, allowing the LLM to access the latest information through vector retrieval.
Keyword Retrieval and Semantic Retrieval
Technologies related to RAG include vector retrieval, also known as semantic retrieval. It differs from traditional keyword retrieval, which relies on finding exact matches of words or phrases used in the query within documents. It typically focuses only on literal matches without considering the context or semantic meaning of the query, while semantic retrieval aims to understand the intent and contextual meaning of the query, not just word matching. It improves retrieval relevance by analyzing the semantic relationships of words (such as synonyms and word sense disambiguation).
For example, if we input Apple 2024 new product launch, keyword retrieval may return any news release about Apple in 2024, but it may also include information about new varieties of the fruit apple. Semantic retrieval, on the other hand, will find news related to the latest electronic product launches by Apple while ignoring content related to the fruit apple.
Although Elasticsearch (hereinafter referred to as ES) initially started as a full-text search engine, i.e., keyword retrieval, with the development of vector retrieval technology, ES has also begun to support vector retrieval, making it a database that can perform both keyword and semantic retrieval. Next, we will introduce the deployment of the ES database.
Deploying Elasticsearch
The simplest way to deploy ES is through Docker. First, you need to install Docker; you can refer to the official installation documentation[1].
After installing Docker, you can start installing ES. We need to use the latest version of ES since it includes vector retrieval functionality. The current latest version is 8.11.3, and the installation command is as follows:
docker run -d --name es -p 9200:9200 -p 9300:9300 -e "discovery.type=single-node" elasticsearch:8.11.3
Use the docker run command to start the ES service. The -d parameter indicates that it runs in the background, the --name parameter specifies the container name, the -p parameter indicates port mapping, and the -e parameter indicates environment variables. The elasticsearch:8.11.3 indicates using the elasticsearch image of the relevant version. If you are deploying on a single machine, you do not need to map the 9300 port, which is mainly used for communication between internal nodes of the ES cluster.
Changing the ES User Password
The default configuration of ES enables security authentication, which means you need to authenticate with a username and password when accessing ES. Therefore, we need to obtain the username and password for ES. The default user of ES is elastic. If you are unsure of this user’s password, you can reset it using the following command:
# Enter the ES container
$ docker exec -it es bash
# Reset password
$ bin/elasticsearch-reset-password -u elastic -i
This tool will reset the password of the [elastic] user.
You will be prompted to enter the password.
Please confirm that you would like to continue [y/N]y


Enter password for [elastic]:
Re-enter password for [elastic]:
Password for the [elastic] user successfully reset.
Inside the ES container, we reset the password for the elastic user using the elasticsearch-reset-password command. After resetting, we can access ES by entering https://localhost:9200 in the browser (note that the URL is https, not http; we will discuss how to disable https later). When accessing for the first time, you will be prompted to enter the username and password:
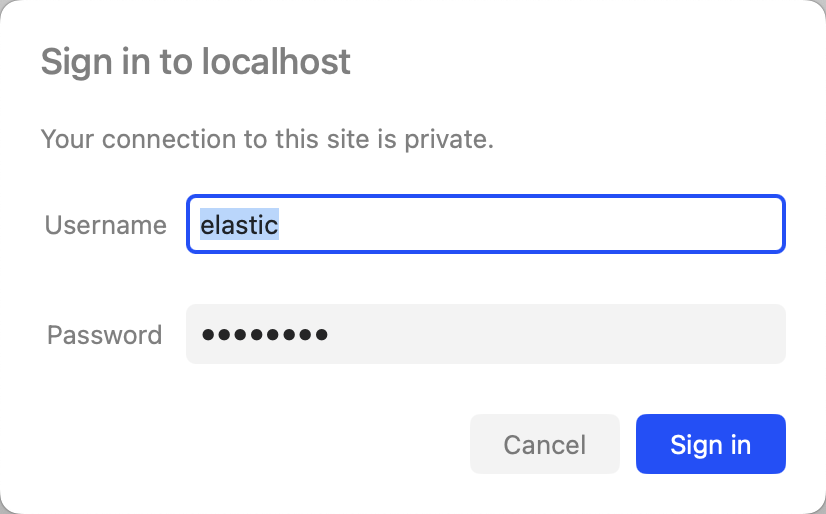
After entering the username and password, we can see the JSON information related to ES.
Disabling ES SSL Authentication
To enhance system security, ES defaults to enabling SSL authentication, requiring the use of HTTPS protocol when accessing ES. However, if we are only using it locally, this level of security is not necessary, so we can disable SSL authentication by modifying the ES configuration file elasticsearch.yml. To modify this file, we first need to copy the default configuration file of ES to the local disk, then modify the configuration file, and finally mount the modified configuration file when starting the ES container.
First, we copy the configuration directory from the running ES container to the local disk, and then we can shut down the original ES container. The command is as follows:
# Copy configuration file
docker cp es:/usr/share/elasticsearch/config ./config
# Stop ES container
docker rm -f es
The config folder contains elasticsearch.yml and other configuration files. We then modify the elasticsearch.yml file to disable SSL authentication. The modified content is as follows:
# Enable encryption for HTTP API client connections, such as Kibana, Logstash, and Agents
xpack.security.http.ssl:
-  enabled: true
+  enabled: false
  keystore.path: certs/http.p12

# Enable encryption and mutual authentication between cluster nodes
xpack.security.transport.ssl:
-  enabled: true
+  enabled: false
  verification_mode: certificate
  keystore.path: certs/transport.p12
  truststore.path: certs/transport.p12
After modifying, we need to run a new ES container and mount the modified configuration file to the container. The command is as follows:
docker run -d --name es -p 9200:9200 -p 9300:9300 -v "$PWD/config":/usr/share/elasticsearch/config -e "discovery.type=single-node" elasticsearch:8.11.3
Once the container starts, we can access ES via http://localhost:9200. Note that since we redeployed the ES container, the previously modified user password will also become invalid, and we need to reset the user password again.
ES Monitoring Tools
If you want to view data in ES, using command-line tools may not be very convenient. Therefore, we need a GUI tool. Here, we recommend elasticvue[2], a browser-based ES GUI tool that is very easy to install, also using Docker:
docker run -p 9080:8080 --name elasticvue -d cars10/elasticvue
Then we can access elasticvue by entering http://localhost:9080 in the browser. After entering the homepage, click the ADD ELASTICSEARCH CLUSTER button, and you will see the following interface:
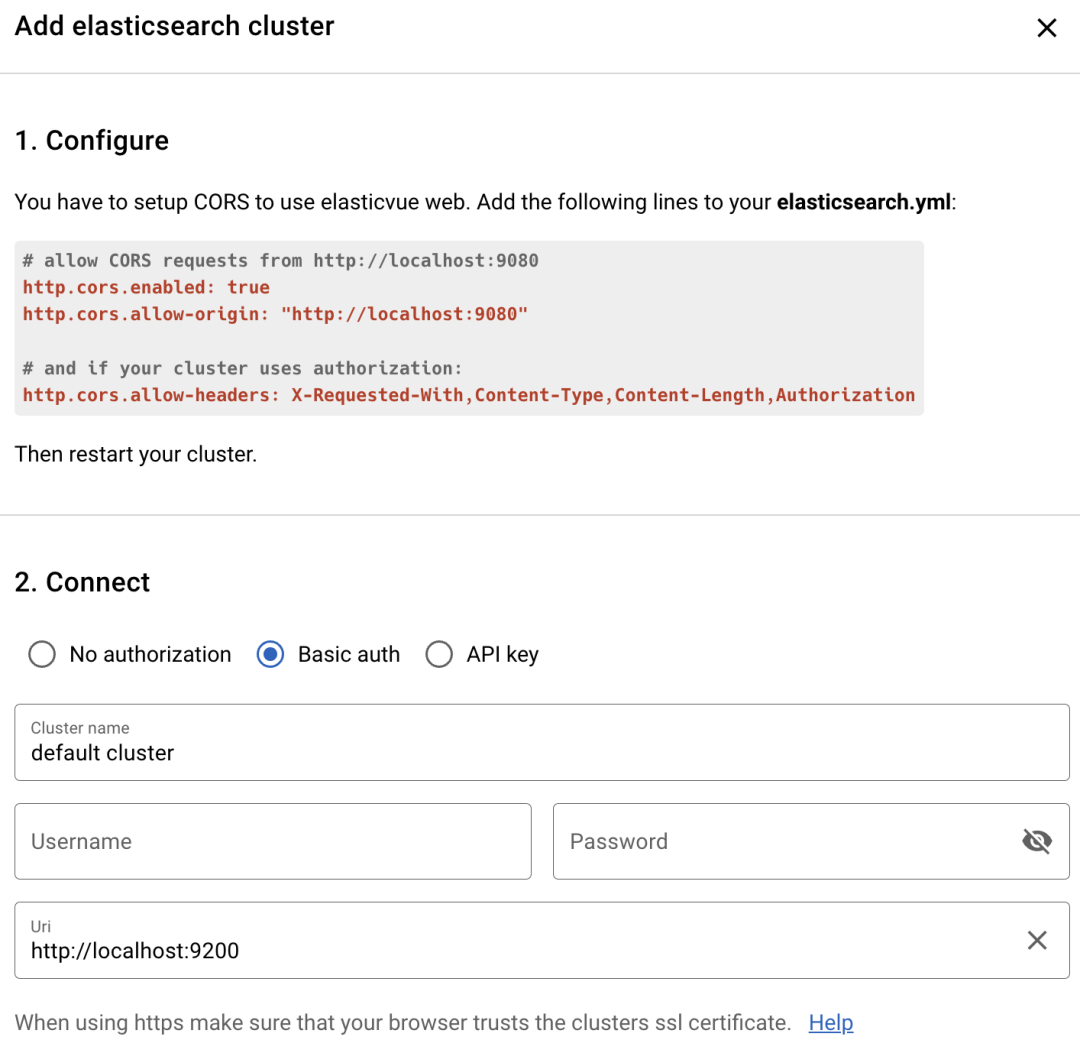
According to the Configure prompts in the upper part of the figure, you need to modify the ES configuration file elasticsearch.yml to connect to elasticvue. The modification content can refer to the Configure section in the figure. After modifying, restart the ES container:
docker restart es
Then in elasticvue, add the ES cluster by entering the ES address http://localhost:9200 and choosing Basic auth to enter the username and password, thus connecting to our ES service.
Embedding Model Deployment
The core of vector retrieval is vectors, which are generated by embedding models. We can use some online embedding models, such as OpenAI’s embedding model, or deploy our own embedding model. Here, we choose to deploy our own embedding model using the BAAI/bge-base-en-v1.5[3] model, which is an English embedding model suitable for generating English vectors.
We will use FastChat[4] to deploy the embedding model. FastChat is a development platform for model training, deployment, and evaluation that supports both LLM models and embedding models. Next, we will introduce how to use FastChat to deploy an embedding model.
First, we need to install FastChat and then use it to deploy an embedding API service compatible with OpenAI API. The installation command is as follows:
pip3 install "fschat[model_worker,api]"
After installation, first use FastChat’s command-line tool to start the controller service as follows:
$ python3 -m fastchat.serve.controller --host 0.0.0.0
2024-01-14 18:29:43 | INFO | controller | args: Namespace(dispatch_method='shortest_queue', host='0.0.0.0', port=21001, ssl=False)
2024-01-14 18:29:43 | ERROR | stderr | INFO:     Started server process [1154]
2024-01-14 18:29:43 | ERROR | stderr | INFO:     Waiting for application startup.
2024-01-14 18:29:43 | ERROR | stderr | INFO:     Application startup complete.
2024-01-14 18:29:43 | ERROR | stderr | INFO:     Uvicorn running on http://0.0.0.0:21001 (Press CTRL+C to quit)
Then open another terminal and use FastChat’s command-line tool to start the worker service as follows:
$ python3 -m fastchat.serve.model_worker --model-path BAAI/bge-base-en-v1.5 --host 0.0.0.0
2024-01-14 18:32:39 | INFO | model_worker | Loading the model ['bge-base-en-v1.5'] on worker 339a9e30 ...
2024-01-14 18:32:40 | INFO | model_worker | Register to controller
2024-01-14 18:32:40 | ERROR | stderr | INFO:     Started server process [1229]
2024-01-14 18:32:40 | ERROR | stderr | INFO:     Waiting for application startup.
2024-01-14 18:32:40 | ERROR | stderr | INFO:     Application startup complete.
2024-01-14 18:32:40 | ERROR | stderr | INFO:     Uvicorn running on http://0.0.0.0:21002 (Press CTRL+C to quit)
After executing the command, FastChat will automatically download the BAAI/bge-base-en-v1.5 model from Hugging Face. Once the download is complete, it will start the worker service, which will automatically connect to the controller service.
Next, open another terminal and use FastChat’s command-line tool to start the API service compatible with OpenAI API as follows:
$ python3 -m fastchat.serve.openai_api_server --host 0.0.0.0 --port 8000
2024-01-14 18:37:10 | ERROR | stderr | INFO:     Started server process [1405]
2024-01-14 18:37:10 | ERROR | stderr | INFO:     Waiting for application startup.
2024-01-14 18:37:10 | ERROR | stderr | INFO:     Application startup complete.
2024-01-14 18:37:10 | ERROR | stderr | INFO:     Uvicorn running on http://0.0.0.0:8000(Press CTRL+C to quit)
Once the service is started, we can access http://localhost:8000/docs to view the API service’s Swagger documentation:
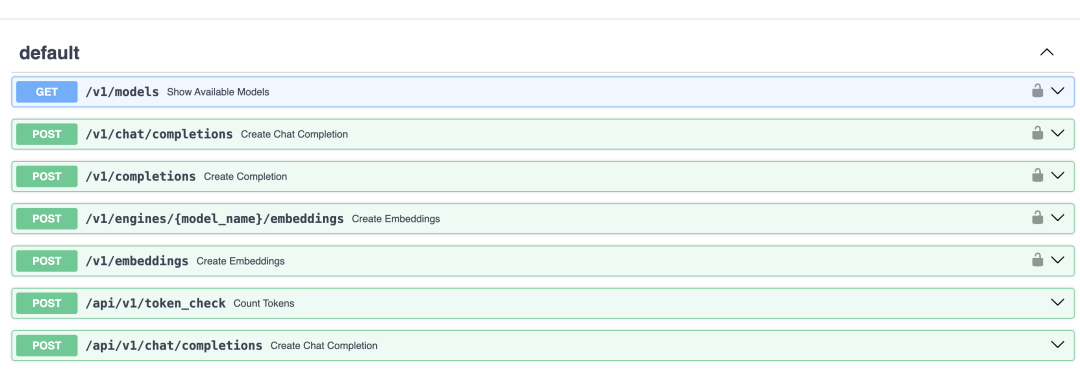
In the figure, we can see that the /v1/embeddings interface is the embedding interface we need to call. We can test this interface using the curl command as follows:
curl -X 'POST' \
  'https://localhost:8000/v1/embeddings' \
  -H 'accept: application/json' \
  -H 'Content-Type: application/json' \
  -d '{\n  "model": "bge-base-en-v1.5",\n  "input": "hello"\n}'

# Display result
{
  "object": "list",
  "data": [
    {
      "object": "embedding",
      "embedding": [0.013750563375651836, …], # Vector data
      "index": 0
    }
  ],
  "model": "bge-base-en-v1.5",
  "usage": {
    "prompt_tokens": 3,
    "total_tokens": 3
  }
}
In the request parameters, we input the model name and the text to be vectorized. Once the command execution is complete, we can see that the returned result includes the vector data after embedding, and the return format is the same as that of the OpenAI API[5].
For more related deployment content of FastChat, you can refer to the documentation[6].
Loading and Retrieving Files with LlamaIndex
LlamaIndex[7] is another LLM application development framework following LangChain, primarily focused on RAG. It is also gradually developing some agent-related functions. The main programming language of this framework is Python, with broad community support and contributions, including numerous forks and stars, indicating its popularity and practicality in the development community.
Next, we will introduce how to use LlamaIndex in conjunction with ES for document loading and retrieval. Before we start writing code, we need to install the Python packages for LlamaIndex and ES as follows:
pip install llama-index elasticsearch
Custom Embedding Class
After installing the dependency packages, we will start writing the relevant code. First, we need to create a custom embedding class that will call the embedding API interface we just deployed to achieve text vectorization. The code is as follows:
from llama_index.embeddings.base import BaseEmbedding, Embedding
from llama_index.bridge.pydantic import PrivateAttr
from typing import Any, List

class CustomEmbeddings(BaseEmbedding):
    """Custom class for embeddings.

    Args:
        model_name (str): Mode for embedding.
        url(str): Url for embedding model.
    """

    _model_name: str = PrivateAttr()
    _url: str = PrivateAttr()

    def __init__(self, model_name: str, url: str, **kwargs: Any) -> None:
        self._model_name = model_name
        self._url = url
        super().__init__(**kwargs)

    @classmethod
    def class_name(cls) -> str:
        return "custom_embedding"

    def _aget_query_embedding(self, query: str) -> Embedding:
        return get_embedding(text=query, model_uid=self._model_name, url=self._url)

    def _aget_text_embedding(self, text: str) -> Embedding:
        return get_embedding(text=text, model_uid=self._model_name, url=self._url)

    def _get_query_embedding(self, query: str) -> Embedding:
        return get_embedding(text=query, model_uid=self._model_name, url=self._url)

    def _get_text_embedding(self, text: str) -> Embedding:
        return get_embedding(text=text, model_uid=self._model_name, url=self._url)

    def _get_text_embeddings(self, texts: List[str]) -> List[Embedding]:
        return get_embeddings(
            list_of_text=texts, model_uid=self._model_name, url=self._url
        )
-
To implement a custom embedding class using LlamaIndex, we need to inherit the BaseEmbedding class and implement the relevant methods.
-
Here, we implemented the
_aget_query_embedding,_aget_text_embedding,_get_query_embedding,_get_text_embedding, and_get_text_embeddingsmethods, which call other public methods to achieve the text-to-vector functionality.
Next, let’s look at the implementation of the get_embedding and get_embeddings methods as follows:
import requests

def send_request(model_uid: str, text: str, url: str):
    url = f"{url}/v1/embeddings"
    request_body = {"model": model_uid, "input": text}
    response = requests.post(url, json=request_body)
    if response.status_code != 200:
        raise RuntimeError(
            f"Failed to create the embeddings, detail: {_get_error_string(response)}"
        )
    return response.json()

def get_embedding(text: str, model_uid: str, url: str) -> Embedding:
    """Get embedding."""
    text = text.replace("\n", " ")
    response_data = send_request(model_uid, text, url)
    return response_data["data"][0]["embedding"]

def get_embeddings(
    list_of_text: List[str], model_uid: str, url: str
) -> List[Embedding]:
    """Get embeddings."""
    assert len(list_of_text) <= 2048, "The batch size should not be larger than 2048."

    list_of_text = [text.replace("\n", " ") for text in list_of_text]
    response_data = send_request(model_uid, list_of_text, url)
    return [d["embedding"] for d in response_data["data"]]
-
get_embeddingandget_embeddingsboth usesend_requestto obtain the vector data of the text. The difference is that one parameter is a string, while the other is an array of strings. -
The
send_requestmethod initiates an HTTP request to call the embedding API interface to achieve text vectorization. -
Referring to the previous API return results, the embedding vectors are stored in an array.
-
get_embeddingretrieves the first vector data from the return result, whileget_embeddingsretrieves all vector data.
Vectorizing Documents
With the custom embedding class in place, we can use LlamaIndex to implement document vector storage. First, we connect to the ES database, as shown in the following code:
from llama_index.vector_stores import ElasticsearchStore
from llama_index import StorageContext

es_url = "http://{username}:{password}@localhost:9200"
index_name = "my_index"
store = ElasticsearchStore(
   es_url=es_url,
   index_name=index_name,
)
storage_context = StorageContext.from_defaults(vector_store=store)
-
Create a new ES store to connect to ES, specifying the ES address and index name.
-
If ES has security authentication enabled, you need to add the username and password to the ES address.
-
Use LlamaIndex’s StorageContext to integrate the ES store.
Next, we define a ServiceContext with the embedding model, as shown in the following code:
from llama_index import ServiceContext
from custom_embedding import CustomEmbeddings

embedding_model_url = "http://localhost:8000"
embedding_model_name = "bge-base-en-v1.5"
service_context = ServiceContext.from_defaults(
    embed_model=CustomEmbeddings(
        url=embedding_model_url, model_name=embedding_model_name
    ),
)
-
The
embedding_model_urlis the address of the embedding API we just deployed, andmodel_nameis the model name.
Next, we will convert documents into LlamaIndex’s Document objects. We can use LlamaIndex’s example document paul_graham_essay[8] for demonstration. This essay is a retrospective of Paul Graham’s personal career and work experience, as shown in the following code:
from llama_index import SimpleDirectoryReader

data_path = "./data" # Directory where paul_graham_essay.txt is located
documents = SimpleDirectoryReader(data_path).load_data()
-
The SimpleDirectoryReader object can parse files in a folder. Parsing of txt files does not require additional dependencies, but if the files are in other formats, such as pdf, you will need to install the related dependency pypdf.
We will assemble the above objects together, as shown in the example code below:
from llama_index import VectorStoreIndex

index = VectorStoreIndex.from_documents(
    documents,
    storage_context=storage_context,
    service_context=service_context,
)
-
Use VectorStoreIndex to integrate the storage_context and service_context, and load the documents.
-
There is no need to worry about whether the ES index has been created. If the index does not exist, LlamaIndex will create it automatically.
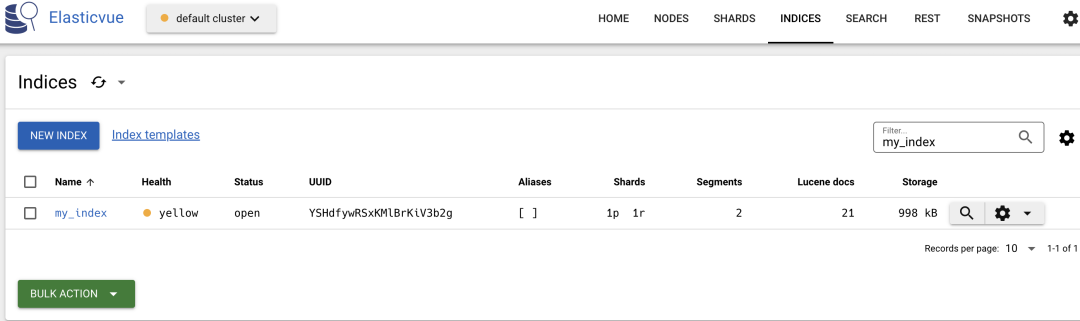
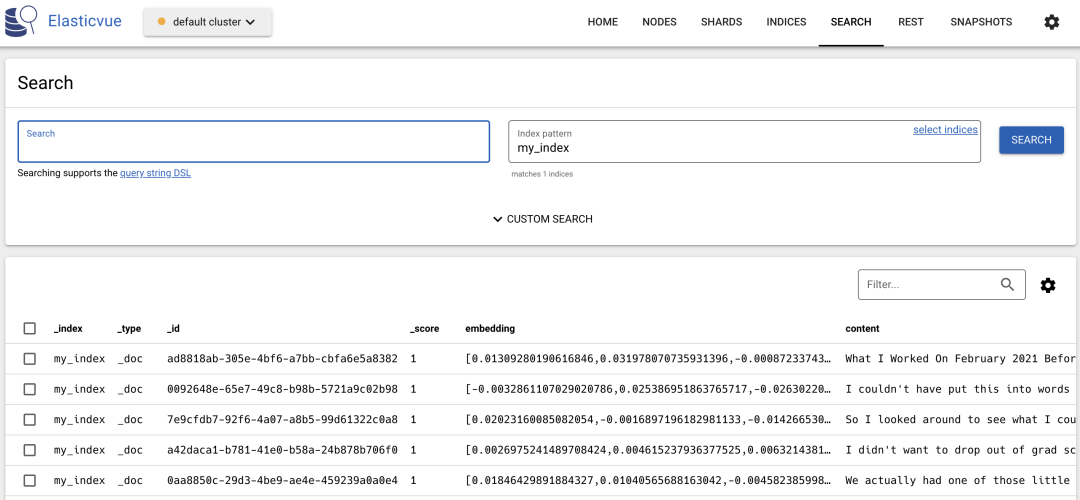
After executing the code, we will see the indexed documents in ES. We can use elasticvue to view the indexed documents, as shown in the following images:
In addition to loading entire folders, we can also add new documents to existing indexes. The code is as follows:
filepath = "./data/paul_graham_essay.txt"
index = VectorStoreIndex.from_vector_store(
    vector_store=store,
    storage_context=storage_context,
    service_context=service_context,
)
document = SimpleDirectoryReader(input_files=[filepath]).load_data()[0]
index.insert(document)
-
Pass the ES store into VectorStoreIndex to load the existing ES index.
-
SimpleDirectoryReader can also accept a single file path, allowing you to load individual files.
-
Use the insert method of VectorStoreIndex to add new documents.
Query Retrieval and Generation
Next, we will use LlamaIndex to perform query retrieval, as shown in the following code:
query_engine = index.as_query_engine()
response = query_engine.query("What did the author do growing up?")
print(f"response: {response}")

# Display result
# response: The author took philosophy courses, but found them boring.
# As a result, the author decided to switch to AI and started teaching
# themselves Lisp, which was regarded as the language of AI at the time.
# The author also reverse-engineered SHRDLU for their undergraduate thesis.
-
LlamaIndex uses OpenAI’s LLM by default for generation. Therefore, before executing the code, you need to set the OPENAI_API_KEY environment variable to your API KEY.
We asked a question about the author’s upbringing, and LlamaIndex will first use vector retrieval to retrieve relevant documents, and then use the LLM to generate answers. We can see that the answer generated by LlamaIndex is correct.
If we disable the LLM in LlamaIndex, the result of response will become a prompt template that incorporates relevant documents, as shown below:
service_context = ServiceContext.from_defaults(
    llm=None, # Disable LLM
    embed_model=CustomEmbeddings(
        url=embedding_model_url, model_name=embedding_model_name
    ),
)
......
response = query_engine.query("What did the author do growing up?")
print(f"response: {response}")

# Display result
# LLM is explicitly disabled. Using MockLLM.
# response: Context information is below.
# ------------------# file_path: data/paul_graham_essay.txt
#
# I don't think it was entirely blabla ......
# ------------------# Given the context information and not prior knowledge, answer the query.
# Query: What did the author do growing up?
# Answer:
-
Simply add the parameter
llm=Nonein the ServiceContext to disable the default OpenAI LLM. -
Other codes remain the same.
As we can see, the same question, when not using the LLM, returns a result that includes a prompt template with relevant documents.
In the response object, we can also access the retrieved document information through response.source_nodes. The JSON information of the document is as follows:
 {
    "py/object": "llama_index.schema.NodeWithScore",
    "py/state": {
      "__dict__": {
        "node": {
          "py/object": "llama_index.schema.TextNode",
          "py/state": {
            "__dict__": {
              "metadata": {"file_path": "data/paul_graham_essay.txt", …},
              "hash": "72baf405cfa89677a1a409d46d58dab2f4c183adcba5602d8b01a27a05d9a7a5",
              "text": "blabla...",
              "start_char_idx": 53611,
              "end_char_idx": 57967
            },
          }
        },
        "score": 1.0
      },
    }
  },
  {
    "py/object": "llama_index.schema.NodeWithScore",
    "py/state": {"__dict__": {…}, …}
  }
-
We can see that LlamaIndex has retrieved 2 nodes based on the question (nodes can be understood as chunks of documents).
-
Each node has attributes such as text content and matching score.
LlamaIndex uses vector retrieval by default, but we can also replace it with other retrieval methods as shown below:
from llama_index.vector_stores.types import VectorStoreQueryMode

# Use keyword retrieval
query_engine = index.as_query_engine(
  vector_store_query_mode=VectorStoreQueryMode.TEXT_SEARCH,
)

# Use hybrid retrieval
query_engine = index.as_query_engine(
  vector_store_query_mode=VectorStoreQueryMode.HYBRID,
)
For more usage of LlamaIndex, you can refer to the official documentation[9].
Conclusion
RAG is an important direction in LLM technology. It not only addresses some issues present in LLMs but also helps us build higher-quality LLM applications. This article unfolds step by step from the deployment of ES and embedding models, in conjunction with the LLM framework LlamaIndex to achieve RAG’s retrieval-augmented generation, and introduces the relevant principles and considerations during the practical process. I hope this article helps everyone better understand RAG technology. If you have any questions or suggestions about the article’s content, please feel free to leave a message in the comments section.
Follow me to learn about various new technologies in artificial intelligence and AIGC. Welcome to communicate; if you have any questions or comments, feel free to leave a message in the comments section.
References:
Official installation documentation: https://docs.docker.com/engine/install/
[2]
elasticvue: https://github.com/cars10/elasticvue
[3]
BAAI/bge-base-en-v1.5: https://huggingface.co/BAAI/bge-base-en-v1.5
[4]
FastChat: https://github.com/lm-sys/FastChat
[5]
OpenAI API format: https://platform.openai.com/docs/api-reference/embeddings
[6]
Documentation: https://github.com/lm-sys/FastChat/blob/main/docs/openai_api.md
[7]
LlamaIndex: https://www.llamaindex.ai/
[8]
paul_graham_essay: https://github.com/run-llama/llama_index/blob/b01426e6b467b0da6d6a5948b3566d3251bf38fa/docs/examples/data/paul_graham/paul_graham_essay.txt
[9]
Official documentation: https://docs.llamaindex.ai/en/stable/