Click on the above“Beginner Learning Vision” to selectStar or “Pin”
Heavyweight content delivered first-hand
Originally published by | Machine Learning AI Algorithm Engineer
The link to the VOC dataset used is provided in the article, the pre-trained model has been uploaded to GitHub, and I used Colab Pro for the environment, everyone can download the model for predictions.
Code link: https://github.com/lixiang007666/segmentation-learning-experiment-pytorch
Usage:
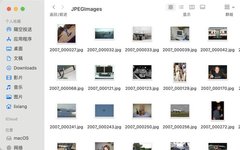
Download the VOC dataset, and place the JPEGImages and SegmentationClass folders into the data folder.
Switch the terminal to the target directory and run python train.py -h to view training options.
(torch) qust116-jq@qustx-X299-WU8:~/semantic-segmentation$ python train.py -h
usage: train.py [-h] [-m {Unet,FCN,Deeplab}] [-g GPU]
choose the model
optional arguments:
-h, --help show this help message and exit
-m {Unet,FCN,Deeplab}, --model {Unet,FCN,Deeplab}
Input model name
-g GPU, --gpu GPU Input required GPU
Choose the model and GPU number to train, for example run python train.py -m Unet -g 0.
For prediction, you need to manually modify the model in predict.py.
If you are very familiar with FCN, you can skip the explanation of d2l (Dive into Deep Learning) and go to the last part.
2 The VOC Dataset
The VOC dataset is generally used for object detection, and the 2012 version added the semantic segmentation task.
The basic dataset includes: a training set with 1464 images, a validation set with 1449 images, and a test set with 1456 images. There are a total of 21 object categories.
In the PASCAL VOC segmentation task, there are 20 categories of objects, with other content as the background class, where red represents the airplane class, black is the background, and the boundary of the airplane is outlined with a beige (appearing white) line to indicate the segmentation blur area.
Among them, the segmentation labels are all png format images, which are actually single-channel color indexed images. This image not only has a single-channel index image that is the same size as the original image but also stores a list of 256 color values (palette), where each index value corresponds to an RGB color value in the palette. Therefore, a single-channel index image + palette can represent a color image.
Original image:
Insert image description label here:
Insert image description here. Selecting an image can reveal that a single image can have more than two segmentation categories, and each image category is not fixed.
3 Fully Convolutional Networks
Semantic segmentation can classify each pixel in an image. Fully Convolutional Networks (FCNs) implement the transformation from image pixels to pixel categories using convolutional neural networks. Unlike the convolutional neural networks we introduced in image classification or object detection, fully convolutional networks transform the height and width of the intermediate feature maps back to the size of the input image: this is achieved by introducing transposed convolution layers. Thus, the output category prediction corresponds pixel by pixel with the input image: given a position in spatial dimensions, the output in channel dimensions is the category prediction for the pixel at that position.
%matplotlib inline
import torch
import torchvision
from torch import nn
from torch.nn import functional as F
d2l import torch as d2l
3.1 Network Structure
Fully convolutional networks first extract image features using convolutional neural networks, then change the number of channels to the number of classes through convolution layers, and finally use transposed convolution layers to change the height and width of the feature maps back to the size of the input image. Therefore, the model output has the same height and width as the input image, and the final output channels contain the category predictions for the pixels at that spatial location.
Next, we use the ResNet-18 model pre-trained on the ImageNet dataset to extract image features and instantiate this network as pretrained_net. The last few layers of this model include the global average pooling layer and the fully connected layer, which are not needed in fully convolutional networks.
pretrained_net = torchvision.models.resnet18(pretrained=True)
list(pretrained_net.children())[-3:]
Create an instance of the fully convolutional network net. It copies most of the pre-trained layers from ResNet-18 but removes the final global average pooling layer and the fully connected layer closest to the output.
net = nn.Sequential(*list(pretrained_net.children())[:-2])
Given input dimensions of height and width of 320 and 480, the forward computation of net will reduce the input height and width to 10 and 15 respectively.
X = torch.rand(size=(1, 3, 320, 480))
net(X).shape
Use convolution layers to convert the output channel number to the number of classes in the Pascal VOC 2012 dataset (21 classes). Finally, we need to increase the height and width of the feature map 32 times to return to the height and width of the input image.
Recall how to calculate the shape of the convolution layer output:
Since we construct a transposed convolution layer with a stride of 32 and set the kernel height and width to 64 with padding of 16.
We can see that if the stride is 32, padding is 16 (assuming it is an integer), and the kernel height and width are 64, the transposed convolution kernel will enlarge the input height and width by a factor of 32.
num_classes = 21
net.add_module('final_conv', nn.Conv2d(512, num_classes, kernel_size=1))
net.add_module('transpose_conv', nn.ConvTranspose2d(num_classes, num_classes,
kernel_size=64, padding=16, stride=32))
3.2 Initializing Transposed Convolution Layers
Upsampling is typically done using methods like bilinear interpolation. Bilinear interpolation is one of the commonly used upsampling methods, and it is often used to initialize transposed convolution layers.
To explain bilinear interpolation, suppose we have a given input image, and we want to compute each pixel in the upsampled output image.
First, map the coordinates of the output image (𝑥,𝑦) to the coordinates of the input image (𝑥′,𝑦′). For example, map based on the ratio of input to output dimensions. Note that the mapped 𝑥′ and 𝑦′ are real numbers.
Then, find the 4 pixels closest to the coordinates (𝑥′,𝑦′) on the input image.
Finally, the pixel at coordinates (𝑥,𝑦) in the output image is calculated based on these 4 pixels on the input image and their relative distances to (𝑥′,𝑦′).
Bilinear interpolation upsampling can be achieved through transposed convolution layers, with the kernel constructed by the following bilinear_kernel function. Due to space limitations, we only provide the implementation of the bilinear_kernel function without discussing the principles of the algorithm.
def bilinear_kernel(in_channels, out_channels, kernel_size):
factor = (kernel_size + 1) // 2
if kernel_size % 2 == 1:
center = factor - 1
else:
center = factor - 0.5
og = (torch.arange(kernel_size).reshape(-1, 1),
torch.arange(kernel_size).reshape(1, -1))
filt = (1 - torch.abs(og[0] - center) / factor) * \
(1 - torch.abs(og[1] - center) / factor)
weight = torch.zeros((in_channels, out_channels,
kernel_size, kernel_size))
weight[range(in_channels), range(out_channels), :, :] = filt
return weight
Experiment with bilinear interpolation upsampling, which is implemented by transposed convolution layers. We construct a transposed convolution layer that enlarges the input height and width by a factor of 2, initializing its convolution kernel with the bilinear_kernel function.
conv_trans = nn.ConvTranspose2d(3, 3, kernel_size=4, padding=1, stride=2,
bias=False)
conv_trans.weight.data.copy_(bilinear_kernel(3, 3, 4));
In fully convolutional networks, we initialize transposed convolution layers with bilinear interpolation upsampling. For the 1×1 convolution layer, we use Xavier initialization for the parameters.
W = bilinear_kernel(num_classes, num_classes, 64)
net.transpose_conv.weight.data.copy_(W);
3.3 Training Loss Function and Accuracy Calculation
The calculation of the loss function and accuracy is not fundamentally different from that in image classification, as we use the channels of the transposed convolution layer to predict the pixel categories, so in the loss calculation, the channel dimension is specified. Additionally, the model calculates accuracy based on whether the predicted category for each pixel is correct.
def loss(inputs, targets):
return F.cross_entropy(inputs, targets, reduction='none').mean(1).mean(1)
num_epochs, lr, wd, devices = 5, 0.001, 1e-3, d2l.try_all_gpus()
trainer = torch.optim.SGD(net.parameters(), lr=lr, weight_decay=wd)
d2l.train_ch13(net, train_iter, test_iter, loss, trainer, num_epochs, devices)
4 Open Source Code and Dataset
Dataset download link: http://host.robots.ox.ac.uk/pascal/VOC/voc2012/VOCtrainval_11-May-2012.tar
Input samples:
Output samples:
Run Segmentat_pytorch.ipynb:
Training:
!python3 train.py -m Unet -g 0
Prediction:
The model code includes implementations of FCN, U-Net, and Deeplab, allowing for easier model switching for training and prediction.
DeeplabV3 segmentation result: FCN segmentation result:
Insert image description here. U-Net segmentation result:
Remember to give it a Star!
5 Summary
By comparing with standard segmentation images, it can be seen that the output segmentation images of the model are almost consistent with the standard segmentation images, and the output segmentation images of the model integrate well with the original images, indicating that the model has good accuracy.
Additionally, considering the input image size, the model can accept images of any size and output segmentation images with the same size that are already labeled. Since the segmentation is performed on images from the PASCAL VOC dataset, which only supports 20 categories (with the background as the 21st category), any objects not in the 20 categories will be labeled as background during segmentation.
Overall, the model achieves high accuracy for image segmentation on the PASCAL VOC dataset.
6 References
[1]. https://zh-v2.d2l.ai/index.html
Personal profile: Li Xiang, a blogger with millions of visits on CSDN, an ordinary male college student specializing in deep learning algorithms and medical image processing, occasionally dabbling in full-stack development, and writing articles in my spare time.
Blog address: lixiang.blog.csdn.netDisclaimer: Some content is sourced from the internet for the purpose of learning and communication. The copyright of the article belongs to the original author. If there are any issues, please contact for deletion.
Download 1: OpenCV-Contrib Extension Module Chinese Version Tutorial
Reply “Extension Module Chinese Tutorial” in the background of the “Beginner Learning Vision” public account to download the first OpenCV extension module tutorial in Chinese, covering installation of extension modules, SFM algorithms, stereo vision, object tracking, biological vision, super-resolution processing, and more than 20 chapters of content.
Download 2: Python Vision Practical Projects 52 Lectures
Reply “Python Vision Practical Projects” in the background of the “Beginner Learning Vision” public account to download 31 practical vision projects including image segmentation, mask detection, lane line detection, vehicle counting, eyeliner addition, license plate recognition, character recognition, emotion detection, text content extraction, facial recognition, etc., to assist in quickly learning computer vision.
Download 3: OpenCV Practical Projects 20 Lectures
Reply “OpenCV Practical Projects 20 Lectures” in the background of the “Beginner Learning Vision” public account to download 20 practical projects based on OpenCV to advance OpenCV learning.
Discussion Group
Welcome to join the public account reader group to communicate with peers. There are currently WeChat groups for SLAM, 3D vision, sensors, autonomous driving, computational photography, detection, segmentation, recognition, medical imaging, GAN, algorithm competitions, etc. (will gradually be subdivided in the future). Please scan the WeChat ID below to join the group, and note: “Nickname + School/Company + Research Direction”, for example: “Zhang San + Shanghai Jiao Tong University + Vision SLAM”. Please follow the format; otherwise, you will not be approved. After successful addition, you will be invited to enter related WeChat groups based on research direction. Please do not send advertisements in the group, or you will be removed. Thank you for your understanding~