
Introduction
In the field of artificial intelligence, Retrieval-Augmented Generation (RAG) systems have become common tools for handling simple queries and generating contextually relevant responses. However, with the growing demand for more complex AI applications, we need to go beyond these retrieval-capable systems. Thus, AI agents have emerged—these autonomous entities can perform complex multi-step tasks while maintaining state during interactions and dynamically adapting to new information. LangGraph, a powerful extension of the LangChain library, aims to help developers build these advanced AI agents by supporting stateful, multi-participant applications with loop computation capabilities.
In this article, we will explore how LangGraph is transforming AI development and provide a step-by-step guide on how to build your own AI agent through an example that calculates the energy-saving effects of solar panels. This example will demonstrate how LangGraph’s unique features can create intelligent, adaptive, and real-world applicable AI systems.
What is LangGraph?
LangGraph is an advanced library built on top of LangChain, designed to enhance your Large Language Model (LLM) applications by introducing loop computation capabilities. While LangChain allows for the creation of directed acyclic graphs (DAG) for linear workflows, LangGraph goes further by supporting the addition of loops, which are crucial for developing complex, agent-like behaviors. These behaviors enable LLMs to continuously execute a certain process and dynamically decide the next action based on changing conditions.
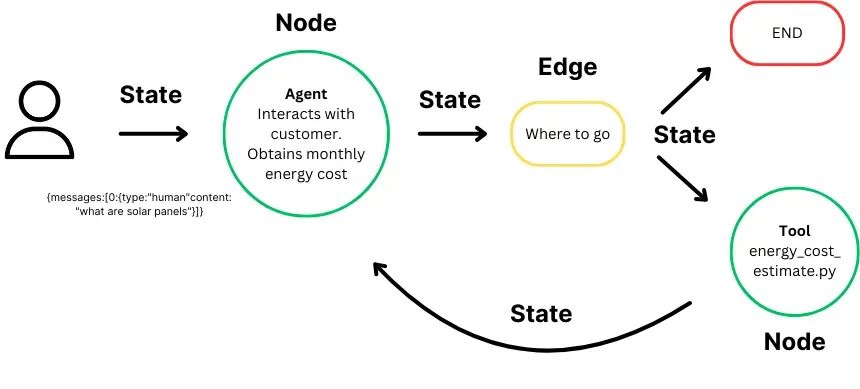
The core concept of LangGraph is the state graph:
-
State: Represents the context or memory that is maintained and updated during the computation process. It ensures that each step in the graph can access relevant information from previous steps, allowing for dynamic decision-making based on accumulated data throughout the process. -
Node: Serving as the basic building blocks of the graph, nodes represent individual computational steps or functions. Each node performs a specific task, such as processing input, making decisions, or interacting with external systems. Nodes can be customized to perform various operations within the workflow. -
Edge: Connects nodes in the graph, defining the computational flow from one step to the next. They support conditional logic, allowing execution paths to change based on the current state, and facilitate the flow of data and control between nodes, enabling complex multi-step workflows.
LangGraph redefines AI development by seamlessly managing graph structures, states, and coordination, making the creation of complex multi-participant applications possible. With automatic state management, LangGraph ensures that context is preserved during interactions, allowing AI to intelligently respond to changing inputs. Its streamlined agent coordination guarantees precise execution and efficient information exchange, enabling developers to focus on designing innovative workflows rather than technical details. The flexibility of LangGraph allows for the development of customized high-performance applications, while its scalability and fault tolerance ensure that your systems remain robust and reliable even in enterprise-level applications.
Step-by-Step Guide
Now that we have a basic understanding of what LangGraph is and how it enhances AI development, let’s dive into a practical example. In this scenario, we will build an AI agent designed to calculate the potential energy-saving effects of solar panels based on user input. This agent can serve as a lead generation tool on a solar panel sales website, interacting with potential customers and providing personalized energy-saving estimates. By collecting key data such as monthly electricity costs, this AI agent helps customers understand the economic benefits of solar energy while filtering leads for the sales team’s follow-up. This example showcases LangGraph’s powerful capabilities in creating intelligent, dynamic systems that can automate complex tasks and drive business value.
Step 1: Import Necessary Libraries
First, import all the essential Python libraries and modules required for the project.
from langchain_core.tools import tool
from langchain_community.tools.tavily_search import TavilySearchResults
from langchain_core.prompts import ChatPromptTemplate
from langchain_core.runnables import Runnable
from langchain_aws import ChatBedrock
import boto3
from typing import Annotated
from typing_extensions import TypedDict
from langgraph.graph.message import AnyMessage, add_messages
from langchain_core.messages import ToolMessage
from langchain_core.runnables import RunnableLambda
from langgraph.prebuilt import ToolNode
from langgraph.prebuilt import tools_condition
These imports include LangChain, LangGraph, and AWS services that will be used later.
Step 2: Define the Tool for Calculating Solar Energy Savings
Define a tool that will calculate the energy savings based on the monthly electricity cost provided by the user.
@tool  # Use the @tool decorator to mark this function as a tool, making it callable in LangGraph
def compute_savings(monthly_cost: float) -> float:
    """
    Tool function: Calculates the potential energy savings after switching to solar based on the user’s monthly electricity cost.

    Parameters:
        monthly_cost (float): User's current monthly electricity cost.

    Returns:
        dict: A dictionary containing:
            - 'number_of_panels': Estimated number of solar panels needed.
            - 'installation_cost': Estimated installation cost.
            - 'net_savings_10_years': Net savings amount after installation costs over 10 years.
    """
    def calculate_solar_savings(monthly_cost):
        # Assumed values in the calculation
        cost_per_kWh = 1.00  # Cost per kWh. This value can be modified as needed, here it’s just an example
        cost_per_watt = 1.50  # Cost per watt of solar panels. This value can be modified as needed, here it’s just an example
        sunlight_hours_per_day = 3.5  # Average sunlight hours per day
        panel_wattage = 350  # Power (watts) of each solar panel
        system_lifetime_years = 10  # Lifespan of the solar system (years)

        # Calculate monthly electricity usage (in kWh)
        monthly_consumption_kWh = monthly_cost / cost_per_kWh

        # Calculate the required system capacity (in kW)
        daily_energy_production = monthly_consumption_kWh / 30  # Assuming 30 days in a month
        system_size_kW = daily_energy_production / sunlight_hours_per_day

        # Calculate the number of solar panels needed and installation cost
        number_of_panels = system_size_kW * 1000 / panel_wattage  # Convert kW to watts
        installation_cost = system_size_kW * 1000 * cost_per_watt  # Calculate total installation cost

        # Calculate annual savings and net savings over 10 years
        annual_savings = monthly_cost * 12  # Annual savings amount
        total_savings_10_years = annual_savings * system_lifetime_years  # Total savings amount over 10 years
        net_savings = total_savings_10_years - installation_cost  # Net savings amount after installation costs

        # Return the calculation results
        return {
            "number_of_panels": round(number_of_panels),  # Round to the nearest integer
            "installation_cost": round(installation_cost, 2),  # Round to two decimal places
            "net_savings_10_years": round(net_savings, 2)  # Round to two decimal places
        }

    # Call the inner function and return the calculation results
    return calculate_solar_savings(monthly_cost)
Code Explanation:
-
@tooldecorator: Marks this function as a tool, making it callable in LangGraph. -
calculate_solar_savingsfunction: Inner function that performs the specific energy savings calculation. -
Assumed values: The code uses some assumed values, such as the cost per kWh, the cost per watt of solar panels, etc., which can be adjusted according to actual conditions. -
Calculation Steps:
-
First, calculate the user’s monthly electricity usage (in kWh). -
Then, calculate the required solar system capacity based on sunlight hours. -
Next, calculate the number of solar panels needed and the installation cost. -
Finally, calculate the annual savings and net savings over ten years.
This function processes the user’s monthly electricity cost and returns a detailed estimate of the solar panel system’s benefits, including the number of solar panels needed, installation costs, and net savings over ten years. To simplify the calculations, we made some assumptions, such as the average cost per kWh and average sunlight hours. However, in more advanced versions of the AI agent, we could directly obtain this information from the user, allowing for more accurate estimates tailored to the user’s unique situation.
Step 3: Set Up State Management and Error Handling
Effective state management and error handling are crucial for building robust AI systems. In this step, we define some tools to manage errors and maintain the state of the conversation.
def handle_tool_error(state) -> dict:
    """
    Function to handle errors that occur during tool execution.

    Parameters:
        state (dict): Current state of the AI agent, including message and tool call details.

    Returns:
        dict: A dictionary containing error messages for each tool that encountered issues.
    """
    # Get error information from the current state
    error = state.get("error")

    # Get the last tool call from the message history of the state
    tool_calls = state["messages"][-1].tool_calls

    # Return a list of ToolMessage containing error details, each associated with the corresponding tool call ID
    return {
        "messages": [
            ToolMessage(
                content=f"Error: {repr(error)}\n please fix your mistakes.",  # Format error message for user understanding
                tool_call_id=tc["id"],  # Associate error message with corresponding tool call ID
            )
            for tc in tool_calls  # Iterate through each tool call to generate individual error messages
        ]
    }

def create_tool_node_with_fallback(tools: list) -> dict:
    """
    Function to create a tool node with error fallback handling.

    Parameters:
        tools (list): List of tools included in the node.

    Returns:
        dict: A tool node with error fallback behavior.
    """
    # Create ToolNode with provided tools and attach a fallback mechanism
    # If an error occurs, the handle_tool_error function will be called to handle the error
    return ToolNode(tools).with_fallbacks(
        [RunnableLambda(handle_tool_error)],  # Use lambda function to wrap error handling function
        exception_key="error"  # Specify that this fallback mechanism is used for error handling
    )
Code Explanation:
-
handle_tool_error function:
-
This function handles errors that occur during tool execution. -
It retrieves error information from the state and generates corresponding error messages based on the last tool call in the messages. -
Returns a list of ToolMessagecontaining error details, each associated with the corresponding tool call ID.
create_tool_node_with_fallback function:
-
This function creates a tool node with error fallback handling. -
It creates a ToolNodeusing the provided list of tools and attaches a fallback mechanism. -
If an error occurs, it will call the handle_tool_errorfunction to handle the error.
Key Points:
-
Error Handling: Through the handle_tool_errorfunction, the system can provide meaningful error feedback when tool execution fails. -
Fallback Mechanism: The create_tool_node_with_fallbackfunction ensures that when tool execution fails, the system can gracefully handle errors and continue running.
These functions ensure that any errors encountered during tool execution are handled gracefully and provide useful feedback to the user.
Step 4: Define State and Assistant Classes
In this step, we define how the AI agent manages its state (the ongoing context of the conversation) and ensures that it can adapt to user inputs and tool outputs.
To do this, we create a State class using Python’s TypedDict to define the structure of the messages passed. The state will hold messages, including inputs from the user and outputs from the agent or tools.
class State(TypedDict):
    messages: Annotated[list[AnyMessage], add_messages]
Next, we create the Assistant class, which is responsible for running the AI agent, interacting with tools, and managing the flow of the conversation. The Assistant calls tools, ensuring they return appropriate results and handling any re-prompts or errors that may occur during execution. Its core functionality includes invoking Runnable, which defines the process of calling the LLM and tools (like compute_savings), and then monitoring the results. If the agent fails to return a valid response or the tool does not provide meaningful data, the Assistant will re-prompt the user or request clarification. It continuously loops through the Runnable until valid output is obtained, ensuring smooth execution and effective responses.
class Assistant:
    def __init__(self, runnable: Runnable):
        # Initialize with a runnable object that defines the interaction process with tools
        self.runnable = runnable

    def __call__(self, state: State):
        while True:
            # Use the current state (messages and context) to call runnable
            result = self.runnable.invoke(state)

            # If the tool fails to return valid output, re-prompt the user for clarification or retry
            if not result.tool_calls and (
                not result.content
                or isinstance(result.content, list)
                and not result.content[0].get("text")
            ):
                # Add a message asking the user to provide valid response
                messages = state["messages"] + [("user", "Respond with a real output.")]
                state = {**state, "messages": messages}
            else:
                # Exit the loop when valid output is obtained
                break

        # Return the final state after processing runnable
        return {"messages": result}
Code Explanation:
-
Assistantclass:
-
This class is responsible for managing the execution flow of the AI agent, ensuring smooth tool calls and user interactions. -
It defines the interaction logic with tools and the LLM through the runnableobject.
__call__ method:
-
This method executes the main logic of the agent. -
It loops through calling the runnableuntil valid output is obtained. -
If tool calls fail or return invalid results, it will re-prompt the user to provide valid input.
Key Points:
-
State Management: Maintains the context and message history of the conversation through the stateobject. -
Error Handling: When tool calls fail, the agent will re-prompt the user, ensuring continuity of the conversation. -
Loop Logic: The while Trueloop ensures the agent continues running until valid output is obtained.
Return Results:
-
Ultimately returns the processed state, containing the agent’s response messages.
This setup is crucial for maintaining the fluidity of the conversation and ensuring the assistant can respond appropriately based on context.
Step 5: Configure the Large Language Model (LLM) with AWS Bedrock
In this step, we configure the Large Language Model (LLM) using AWS Bedrock, although other models can also be used. For information about AWS applications, refer to their official documentation.
def get_bedrock_client(region):
    return boto3.client("bedrock-runtime", region_name=region)

def create_bedrock_llm(client):
    return ChatBedrock(model_id='anthropic.claude-3-sonnet-20240229-v1:0', client=client, model_kwargs={'temperature': 0}, region_name='us-east-1')

llm = create_bedrock_llm(get_bedrock_client(region='us-east-1'))
This integration ensures that the assistant can effectively interpret and respond to user inputs.
Step 6: Define the Assistant’s Workflow
With the LLM and tools configured, the next step is to define the workflow of the AI assistant. This includes creating conversation templates, specifying the tools the assistant will use, and configuring how the AI agent will respond to user inputs and trigger different functions (such as calculating solar energy savings). The workflow essentially controls how the assistant interacts with users, collects information, and calls tools to provide results.
The first part of the workflow involves creating a prompt template, which defines how the assistant will communicate with users. The prompt helps guide the AI assistant in determining what to ask the user, how to respond based on input, and when to trigger tools like compute_savings.
In this case, the assistant needs to ask the user for their monthly electricity cost to calculate the energy-saving effects of solar panels. Here’s how to define the conversation:
primary_assistant_prompt = ChatPromptTemplate.from_messages(
    [
        (
            "system",  # System message used to define the assistant's behavior and task
            '''You are a helpful solar panel customer support assistant.
               You need to obtain the following information from the user:
            - Monthly electricity cost
            If you cannot obtain this information, please ask the user for clarification! Do not guess.
            After obtaining all information, call the relevant tools
            ''',
        ),
        ("placeholder", "{messages}"),  # Placeholder for inserting conversation history or user input
    ]
)
Code Explanation:
-
ChatPromptTemplate.from_messages: Used to create a conversation prompt template that defines the assistant’s behavior and conversation flow. -
systemsystem message:
-
Defines the assistant’s basic tasks and behavioral guidelines. -
The assistant needs to obtain the monthly electricity cost from the user and ask for clarification if it cannot obtain this information. -
After collecting all necessary information, the assistant will call relevant tools (like compute_savings).
{messages} is a placeholder for inserting conversation history or user input, ensuring that the context of the conversation can be dynamically updated.Next, define the tools that the assistant will use during interactions, with the primary tool being compute_savings, which calculates the potential energy savings based on the user’s monthly electricity cost. After specifying the tools in a list, use the llm.bind_tools() method to bind them to the assistant’s workflow. This step ensures that the AI assistant can access and trigger these tools as needed during the conversation, creating a seamless interaction between the user and the assistant.
# Define the tools the assistant will use
part_1_tools = [
    compute_savings  # Primary tool: Calculate solar energy savings
]

# Bind the tools to the assistant's workflow
part_1_assistant_runnable = primary_assistant_prompt | llm.bind_tools(part_1_tools)
Code Explanation:
-
part_1_tools:
-
Defines the list of tools the assistant will use during interactions. -
Currently, there is only one tool compute_savings, which calculates the energy-saving effects of solar panels.
llm.bind_tools(part_1_tools):
-
Binds the list of tools to the LLM (Large Language Model), enabling the assistant to call these tools during the conversation. -
This step ensures the assistant can dynamically trigger tools as needed.
primary_assistant_prompt | llm.bind_tools(part_1_tools):
-
Combines the prompt template ( primary_assistant_prompt) with the LLM after binding the tools using the pipe operator|. -
This way, the assistant’s workflow includes both the conversation logic and the ability to call tools.
Key Points:
-
Tool Binding: Through the bind_toolsmethod, the assistant can dynamically call tools during the conversation, achieving more complex functionalities. -
Workflow Integration: Combining the prompt template with the LLM that has bound tools forms a complete workflow, ensuring the assistant can intelligently respond to user needs.
Step 7: Build the Graph Structure
In this step, we use LangGraph to build a graph structure for the AI assistant, which controls how the assistant processes user inputs, triggers tools, and transitions between various stages. The graph structure defines the nodes for core actions (like calling the assistant and tools) and the edges that determine the flow between nodes.
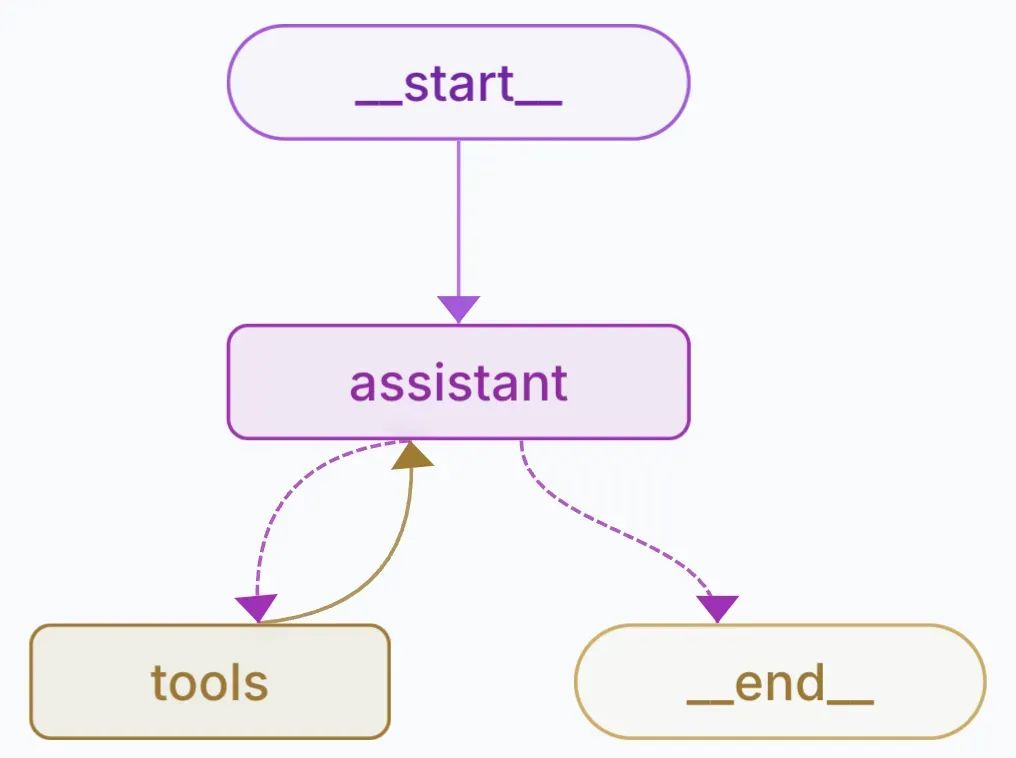
In LangGraph, each node represents an operational step, such as interacting with the user or executing a tool. Two key nodes are defined for this AI assistant:
-
Assistant Node: Manages the conversation flow, asking the user for their electricity cost and processing responses. -
Tool Node: Executes tools (like compute_savings) to calculate the user’s solar panel energy savings.
# Create a StateGraph instance to define the graph structure
builder = StateGraph(State)

# Add the assistant node responsible for managing conversation flow
builder.add_node("assistant", Assistant(part_1_assistant_runnable))

# Add the tool node responsible for executing tools (like compute_savings) and handling errors
builder.add_node("tools", create_tool_node_with_fallback(part_1_tools))
Code Explanation:
-
StateGraph(State):
-
Creates a StateGraphinstance to define the graph structure. -
Stateis the previously defined state class used to maintain the context and message history of the conversation.
add_node("assistant", Assistant(part_1_assistant_runnable)):
-
Adds a node named assistant, instantiated by theAssistantclass. -
part_1_assistant_runnableis the assistant’s workflow, combining the prompt template and tool calling logic.
add_node("tools", create_tool_node_with_fallback(part_1_tools)):
-
Adds a node named tools, responsible for executing tools (likecompute_savings). -
create_tool_node_with_fallbackfunction ensures graceful error handling when tool execution fails.
Edges define how the flow moves between nodes. Here, the assistant starts the conversation and transitions to the tool node after collecting the required input, returning to the assistant node after the tool has executed.
# Add edges from the start node to the assistant node, indicating the conversation starts with the assistant
builder.add_edge(START, "assistant")  # Start with the assistant

# Add conditional edges that determine whether to transition from the assistant node to the tool node based on conditions
builder.add_conditional_edges("assistant", tools_condition)  # Transition to the tool node after collecting input

# Add edges from the tool node back to the assistant node, indicating that the assistant continues processing after the tool has executed
builder.add_edge("tools", "assistant")  # Return to the assistant after tool execution
Code Explanation:
-
add_edge(START, "assistant"):
-
Defines an edge from the starting node ( START) to the assistant node (assistant). -
Indicates that the conversation flow starts with the assistant, who first interacts with the user.
add_conditional_edges("assistant", tools_condition):-
Adds conditional edges that determine whether to transition from the assistant node to the tool node based on the return value of the tools_conditionfunction. -
The tools_conditionfunction is used to determine whether to call the tool (e.g., whether the user’s electricity cost has been collected).
add_edge("tools", "assistant"):-
Defines an edge from the tool node ( tools) back to the assistant node (assistant). -
Indicates that after the tool has executed, the flow returns to the assistant, who continues interacting with the user.
Use MemorySaver to ensure that the graph structure retains the conversation state between different steps. This allows the assistant to remember user inputs, maintaining continuity in multi-step interactions.
# Create a MemorySaver instance to save conversation state
memory = MemorySaver()

# Compile the graph structure and pass MemorySaver as the checkpoint manager
graph = builder.compile(checkpointer=memory)
Code Explanation:
-
MemorySaver():
-
Creates a MemorySaverinstance to save and restore the conversation state. -
Ensures that the assistant can remember user inputs and context during multi-step interactions.
builder.compile(checkpointer=memory):-
Compiles the graph structure, making it executable. -
Passes memoryas the checkpoint manager, ensuring that the conversation state can be persisted between different steps.
Step 8: Run the Assistant
Finally, run the assistant by initializing the graph structure and starting the conversation.
# Import necessary libraries
# import shutil  # Unused library, commented out
import uuid  # For generating unique IDs

# Create a sample conversation to simulate user interaction with the assistant
tutorial_questions = [
    'hey',  # User greets
    'can you calculate my energy saving',  # User requests to calculate energy savings
    "my montly cost is $100, what will i save"  # User provides monthly electricity cost and asks about savings
]

# Generate a unique conversation ID
thread_id = str(uuid.uuid4())

# Configuration parameters including conversation ID
config = {
    "configurable": {
        "thread_id": thread_id,  # Use the generated unique ID as the conversation ID
    }
}

# To track printed events and avoid duplicates
_printed = set()

# Iterate through the user's questions to simulate the conversation flow
for question in tutorial_questions:
    # Use the graph.stream method to process user input and get the event stream
    events = graph.stream(
        {"messages": ("user", question)}, config, stream_mode="values"
    )
    # Iterate through the event stream and print event content
    for event in events:
        _print_event(event, _printed)  # Print event content, ensuring no duplicates are printed
Code Explanation:
-
tutorial_questions: Simulates the conversation content between the user and the assistant, including user greetings, requests to calculate energy savings, and providing monthly electricity costs. -
uuid.uuid4(): Generates a unique conversation ID used to identify the current conversation session. -
config: Configuration parameters including the conversation ID, ensuring that the conversation state can be correctly saved and restored. -
_printed: Used to track printed events and avoid printing the same content multiple times. -
graph.stream: -
Uses the graph.streammethod to process user input and return an event stream. -
stream_mode="values"indicates that only the values of the events are returned, not the complete event objects. -
_print_event: A custom function to print event content and ensure no duplicates are printed.
Conclusion
Through the steps above, we have successfully created an AI assistant using LangGraph that can calculate the energy-saving effects of solar panels based on user input. This tutorial demonstrates LangGraph’s powerful capabilities in managing complex multi-step processes and emphasizes how to leverage advanced AI tools to efficiently address real-world challenges. Whether developing AI agents for customer support, energy management, or other applications, LangGraph provides the flexibility, scalability, and robustness needed to realize your creative ideas.