Click on the “Beginner’s Visual Learning” above to select “Star” or “Pin“
Important content delivered promptly
0. Introduction
During the pandemic, we searched for TensorFlow pre-trained models on GitHub and found a repository containing 25 object detection pre-trained models with their performance and speed metrics. Utilizing one of these models to build a social distance program would be interesting, combined with some knowledge of computer vision.
While learning OpenCV, you should know that it has powerful functions for some small projects, one of which is performing bird’s-eye view transformations. A bird’s-eye view is a top-down representation of a scene, which is often a task that needs to be executed when building autonomous driving applications.
Implementation of the Bird’s-Eye View System in Vehicles
This indicates that applying bird’s-eye view transformation technology to monitor social distance can enhance surveillance quality.
In this issue, we will introduce how to use deep learning models and some knowledge in computer vision to construct a powerful social distance detector.
The structure of this article is as follows:
·Model Selection
·People Detection
·Bird’s-Eye View Transformation
·Social Distance Measurement
·Results and Improvements
All code and installation instructions can be found at the following link: https://github.com/basileroth75/covid-social-distancing-detection
1. Model Selection
All available models in the TensorFlow object detection model zoo have been pre-trained on the COCO dataset (Common Objects in Context). The COCO dataset contains 120,000 images with a total of 880,000 labeled objects. These pre-trained models can detect 90 different types of objects, and the complete list of object types can be found in the data section of GitHub at: https://github.com/tensorflow/models/blob/master/research/object_detection/data/mscoco_complete_label_map.pbtxt
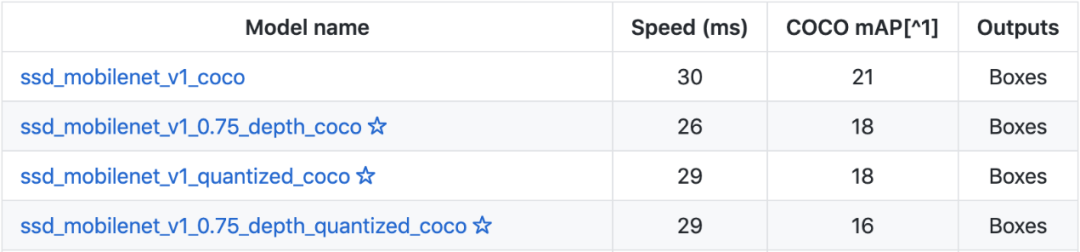
Non-exhaustive list of available models
The prediction speed of models varies, as does their performance. To determine how to utilize the models based on their prediction speed, I conducted some tests. Since the goal of the social distance detector is not to perform real-time analysis, I ultimately chose fast_rcnn_inception_v2_coco, which has a mAP (mean Average Precision) of 28 on the validation set and an execution speed of 58ms, making it very powerful. The download link is:
http://download.tensorflow.org/models/object_detection/faster_rcnn_inception_v2_coco_2018_01_28.tar.gz
2. People Detection
To detect people using the model mentioned above, several steps must be completed:
·Load the model files into the TensorFlow graph and define the outputs we want from the model.
·For each frame, input the image into the TensorFlow graph to get the desired outputs.
·Filter out weak predictions and unnecessary detected objects.
Loading and starting the model:
The way TensorFlow models work is by using graphs. The first step means loading the model into the TensorFlow graph, which will contain the required detections. The next step is to create a session that is responsible for executing operations defined in the graph. For more details on graphs and sessions, see https://danijar.com/what-is-a-tensorflow-session/ . Here we implement a class that associates all data related to the TensorFlow graph.
class Model:""" Class that contains the model and all its functions """def __init__(self, model_path):""" Initialization function @ model_path : path to the model """# Declare detection graph self.detection_graph = tf.Graph()# Load the model into the tensorflow graphwith self.detection_graph.as_default(): od_graph_def = tf.compat.v1.GraphDef()with tf.io.gfile.GFile(model_path, 'rb') as file: serialized_graph = file.read() od_graph_def.ParseFromString(serialized_graph) tf.import_graph_def(od_graph_def, name='')# Create a session from the detection graph self.sess = tf.compat.v1.Session(graph=self.detection_graph)def predict(self,img):""" Get the prediction results on 1 frame @ img : our img vector """# Expand dimensions since the model expects images to have shape: [1, None, None, 3] img_exp = np.expand_dims(img, axis=0)# Pass the inputs and outputs to the session to get the results (boxes, scores, classes) = self.sess.run([self.detection_graph.get_tensor_by_name('detection_boxes:0'), self.detection_graph.get_tensor_by_name('detection_scores:0'), self.detection_graph.get_tensor_by_name('detection_classes:0')],feed_dict={self.detection_graph.get_tensor_by_name('image_tensor:0'): img_exp})return (boxes, scores, classes)Passing each frame through the model
For each frame that needs to be processed, a new session will be initiated by calling the run() function. When doing this, several parameters must be specified, including the input types required by the model and the outputs we want to retrieve. The required outputs in our case are as follows:
·Bounding box coordinates for each object
·Confidence score for each prediction (0 to 1)
·Predicted class (0 to 90)
·Filtering weak predictions and unrelated objects
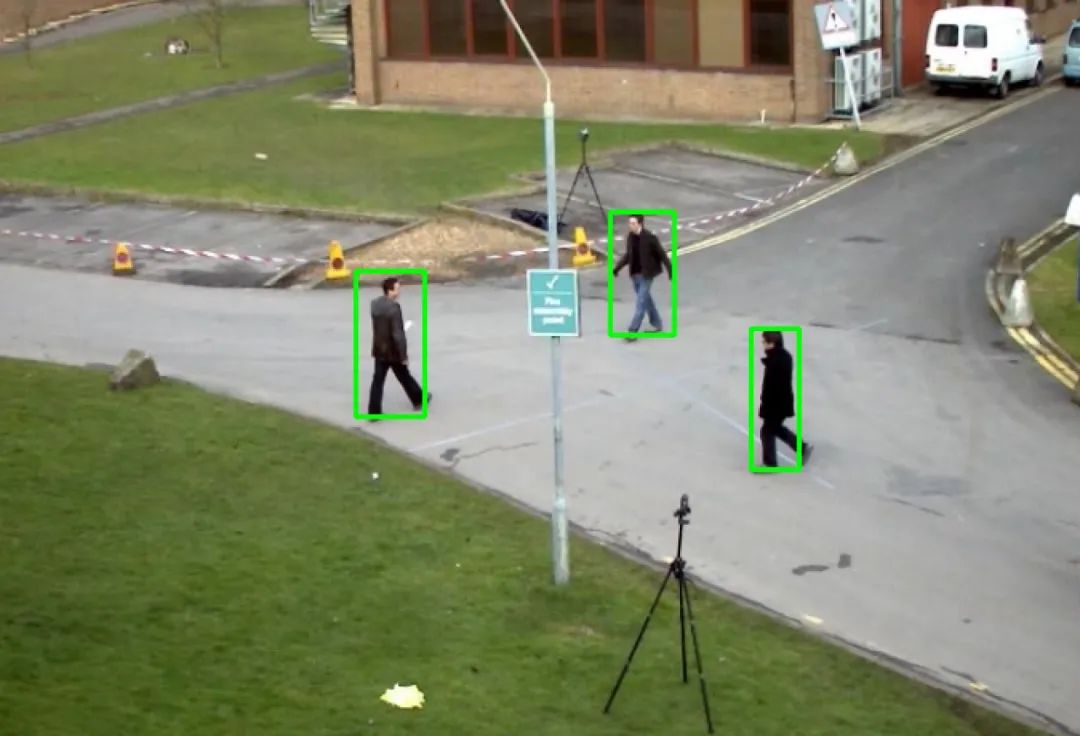
Results of People Detection
Many object categories can be detected by the model, one of which is people, associated with class 1. To exclude weak predictions (threshold: 0.75) and all other object categories besides people, I used an if statement to combine these two conditions to exclude any other objects to avoid further calculations.
if int(classes[i]) == 1 and scores[i] > 0.75However, since these models have been pre-trained, it is not possible to detect only this class (people). Therefore, these models take a long time to run, as they attempt to recognize all 90 different types of objects in the scene.
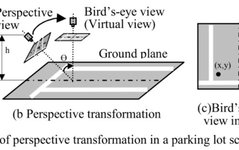
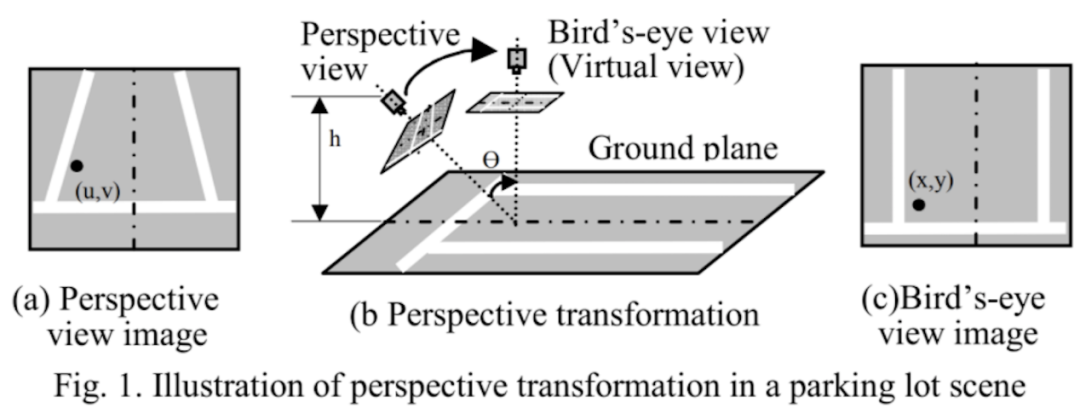
3. Bird’s-Eye View Transformation
As mentioned in the introduction, performing a bird’s-eye view transformation provides us with a top-down view of the scene. Fortunately, OpenCV has powerful built-in functions that can convert images taken from a perspective view into a bird’s-eye view. I used Adrian Rosebrock’s tutorial to learn how to do this: https://www.pyimagesearch.com/2014/08/25/4-point-opencv-getperspective-transform-example/
The first step is to select 4 points on the original image that will become the corners of the image to be transformed. These points must form a rectangle, with at least two opposite edges parallel; otherwise, the proportions will differ during the transformation. I have implemented a script in my repository that uses OpenCV’s setMouseCallback() function to obtain these coordinates. The function to calculate the transformation matrix also needs to use the image’s image.shape property to calculate the image size.
width, height, _ = image.shapeThis will return the width, height, and other irrelevant color pixel values. Let’s see how to use them to calculate the transformation matrix:
def compute_perspective_transform(corner_points,width,height,image):""" Compute the transformation matrix @ corner_points : 4 corner points selected from the image @ height, width : size of the image return : transformation matrix and the transformed image """# Create an array out of the 4 corner points corner_points_array = np.float32(corner_points)# Create an array with the parameters (the dimensions) required to build the matrix img_params = np.float32([[0,0],[width,0],[0,height],[width,height]])# Compute and return the transformation matrix matrix = cv2.getPerspectiveTransform(corner_points_array,img_params) img_transformed = cv2.warpPerspective(image,matrix,(width,height))return matrix,img_transformedNote that the return value of the function is the matrix, as this matrix will be used in the next step to calculate the new coordinates of each detected person, with the new coordinates being the “GPS” coordinates of each person in the frame. Using these new coordinates instead of the original baseline results is more accurate, as the distances differ when people are at different planes in a perspective view, and the distance from the camera is also different. This can greatly improve the measurement of social distance compared to using points in the original detection boxes.
For each detected person, two points are returned that are necessary to construct the bounding box, which are the top-left and bottom-right corners of the bounding box. By obtaining the midpoint between these two points, the centroid of the bounding box is calculated. Using this result, the coordinates of the point located at the bottom center of the bounding box are calculated. I believe this point (referred to as the “baseline”) is the best representation of the person’s coordinates in the image.
Then, using the transformation matrix, the transformed coordinates for each detected baseline are calculated. After detecting people, this is done on each frame using cv2.perspectiveTransform(). The implementation of this task is as follows:
def compute_point_perspective_transformation(matrix,list_downoids):""" Apply the perspective transformation to every ground point which have been detected on the main frame. @ matrix : the 3x3 matrix @ list_downoids : list that contains the points to transform return : list containing all the new points """# Compute the new coordinates of our points list_points_to_detect = np.float32(list_downoids).reshape(-1, 1, 2) transformed_points = cv2.perspectiveTransform(list_points_to_detect, matrix)# Loop over the points and add them to the list that will be returned transformed_points_list = list()for i in range(0,transformed_points.shape[0]): transformed_points_list.append([transformed_points[i][0][0],transformed_points[i][0][1]])return transformed_points_list4. Social Distance Measurement
After calling this function on each frame, a list containing all the new transformed points will be returned, from which the distance between each pair of points is calculated. Here, I used the itertools library’s Combination() function, which allows obtaining all possible combinations in the list without retaining double precision. This is well explained in the https://stackoverflow.com/questions/104420/how-to-generate-all-permutations-of-a-list Stack Overflow question. The rest is simple math: using the math.sqrt() function to calculate the distance between two points. The chosen threshold is 120 pixels, as it is approximately equal to 2 feet in our scene.
# Check if 2 or more people have been detected (otherwise no need to detect)if len(transformed_downoids) >= 2: # Iterate over every possible 2 by 2 between the points combinations list_indexes = list(itertools.combinations(range(len(transformed_downoids)), 2))for i,pair in enumerate(itertools.combinations(transformed_downoids, r=2)): # Check if the distance between each combination of points is less than the minimum distance chosenif math.sqrt( (pair[0][0] - pair[1][0])**2 + (pair[0][1] - pair[1][1])**2 ) < int(distance_minimum): # Change the colors of the points that are too close from each other to redchange_color_topview(pair) # Get the equivalent indexes of these points in the original frame and change the color to redindex_pt1 = list_indexes[i][0]index_pt2 = list_indexes[i][1]change_color_originalframe(index_pt1,index_pt2)Once it is determined that the distance between two points is too close, the color of the circle marking that point will change from green to red, and the bounding box color on the original frame will also undergo the same color change.
5. Results
Reviewing how the project works:
·First, obtain the 4 corner points of the image, then apply perspective transformation to obtain the bird’s-eye view of the image and save the perspective transformation matrix.
·Obtain the bounding boxes for each person detected in the original frame.
·Calculate the lowest points of these boxes, which are the points located between the feet of the people.
·Apply the transformation matrix to these points to get the true “GPS” coordinates of each person.
·Use itertools.combinations() to measure the distance from each point in the frame to all other points.
·If a violation of social distance is detected, change the bounding box color to red.
I used a video from the PETS2009 dataset http://www.cvg.reading.ac.uk/PETS2009/a.html#s0, which consists of multi-sensor sequences containing different crowd activities, originally built for tasks like counting people in crowds and estimating density. I decided to use the first angle of the video as it is the widest one, providing the best scene perspective. The results obtained from the video are:
https://youtu.be/3b2GPwN2_I0
6. Conclusion and Improvements
Nowadays, isolation and other basic hygiene measures are crucial to curb the spread of Covid-19. However, this project is merely a proof of concept and cannot be used to monitor social distance in public or private areas due to ethical and privacy concerns.
This project has some minor flaws, and the improvement ideas are as follows:
·Use faster models to perform real-time social distance analysis.
·Use models that are more robust to occlusions.
·Automatic calibration is a well-known problem in computer vision that can greatly improve bird’s-eye view transformation across different scenes.
7. References
https://towardsdatascience.com/analyse-a-soccer-game-using-tensorflow-object-detection-and-opencv-e321c230e8f2
https://www.pyimagesearch.com/2014/08/25/4-point-opencv-getperspective-transform-example/
https://developer.ridgerun.com/wiki/index.php?title=Birds_Eye_View/Introduction/Research
http://www.cvg.reading.ac.uk/PETS2009/a.html#s0
If this article helps you, please consider giving a “one-click three connections” at the end.

Discussion Group
Welcome to join the reader group of the public account to communicate with peers. Currently, there are WeChat groups for SLAM, 3D Vision, Sensors, Autonomous Driving, Computational Photography, Detection, Segmentation, Recognition, Medical Imaging, GAN, Algorithm Competitions, etc. (which will gradually be subdivided later). Please scan the WeChat ID below to join the group, and note: “nickname + school/company + research direction”, for example: “Zhang San + Shanghai Jiao Tong University + Visual SLAM”. Please follow the format for notes; otherwise, you will not be approved. After successful addition, you will be invited to the relevant WeChat group based on your research direction. Please do not send advertisements in the group, or you will be removed from the group; thank you for your understanding~