Click the card below to follow the WeChat public account “Python for Beginners”
Object detection is a core task in computer vision that drives the development of technologies ranging from autonomous vehicles to real-time video surveillance. It involves detecting and locating objects within an image, and recent advances in deep learning have made this task more accurate and efficient. One of the latest innovations driving object detection is the Vision Transformer (ViT), which has changed the landscape of image processing by better capturing global context than traditional methods.
In this article, we will explore object detection in detail, introduce the powerful capabilities of Vision Transformers, and demonstrate step-by-step how to use ViT for object detection through a practical project. To make the project more engaging, we will create an interactive interface that allows users to upload images and view real-time object detection results.
-
What is object detection and its importance.
-
The differences between Vision Transformer (ViT) and traditional neural networks.
-
Step-by-step implementation of ViT-based object detection using PyTorch.
-
Building an interactive object detection tool using ipywidgets.
-
Introduction to Object Detection
-
What is Vision Transformer?
-
Detailed Explanation of Transformer Architecture
-
Project Setup
-
Step-by-step Implementation of Object Detection with ViT
-
Building an Interactive Image Classifier
-
Frequently Asked Questions
-
Next Steps
-
Conclusion
Introduction to Object Detection
Object detection is a computer vision technique used to identify and locate objects in images or videos. It can be seen as teaching a computer to recognize objects like cats, cars, or even people. By drawing bounding boxes around these objects in an image, we can determine their locations within the image.
The Importance of Object Detection
-
Autonomous Vehicles: Real-time identification of pedestrians, traffic lights, and other vehicles.
-
Surveillance: Detecting and tracking suspicious activities in video streams.
-
Healthcare: Identifying tumors and abnormalities in medical scans.
What is Vision Transformer?
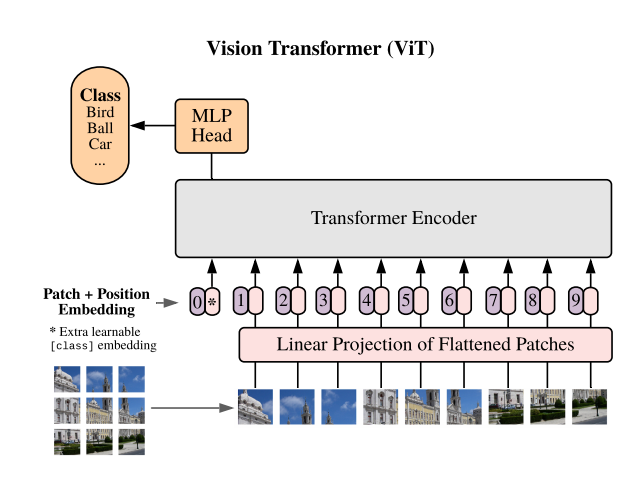
ViT was originally proposed by researchers at Google. The Vision Transformer (ViT) is a cutting-edge technology that uses the Transformer architecture, initially designed for natural language processing, to understand and process images. Imagine breaking an image into small patches (like a puzzle) and then using intelligent algorithms to recognize what these patches represent and how they combine together.
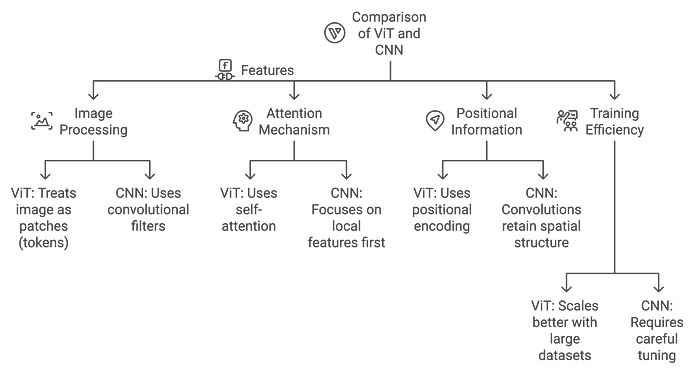
Differences Between ViT and CNN
-
CNN: Efficiently identifies local patterns (such as edges and textures) through convolutional layers.
-
ViT: Captures global patterns from the start, making it more suitable for tasks that require understanding the entire context of an image.
Detailed Explanation of Transformer Architecture
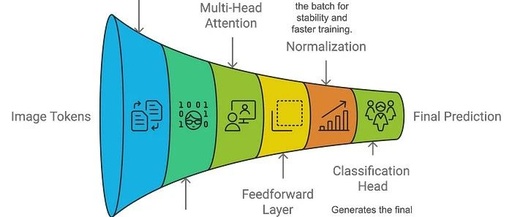
The Transformer architecture was originally designed for sequence-based natural language processing tasks like machine translation and has now been adapted for visual data by ViT. Here’s a breakdown of how it works:
Key Components of the Transformer Architecture:
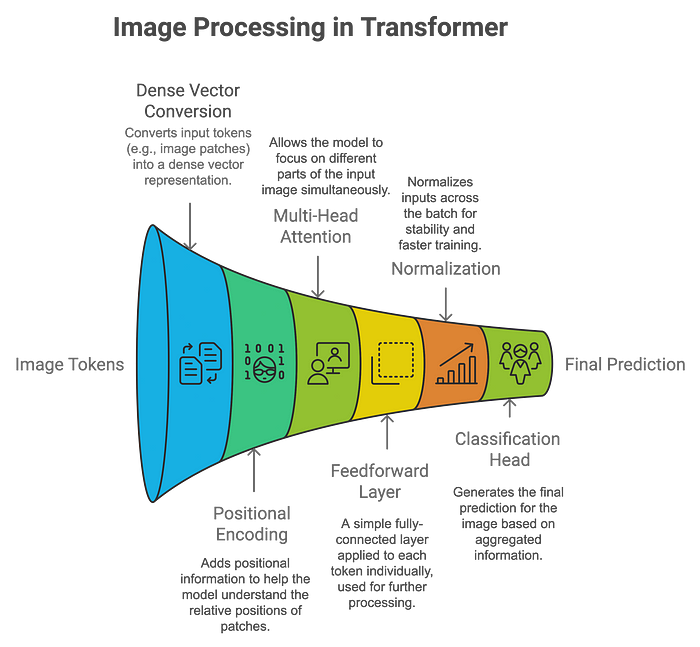
How Vision Transformers Process Images:
-
Patch Embedding: The image is divided into small patches (e.g., 16×16 pixels), and each patch is linearly embedded as a vector. These patches are processed similarly to words in NLP tasks.
-
Positional Encoding: Since the Transformer itself does not understand spatial information, positional encodings are added to retain the relative position of each patch.
-
Self-Attention Mechanism: This mechanism allows the model to focus on different parts of the image (or patches) simultaneously. Each patch learns the relationship weights with other patches, enabling a global understanding of the image.
-
Classification: The aggregated output is passed through a classification head, allowing the model to predict what objects are present in the image.
Advantages of ViT Over CNN:
-
Better at Capturing Global Context: ViT can model long-range dependencies, making it better at understanding complex scenes.
-
Adapts to Different Input Sizes: Unlike CNNs, which require fixed-size inputs, ViT can adapt to images of varying sizes.
Here’s a comparison chart of Vision Transformer (ViT) and Convolutional Neural Network (CNN) architectures:
Project Setup
We will set up a simple object detection project using PyTorch and a pre-trained Vision Transformer. Make sure to install the following necessary libraries:
pip install torch torchvision matplotlib pillow ipywidgetsFunctions of these libraries:
-
PyTorch: Loads and interacts with the pre-trained model.
-
torchvision: Preprocesses images and applies transformations.
-
matplotlib: Visualizes images and results.
-
pillow: Image processing.
-
ipywidgets: Creates an interactive UI for uploading and processing images.
Step-by-step Implementation of Object Detection with ViT
Step 1: Load and Display the Image
We will start by loading an image from the web and displaying it using matplotlib.
import torch
from torchvision import transforms
from PIL import Image
import requests
from io import BytesIO
import matplotlib.pyplot as plt

# Load an image from a URL
image_url = "https://upload.wikimedia.org/wikipedia/commons/2/26/YellowLabradorLooking_new.jpg"

# Use a user agent to avoid being blocked by the website
headers = {    "User-Agent": "Mozilla/5.0 (Windows NT 10.0; Win64; x64) AppleWebKit/537.36 (KHTML, like Gecko) Chrome/114.0.0.0 Safari/537.36"}
response = requests.get(image_url, headers=headers)

# Check if the request was successful
if response.status_code == 200:
    image = Image.open(BytesIO(response.content))
    # Display the image
    plt.imshow(image)
    plt.axis('off')
    plt.title('Original Image')
    plt.show()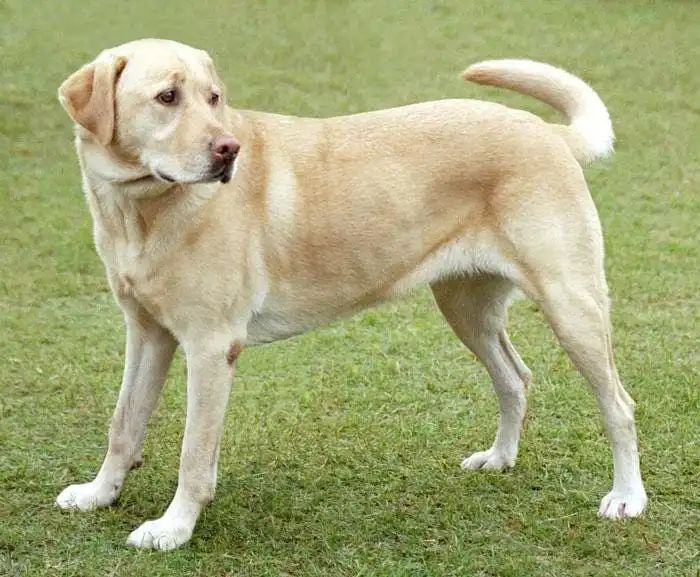
Step 2: Preprocess the Image
ViT expects the image to be normalized before inputting it into the model.
from torchvision import transforms
preprocess = transforms.Compose([
    transforms.Resize((224, 224)),
    transforms.ToTensor(),
    transforms.Normalize(mean=[0.485, 0.456, 0.406], std=[0.229, 0.224, 0.225]),
])

input_tensor = preprocess(image)
input_batch = input_tensor.unsqueeze(0)
Step 3: Load the Pre-trained Vision Transformer Model
Now we will load a pre-trained Vision Transformer model from PyTorch’s torchvision.
from torchvision.models import vit_b_16

# Step 3: Load a pre-trained Vision Transformer model
model = vit_b_16(pretrained=True)
model.eval()  # Set the model to evaluation mode (no training happening here)

# Forward pass through the model
with torch.no_grad():  # No gradients are needed, as we are only doing inference
    output = model(input_batch)
# Output: This will be a classification result (e.g., ImageNet classes)
Step 4: Interpret the Output
Let’s fetch the predicted labels from the ImageNet dataset.
# Step 4: Interpret the output
from torchvision import models

# Load ImageNet labels for interpretation
imagenet_labels = requests.get("https://raw.githubusercontent.com/anishathalye/imagenet-simple-labels/master/imagenet-simple-labels.json").json()

# Get the index of the highest score_, predicted_class = torch.max(output, 1)

# Display the predicted class
predicted_label = imagenet_labels[predicted_class.item()]
print(f"Predicted Label: {predicted_label}")

# Visualize the result
plt.imshow(image)
plt.axis('off')
plt.title(f"Predicted: {predicted_label}")
plt.show()
Predicted Label: Labrador RetrieverBuilding an Interactive Image Classifier
We can make the project more user-friendly by creating an interactive tool where users can upload images or select sample images for classification. To enhance interactivity, we will use ipywidgets to create a user interface where users can upload their images or choose sample images for object detection.
import ipywidgets as widgets
from IPython.display import display, HTML, clear_output
from PIL import Image
import torch
import matplotlib.pyplot as plt
from io import BytesIO
import requests
from torchvision import transforms

# Preprocessing for the image
preprocess = transforms.Compose([
    transforms.Resize(256),
    transforms.CenterCrop(224),
    transforms.ToTensor(),
    transforms.Normalize(mean=[0.485, 0.456, 0.406], std=[0.229, 0.224, 0.225]),
])

# Create header with glowing title
header = HTML("""    <div style='text-align:center; margin-bottom:20px;'>        <h1 style='font-family: Arial, sans-serif; color: #ffe814; font-size: 40px; text-shadow: 0 0 8px #39FF14;'>            Vision Transformer Object Detection        </h1>        <p style='font-family: Arial, sans-serif; color: #ff14b5; font-size:20px'>Upload an image or select a sample image from the cards below</p>    </div>""")

# Footer with signature
footer = HTML("""    <div style='text-align:center; margin-top:20px;'>        <p style='font-family: Arial, sans-serif; color: #f3f5f2; font-size:25px'>Powered by Vision Transformers | PyTorch | ipywidgets and Create by AI Innovators</p>    </div>""")

# Make upload button bigger and centered
upload_widget = widgets.FileUpload(accept='image/*', multiple=False)
upload_widget.layout = widgets.Layout(width='100%', height='50px')
upload_widget.style.button_color = '#007ACC'
upload_widget.style.button_style = 'success'

# Sample images (as cards)
sample_images = [
    ("Dog", "https://upload.wikimedia.org/wikipedia/commons/2/26/YellowLabradorLooking_new.jpg"),
    ("Cat", "https://upload.wikimedia.org/wikipedia/commons/b/b6/Felis_catus-cat_on_snow.jpg"),
    ("Car", "https://upload.wikimedia.org/wikipedia/commons/f/fc/Porsche_911_Carrera_S_%287522427256%29.jpg"),
    ("Bird", "https://upload.wikimedia.org/wikipedia/commons/3/32/House_sparrow04.jpg"),
    ("Laptop", "https://upload.wikimedia.org/wikipedia/commons/c/c9/MSI_Gaming_Laptop_on_wood_floor.jpg")
]

# Function to display and process image
def process_image(image):    # Clear any previous outputs and predictions    clear_output(wait=True)
    # Re-display header, upload button, and sample images after clearing    display(header)    display(upload_widget)    display(sample_buttons_box)
    if image.mode == 'RGBA':        image = image.convert('RGB')
    # Center and display the uploaded image    plt.imshow(image)    plt.axis('off')    plt.title('Uploaded Image')    plt.show()
    # Preprocess and make prediction    input_tensor = preprocess(image)    input_batch = input_tensor.unsqueeze(0)
    with torch.no_grad():        output = model(input_batch)
    _, predicted_class = torch.max(output, 1)    predicted_label = imagenet_labels[predicted_class.item()]
    # Display the prediction with space and style    display(HTML(f"""        <div style='text-align:center; margin-top:20px; font-size:30px; font-weight:bold; color:#39FF14; text-shadow: 0 0 8px #39FF14;'>            Predicted: {predicted_label}        </div>    """))
    # Display footer after prediction    display(footer)

# Function triggered by file upload
def on_image_upload(change):    uploaded_image = Image.open(BytesIO(upload_widget.value[list(upload_widget.value.keys())[0]]['content']))    process_image(uploaded_image)

# Function to handle sample image selection
def on_sample_image_select(image_url):    # Define custom headers with a compliant User-Agent    headers = {        'User-Agent': 'MyBot/1.0 ([email protected])'  # Replace with your bot's name and contact email    }
    response = requests.get(image_url, stream=True, headers=headers)  # Added headers    response.raise_for_status()    img = Image.open(response.raw)    process_image(img)

# Add a button for each sample image to the UI (as cards)
sample_image_buttons = [widgets.Button(description=label, layout=widgets.Layout(width='150px', height='150px')) for label, _ in sample_images]

# Link each button to its corresponding image
for button, (_, url) in zip(sample_image_buttons, sample_images):    button.on_click(lambda b, url=url: on_sample_image_select(url))

# Display buttons horizontally
sample_buttons_box = widgets.HBox(sample_image_buttons, layout=widgets.Layout(justify_content='center'))

# Link the upload widget to the function
upload_widget.observe(on_image_upload, names='value')

# Display the complete UIDisplay(header)display(upload_widget)  # Show file upload widgetdisplay(sample_buttons_box)  # Display sample image cards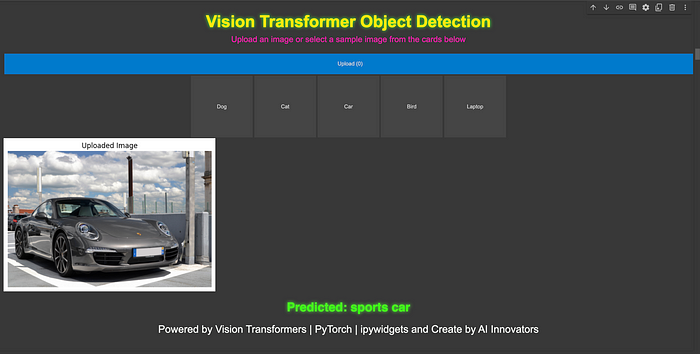
Frequently Asked Questions
Q1: Can Vision Transformers be fine-tuned? Yes, pre-trained Vision Transformers can be fine-tuned on custom datasets for tasks like object detection and segmentation.
Q2: Is the computational cost of ViT high? Due to its self-attention mechanism, ViT has a higher computational cost compared to CNNs, especially on small datasets.
Q3: What datasets are best for training ViT? Large datasets like ImageNet are ideal for training ViT, as it has advantages in scalability compared to CNNs.
Next Steps
Now that you have learned the basics of Vision Transformers and implemented object detection using PyTorch, you can try fine-tuning ViT on a custom dataset or explore other Transformer-based models like DETR (Detection Transformer).
Conclusion
The Vision Transformer (ViT) represents a significant leap in the field of computer vision, providing a new alternative to traditional CNN-based methods. By leveraging the ability of the Transformer architecture to capture global context from the beginning, ViT has demonstrated impressive performance on large datasets.
· END ·
🌟 Want to become a computer vision expert? Come to the “Python for Beginners” public account!
Reply “Python Vision Practical Project”, unlock a gift pack of 31 interesting vision projects! 🎁

This article is for learning and communication purposes only. If there is any infringement, please contact the author for deletion.