Click on "Xiaobai Learns Vision" above, select "Star" or "Pin"
Heavy content, delivered immediately


 Machine Learning

Author: Yang Jianli, Datawhale member, Data Analyst
From: Datawhale

Many data science practitioners face a pain point: without the skill set to illuminate the web front end, they cannot quickly develop a user interface for project display or collaboration. Today, we will introduce Streamlit, which was created to address this pain point.
Streamlit is a development framework specifically designed for machine learning engineers and data science teams, providing the fastest way to develop custom machine learning tools. It can be seen as aiming to replace Flask's position in machine learning projects, helping machine learning engineers quickly develop user interaction tools.
This article covers:
1. What is Streamlit 2. How to Start a Streamlit Project 3. An Exploration of Streamlit Architecture and Design
-
APP Model
-
Web Layout
4. Summary of Common Tools
-
Display Text
-
Display Data
-
Display Interactive Controls
-
Display Charts
-
Other Tools
-
Sidebar
5. Important Features
-
Cache Mechanism
-
Screen Recording Function
6. Recent Major Updates 7. Excellent Demos
-
Autonomous Driving Object Detection
-
GAN Facial Generation Project
1.What is Streamlit?
-
No need for any web front-end design basics to easily build web apps
-
Since the web automatically refreshes with code blocks, you can observe the impact of each code change on the web display in real-time while coding, making debugging easier
-
Interactive interfaces can elegantly showcase data science projects
-
Streamlit’s code framework follows a top-down execution logic, which is easy to understand, and what you see is what you get
2.How to Start a Streamlit Project
Before installing Streamlit, ensure that your Python version is at least 3.6. Install the Streamlit library using pip
$ pip install streamlitImport the package in your Python script
import streamlit as st1) Run the local Python file directly
$ streamlit run myapp.py2) Run a remote URL; this feature allows you to run links directly from GitHub
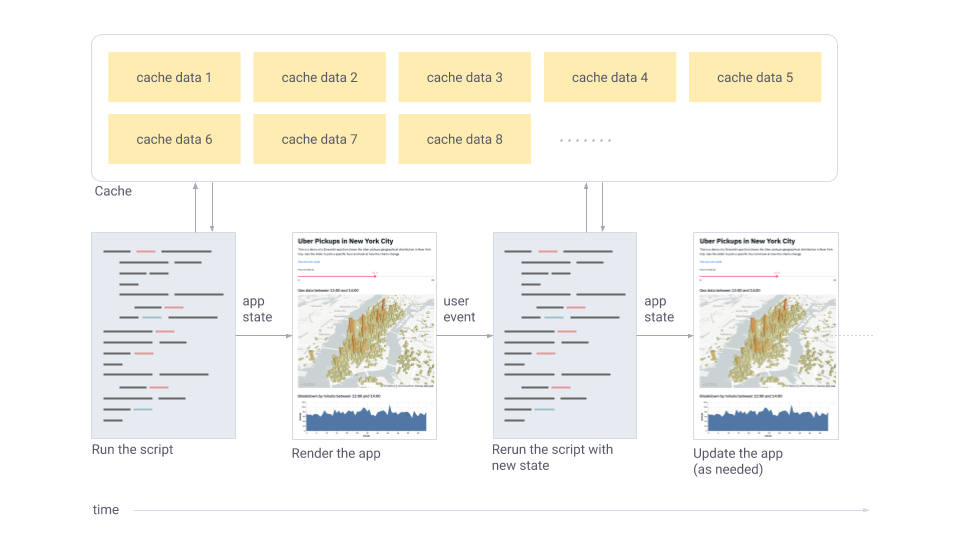
$ streamlit run https://raw.githubusercontent.com/streamlit/demo-uber-nyc-pickups/master/app.pyYou can try running the following command to start the demo project provided by the official website
$ streamlit hello3.Exploration of Streamlit Architecture and Design
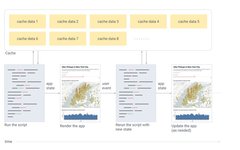
3.1 APP Model
-
Streamlit runs the Python script sequentially from top to bottom
-
Every time a user opens the web page pointing to that app service, the entire script is re-executed
-
During the script execution, Streamlit displays data tables, images, controls, etc., in real-time on the web page
-
During execution, Streamlit prioritizes calling the cache (which needs to be set by the user in the program) to avoid expensive computation processes
-
Every time a user interacts with a control, the script is re-executed, and images, controls, etc., are displayed with new values
3.2 Web Layout
4.Summary of Common Tools
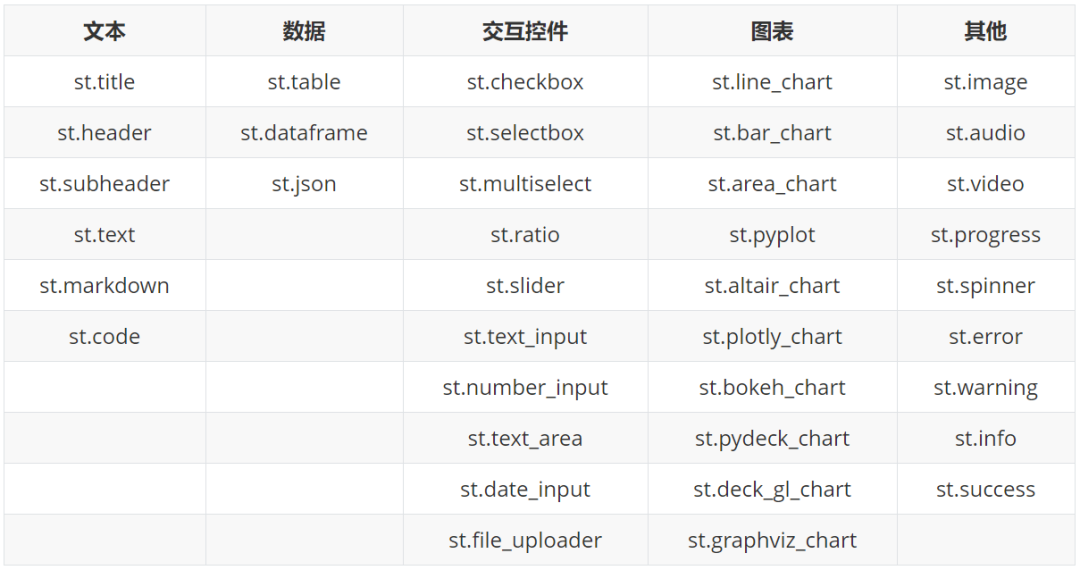
4.1 Display Text
-
st.title
-
st.header
-
st.subheader
-
st.text
-
st.markdown
-
st.code
-
st.write
Common commands for displaying text include large title title, main title header, subheader subheader, body text text, markdown format (supports text and emoji), code code
st.title('Streamlit introduction')
st.header('Build your first app')
st.subheader('Text widgets are shown as below')
st.text('I am the tool to display text')
st.markdown('I am the *tool* to **display markdown**')
st.markdown(':sunglasses:')
st.code('''def hello():
    print("Hello, Streamlit!")''', language='python')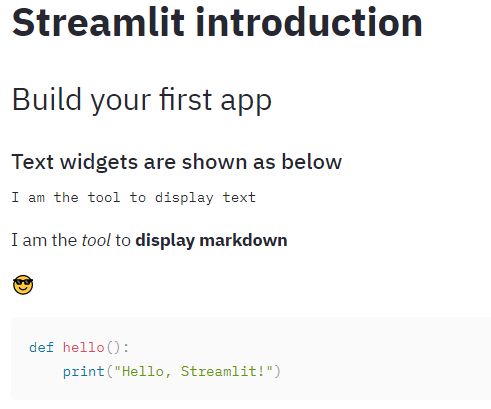
In Streamlit, there is also a versatile display tool st.write, which can accept various formats of input parameters such as text, markdown, data frames, charts, dictionaries, functions, and will present them in different ways based on the input format.
4.2 Display Data
-
st.table
-
st.dataframe
-
st.json
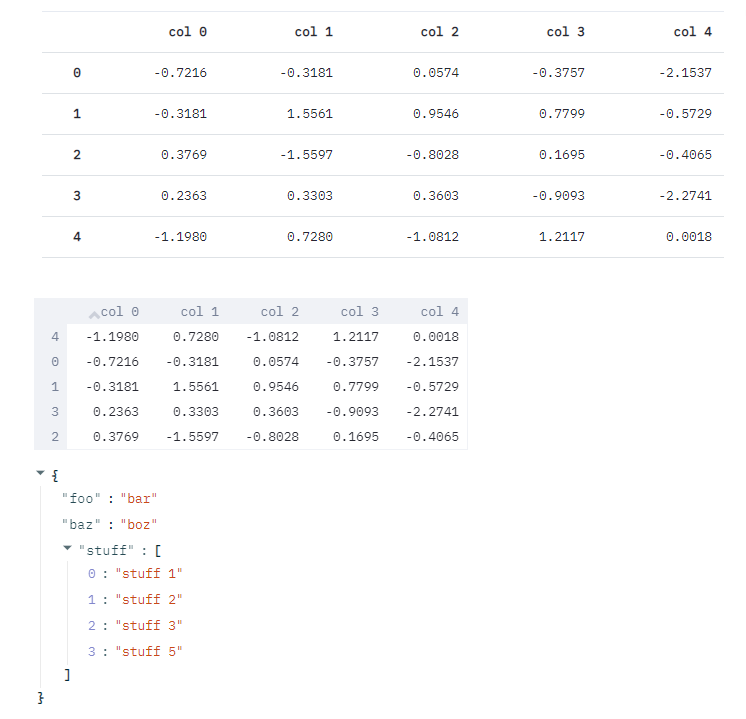
Streamlit supports displaying data in data frame and JSON formats, where the difference between table and dataframe is that table is for static data while dataframe is for dynamic data.
df = pd.DataFrame(
    np.random.randn(10, 5),
   columns=('col %d' % i for i in range(5)))
st.table(df)
st.dataframe(df)
st.json({
    'foo': 'bar',
    'baz': 'boz',
    'stuff': [
         'stuff 1',
        'stuff 2',
        'stuff 3',
         'stuff 5',
    ],
})
4.3 Display Interactive Controls
-
st.checkbox
-
st.selectbox
-
st.multiselect
-
st.radio
-
st.slider
This group of tools can be used to select user parameters when building machine learning models, such as dropdown single selection, dropdown multiple selection, slider selection, etc.
st.write('-----------------------------------------checkbox--------------------------------------------')
agree = st.checkbox('I agree')
if agree:
    st.write('Great! You agreed!')

st.write('-----------------------------------------selectbox-------------------------------------------')
option = st.selectbox(
    'Select your model',
     ('decision tree', 'logistic regression', 'SVM'))
st.write('You selected:', option)

st.write('-----------------------------------------multiselect-------------------------------------------')
options = st.multiselect(
 'What are your favorite colors',
    ['Green', 'Yellow', 'Red', 'Blue'],
    ['Yellow', 'Red'])
st.write('You selected:', options)

st.write('-----------------------------------------radio-------------------------------------------')
genre = st.radio(
    "What's your favorite model",
    ('linear regression', 'neural network'))
if genre == 'linear regression':
    st.write('You like simple model')
else:
    st.write("You like complex model")

st.write('-----------------------------------------slider-------------------------------------------')
st.slider('How old are you?', min_value=0, max_value=100, value=20, step=5)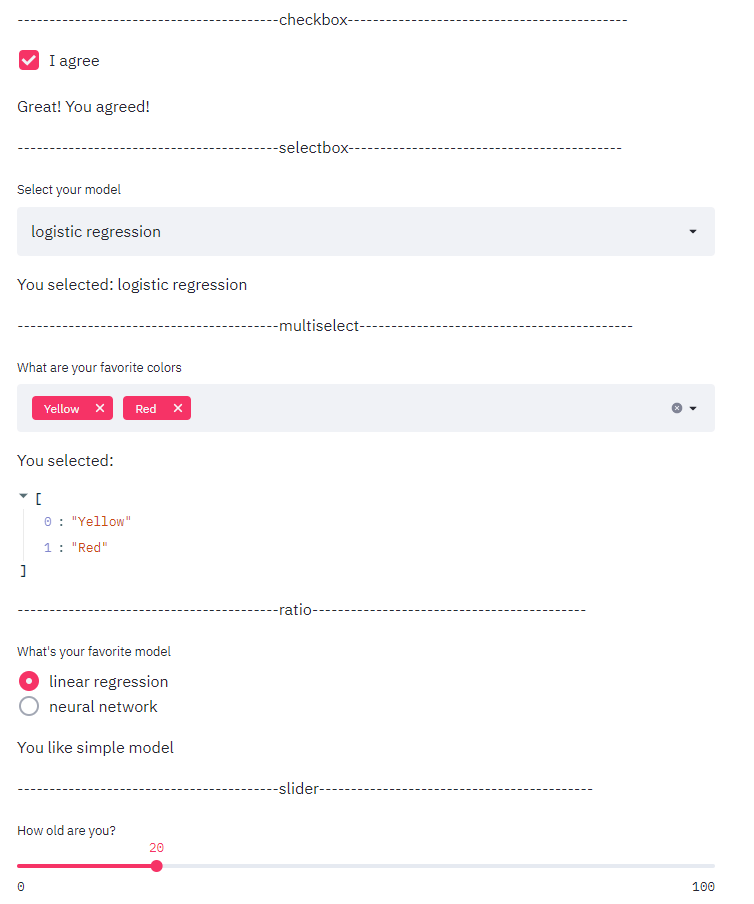
-
st.text_input
-
st.number_input
-
st.text_area
-
st.date_input
-
st.file_uploader
This group of tools can be used for different formats of user input and data uploads when building machine learning models. The file_uploader has a default file upload size limit of 200MB.
st.write('-----------------------------------------text_input--------------------------------------------')
st.text_input('Movie title', 'Life of Brian')

st.write('-----------------------------------------number_input-------------------------------------------')
st.number_input('Insert a number')

st.write('-----------------------------------------text_area-------------------------------------------')
txt = st.text_area('Text to analyze', '''It was the best of times, it was the worst of times, it wasthe age of wisdom, it was the age of foolishness, it wasthe epoch of belief, it was the epoch of incredulity, itwas the season of Light, it was the season of Darkness, itwas the spring of hope, it was the winter of despair, (...)''')

st.write('-----------------------------------------date_input-------------------------------------------')
st.date_input(
    "When's your birthday",
    datetime.date(2019, 7, 6))

st.write('-----------------------------------------file_uploader-------------------------------------------')
uploaded_file = st.file_uploader("Choose a CSV file", type="csv")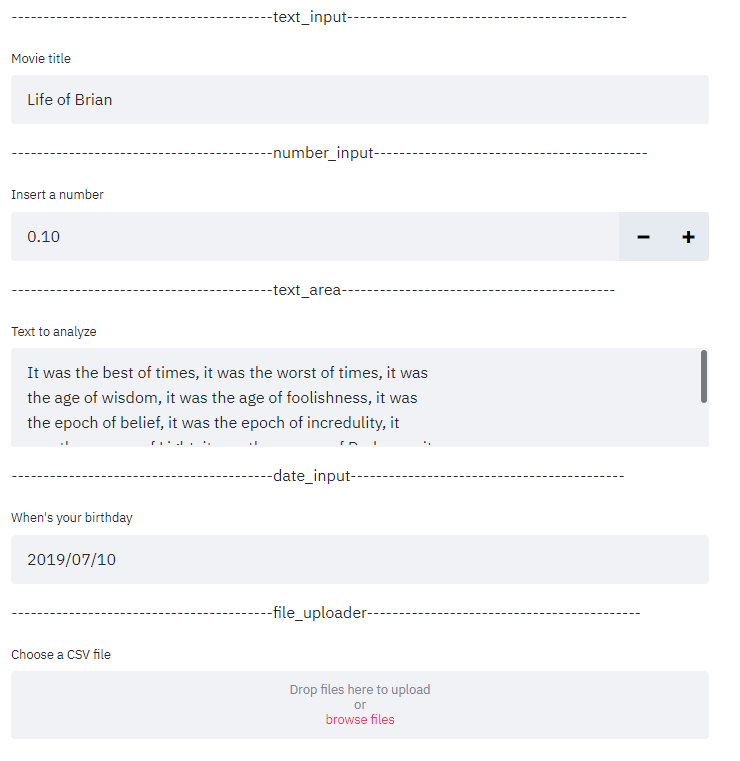
4.4 Display Charts
-
st.line_chart
-
st.bar_chart
-
st.area_chart
Streamlit natively supports three types of charts: line charts, bar charts, and area charts. However, they are generally not used much because Streamlit also supports a large number of third-party visualization chart interfaces.
chart_data = pd.DataFrame(
     np.random.randn(20, 3),
     columns=['a', 'b', 'c'])
st.line_chart(chart_data)

chart_data = pd.DataFrame(
     np.random.randn(50, 3),
    columns=["a", "b", "c"])
st.bar_chart(chart_data)

chart_data = pd.DataFrame(
     np.random.randn(20, 3),
     columns=['a', 'b', 'c'])
st.area_chart(chart_data)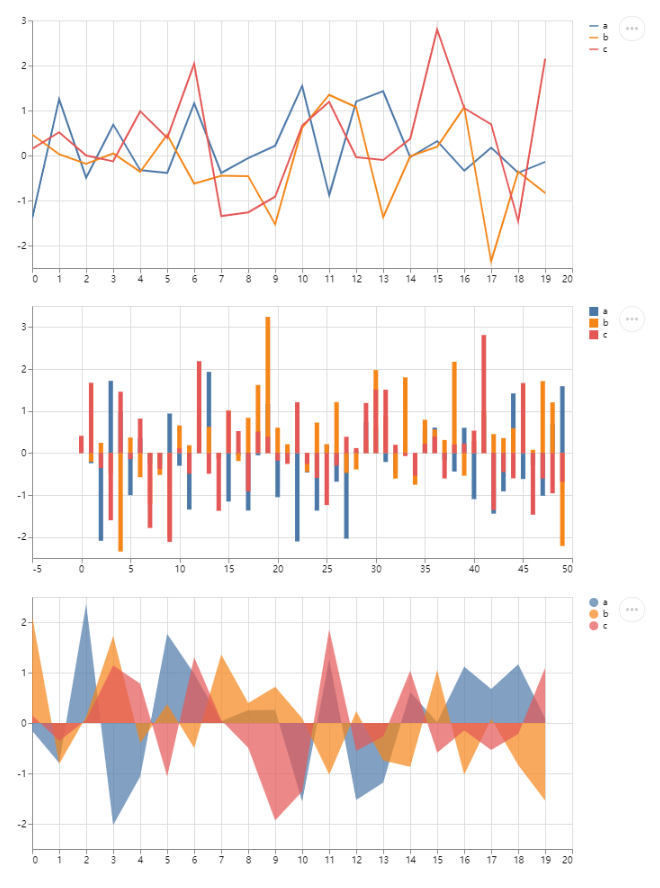
-
st.pyplot
-
st.altair_chart
-
st.plotly_chart
-
st.bokeh_chart
-
st.pydeck_chart
-
st.deck_gl_chart
-
st.graphviz_chart
The power of Streamlit lies in its provision of a large number of third-party visualization interfaces. For example, with the most common matplotlib, you only need to add one line of code st.pyplot() to display the chart on the web page.
arr = np.random.normal(1, 1, size=100)
plt.hist(arr, bins=20)
st.pyplot()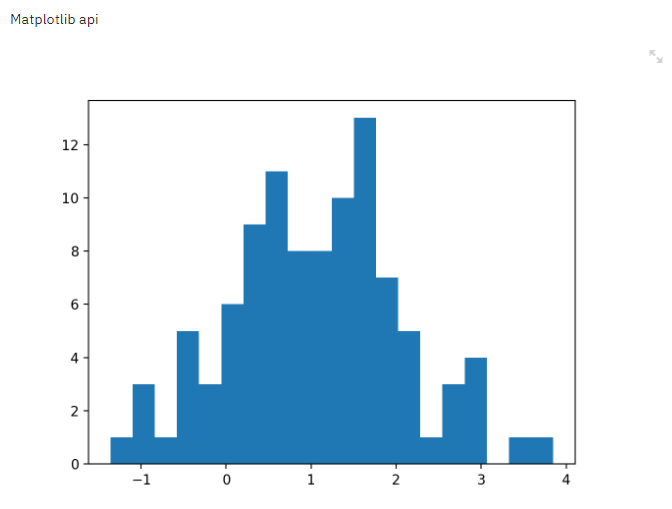
4.5 Other Tools
-
st.image
-
st.audio
-
st.video
-
st.progress
-
st.spinner
-
st.error
-
st.warning
-
st.info
-
st.success
This is a set of tools for displaying different statuses
st.error('This is an error')
st.warning('This is a warning')
st.info('This is a purely informational message')
st.success('This is a success message!')
4.6 Sidebar
Almost all tools mentioned above can be placed in the sidebar, with the code given in the form of st.sidebar.[element_name]. For example, for selectbox, st.sidebar.selectbox means that this tool will appear on the left side. Similarly, the layout of the sidebar tools is also displayed from top to bottom in the order of the code.
add_selectbox = st.sidebar.selectbox(
    "How would you like to be contacted?",
    ("Email", "Home phone", "Mobile phone"))
5.Important Features
5.1 Cache Mechanism
The cache mechanism in Streamlit is implemented using the @st.cache decorator.
@st.cache
def expensive_computation(a, b):
    time.sleep(10)
    return a * b

a = 2
b = 21
res = expensive_computation(a, b)
st.write("Result:", res)
Whenever the program runs to the function decorated with cache, when running for the first time, it will execute normally and store the result in the cache. When the function runs again, it will first check whether the input parameters and the function body content have changed. If they have changed, the function will be re-executed; otherwise, it will skip the function and directly read the cached result.
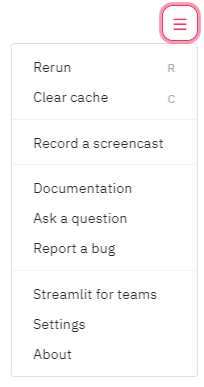
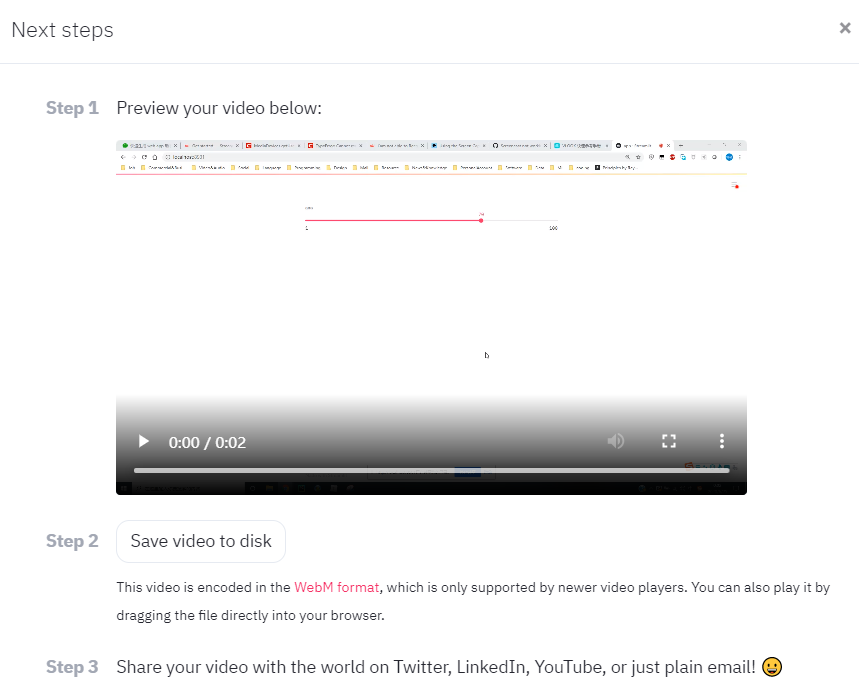
5.2 Screen Recording Function
Streamlit also provides a very useful screen recording function. In the upper right corner of the webpage menu, there is a “Record a screencast” feature that supports recording screen interactions, which is very suitable for team collaboration and effect demonstration.
6.Recent Major Updates
-
Custom components (user-defined Javascript/React)
-
Custom layout structure (newly introduced grid and horizontal layout)
-
More robust caching mechanism
7.Excellent Demos
7.1 Autonomous Driving Object Detection
This project uses less than 300 lines of code to showcase the application of the Udacity self-driving dataset and the YOLO object detection method through Streamlit’s interactive interface.
$ streamlit run https://raw.githubusercontent.com/streamlit/demo-self-driving/master/app.py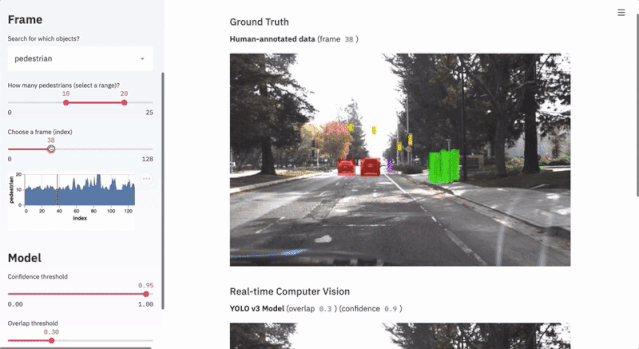
7.2 GAN Facial Generation Project
This project uses only 150 lines of code to demonstrate the application of TensorFlow and Nvidia’s Progressive Growing of GANs and Shaobo Guan’s Transparent Latent-space GAN method in facial feature generation.
$ git clone https://github.com/streamlit/demo-face-gan.git
$ cd demo-face-gan
$ pip install -r requirements.txt
$ streamlit run app.py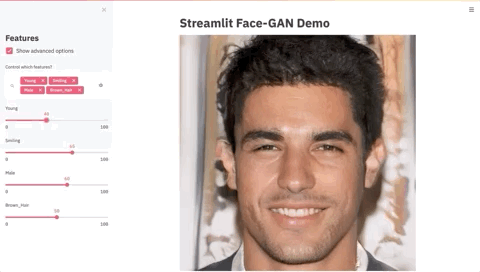
Good news!
Xiaobai Learns Vision Knowledge Planet
is now open to the public👇👇👇


Download 1: OpenCV-Contrib Extension Module Chinese Version Tutorial
Reply "Extension Module Chinese Tutorial" in the background of "Xiaobai Learns Vision" public account to download the first OpenCV extension module tutorial in Chinese on the internet, covering installation of extension modules, SFM algorithms, stereo vision, target tracking, biological vision, super-resolution processing, and more than twenty chapters of content.

Download 2: Python Vision Practical Project 52 Lectures
Reply "Python Vision Practical Project" in the background of "Xiaobai Learns Vision" public account to download 31 practical vision projects including image segmentation, mask detection, lane line detection, vehicle counting, adding eyeliner, license plate recognition, character recognition, emotion detection, text content extraction, facial recognition, etc., to help quickly learn computer vision.

Download 3: OpenCV Practical Project 20 Lectures
Reply "OpenCV Practical Project 20 Lectures" in the background of "Xiaobai Learns Vision" public account to download 20 practical projects based on OpenCV, achieving advanced learning in OpenCV.

Group Chat

Welcome to join the public account reader group to communicate with peers. Currently, there are WeChat groups for SLAM, 3D vision, sensors, autonomous driving, computational photography, detection, segmentation, recognition, medical imaging, GAN, algorithm competitions, etc. (will gradually be subdivided in the future). Please scan the WeChat number below to join the group, and note: "Nickname + School/Company + Research Direction", for example: "Zhang San + Shanghai Jiao Tong University + Vision SLAM". Please follow the format for notes; otherwise, you will not be allowed to join. After successful addition, you will be invited to the relevant WeChat group based on your research direction. Please do not send advertisements in the group; otherwise, you will be removed from the group. Thank you for your understanding~