Are you still troubled by the uneven quality and poor performance of AI in China?
Then let’s take a look at Dev Cat AI (3in1).
This is an integrated AI assistant that combines GPT-4, Claude3, and Gemini.
It covers all models of the three AI tools.
Including GPT-4o and Gemini flash
Now you can own them for only ¥68.
The official value is ¥420+.
Send “Dev Cat” in the backend to start using.
Become a member now to enjoy one-on-one personal service, ensuring your usage is secure.
As you scroll through endless streams of information, you may feel overwhelmed by data. Then you remember the lengthy Slack message from a colleague last night, which you saved for later reading.
At work, I admit, this is exactly me! So, I want to say to my colleagues: I’m sorry, I hope this article inspires you to understand how modern AI can help you cope with my urgent need to write Slack papers.
Who knows what confidential information might be hidden in that text? You can’t simply copy and paste it into an online AI tool; your company strictly prohibits sharing sensitive data with external services. But wait! Imagine this: you copy the text, run a simple shortcut, and instantly get a concise summary, all without leaving your machine. No worries about data privacy, no concerns about costs or subscription limits.
I remember the first time I tried running an AI model on my own machine. It felt like magic! Suddenly, I had this incredible capability for free. Creating small assistant scripts quickly became addictive.
Everything is local, secure, and under your control. That’s the power of local AI. It not only handles information overload; it also processes information securely, privately, and efficiently. It doesn’t aim to replace your intelligence but to enhance it, providing a lifeline in the ocean of information while respecting confidentiality boundaries.
In this article, we will delve into the world of local AI, exploring tools like Ollama and advanced models like Gemma 2 and LLaVA, and how they can transform your daily workflow. We will go beyond the hype to practicality, showing you how to turn complex tasks into simple, efficient processes. Unlock new levels of productivity and regain control of your digital life before you finish your first cup of coffee, all while ensuring your sensitive data is safe.
Setting Up Ollama and Pulling Gemma 2 and LLaVA Models
Let’s prepare the environment. The following instructions were tested on macOS 15.2 with Homebrew installed, but they can also apply to other systems, so get ready to be inspired. First, we will install Ollama, start the Ollama server, and use the client to pull the Gemma 2 and LLaVA models.
brew install ollama
ollama serve # Start the server

# Run in another terminal window
ollama pull gemma2
ollama pull llava
Ollama allows you to run powerful AI models directly on your local machine, providing enhanced transparency, control, and customization compared to cloud-based closed-source solutions.
I must admit, one downside is that you need to store and process models on your local machine. While my MacBook is powerful enough to run Gemma 2 and it generally performs well, more advanced models (like Llama 3.3 70B) may take some time to process requests. Moreover, Gemma 2 only requires 5.3 GB, while Llama 3.3 occupies 43 GB of space. This means you will quickly fill up your disk when experimenting with Ollama.
Ollama consists of two main components: the client and the server. The client is the part that interacts with users, while the server serves as the backend implemented in Go.
Ollama contains model files that can be used to create and share models. These files include basic information such as the base model, parameters, prompt templates, system messages, etc. By default, these models are stored in ~/.ollama.
tree ~/.ollama/models
du -shc ~/.ollama/models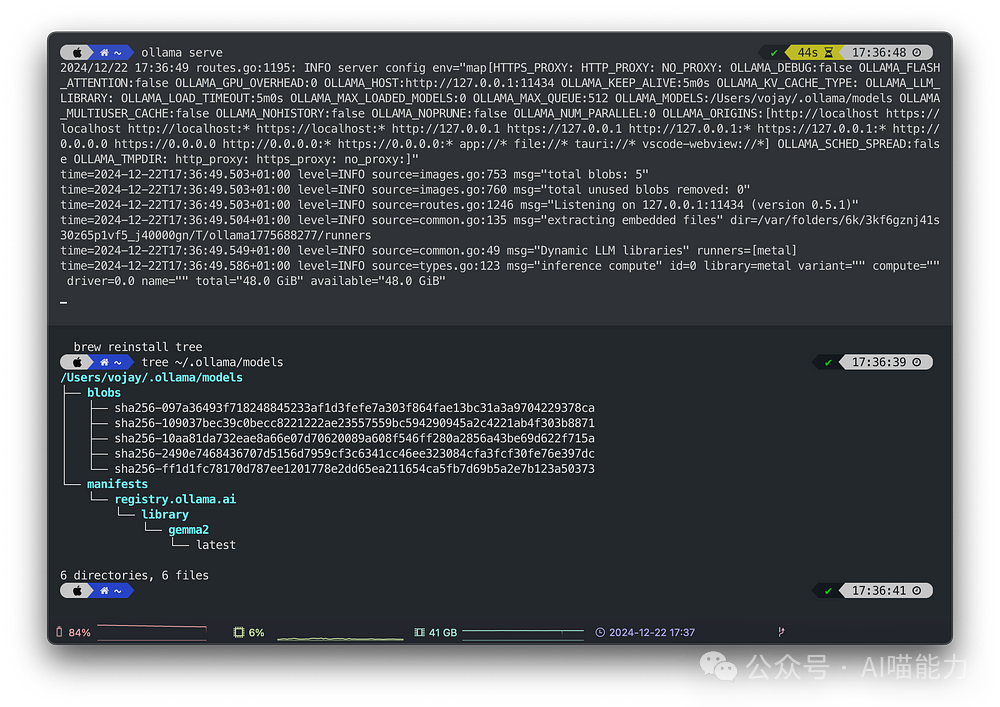
In this article, we mainly use the Gemma 2 model developed by Google. Gemma is a set of lightweight, cutting-edge open models created using the same research and techniques as the Gemini models. They achieve an excellent balance between quality and resource requirements.
Additionally, we will use the LLaVA (Large Language and Vision Assistant) model, which is a large multimodal model trained end-to-end, integrating a visual encoder and Vicuna for comprehensive visual and language understanding.
Boosting Productivity with Local AI
I bet everyone reading this article uses cmd+c (or ctrl+c) and cmd+v (or ctrl+v) at least once a day to copy and paste.
You can use pbcopy in the Mac terminal to perform the same actions as pbpaste. pbcopy allows you to directly copy the output of a command to the clipboard. Conversely, pbpaste lets you paste directly from the clipboard to the terminal.
I often use it for small helper Bash scripts. You can pipe the clipboard to any other command, like
pbpaste | cat. This opens up many possibilities.
Unfortunately, the pbcopy and pbpaste commands are specific to Mac, but you can recreate these commands on Linux with xsel.
We will use pbcopy and pbpaste in the examples below. We will also use a command called glow. Glow is a terminal-based markdown reader that allows you to read documents directly in the command line, which can be installed as follows:
brew install glowWith it, we can unleash the magic of local LLM and simple Bash scripts.
Demo: Code Review
Note: For all demos, ensure your local Ollama server is up and running.
ollama serveUsing ollama run <model> <prompt>, we can execute prompts directly against the local model.
Pro tip: If you pipe the output of the command to ollama run, it will be appended to the prompt. This feature allows for impressive productivity tricks that we will explore below.
Let’s first review the code. We create a source file with cat, pipe it into ollama run, and render the model’s markdown response with glow:
cat ~/projects/biasight/biasight/parse.py | ollama run gemma2 "Review the following code and suggest improvements concisely:" | glow -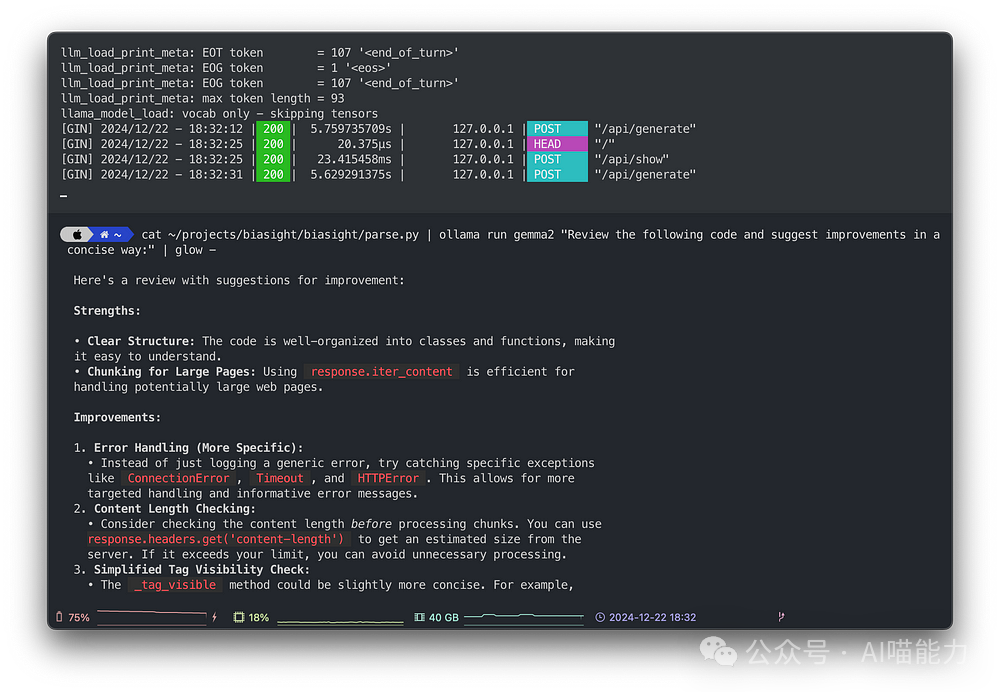
With glow, the model’s suggested code snippets have syntax highlighting, allowing you to receive feedback quickly, even for sensitive internal code, as it never leaves your laptop. You can view confidential code for free.
Of course, the quality of the review depends on the model you use. While Gemma 2 generally performs well, there are also models specifically trained for code generation, such as CodeGemma based on Gemma 2. Experimentation is essential; check the Ollama model library for all available models.
Demo
We have all experienced this: at 11:42 PM, hidden among 200 replies in work messages is information that could prevent a production incident tomorrow. You may not be sure if there is confidential information, so you can’t simply copy and paste it into your favorite online LLM.
Using the following code snippet, you can copy any text (like a long Slack thread) and have the local model summarize it for you. Everything stays on your local machine, and there are no complicated workflows—just copy and press Enter.
pbpaste | ollama run gemma2 "Provide a concise and comprehensive summary of the given text:" | glow -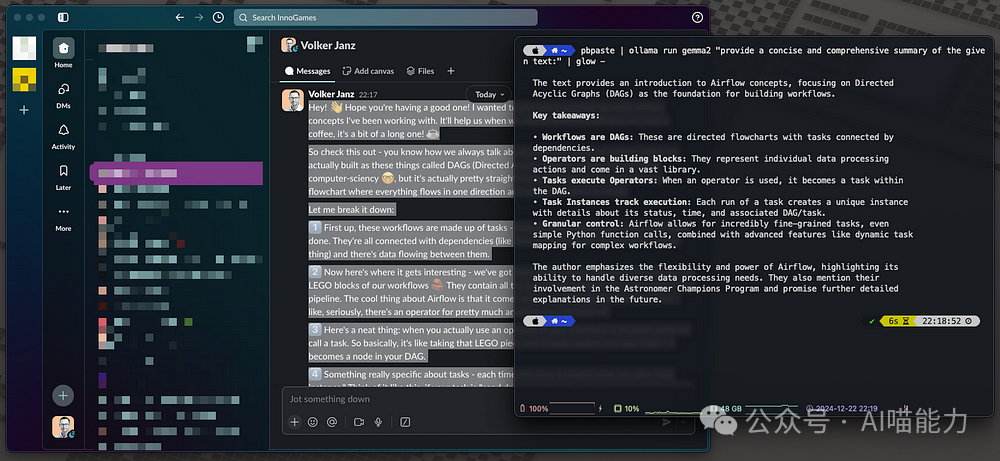
Honestly, I wouldn’t use this code snippet this way because pasting it into the terminal would overwrite the clipboard. First, you need to paste the code snippet, then copy the text you want to summarize, and finally press Enter in the terminal. I value efficiency, and this process is not efficient. Instead, I use this code snippet in a script bound to a shortcut run through Raycast. I will explain this later in the article, so keep reading; there is much more to learn about improving productivity.
Demo: Creating Mind Maps
The simplest form of a mind map presents various ideas in a visual chart. A mind map starts with a central idea or theme in the middle, branching outwards to include more topics and concepts to explore—usually represented by words, phrases, and images. This structure gives mind maps a natural flow of organization.
Mind maps organize information in a way that reflects how the brain works—radially rather than linearly. It essentially “maps out” your thoughts, using associations, connections, and triggers to spark further ideas. This approach makes understanding complex information easier.
I love learning through mind maps. Converting complex articles, books, and documents into mind maps makes them easier to understand and serves as a great reference later.
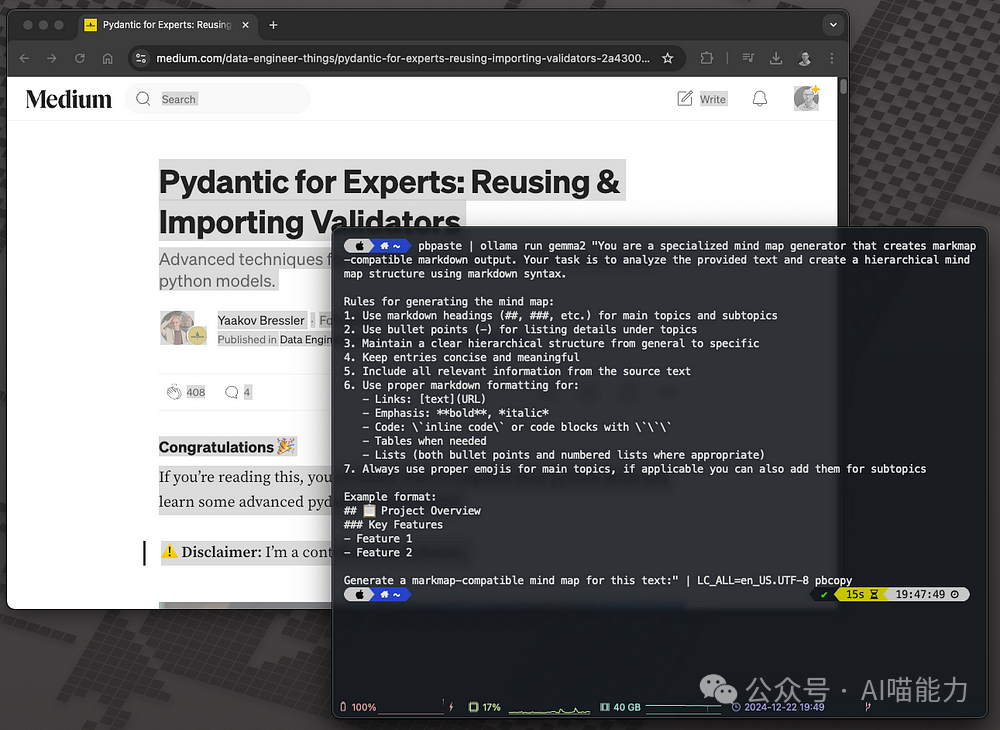
Using the following code snippet, we will combine local AI with markmap, a project that allows you to convert regular Markdown into mind maps. Since LLMs excel at summarization and creating Markdown, we just need to add a few special components to the prompt.
With this code snippet, you can select and copy any complex article, message, or text and convert it into a mind map! The mind map code will be automatically copied to your clipboard using pbcopy. Then, just paste it into https://markmap.js.org/repl and watch the magic happen. They also offer various integrations, including Obsidian and VSCode.
pbpaste | ollama run gemma2 "You are a specialized mind map generator that creates markmap-compatible markdown output. Your task is to analyze the provided text and create a hierarchical mind map structure using markdown syntax.

Rules for generating the mind map:
1. Use markdown headings (##, ###, etc.) for main topics and subtopics
2. Use bullet points (-) for listing details under topics
3. Maintain a clear hierarchical structure from general to specific
4. Keep entries concise and meaningful
5. Include all relevant information from the source text
6. Use proper markdown formatting for:
   - Links: [text](URL)
   - Emphasis: **bold**, *italic*
   - Code: `inline code` or code blocks with ```
   - Tables when needed
   - Lists (both bullet points and numbered lists where appropriate)
7. Always use proper emojis for main topics; if applicable, you can also add them for subtopics

Example format:
## 📋 Project Overview
### Key Features
- Feature 1
- Feature 2

Generate a markmap-compatible mind map for this text:" | LC_ALL=en_US.UTF-8 pbcopy
Pydantic Expert: Reusing and Importing Validators
Advanced techniques for reusing and importing validation in Python models.
-
First, we will paste the code snippet into the terminal window but not submit it.
-
Then, we select the entire article (cmd+a) and copy it (cmd+c).
-
After that, we press Enter in the terminal window to submit the code snippet.
-
Let AI work its magic locally.
-
Once done, we will save the results to the clipboard and can paste them (cmd+v) into https://markmap.js.org/repl.
Generate a markdown-based mind map based on the article.
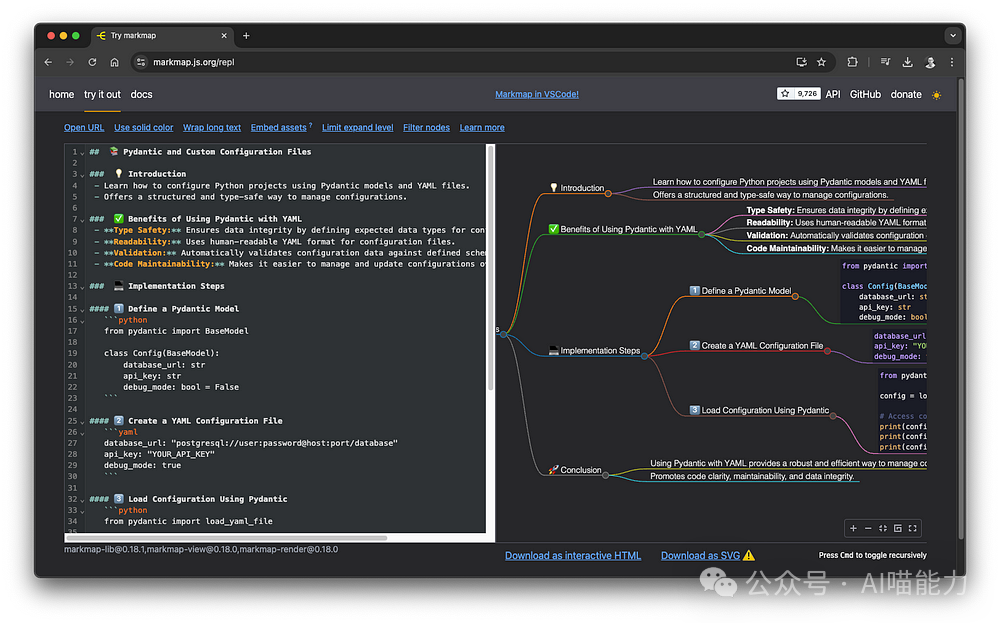
Mind map drawn using markmap.
The result is as follows:
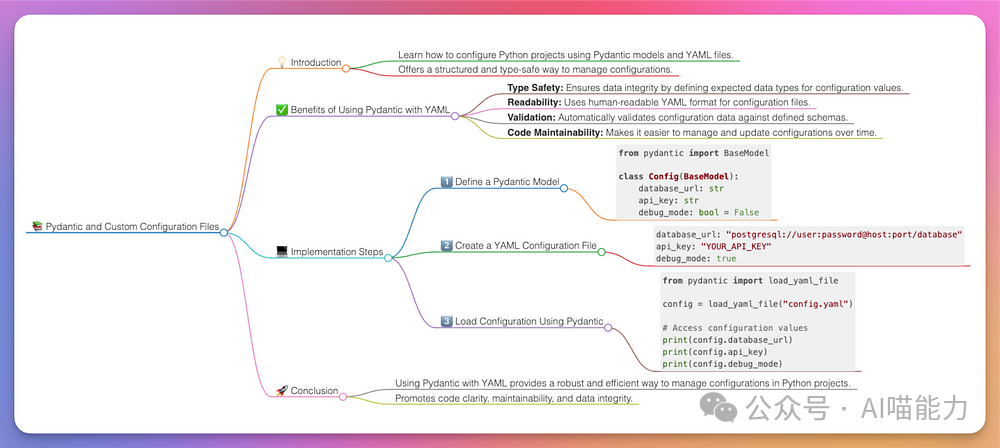
If you imagine having a mind map as a reference for later while reading an article, your learning process becomes much more effective, almost like cheating.
Remember, one important reason why mind maps are so useful is that the creation process requires you to distill complex information into a few key points and connect them logically. This creative process is crucial for internalizing and learning information, such as learning from a great article by Yaakov. When AI generates content for you, this benefit is entirely lost. Personally, I find these AI-generated mind maps best used as reference tools. I create them after browsing articles or documents to have a cheat sheet that triggers my memory later. Learning is a personal process, so find the method that works best for you. However, do not overlook AI; it can significantly enhance your learning efficiency.
Moreover, since everything runs locally, you can use it to create mind maps for confidential or internal information (like project documentation or concepts).
Demo: Analyzing Images
This is just a brief additional demo to show that you can have multimodal AI locally. This could help you organize photos without uploading them somewhere, keeping everything local. If you have a model that supports it, you just need to add the path to the image on your local machine to your prompt, and Ollama will take care of passing it to the model.
I recommend using the fully qualified path for images. I often encounter issues with relative paths. If the image cannot be found, Ollama won’t complain; it will just generate something else, which can be very frustrating. When using this method, be sure to check the output ” **Added image …” ** to confirm that it is indeed using the image file.
Let’s analyze an interesting cat image:

ollama run llava "Describe this image ./funny-cat.jpg" | glow -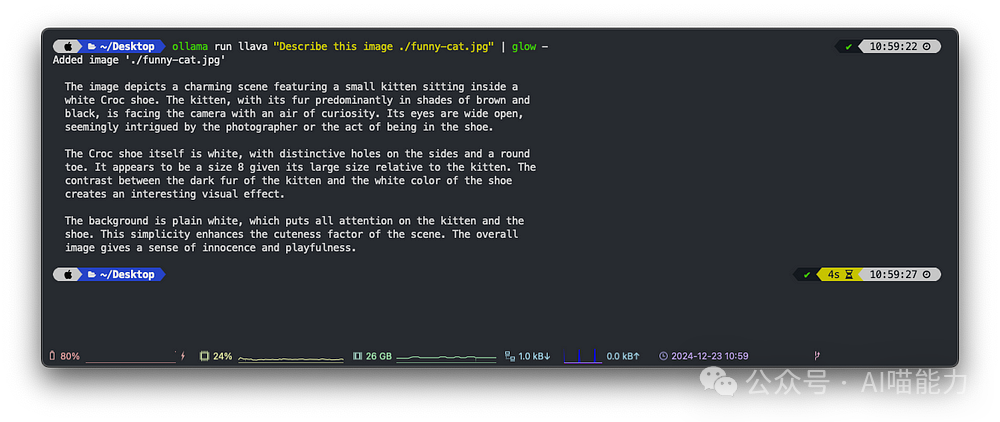
I find this particularly useful for structured output. Since December 2024, Ollama has supported structured output. This feature allows you to write scripts to analyze images and ensure that the LLM always returns correctly structured objects. For example, you can identify the main color, objects, or image type. This feature can create useful AI applications to manage your images. However, local models may have performance limitations. Still, it remains a delightful learning project.
AI Scripts: Your Daily Assistant
As mentioned earlier, copying and pasting these code snippets may not be the most efficient workflow. In this article, our goal is to enhance efficiency. So, how about creating some Bash scripts as daily AI assistants?
We will use the summary demo as an example, but you can easily adapt it for other snippets.
First, create a folder in your home directory to store the scripts:
mkdir ~/binNext, create a file for your script and ensure it is executable:
touch ~/bin/ai-summarize
chmod +x ~/bin/ai-summarize
Open it with your favorite editor:
vim ~/bin/ai-summarizeThen, add the code snippet as a Bash script:
#!/bin/bash

 MODEL=gemma2

echo  "Summarizing clipboard content..."
 pbpaste | ollama run ${MODEL}  "Provide a concise and comprehensive summary of the given text:" | glow -
Finally, add the script folder to your path. Adjust your main path and add the following line to your ~/.zshrc:
export PATH="$PATH:/Users/vojay/bin"Now, if you open a new terminal session or reload the configuration, you will have a new command that can be executed from anywhere.
You can now copy any text, type ai-summarize in the terminal, and receive a concise summary.

Achieving Higher Levels of Productivity with Raycast
Raycast can be seen as an upgraded version of Spotlight—it’s a Mac launcher that does far more than just find files. From managing calendars to controlling Spotify, everything can be done through this minimalist launcher.
While Raycast offers AI features in its Pro plan, we can leverage our local AI setup using its free script command feature. When you run Ollama locally, who needs a subscription? More seriously, I think the Raycast project is fantastic. The Pro features are excellent, and the team deserves our support, so I personally chose it.
Magical things happen within Raycast’s script commands. You can create custom scripts that Raycast can execute, written in various languages including Bash. Let’s integrate our AI assistant script with Raycast:
-
Open Raycast settings.
-
Navigate to Extensions → Script Commands.
-
Add your script directory (e.g.,
~/bin).
Now you can trigger AI workflows directly through Raycast. For example:
-
Open Raycast.
-
Type summary to run the summary script.
-
The text in the clipboard will be processed by the local Gemma 2 model.
-
Get instant results while ensuring data privacy.
Pro tip: You can assign custom hotkeys for your most used AI commands. I use cmd+shift+s for summarizing and cmd+shift+m for creating mind maps.
The combination of local AI and Raycast creates a powerful, private, and free productivity system. No need to open browser tabs, no data leaves your machine, and no subscriptions required. Just pure keyboard-driven efficiency.
Open WebUI for Web Searches and More
This deserves an article of its own, but if you’ve made it this far, you’ll find this a very powerful next step. Open WebUI is a scalable, feature-rich, user-friendly self-hosted WebUI designed to run completely offline. It supports various LLM runners, including Ollama.
We can start Open WebUI using Docker. Before starting, ensure your Ollama server is running ollama serve.
docker run -d -p 3000:8080 -e WEBUI_AUTH=False -e OLLAMA_BASE_URL=http://host.docker.internal:11434 -v open-webui:/app/backend/data --name open-webui ghcr.io/open-webui/open-webui:mainHere’s what happens:
-
--rm: Automatically remove the container when stopped, keeping things tidy. -
-d: Runs in “detached” mode (in the background), so you can continue using your terminal. -
-p 3000:8080: Maps port 3000 on your Mac to port 8080 in the container (this is how you access the UI). -
-e WEBUI_AUTH=False: Disables authentication in Open WebUI, very suitable for local use, but be careful in production! -
-e OLLAMA_BASE_URL=http://host.docker.internal:11434: The magical way to connect Open WebUI inside Docker to the Ollama server running on your Mac. -
-v open-webui:/app/backend/data: Creates a volume to save your chats and settings. -
--name open-web-ui: Gives a friendly name to our container. -
ghcr.io/open-webui/open-webui:main: The latest version of Open WebUI from GitHub.
Pro tip:
host.docker.internalis a special feature of Docker Desktop for Mac that allows containers to communicate with services running on your Mac. It’s like giving your Docker container a secret passage to your local Ollama server!
After running this command, your personal AI chat (with many advanced features, all running locally for free) will be available at: http://localhost:8080/. You can choose from all the models pulled by Ollama from the top left corner.
If you want to avoid the hassle of setting up Open WebUI and you’re using macOS, consider using an excellent utility called Enchanted. This open-source tool is compatible with Ollama. You can download it directly from the App Store, making it a great lightweight entry point.
Conclusion
Remember the scenario at 6 AM? Overwhelming information, long Slack messages, and a desperate need for that first cup of coffee? Well, it’s time to write a different ending to that story.
Yes, you should still have that cup of coffee first. Some things even AI cannot replace!
Through this journey, we discovered how local AI can transform our daily workflows. From instant code reviews to magical mind maps, from summarizing articles to analyzing images—all while ensuring our sensitive data is secure and under our control.
But perhaps the most exciting part is not just what these tools can do—but what you can do with them. Those little assistant scripts we created? They are just the beginning. Every time you find yourself performing repetitive tasks, remember: there might be a local AI solution waiting for you to implement.
I started with simple scripts but soon found myself building an entire ecosystem of AI-driven tools. It’s like having a super-powerful command line that actually understands what you need.
So, what’s next? That depends on you. The tools are in your hands, the models are on your machine, and the possibilities are endless. Maybe you’ll create the perfect workflow that saves your team hours each week. Or perhaps you’ll build something entirely new that we haven’t even thought of yet.

If you found this helpful, don’t hesitate to hit “Share” and “Look” before you scroll away.🫦