This is a completely rewritten version of AutoGen that is not backward compatible, so this learning does not rely on the learning foundation of the old version v0.2. Additionally, since AutoGen focuses more on Agent applications, it can fully integrate with LangGraph/LlamaIndex Workflows, thus learning AutoGen will provide you with more flexible development combination choices.
We will gradually get to know the two different framework levels of the new version, AutoGen-Core and AutoGen-AgentChat. The content of AutoGen-Core includes:
-
Introduction to AutoGen 0.4 and AutoGen-Core -
AutoGen-Core: Using Tools and Code Executors -
AutoGen-Core: Multi-Agent Work Patterns and Examples -
AutoGen-Core: Integration with LangGraph/LlamaIndex
1
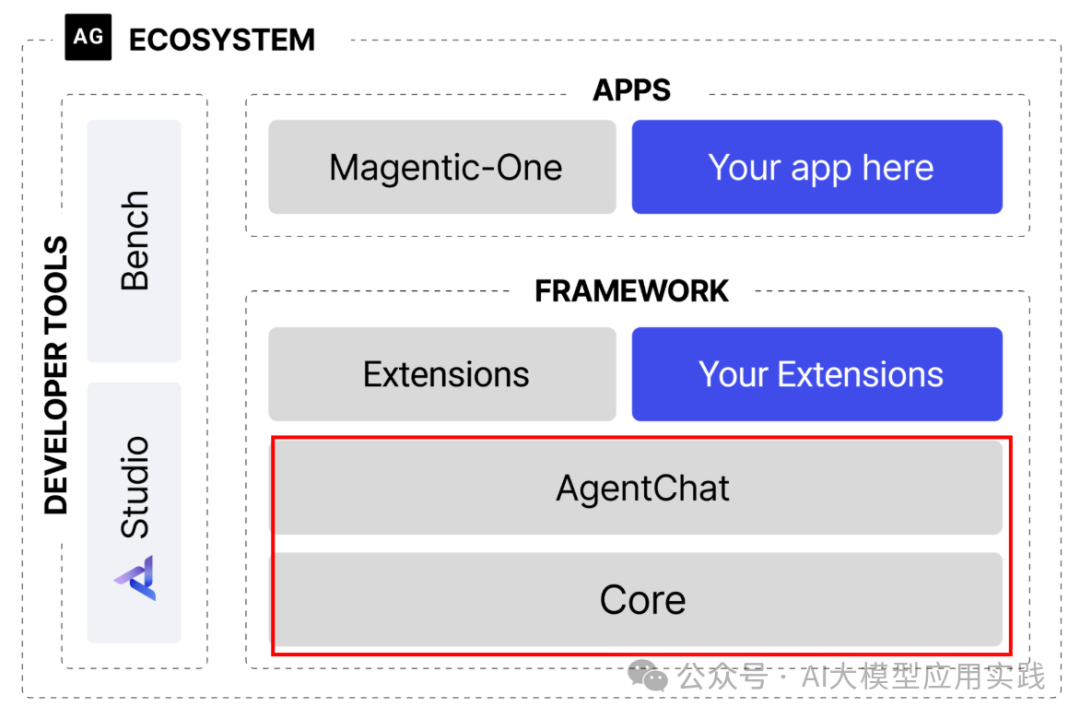
Understanding the Overall Architecture of AutoGen 0.4
-
Core (Core Framework):Provides basic components and runtime environment.Includes basic abstractions such as message communication, message-driven Agents, Tools, logs, etc., as well as support for the operation of distributed Agent systems. -
AgentChat (High-Level API Layer):High-level APIs built on top of Core.Includes various pre-built Agent types, Agent team types, Message types, etc. This is the level closest to the old version of AutoGen, making it convenient for migration from the old version. -
Extensions:Third-party extension components to improve the ecosystem.For example, third-party LLM components, code executors, Tools, more pre-set Agents, etc. You can also develop your own Extensions and submit them to the community. -
Magentic-One:A general-purpose multi-agent application.Can be used for web browsing, code execution, file processing, and other automated tasks. It is built on top of the magentic_one component in the Extensions layer.
-
AutoGen Studio:A UI program for low-code development of multi-Agent applications.It can be imagined as Coze based on the underlying AutoGen framework. -
AutoGen Bench:A tool for evaluating Agent performance and benchmarking suite.Part of the engineering platform.
Although AutoGen 0.4 has a clear layered design, it does not mean absolute isolation during use. For example, you may use components from the Extensions while developing with Core; or use a certain encapsulated Agent type from AgentChat, as will be seen in later examples.
2
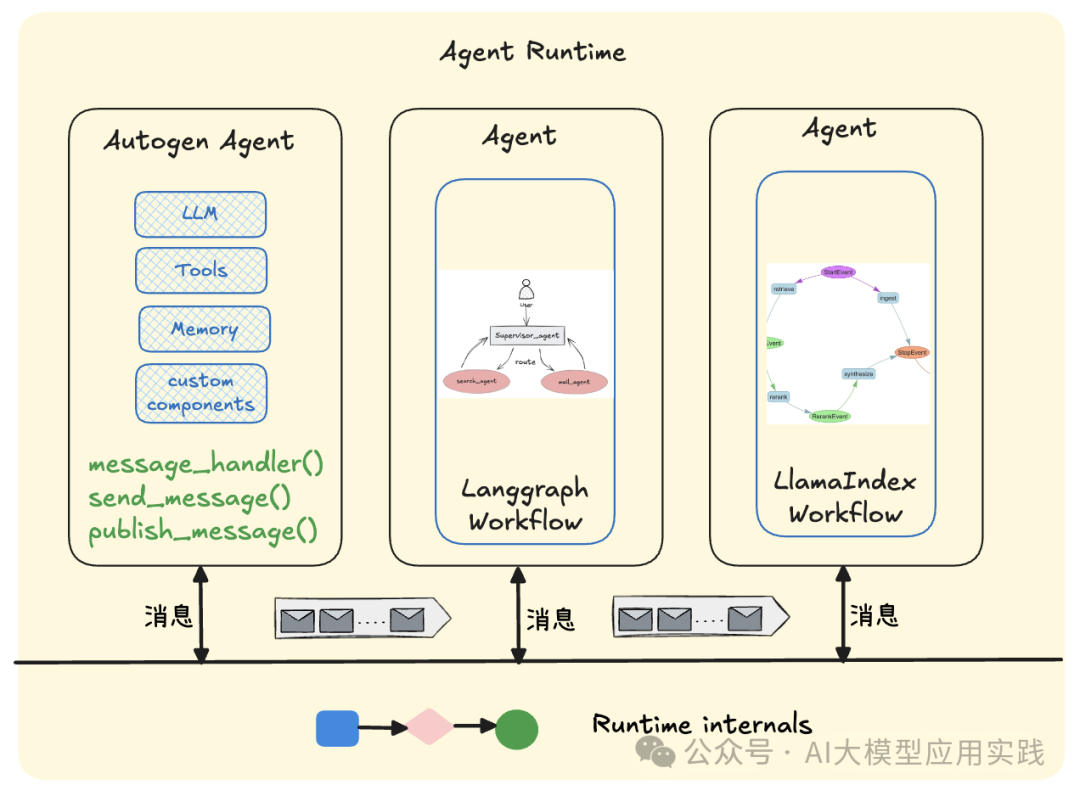
AutoGen-Core: Core Concepts
-
Managing the registration, creation, and destruction of Agents, as well as lifecycle management -
Providing a message communication mechanism between Agents
-
Agent Type: Represents the type of this Agent instance. -
Agent Key: Represents the identifier of this Agent instance.
-
Direct Messages:That is, sending messages directly to a certain Agent instance, where the sender can be either an Agent instance or the Runtime. -
Broadcast and Subscribe:Broadcasters publish messages to a certain topic, and all Agent instances subscribed to that topic will receive the message.
3
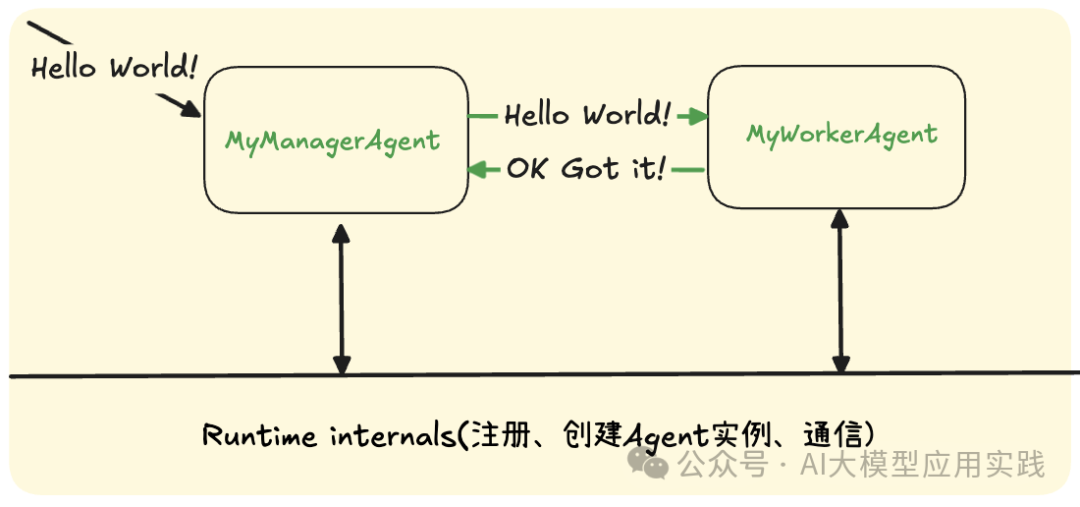
AutoGen-Core: Hello World!
from dataclasses import dataclass

@dataclass
class MyTextMessage:
content: strfrom autogen_core import AgentId, MessageContext, RoutedAgent, message_handler
class MyWorkerAgent(RoutedAgent):
def __init__(self) -> None:
super().__init__("MyWorkerAgent")
@message_handler
async def handle_my_message(self, message: MyTextMessage, ctx: MessageContext) -> MyTextMessage:
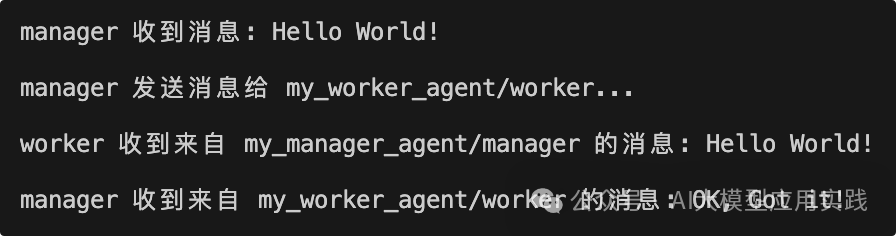
print(f"{self.id.key} received a message from {ctx.sender}: {message.content}\n")
return MyTextMessage(content="OK, Got it!")-
Receive the task message, usually sent by Runtime -
Forward the message to WorkerAgent (using AgentId) -
Wait for the response message from WorkerAgent and output
class MyManagerAgent(RoutedAgent):
    def __init__(self) -> None:
        super().__init__("MyManagerAgent")
        self.worker_agent_id = AgentId('my_worker_agent', 'worker')

    @message_handler
    async def handle_my_message(self, message: MyTextMessage, ctx: MessageContext) -> None:
        print(f"{self.id.key} received message: {message.content}\n")
        print(f"{self.id.key} sending message to {self.worker_agent_id}...\n")
        response = await self.send_message(message, self.worker_agent_id)
print(f"{self.id.key} received a message from {self.worker_agent_id}: {response.content}\n")-
Create Runtime, responsible for starting and stopping -
Register the defined Agent types and specify factory functions for instantiation -
Send task messages to the entry Agent instance through Runtime, here it is ManagerAgent
from autogen_core import SingleThreadedAgentRuntime
import asyncio

async def main():

    # Create runtime and register agent types
    runtime = SingleThreadedAgentRuntime()
    await MyManagerAgent.register(runtime, "my_manager_agent", lambda: MyManagerAgent())
    await MyWorkerAgent.register(runtime, "my_worker_agent", lambda: MyWorkerAgent())

    # Start runtime, send messages, close runtime
    runtime.start()

    # Create agent_id, send message
    agent_id = AgentId("my_manager_agent", "manager")
    await runtime.send_message(MyTextMessage(content="Hello World!"), agent_id)

    # Close runtime
    await runtime.stop_when_idle()

asyncio.run(main())-
Register Agents using the class method register(), setting the Agent class name and factory method during registration -
The initial task message is sent via Runtime.send_message() -
Sending a direct message with send_message only requires specifying the AgentId that receives the message, without having to worry about whether its real instance exists; Runtime will manage it automatically
4
AutoGen-Core: The First AI Agent
......
@dataclass
class Message:
    content: str

class MyAgent(RoutedAgent):
    def __init__(self) -> None:
        super().__init__("A simple agent")
        self._system_messages = [SystemMessage(content="You are a helpful AI assistant. Please answer using Chinese.")]
        self._model_client = OpenAIChatCompletionClient(model="gpt-4o-mini")
        self._model_context = BufferedChatCompletionContext(buffer_size=5)

    @message_handler
    async def handle_user_message(self, message: Message, ctx: MessageContext) -> Message:
        user_message = UserMessage(content=message.content, source="user")
        await self._model_context.add_message(user_message)
        response = await self._model_client.create(
            self._system_messages + (await self._model_context.get_messages()), cancellation_token=ctx.cancellation_token
        )
        await self._model_context.add_message(AssistantMessage(content=response.content, source=self.metadata["type"]))
return Message(content=response.content)-
Using model_client to access LLM; using model_context to save conversational history; -
Each time a new message is received, it adds the new message to the conversation history and passes it to LLM for output -
After adding the LLM output message to the conversation history, it returns the response content
...
    # Create agent_id, send message
    message = Message("What is the capital city of China?")
    response = await runtime.send_message(message, AgentId("my_agent", "default"))    print(response.content)
And thus, a minimalist version of an Agent based on AutoGen-Core is completed.
In fact, this is just a simple LLM application, without external tool usage, long-term memory, ReAct, and other capabilities. We will continue to introduce how to develop AI Agents with tool capabilities using AutoGen-Core in the next article.
end
Welfare Time
To help LLM developers learn RAG applications more systematically and in-depth, especially in enterprise-level RAG application scenarios, the current mainstream optimization methods and technical implementations, we have written “Development and Optimization of RAG Applications Based on Large Models – Building Enterprise-Level LLM Applications”, a 500-page development and optimization guide, to explore the new world of LLM application development together.
For more details, click the link to learn more 
Purchase here to enjoy a 50% discount