Click on the above “Beginner’s Visual Learning” to select “Star” or “Pin”
Heavyweight content delivered first hand
In 2014, Ian Goodfellow proposed Generative Adversarial Networks (GANs), which have become one of the hottest directions in deep learning today. This article will focus on how to use Keras to apply GAN to the task of image deblurring.
Keras code link: https://github.com/RaphaelMeudec/deblur-gan
Additionally, please refer to the original paper on DeblurGAN (https://arxiv.org/pdf/1711.07064.pdf) and its Pytorch version implementation: https://github.com/KupynOrest/DeblurGAN/.
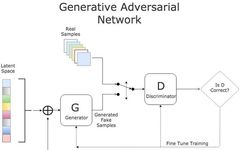
Introduction to Generative Adversarial Networks
In a Generative Adversarial Network, there are two networks that train against each other. The generator misleads the discriminator by producing realistic fake inputs, while the discriminator distinguishes whether the input is real or artificial.
GAN Training Process
There are three key steps during the training process:
-
Use the generator to create fake inputs based on noise;
-
Train the discriminator using real and fake inputs;
-
Train the entire model: this model is built from the connection of the discriminator and the generator.
Note that the weights of the discriminator are frozen during the third step.
The reason for connecting the two networks is that there is no separate feedback for the generator’s output. Our only metric is whether the discriminator accepts the generated samples.
Above, we briefly introduced the architecture of GAN. If you feel it is not detailed enough, you can refer to this excellent introduction: Introduction to Generative Adversarial Networks: Understanding the Basic Principles of GAN (with Resources).
Data
Ian Goodfellow first applied the GAN model to generate MNIST data. In this tutorial, we will apply Generative Adversarial Networks to image deblurring. Therefore, the input to the generator is not noise, but blurred images.
The dataset we use is the GOPRO dataset. This dataset contains artificially blurred images from various street scenes. Depending on the scenes, the dataset is categorized into different subfolders.
You can download the simple version: https://drive.google.com/file/d/1H0PIXvJH4c40pk7ou6nAwoxuR4Qh_Sa2/view
Or the full version: https://drive.google.com/file/d/1SlURvdQsokgsoyTosAaELc4zRjQz9T2U/view
We first assign the images to two folders A (blurred) and B (clear). This A&B architecture corresponds to the original pix2pix paper. To do this, I created a custom script on GitHub to perform this task. Please follow the README instructions to use it:
https://github.com/RaphaelMeudec/deblur-gan/blob/master/organize_gopro_dataset.py
Model
The training process remains unchanged. First, let’s take a look at the architecture of the neural network!
Generator
The generator is designed to reproduce clear images. This network is based on ResNet modules, which continuously track the evolution of the original blurred images. This article also uses a version based on UNet, but I have not implemented this version yet. Both modules should be suitable for image deblurring.

DeblurGAN Generator Network Architecture, Source Paper “DeblurGAN: Blind Motion Deblurring Using Conditional Adversarial Networks”.
At its core, it applies 9 ResNet modules for upsampling on the original image. Let’s take a look at the code implementation on Keras!
from keras.layers import Input, Conv2D, Activation, BatchNormalization
from keras.layers.merge import Add
from keras.layers.core import Dropout

def res_block(input, filters, kernel_size=(3,3), strides=(1,1), use_dropout=False):
    """
    Instanciate a Keras Resnet Block using sequential API.
    :param input: Input tensor
    :param filters: Number of filters to use
    :param kernel_size: Shape of the kernel for the convolution
    :param strides: Shape of the strides for the convolution
    :param use_dropout: Boolean value to determine the use of dropout
    :return: Keras Model
    """
    x = ReflectionPadding2D((1,1))(input)
    x = Conv2D(filters=filters,
               kernel_size=kernel_size,
               strides=strides,)(x)
    x = BatchNormalization()(x)
    x = Activation('relu')(x)

    if use_dropout:
        x = Dropout(0.5)(x)

    x = ReflectionPadding2D((1,1))(x)
    x = Conv2D(filters=filters,
                kernel_size=kernel_size,
                strides=strides,)(x)
    x = BatchNormalization()(x)

    # Two convolution layers followed by a direct connection between input and output
    merged = Add()([input, x])
    return merged
The ResNet layer essentially consists of convolutional layers, where the input and output are added to form the final output.
from keras.layers import Input, Activation, Add
from keras.layers.advanced_activations import LeakyReLU
from keras.layers.convolutional import Conv2D, Conv2DTranspose
from keras.layers.core import Lambda
from keras.layers.normalization import BatchNormalization
from keras.models import Model

from layer_utils import ReflectionPadding2D, res_block

ngf = 64
input_nc = 3
output_nc = 3
input_shape_generator = (256, 256, input_nc)
n_blocks_gen = 9

def generator_model():
    """Build generator architecture."""
    # Current version : ResNet block
    inputs = Input(shape=image_shape)

    x = ReflectionPadding2D((3, 3))(inputs)
    x = Conv2D(filters=ngf, kernel_size=(7,7), padding='valid')(x)
    x = BatchNormalization()(x)
    x = Activation('relu')(x)

    # Increase filter number
    n_downsampling = 2
    for i in range(n_downsampling):
        mult = 2**i
        x = Conv2D(filters=ngf*mult*2, kernel_size=(3,3), strides=2, padding='same')(x)
        x = BatchNormalization()(x)
        x = Activation('relu')(x)

    # Apply 9 ResNet blocks
    mult = 2**n_downsampling
    for i in range(n_blocks_gen):
        x = res_block(x, ngf*mult, use_dropout=True)

    # Decrease filter number to 3 (RGB)
    for i in range(n_downsampling):
        mult = 2**(n_downsampling - i)
        x = Conv2DTranspose(filters=int(ngf * mult / 2), kernel_size=(3,3), strides=2, padding='same')(x)
        x = BatchNormalization()(x)
        x = Activation('relu')(x)

    x = ReflectionPadding2D((3,3))(x)
    x = Conv2D(filters=output_nc, kernel_size=(7,7), padding='valid')(x)
    x = Activation('tanh')(x)

    # Add direct connection from input to output and recenter to [-1, 1]
    outputs = Add()([x, inputs])
    outputs = Lambda(lambda z: z/2)(outputs)

    model = Model(inputs=inputs, outputs=outputs, name='Generator')
    return model
Keras Implementation of the Generator Architecture
As planned, 9 ResNet modules will be applied to the upsampled version of the input. We added a connection from input to output and divided the result by 2 to maintain normalized output.
This is the architecture of the generator! Let’s continue to see how the discriminator works.
Discriminator
The goal of the discriminator is to determine whether the input image is artificial. Therefore, the architecture of the discriminator consists of convolutions and outputs a single value.
from keras.layers import Input
from keras.layers.advanced_activations import LeakyReLU
from keras.layers.convolutional import Conv2D
from keras.layers.core import Dense, Flatten
from keras.layers.normalization import BatchNormalization
from keras.models import Model

ndf = 64
output_nc = 3
input_shape_discriminator = (256, 256, output_nc)


def discriminator_model():
    """Build discriminator architecture."""
    n_layers, use_sigmoid = 3, False
    inputs = Input(shape=input_shape_discriminator)

    x = Conv2D(filters=ndf, kernel_size=(4,4), strides=2, padding='same')(inputs)
    x = LeakyReLU(0.2)(x)

    nf_mult, nf_mult_prev = 1, 1
    for n in range(n_layers):
        nf_mult_prev, nf_mult = nf_mult, min(2**n, 8)
        x = Conv2D(filters=ndf*nf_mult, kernel_size=(4,4), strides=2, padding='same')(x)
        x = BatchNormalization()(x)
        x = LeakyReLU(0.2)(x)

    nf_mult_prev, nf_mult = nf_mult, min(2**n_layers, 8)
    x = Conv2D(filters=ndf*nf_mult, kernel_size=(4,4), strides=1, padding='same')(x)
    x = BatchNormalization()(x)
    x = LeakyReLU(0.2)(x)

    x = Conv2D(filters=1, kernel_size=(4,4), strides=1, padding='same')(x)
    if use_sigmoid:
        x = Activation('sigmoid')(x)

    x = Flatten()(x)
    x = Dense(1024, activation='tanh')(x)
    x = Dense(1, activation='sigmoid')(x)

    model = Model(inputs=inputs, outputs=x, name='Discriminator')
    return model
Keras Implementation of the Discriminator Architecture
The final step is to build the complete model. The specificity of this GAN in this article is that its input is actual images rather than noise. Therefore, we can get direct feedback on the generator’s output.
from keras.layers import Input
from keras.models import Model

def generator_containing_discriminator_multiple_outputs(generator, discriminator):
    inputs = Input(shape=image_shape)
    generated_images = generator(inputs)
    outputs = discriminator(generated_images)
    model = Model(inputs=inputs, outputs=[generated_images, outputs])
    return model
Let’s see how to fully utilize this specificity with two loss functions.
Training Process
Loss Functions
We extract loss functions at two levels: at the end of the generator and at the end of the entire model.
The former is a perceptual loss that is calculated directly based on the output of the generator. This loss function ensures that the GAN model is oriented towards a deblurring task. It compares the output values of the first batch of convolutions from VGG.
import keras.backend as K
from keras.applications.vgg16 import VGG16
from keras.models import Model

image_shape = (256, 256, 3)

def perceptual_loss(y_true, y_pred):
    vgg = VGG16(include_top=False, weights='imagenet', input_shape=image_shape)
    loss_model = Model(inputs=vgg.input, outputs=vgg.get_layer('block3_conv3').output)
    loss_model.trainable = False
    return K.mean(K.square(loss_model(y_true) - loss_model(y_pred)))
And the latter is the Wasserstein loss applied to the output of the entire model, which takes the mean of the differences between the two images. This loss function can improve the convergence of Generative Adversarial Networks.
import keras.backend as K

def wasserstein_loss(y_true, y_pred):
    return K.mean(y_true*y_pred)
Training Process
The first step is to load the data and initialize all models. We use our custom function to load the dataset while adding the Adam optimizer to our model. We prevent the discriminator from training by setting Keras’s trainable options.
# Load dataset
data = load_images('./images/train', n_images)
y_train, x_train = data['B'], data['A']

# Initialize models
g = generator_model()
d = discriminator_model()
d_on_g = generator_containing_discriminator_multiple_outputs(g, d)

# Initialize optimizers
g_opt = Adam(lr=1E-4, beta_1=0.9, beta_2=0.999, epsilon=1e-08)
d_opt = Adam(lr=1E-4, beta_1=0.9, beta_2=0.999, epsilon=1e-08)
d_on_g_opt = Adam(lr=1E-4, beta_1=0.9, beta_2=0.999, epsilon=1e-08)

# Compile models
d.trainable = True
d.compile(optimizer=d_opt, loss=wasserstein_loss)
d.trainable = False
loss = [perceptual_loss, wasserstein_loss]
loss_weights = [100, 1]
d_on_g.compile(optimizer=d_on_g_opt, loss=loss, loss_weights=loss_weights)
d.trainable = True
Then, we start the epochs and divide the dataset into different batches.
for epoch in range(epoch_num):
  print('epoch: {}/{}'.format(epoch, epoch_num))
  print('batches: {}'.format(x_train.shape[0] / batch_size))

  # Randomize images into batches
  permutated_indexes = np.random.permutation(x_train.shape[0])

  for index in range(int(x_train.shape[0] / batch_size)):
      batch_indexes = permutated_indexes[index*batch_size:(index+1)*batch_size]
      image_blur_batch = x_train[batch_indexes]
      image_full_batch = y_train[batch_indexes]
Finally, we train the discriminator and generator in succession based on the two losses. We generate fake inputs with the generator, then train the discriminator to distinguish between fake and real inputs, and train the entire model.
for epoch in range(epoch_num):
  for index in range(batches):
    # [Batch Preparation]

    # Generate fake inputs
generated_images = g.predict(x=image_blur_batch, batch_size=batch_size)

    # Train multiple times discriminator on real and fake inputs
    for _ in range(critic_updates):
        d_loss_real = d.train_on_batch(image_full_batch, output_true_batch)
        d_loss_fake = d.train_on_batch(generated_images, output_false_batch)
        d_loss = 0.5 * np.add(d_loss_fake, d_loss_real)

    d.trainable = False
    # Train generator only on discriminator's decision and generated images
d_on_g_loss = d_on_g.train_on_batch(image_blur_batch, [image_full_batch, output_true_batch])

    d.trainable = True
You can refer to the following GitHub address to see the complete loop:
https://www.github.com/raphaelmeudec/deblur-gan
Materials
I used an AWS instance (p2.xlarge) from the Deep Learning AMI (version 3.0). It took about 5 hours (50 epochs) to train on the GOPRO dataset.
Image Deblurring Results
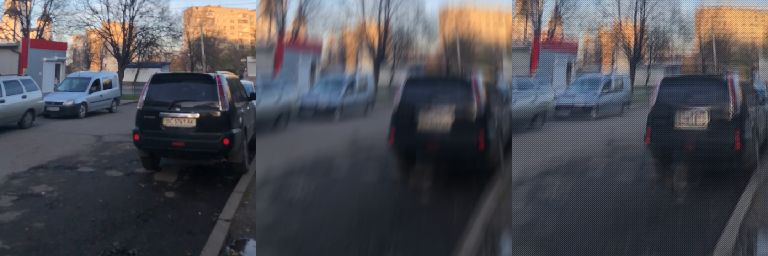
From left to right: Original image, Blurred image, GAN output.
The output above is the result from our Keras Deblur GAN. Even in a blurred state, the network is capable of producing more convincing images. Car lights and branches are clearer.

Left image: GOPRO test image; Right image: GAN output.
One limitation is the noise pattern at the top of the image, which may be caused by using VGG as a loss function.
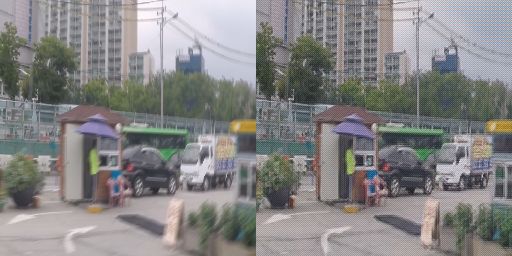
Left image: GOPRO test image; Right image: GAN output.
I hope you had a pleasant reading experience with this article on “Image Deblurring Based on Generative Adversarial Networks”!

Left image: GOPRO test image; Right image: GAN output.
Paper: DeblurGAN: Blind Motion Deblurring Using Conditional Adversarial Networks

Paper link: https://arxiv.org/pdf/1711.07064.pdf
Abstract: We propose an end-to-end learning method for motion deblurring based on conditional GAN and content loss function—DeblurGAN. In terms of structural similarity measurement and visual appearance, DeblurGAN achieves state-of-the-art levels. The quality of the deblurring model is also considered in a novel way in real-world problems—specifically for object detection of (de)blurred images. This method is five times faster than the current best competitors. Additionally, we propose a new method for synthesizing motion-blurred images from clear images, which can enhance real datasets.
Models, training code, and datasets are available at: https://github.com/KupynOrest/DeblurGAN.
Good News!
Beginner’s Visual Learning Knowledge Planet
Is now open to the public 👇👇👇
Download 1: OpenCV-Contrib Extension Module Chinese Version Tutorial
Reply "Chinese Tutorial for Extension Modules" in the "Beginner's Visual Learning" public account background to download the first OpenCV extension module tutorial in Chinese, covering installation of extension modules, SFM algorithms, stereo vision, object tracking, biological vision, super-resolution processing, etc., with more than twenty chapters of content.

Download 2: Python Visual Practical Projects 52 Lectures
Reply "Python Visual Practical Projects" in the "Beginner's Visual Learning" public account background to download 31 visual practical projects including image segmentation, mask detection, lane line detection, vehicle counting, eyeliner addition, license plate recognition, character recognition, emotion detection, text content extraction, facial recognition, etc., to help quickly learn computer vision.

Download 3: OpenCV Practical Projects 20 Lectures
Reply "OpenCV Practical Projects 20 Lectures" in the "Beginner's Visual Learning" public account background to download 20 practical projects based on OpenCV, achieving advanced OpenCV learning.

Communication Group

Welcome to join the public account reader group to communicate with peers. There are currently WeChat groups on SLAM, 3D vision, sensors, autonomous driving, computational photography, detection, segmentation, recognition, medical imaging, GANs, algorithm competitions, etc. (will gradually be subdivided later). Please scan the WeChat ID below to join the group, with a note: "Nickname + School/Company + Research Direction", for example: "Zhang San + Shanghai Jiao Tong University + Vision SLAM". Please follow the format for the note, otherwise, it will not be approved. After successful addition, you will be invited to the relevant WeChat group according to your research direction. Please do not send advertisements in the group, otherwise, you will be removed from the group. Thank you for your understanding~