
Important content delivered at the first time
Introduction
One of the most common uses of TensorFlow and Keras is image recognition/classification. Through this article, you will learn how to achieve this using Keras.
Definition
If you do not understand the basic concepts of image recognition, it will be difficult to fully grasp the content of this article. Therefore, before we start the main text, let’s take some time to understand some terminology.
TensorFlow/Keras
TensorFlow is a Python open-source library created by the Google Brain team, which contains many algorithms and models capable of implementing deep neural networks for scenarios such as image recognition/classification and natural language processing. TensorFlow is a powerful framework that operates by implementing a series of processing nodes, each representing a mathematical operation, and the entire series of nodes is called a “graph”.
Keras is a high-level API (Application Programming Interface) that supports TensorFlow (as well as other ML libraries like Theano). Its design principles aim to be user-friendly and modular, simplifying the powerful features of TensorFlow as much as possible, allowing for usage in Python without excessive modifications and configurations.
Image Recognition (Classification)
Image recognition refers to inputting an image into a neural network and outputting a label corresponding to a certain class of that image. The label corresponds to a predefined class. An image can be labeled as multiple classes or a single class. If there is only one class, the term “recognition” should be used, while multi-class recognition tasks are usually referred to as “classification”.
A subset of image classification is object detection, where specific instances of objects are identified as a class such as animals, vehicles, or humans.
Feature Extraction
To achieve image recognition/classification, neural networks must perform feature extraction. Features, as data elements, will be fed back through the network. In the specific context of image recognition, features are a set of pixels of an object, such as edges and corners, which the network analyzes for pattern recognition.
Feature recognition (or feature extraction) is the process of pulling relevant features from the input image for analysis. Many images contain corresponding annotations and metadata that help the neural network acquire relevant features.
How Neural Networks Learn to Recognize Images
Intuitively understanding how neural networks recognize images will help in implementing neural network models, so the following sections will briefly introduce the image recognition process.
Using Filters for Feature Extraction
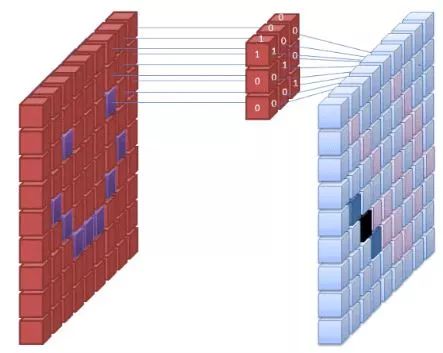
Image source: commons.wikimedia.org
The first layer of the neural network receives all the pixels of the image. When all the data is fed into the network, different filters are applied to the image, forming representations of different parts of the image. This is feature extraction, which creates a “feature map”.
The process of extracting features from an image is accomplished through a “convolutional layer”, and convolution simply forms partial representations of the image. The term Convolutional Neural Network (CNN) is derived from the concept of convolution, which is the most commonly used type of neural network in image classification/recognition.
If you cannot imagine how feature maps are created, think of shining a flashlight on a picture in a dark room. As the beam moves across the picture, you are learning the features of the image. In this analogy, the beam emitted by the flashlight is the filter that the network uses to form the representation of the image.
The width of the beam controls the size of the area of the image being swept at one time, and the neural network has similar parameters, namely the size of the filter. This affects the number of pixels swept at one time. A common filter size in CNNs is 3, which includes height and width, so the size of the pixel area scanned is 3×3.
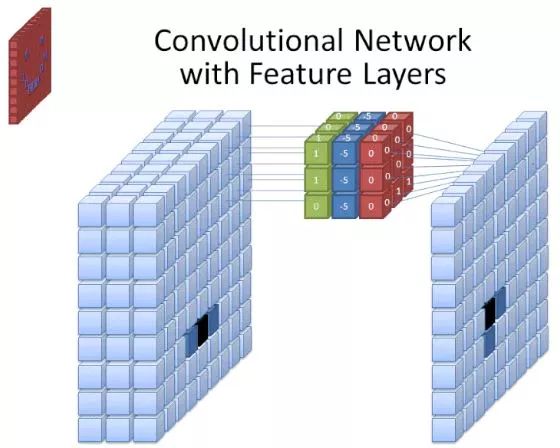
Image source: commons.wikimedia.org
While the size of the filter covers its height and width, the depth of the filter must also be specified.
How do 2D images have depth?
Digital images are rendered as height, width, and some RGB values that define pixel colors, so the “depth” being tracked is the number of color channels the image has. Grayscale (non-color) images contain only 1 color channel, while color images contain 3 color channels.
This means that for a filter with a size of 3 applied to a full-color image, its scale is 3×3×3. For each pixel covered by this filter, the neural network multiplies the filter’s values by the pixel’s values to obtain a numerical representation of the pixel. The above process is then repeated over the entire image to achieve a complete representation. The filter slides over the rest of the image based on the parameter “stride”. This parameter defines the number of pixels the filter will slide after calculating the value at the current position. The default stride value in CNNs is 2.
Through the above calculations, the final feature map will be obtained. This process is typically accomplished with multiple filters, helping to maintain the complexity of the image.
Activation Function
Once the feature map of the image is created, the values representing the image will be passed through an activation function or activation layer. Influenced by the convolutional layer, the values representing the image obtained by the activation function are linear, and since the image itself is nonlinear, this also adds nonlinearity to the value.
Although some other activation functions are occasionally used (see here for details), the Rectified Linear Unit (ReLU) is the most commonly used.
Pooling Layer
Once the data is activated, they will be sent to the pooling layer. Pooling downsamples the image, meaning it takes the image information and compresses it, making it smaller. The pooling process makes the network more flexible and better at recognizing objects/images based on relevant features.
When observing an image, we usually do not care about the background information, only focusing on the features we care about, such as humans or animals.
Similarly, the pooling layer of the CNN will abstract unnecessary parts of the image, retaining only the relevant parts. This is controlled by the size specified by the pooling layer.
Since the pooling layer needs to determine the most relevant parts of the image, it is hoped that the neural network only learns the parts of the image that truly represent the object in question. This helps prevent overfitting, where the neural network learns the training cases well but fails to generalize to new data.
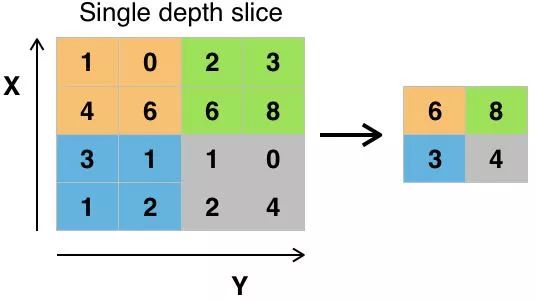
Image source: commons.wikimedia.org
There are various ways to obtain pooling values, with max pooling being the most commonly used. Max pooling takes the maximum value of the pixels in a single filter. Assuming the use of a filter with a convolution kernel size of 2×2, 3/4 of the information will be lost.
Using the maximum value of the pixels to account for possible image distortion, and reducing the parameters/size of the image to control overfitting. There are other types of pooling, such as average pooling and sum pooling, but these are not commonly used because max pooling often has higher accuracy.
Flattening
The last layer of the CNN, the dense layer, requires the data to be in a vector form for processing. Therefore, the data must be “flattened”. The values will be compressed into a vector or arranged in sequential columns.
Fully Connected Layer
The final layer of the CNN is the dense layer or Artificial Neural Network (ANN). ANNs are primarily used to analyze input features and combine them into different attributes that aid in classification. These layers essentially form a collection of neurons representing different parts of the discussed object, and these collections may represent a dog’s soft ears or the color red of an apple. When enough neurons are activated in response to the input image, the image will be classified as a certain object.
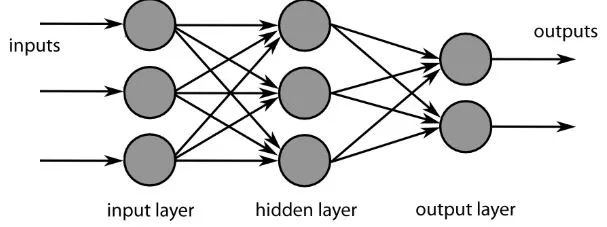
Image source: commons.wikimedia.org
The error between the calculated values and the expected values in the dataset is computed by the ANN. The network is then subjected to backpropagation, calculating the influence of a given neuron on the next layer of neurons and adjusting it. This optimizes the model’s performance, and the process is repeated over and over. This is how neural networks train data and learn the association between input features and output classes.
The neurons in the intermediate fully connected layer will output binary values related to the possible classes. If there are four different classes (e.g., dog, car, house, and person), the neuron assigns “1” to the class represented by the image and “0” to the others.
The final fully connected layer will receive the output from the previous layer and pass the probability of each class, summing to 1. If the value for the “dog” category is 0.75, it indicates that the certainty that the image is a dog is 75%.
At this point, the image classifier has been trained and can input images into the CNN, which will output guesses about the content of the image.
The Workflow of Machine Learning
Before we start with an example of training an image classifier, let’s first understand the workflow of machine learning. The process of training a neural network model is quite standard and can be divided into four different stages.
Data Preparation
First, data needs to be collected and placed into a table that the network can train on. This involves collecting images and labeling them. Even if you download datasets prepared by others, preprocessing may be required before they can be used for training. Data preparation itself is an art, including handling missing values, data corruption, incorrectly formatted data, incorrect labels, etc.
In this article, we will use a preprocessed dataset.
Creating the Model
Creating a neural network model involves selecting various parameters and hyperparameters. It is necessary to determine the number of layers used in the model, the size of the input and output of the layers, the type of activation function used, and whether to use dropout, etc.
How to set parameters and hyperparameters requires a lot of learning and accumulation of experience, which will be introduced in the example explanation in this article.
Training the Model
After creating the model, you simply create an instance of the model and match it with the training data. An important factor when training the model is the time required for training. You can specify the number of epochs for training to determine the duration of the network’s training. The longer the time, the higher the performance, but too many epochs may pose a risk of overfitting.
You can appropriately set the number of epochs during training, and it is common to save the network weights between training epochs so that once progress is made in training the network, there is no need to start over.
Model Evaluation
Evaluating the model involves multiple steps. The first step in evaluating the model is to compare it with a validation dataset that the model has not been trained on, and its performance can be analyzed through different metrics.
There are various metrics for evaluating the performance of neural network models, the most common being “accuracy”, which is the number of correctly classified images divided by the total number of images in the dataset.
After understanding the accuracy of the model’s performance on the validation dataset, parameters are usually fine-tuned and retrained, as the results of the first training are often unsatisfactory, repeating the above process until satisfied with the accuracy.
Finally, you will test the network’s performance on the test set. This test set consists of data that the model has never used.
You may be wondering:
Why use a test set? Isn’t it enough to use the validation dataset to understand the model’s accuracy?
It is necessary to test with a batch of data that the network has never trained on. Because all parameter adjustments, combined with retesting the validation set, mean the network may have learned some features of the validation set, which will lead to an inability to generalize to out-of-sample data.
Therefore, the purpose of the test set is to detect issues such as overfitting and to make the model more practically applicable.
Original text in English: https://stackabuse.com/image-recognition-in-python-with-tensorflow-and-keras/ Translator: My nickname is Ye~
Good News!
Beginner Learning Vision Knowledge Planet
Is now open to the public👇👇👇
Download 1: OpenCV-Contrib Extension Module Chinese Version Tutorial

Reply "Extension Module Chinese Tutorial" in the background of the "Beginner Learning Vision" public account to download the first Chinese version of the OpenCV extension module tutorial online, covering more than twenty chapters including extension module installation, SFM algorithms, stereo vision, object tracking, biological vision, super-resolution processing, etc.

Download 2: Python Vision Practical Projects 52 Lectures

Reply "Python Vision Practical Projects" in the background of the "Beginner Learning Vision" public account to download 31 visual practical projects including image segmentation, mask detection, lane line detection, vehicle counting, eyeliner addition, license plate recognition, character recognition, emotion detection, text content extraction, face recognition, etc., to help quickly learn computer vision.

Download 3: OpenCV Practical Projects 20 Lectures

Reply "OpenCV Practical Projects 20 Lectures" in the background of the "Beginner Learning Vision" public account to download 20 practical projects based on OpenCV for advanced learning.

Group Chat

Welcome to join the reader group of the public account to exchange ideas with peers. Currently, there are WeChat groups for SLAM, 3D vision, sensors, autonomous driving, computational photography, detection, segmentation, recognition, medical imaging, GAN, algorithm competitions, etc. (will gradually be subdivided in the future). Please scan the WeChat number below to join the group, and note: "nickname + school/company + research direction", for example: "Zhang San + Shanghai Jiao Tong University + Vision SLAM". Please follow the format, otherwise, you will not be approved. After successfully adding, you will be invited to related WeChat groups based on your research direction. Please do not send advertisements in the group, otherwise you will be removed from the group, thank you for your understanding~