
↑↑↑ Follow after Star ”Alchemy Notes
1DCNN

Recently, many data competitions on Kaggle have featured the 1DCNN model. After reviewing related competitions, I found the concept of 1DCNN to be quite interesting. The basic idea is:
-
First, we map the original features to a high-dimensional space using a fully connected layer, and then reshape it into an image format; -
Next, we use CNN multi-strategy to automate the processing of features.
Currently, the idea of 1DCNN is becoming increasingly common in many competitions. In this article, we will analyze the performance of the second-place contestant in the MoA competition, who compared the effects of 1DCNN, TabNet, and DNN, finding that 1DCNN can achieve very good results and outperforms both TabNet and DNN. So let’s learn about this model together.

01
Concept
First, increase the feature dimension M through a fully connected layer. The purpose of this layer includes providing sufficient pixels for the image by increasing the size, and making the generated image meaningful through feature ranking.
Next, the data is directly reshaped into image format (size N * 1, channel number C), noting that C * N = M.
Subsequently, it is similar to the CNN model, using several 1D Conv layers to extract features.
Finally, the extracted features are flattened and concatenated for prediction using a fully connected layer.
02
Model Framework
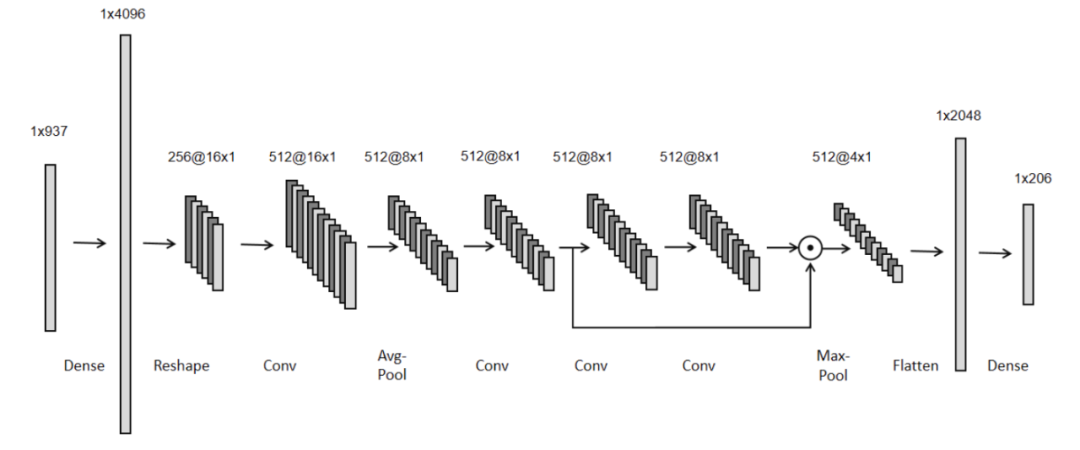
The overall framework of 1DCNN is as follows:

-
Code excerpt from the second-place open source: https://github.com/baosenguo/Kaggle-MoA-2nd-Place-Solution/blob/main/training/1d-cnn-train.ipynb
class Model(nn.Module):
    def __init__(self, num_features, num_targets, hidden_size):
        super(Model, self).__init__()
        cha_1 = 256
        cha_2 = 512
        cha_3 = 512

        cha_1_reshape = int(hidden_size/cha_1)
        cha_po_1 = int(hidden_size/cha_1/2)
        cha_po_2 = int(hidden_size/cha_1/2/2) * cha_3

        self.cha_1 = cha_1
        self.cha_2 = cha_2
        self.cha_3 = cha_3
        self.cha_1_reshape = cha_1_reshape
        self.cha_po_1 = cha_po_1
        self.cha_po_2 = cha_po_2

        self.batch_norm1 = nn.BatchNorm1d(num_features)
        self.dropout1 = nn.Dropout(0.1)
        self.dense1 = nn.utils.weight_norm(nn.Linear(num_features, hidden_size))

        self.batch_norm_c1 = nn.BatchNorm1d(cha_1)
        self.dropout_c1 = nn.Dropout(0.1)
        self.conv1 = nn.utils.weight_norm(nn.Conv1d(cha_1,cha_2, kernel_size = 5, stride = 1, padding=2,  bias=False),dim=None)

        self.ave_po_c1 = nn.AdaptiveAvgPool1d(output_size = cha_po_1)

        self.batch_norm_c2 = nn.BatchNorm1d(cha_2)
        self.dropout_c2 = nn.Dropout(0.1)
        self.conv2 = nn.utils.weight_norm(nn.Conv1d(cha_2,cha_2, kernel_size = 3, stride = 1, padding=1, bias=True),dim=None)

        self.batch_norm_c2_1 = nn.BatchNorm1d(cha_2)
        self.dropout_c2_1 = nn.Dropout(0.3)
        self.conv2_1 = nn.utils.weight_norm(nn.Conv1d(cha_2,cha_2, kernel_size = 3, stride = 1, padding=1, bias=True),dim=None)

        self.batch_norm_c2_2 = nn.BatchNorm1d(cha_2)
        self.dropout_c2_2 = nn.Dropout(0.2)
        self.conv2_2 = nn.utils.weight_norm(nn.Conv1d(cha_2, cha_3, kernel_size = 5, stride = 1, padding=2, bias=True),dim=None)

        self.max_po_c2 = nn.MaxPool1d(kernel_size=4, stride=2, padding=1)

        self.flt = nn.Flatten()

        self.batch_norm3 = nn.BatchNorm1d(cha_po_2)
        self.dropout3 = nn.Dropout(0.2)
        self.dense3 = nn.utils.weight_norm(nn.Linear(cha_po_2, num_targets))

    def forward(self, x):

        ## 1. First FC layer
        x = self.batch_norm1(x)
        x = self.dropout1(x)
        x = F.celu(self.dense1(x), alpha=0.06)

        ## 2. Reshape
        x = x.reshape(x.shape[0],self.cha_1,self.cha_1_reshape)

        ## 3. First convolutional layer
        x = self.batch_norm_c1(x)
        x = self.dropout_c1(x)
        x = F.relu(self.conv1(x))
        x = self.ave_po_c1(x)

        ## 3. Second convolutional layer
        x = self.batch_norm_c2(x)
        x = self.dropout_c2(x)
        x = F.relu(self.conv2(x))
        x_s = x

        ## 4. Third and fourth convolutional layers
        x = self.batch_norm_c2_1(x)
        x = self.dropout_c2_1(x)
        x = F.relu(self.conv2_1(x))

        x = self.batch_norm_c2_2(x)
        x = self.dropout_c2_2(x)
        x = F.relu(self.conv2_2(x))

        # 5. Element-wise multiplication
        x =  x * x_s

        x = self.max_po_c2(x)

        # 6. Flatten and fully connected layer for final prediction
        x = self.flt(x)

        x = self.batch_norm3(x)
        x = self.dropout3(x)
        x = self.dense3(x)

        return x
I personally feel that this approach is very innovative, and everyone can try it with various tabular data.

-
2nd Place Solution – with 1D-CNN (Private LB: 0.01601) -
https://github.com/baosenguo/Kaggle-MoA-2nd-Place-Solution/blob/main/training/1d-cnn-train.ipynb