Click the above “Beginner Learning Vision”, select to add Star or “Pin”
Essential Knowledge Delivered at First Time
In the field of deep learning (including areas built with ChatGPT), one of the most important libraries is PyTorch. Like the TensorFlow framework, PyTorch is one of the most renowned neural network training frameworks available for software developers and data scientists. In addition to its ease of use and simple API, it excels in flexibility and memory usage, making it extremely fast in multidimensional computations (a crucial component of backpropagation, a technique used to optimize the weights of neural networks) — these details make it one of the most sought-after libraries for companies building deep learning models.
In this article, we will examine some basic operations using PyTorch and learn how to work with tensor objects! Tensors are mathematical representations of data, often referred to by different names:
-
Single-element tensor: commonly known as a scalar, contains a single mathematical value.
-
1D tensor: contains n examples, usually referred to as a 1D vector, and stores different mathematical elements in a single dimension.
-
2D tensor: commonly known as a matrix, capable of storing data in two dimensions. Think of a regular SQL table or an Excel spreadsheet.
-
3D tensors and higher dimensions: data organized in this dimension is usually more difficult to visualize, commonly referred to as n-dimensional tensors.
With this brief introduction to mathematical concepts, let’s explore how to use PyTorch in Python!
As we described, tensor objects are mathematical generalizations of n-dimensional objects that can extend to almost any dimension. Although tensors are often multidimensional in the context of deep learning, we can also create single-element tensors (commonly known as scalars) using torch (even though it’s named PyTorch, we use torch in Python to operate the library).
If tensors are the core objects in torch (or PyTorch), how do we create them in the library?
It’s very simple! Let’s create our first single-element tensor:
import torch
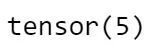
scalar = torch.tensor(5)
Our scalar object contains a single number — 5. By calling it in the Python console, let’s visualize our tensor:
Fact 1: `torch.tensor` is used to create tensor objects
Of course, we are not limited to single-element tensors — we can also create 1D objects containing multiple elements. Let’s pass a list into `torch.tensor` and see what happens:
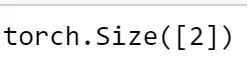
vector = torch.tensor([7, 7])
vectortensor
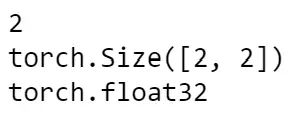
Our `vector` object now contains two elements along one dimension. Imagine this data contains 1 row or 1 column of data. Having “dimensions” allows us to access interesting properties of the tensor — for example, `ndim`:
Fact 2: `tensor.ndim` is used to get the number of dimensions of a tensor object
In our case, the `vector` object has only one dimension. How do we know how many elements our tensor object has? By using another property – `shape`!
Fact 3: `tensor.shape` is used to get the shape of a tensor object
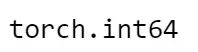
Our tensor object contains two elements in one dimension. We will see this output compared to multidimensional objects. torch tensors also contain associated data types. We can use:
Fact 4: `tensor.dtype` outputs the type of our tensor object
Our tensor contains data stored in int64 format.
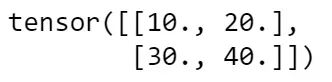
Now let’s expand our object to a 2D tensor:
matrix = torch.tensor([[10.0, 20.0],                     [30.0, 40.0]])
matrix
Let’s take a look at some properties of our matrix object:
print(matrix.ndim)
print(matrix.shape)
print(matrix.dtype)
ndim, shape and dtype of matrix object
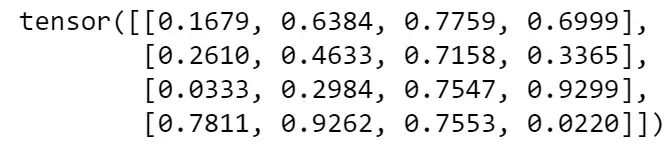
Our matrix object contains elements of float32 data type across two dimensions, with 2 elements in each dimension. To conclude our exploration of creating tensors, let’s see how to generate random tensors using `torch.rand`:
For instance, in the tensor above, we used `torch.rand` to generate a 4 by 4 matrix. In the context of deep learning, this is a very common operation (e.g., generating random neural network layer weights to be optimized later).
Now let’s see how to perform operations on our tensors. If you are already familiar with numpy, this should be easy! Starting with a simple addition operation:
tensor = torch.tensor([1, 2, 3])
tensor + 20
Adding a scalar to a tensor is easy — just use normal mathematical operations! Can you guess how to multiply a tensor by a scalar?
You can also use the abstract `torch.multiply`:
torch.multiply(tensor, 10)
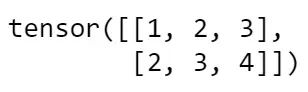
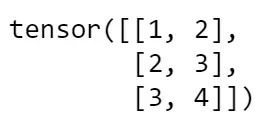
The two most common tensor operations are Hadamard and dot products, the latter being one of the most famous computations widely used in attention mechanisms. Let’s create two 2-D tensors to check these operations:
tensor_1 = torch.tensor([[1,2,3],[2,3,4]])
tensor_2 = torch.tensor([[1,2],[2,3],[3,4]])
tensor_1, a 2 by 3 tensor
tensor_2, a 3 by 2 tensor
When performing the Hadamard product, the shapes of the tensors must match. Let’s compute `tensor_1` with itself:
# Hadamard product
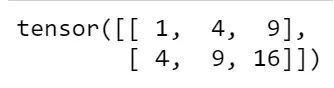
tensor_1 * tensor_1
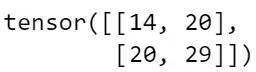
In the case of the dot product, the inner dimensions of the tensors must match. Let’s multiply `tensor_1` (a 2×3 tensor) with `tensor_2` (a 3×2 tensor):
torch.matmul(tensor_1, tensor_2)
dot product of tensor_1 with tensor_2
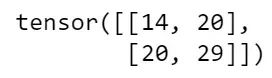
We can also use the elegant `@` operator, which does the same thing:
dot product of tensor_1 with tensor_2
In our last few examples, let’s see how to extract certain elements from our tensors. For these examples, we will use:
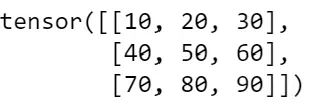
indexing_example = torch.tensor([[10,20,30],[40,50,60],[70,80,90]])
indexing_example
In PyTorch, indexing is similar to other Python objects — let’s try indexing the first row:
Using the 0 index on `[]` will allow us to extract the first row of the object. The `:` symbol allows us to extract all elements from a certain dimension. In our case, we want to extract all elements from the column (2nd dimension). Can you guess how to extract the first column? Just swap the index positions!
For more complex objects, we can also use the same logic. Let’s try to index an element from a 3D tensor:
indexing_example_3d = torch.tensor([[[10,20,30],[40,50,60],[70,80,90]], [[100,200,300],[400,500,600],[700,800,900]]])
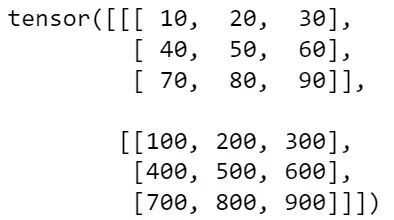
3D Tensor
How do we extract the element “100” from this tensor? Let’s see what we want:
Using indexing logic, we can easily do this:
indexing_example_3d[1,0,0]

100 element from indexing_example
In torch, the indexing order for 3D objects is: matrix, row, column. Can you try to index a 4D object?
Extra Content — Where Are Tensors Stored?
One of the advantages of using torch over other array libraries (like numpy) is that we can store tensors on the GPU — this will be particularly useful if we need to accelerate neural network computations. By default, your tensors are stored on the CPU (most computers only have CPU available), but you can send tensors to the GPU as follows:
device = "cuda" if torch.cuda.is_available() else "cpu"
If `torch.cuda.is_available()` finds a specific NVIDIA GPU on your computer, it will allow you to send tensors to that GPU. Assuming you have a tensor stored in a variable named `tensor`, you can use the `.to` method to send it to the device:
tensor_on_gpu = tensor.to(device)
The Torch API is very concise and easy to understand. These tensors can be used to train neural networks (which I will demonstrate in the next blog post in this series). Additionally, having a slight understanding of linear algebra during the learning process will be very helpful for learning other data science and machine learning algorithms.
Download 1: OpenCV-Contrib Extension Module Chinese Tutorial

Reply "Extension Module Chinese Tutorial" in the backend of the "Beginner Learning Vision" public account to download the first Chinese version of the OpenCV extension module tutorial covering installation of extension modules, SFM algorithms, stereo vision, object tracking, biological vision, super-resolution processing, and more than twenty chapters of content.

Download 2: Python Vision Practical Project 52 Lectures

Reply "Python Vision Practical Project" in the backend of the "Beginner Learning Vision" public account to download 31 visual practical projects including image segmentation, mask detection, lane detection, vehicle counting, eyeliner addition, license plate recognition, character recognition, emotion detection, text content extraction, and face recognition, helping to quickly learn computer vision.

Download 3: OpenCV Practical Project 20 Lectures

Reply "OpenCV Practical Project 20 Lectures" in the backend of the "Beginner Learning Vision" public account to download 20 practical projects based on OpenCV, achieving advanced OpenCV learning.

Group Chat

Welcome to join the public account reader group to exchange with peers. Currently, there are WeChat groups for SLAM, 3D vision, sensors, autonomous driving, computational photography, detection, segmentation, recognition, medical imaging, GAN, algorithm competitions, etc. (these will gradually be subdivided). Please scan the WeChat number below to join the group, and note: "Nickname + School/Company + Research Direction", for example: "Zhang San + Shanghai Jiao Tong University + Vision SLAM". Please follow the format, otherwise, it will not be approved. After successful addition, you will be invited to the relevant WeChat group based on research direction. Please do not send advertisements in the group, otherwise, you will be removed from the group. Thank you for your understanding~