This article introduces how to build a simple neural network using Python 3.0 and TensorFlow 2.0 framework for basic image recognition.
1 Import Dataset
from tensorflow import keras
fashion_mnist = keras.datasets.fashion_mnist
#devide the data into training and test:
#train 60000 and test 10000
(train_images, train_labels), (test_images, test_labels) = fashion_mnist.load_data()
This code imports the MNIST image dataset, covering 70,000 different items in 10 categories along with their corresponding labels. Each image is a 28×28 grayscale image. The training/test split is 60,000/10,000, meaning there are 60,000 training images and 10,000 test images.
You can use the following code to view the shape of the training dataset.
print(train_images.shape)  # You can check the shape of the training dataset
print(train_images[0])  # You can check the pixel values of a specific image in the training set
plt.imshow(train_images[0])  # You can view the image style, for usage of the imshow function refer to the previous blog post
The corresponding shape is (60000, 28, 28), indicating 60,000 grayscale images of size 28×28.
Knowledge Introduction: tf.keras is an implementation of the Keras API specification for TensorFlow. It is a high-level API for building and training models, providing top support for TensorFlow-specific features (such as Eager Execution, tf.data pipelines, and Estimator). tf.keras makes TensorFlow easier to use without sacrificing flexibility and performance.
2 Build Network Model
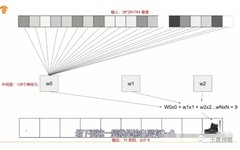
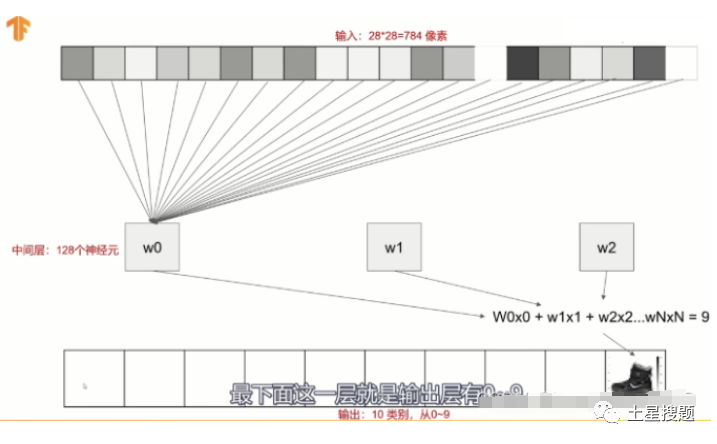
# Define a three-layer structure: input layer, hidden layer, output layer
model = keras.Sequential([
    keras.layers.Flatten(input_shape=(28,28)),  # Image is in 28 28 format
    keras.layers.Dense(128, activation=tf.nn.relu),  # Hidden layer has 128 neurons, this number is user-defined
    keras.layers.Dense(10, activation=tf.nn.softmax)  # 10 refers to the output having 10 categories, 10 neurons
])
Here, a three-layer network structure is defined: input layer, hidden layer, and output layer. The input layer flattens the 28×28 image pixels, the hidden layer has 128 neurons, and the output layer has 10 neurons.
The keras.Sequential function, in my understanding, builds the neural network layers in order: first layer, second layer, third layer. Sequential means in order; for example, here the keras.layers.Flatten function creates the first layer of the neural network, and keras.layers.Dense creates the second layer.
The keras.layers.Flatten function compresses the input layer data into one-dimensional data, which is 28×28=784. It is typically used for fully connected layers because fully connected layers can only accept one-dimensional data while convolutional layers can handle two-dimensional data.
The keras.layers.Dense function creates a fully connected layer:
keras.layers.Dense(units, activation=None, use_bias=True, kernel….)
Here, units refer to the number of neurons, which is a positive integer.
Activation refers to the choice of activation function; if not specified, no activation function is used by default.
3 Train the Network Model
# train the module
train_images_scaled = train_images/255  # Normalize input data for better training performance
model.compile(optimizer="adam", loss="sparse_categorical_crossentropy", metrics=['accuracy'])
model.fit(train_images_scaled, train_labels, epochs=5)
Since pixel values range from 0 to 255, compressing them between 0 and 1 will improve training performance.
model.compile is used to configure the training, specifying the optimizer, loss function, and accuracy evaluation metric.
model.fit is used to execute the model training process.
model.fit(training set input features X, training set labels Y, batch_size, # batch size, not set here
epochs, number of iterations)
4 Evaluate the Model, How to Check Training Performance
test_images_scaled = test_images/255  # Normalize here as well since the training set was normalized
model.evaluate(test_images_scaled, test_labels)  # Evaluate the model performance
model.evaluate takes input data and corresponding true labels, then compares the predicted results with the true standards, calculating the error and outputting it.
The following figure shows the loss and accuracy corresponding to 5 rounds of training:
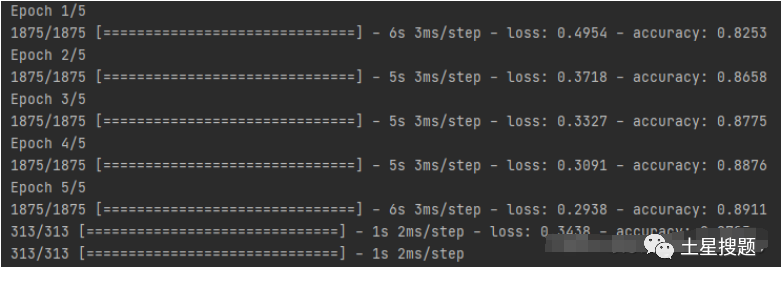
We can see that the loss is decreasing and the accuracy is increasing. The output at the bottom corresponds to the evaluation results, showing the error and accuracy, which is normal as it is worse than the training result of 0.2938 and 0.8911.
5 Model Prediction
#module to predict
print(model.predict(test_images/255)[0])  # Input the first image in the test set for prediction
model.predict takes a new image as input and outputs the prediction result.
The output consists of 10 probability values corresponding to the likelihood that this image belongs to each of the 10 categories, with the highest probability indicating the model’s prediction.

The maximum value of 9.5131058e-01 indicates that the model predicts this image belongs to the 10th category.
You can use “print(test_labels[0])” to check the label of the 0th image in the test set.
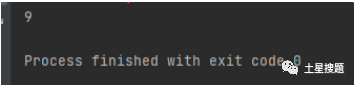
The output is 9 (indexing starts from 0), so the model prediction is correct.
6 Summary
This code creates a three-layer neural network to train and validate on the MNIST image dataset.
The overall network structure is as follows:
You can use model.summary() to check the network shape.
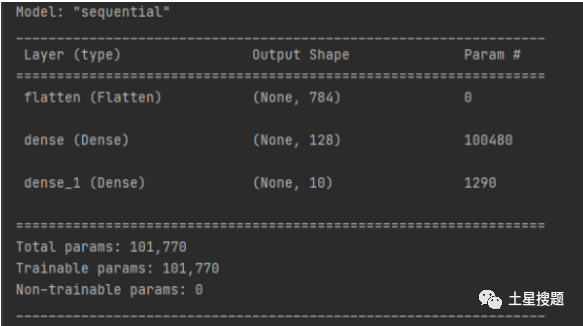
100480 is the number of synapses between the input layer and the hidden layer.
100480: 784 pixels × 128 neurons = 100352, but since each layer has a bias (automatically added), one for the input layer and one for the hidden layer, it is (784+1)×128.
129
0 is the number of synapses between the hidden layer and the output layer.
1290: The output layer has 10 neurons, and the input is 128 + 1, which is the bias. So it is (128+1)×10=1290.
7 Full Source Code
import tensorflow as tf
from tensorflow import keras  # Import dataset
fashion_mnist = keras.datasets.fashion_mnist
#devide the data into training and test:
#train 60000 and test 10000
(train_images, train_labels), (test_images, test_labels) = fashion_mnist.load_data()

# Define a three-layer structure: input layer, hidden layer, output layer
model = keras.Sequential([
    keras.layers.Flatten(input_shape=(28,28)),  # Image is in 28 28 format
    keras.layers.Dense(128, activation=tf.nn.relu),  # Hidden layer has 128 neurons, this number is user-defined
    keras.layers.Dense(10, activation=tf.nn.softmax)  # 10 refers to the output having 10 categories, 10 neurons
])

# train and evaluate the module
train_images_scaled = train_images/255  # Normalize input data for better training performance
model.compile(optimizer="adam", loss="sparse_categorical_crossentropy", metrics=['accuracy'])
model.fit(train_images_scaled, train_labels, epochs=5)

test_images_scaled = test_images/255
model.evaluate(test_images_scaled, test_labels)  #module to predict
print(model.predict(test_images/255)[0])
Bonus: There is a PDF version of “Complete Interview Questions on Machine Learning” that I personally find good, sharing it for free. Get it by following the public account and responding to the automatic reply message to obtain it. Reply with “decompression code” to get the decompression password!