
Click on the above“Beginner’s Guide to Vision”, select to add “Star” or “Pin”
Significant content delivered promptly
Source: AI Park
Author: Mehdi Amine
Translation: ronghuaiyang
Capturing and interpreting the journey of light.
This article provides an overview of the systems for implementing computer vision, focusing on breadth rather than depth. To balance this approach, the article guides readers to consult instructive references and provides source code that can be run at any time. We start with the mechanisms of image formation. We cover pinholes, lenses, sensors (CCD and CMOS), Bayer filters, and color reconstruction.
Next, we turn to applications of computer vision, detecting lane lines in images. This method is based on a set of commonly used computer vision algorithms. We cover Canny edge detection, Gaussian blur, regions of interest, and Hough transform.
Overview of Imaging History
Photography is the projection of a 3D scene onto a 2D plane. The dark box achieves this projection through a pinhole. A small pinhole on the wall allows light to penetrate the dark camera chamber. This simple mechanism produces sharp projections, enabling artists to sketch details of the scene. However, this method lacks brightness, and the pinhole itself cannot gather enough light.
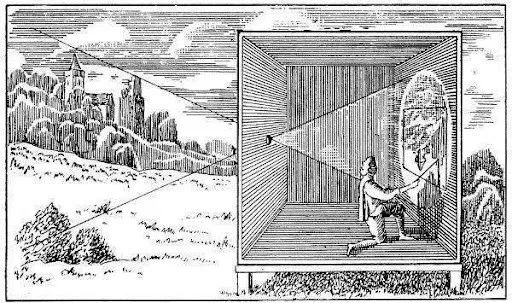
Pinhole cameras still attract widespread interest today, capable of capturing stunning images that can be used anywhere. The drawback remains the same: images are dark and require long exposure times.
To solve the problem of dim lighting, lenses were introduced. By placing a lens in front of the aperture, more light can be gathered. Lenses can also modify the magnification of the projected image. In the past, magnification required the artist to move the entire camera. Today, the magnification effect can be adjusted by moving the lens position without changing the distance between the scene and the image plane. Zoom is the process of moving the lens to change the magnification.
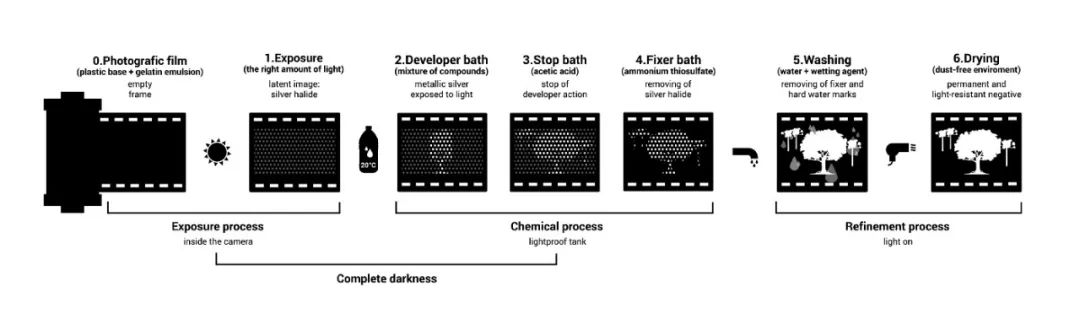
Even with lenses, capturing images still required a long time relying on artists painting over the projected image. In the 1830s, Louis Daguerre invented film, one of the most important inventions in the history of photography. This was the first time it was possible to record light on a physical level, without relying on artists, simply by pressing a button to capture a moment.
Film is coated with silver halide. Once exposed to light, silver halide transforms into metallic silver. The amount of conversion depends on the exposure of any specific point on the film. To produce an image, the film must then undergo chemical development.
The invention of silicon imaging detectors had an even greater impact than film. The same chip can be used to capture an unlimited number of images without the need for chemical photographic development. It is the technology used in digital cameras and in most of our smartphones today.
Image Sensors
In summary, photography involves projecting a 3D scene onto a 2D plane. The projection is achieved through an aperture, with lenses gathering more light and adjusting magnification. The 2D plane was initially a simple surface for artists to paint on. It later became the surface of silver halide film. Finally, it became the surface of silicon chips: image sensors.
To convert the received light into digital images, most image sensors rely on the properties of silicon atoms. When a photon with sufficient energy strikes a silicon atom, it releases an electron. On the silicon lattice (a pixel), the photon flux exposure generates an electron flux. This electron flux is then converted into voltage.
Charge-Coupled Device (CCD)
In this type of image sensor, the conversion from photons to electrons occurs in each pixel. There is a capacitor under each pixel that stores the released electrons. A circuit called “vertical CCD shift register” connects the capacitors of each column of pixels. This circuit allows electrons to be transferred vertically from one pixel to the pixel directly below it, until they reach the last row. The last row is connected by a horizontal CCD shift register, which sends the electrons to the analog-to-digital converter (ADC).
The vertical transfer of electrons in CCD is accomplished using the bucket-brigade method. This means that each row transfers its electrons to the next row before acquiring electrons from its preceding row. The horizontal transfer maintains row order, and when they move horizontally to the ADC, they are converted to voltages proportional to their electron charge.
Complementary Metal-Oxide-Semiconductor (CMOS)
CMOS implements image sensors differently. It does not transfer electrons from pixels to the ADC, but integrates voltage conversion at the pixel level.
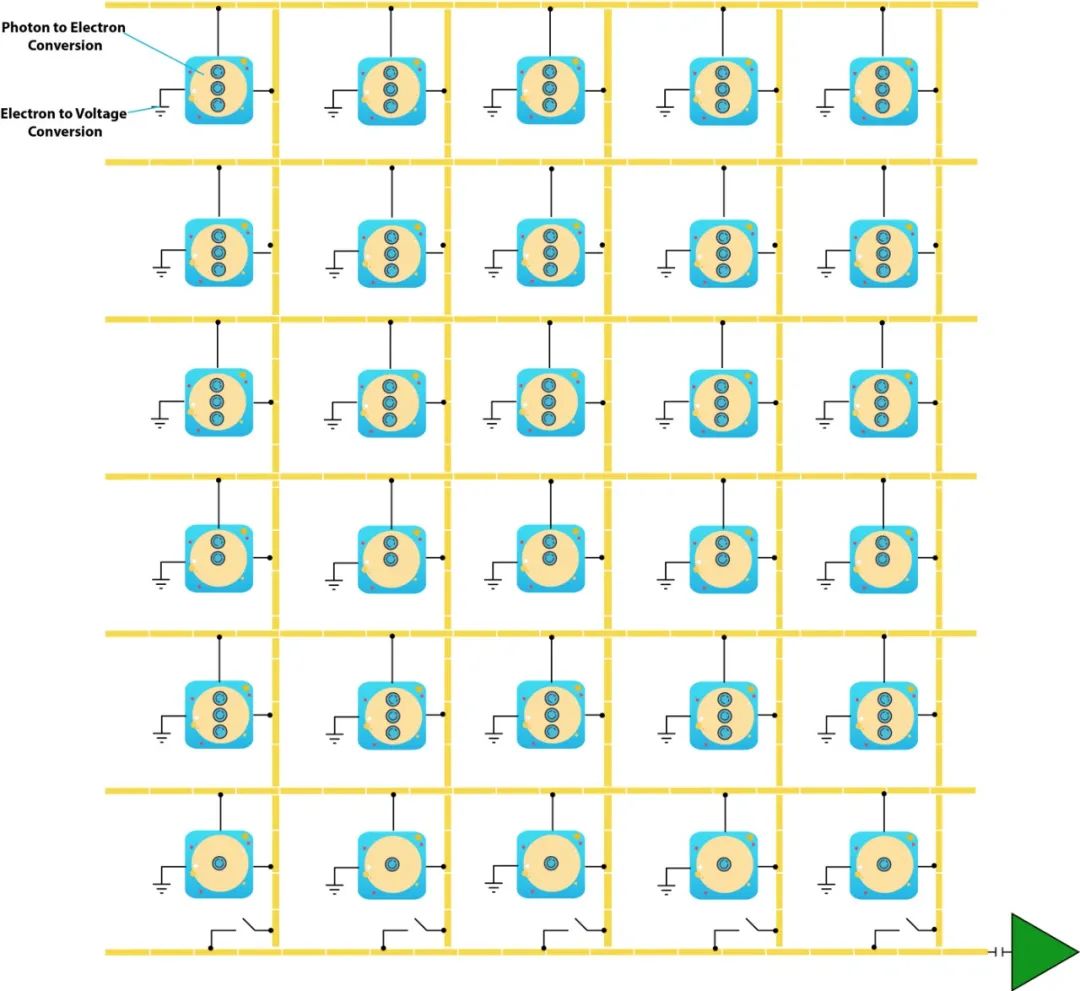
Using CMOS allows each pixel to be addressed individually to read its voltage. This provides more flexibility, as it can speed up the reading of specific regions of interest. This flexibility comes at the cost of smaller photosensitive areas since more components are integrated at the pixel level. To compensate for the reduced photosensitive area, micro-lenses are placed directly above each pixel. These micro-lenses focus light onto the photosensitive detectors.

Capturing Color
Pixels themselves can capture the intensity of light but cannot capture the wavelength of light. To capture color (wavelength), the most popular method is to overlay a Bayer filter array. In this method, each pixel is covered by a red, green, or blue filter.
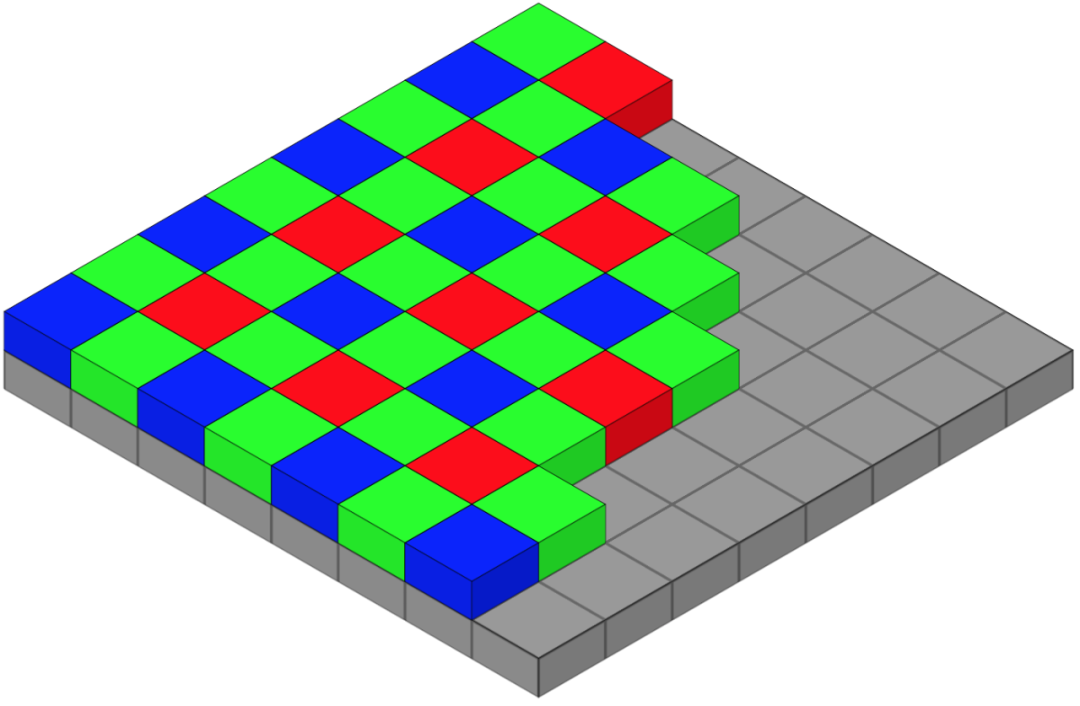
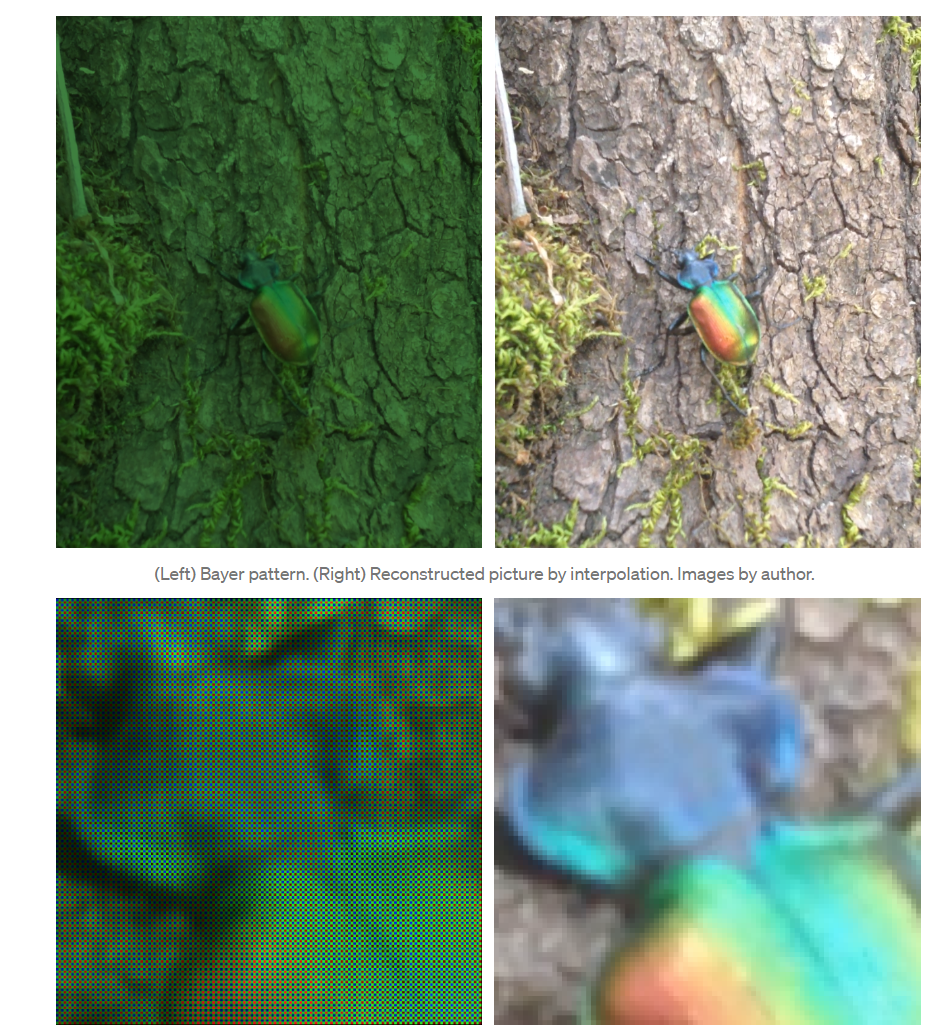
The human perception of nearly all colors can be generated by three wavelengths. Capturing the wavelengths of red, green, and blue is sufficient to reproduce the actual colors of the scene captured. However, the overlay of the Bayer pattern alone is insufficient. The image it produces looks like the one on the left:
The pixels in the left image are either red, green, or blue. Note that the image appears mostly green. The Bayer pattern simulates the fact that the human retina is most sensitive to green light during the day. Therefore, the filter is half green, a quarter red, and a quarter blue.
To convert the left image into the right image, we take the value of each pixel and combine it with the values of adjacent pixels. This process is called interpolation. Suppose we take a blue pixel from the left image. Interpolation involves mixing the blue value with the red and green values of adjacent pixels.
Computer Vision
The applications of image sensors have become fundamental components of our lives. They shape the way we express ourselves and communicate, opening interdisciplinary fields in science and art. Perhaps the most advanced of these fields is computer vision.
Studying computer vision must start with an appreciation of the hardware that makes it possible. We have briefly reviewed the history, advancements, and key components of the hardware. Let’s look at an exciting practical application that uses it.
Lane Detection in Autonomous Driving
Since May 2021, Tesla has begun delivering Model 3 and Model Y that no longer come with radar installed. These models rely on a camera-based autonomous driving system to provide the same functionality with the same safety ratings.
One of the active safety features of Tesla Vision is lane departure warning/avoidance. Being able to detect lane markings on the road while driving is crucial. We will study lane detection and implement it in two different ways. First, using computer vision algorithms, and secondly, using spatial convolutional neural networks.

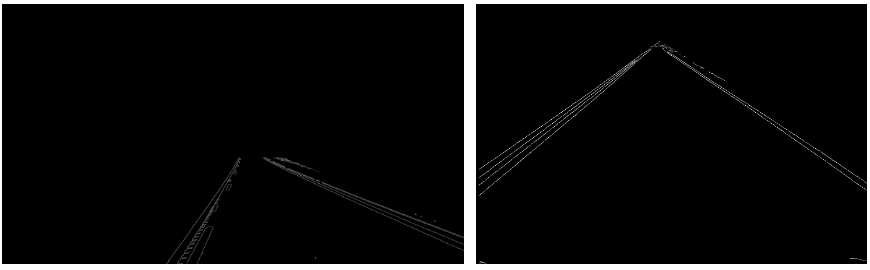
The first step is to detect the most prominent edges in the image. Areas with a significant contrast in brightness compared to adjacent pixels are marked as edges. The code below converts the image to grayscale, applies Gaussian blur to reduce noise, and uses the Canny edge detection algorithm.
def canny(image):
  gray = cv2.cvtColor(image, cv2.COLOR_RGB2GRAY)
  blur = cv2.GaussianBlur(gray, (5, 5), 0)
  canny = cv2.Canny(blur, 10, 30)
  return canny

These images are filled with information we do not need. We want to focus on the road ahead, so we will define a polygonal region to crop each image. The points defining the polygon are different for these two images. To find them, we can draw the image and display the width and height axes.
def region_of_interest(image):
    height = image.shape[0]
    width = image.shape[1]
    polygons = np.array([[(10,height), (width,height), (width,1100), (630, 670), (10, 1070)]])
    mask = np.zeros_like(image)
    cv2.fillPoly(mask, polygons, 255)
    masked_image = cv2.bitwise_and(image, mask)
    return masked_image

Observing the generated region of interest, the human eye can easily perceive lines. These lines are actually a series of pixels that are just points in the computer. We need to track the two main lines that best describe the arrangement of points. This is accomplished using the Hough transform algorithm.
lines = cv2.HoughLinesP(cropped_image, 2, np.pi/180, 100, np.array([]), minLineLength=40, maxLineGap=5)

This method seems to produce good results, but this implementation is far from optimal because:
-
We must clearly define the region of interest for each situation. It is impossible to apply the same polygon mask to crop the ROI due to perspective changes. -
Calculation time is too slow; driving requires a high processing speed. -
Turns include curved lanes; this method only includes straight lines.
Original article in English: https://towardsdatascience.com/computer-vision-sensors-systems-bdc079847316
Good news!
The Beginner's Guide to Vision knowledge community is now open to the public👇👇👇


Download 1: OpenCV-Contrib Extension Module Chinese Version Tutorial
Reply "Extension Module Chinese Tutorial" in the backend of the "Beginner's Guide to Vision" public account to download the first OpenCV extension module tutorial in Chinese on the internet, covering installation of extension modules, SFM algorithms, stereo vision, target tracking, biological vision, super-resolution processing, and more than twenty chapters.

Download 2: Python Vision Practical Projects 52 Lectures
Reply "Python Vision Practical Projects" in the backend of the "Beginner's Guide to Vision" public account to download 31 visual practical projects including image segmentation, mask detection, lane line detection, vehicle counting, eyeliner addition, license plate recognition, character recognition, emotion detection, text content extraction, and face recognition, to help quickly learn computer vision.

Download 3: OpenCV Practical Projects 20 Lectures
Reply "OpenCV Practical Projects 20 Lectures" in the backend of the "Beginner's Guide to Vision" public account to download 20 practical projects based on OpenCV to advance OpenCV learning.

Discussion Group

Welcome to join the public account reader group to exchange with peers. Currently, there are WeChat groups on SLAM, 3D vision, sensors, autonomous driving, computational photography, detection, segmentation, recognition, medical imaging, GAN, algorithm competitions, etc. (will gradually be subdivided in the future). Please scan the WeChat number below to join the group, and note: "nickname + school/company + research direction", for example: "Zhang San + Shanghai Jiao Tong University + Vision SLAM". Please follow the format; otherwise, you will not be approved. After successful addition, you will be invited to the relevant WeChat group based on your research direction. Please do not send advertisements in the group; otherwise, you will be removed. Thank you for your understanding~