
Click on the above“Beginner Learning Vision”, select to add “Star” or “Pin”
Heavyweight content delivered first time
Contents
Introduction
content
1. Project Introduction and Preface
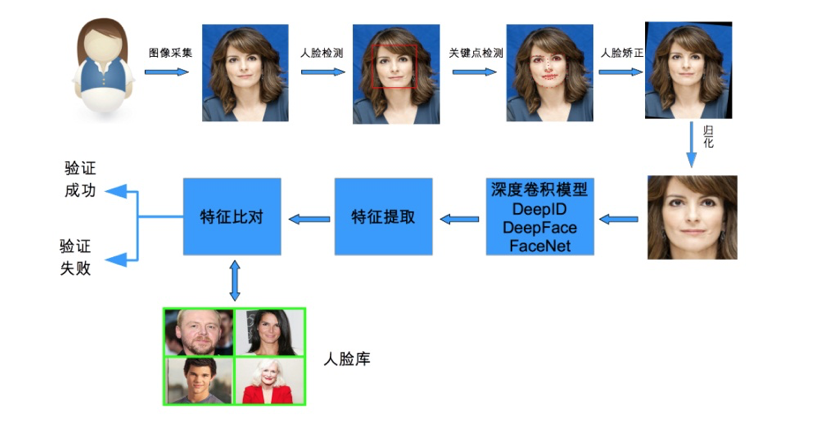
2. Recognition and Detection Methods
-
Methods in this article
-
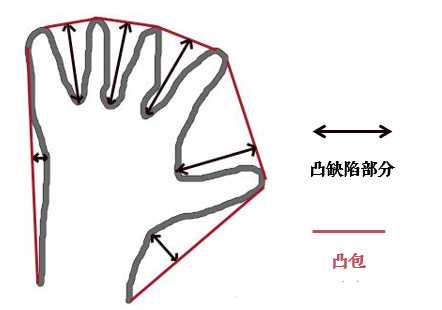
Project Analysis
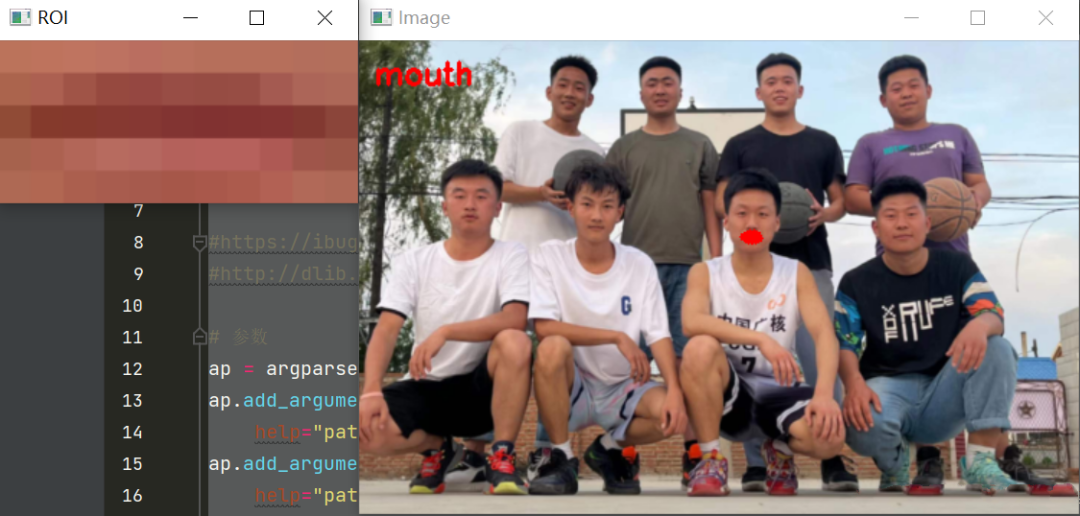
3. Complete Code and Effect Display


from collections import OrderedDict
import numpy as np
import argparse
import dlib
import cv2
ap = argparse.ArgumentParser()
ap.add_argument("-p", "--shape-predictor", required=True,  help="path to facial landmark predictor")
ap.add_argument("-i", "--image", required=True,  help="path to input image")
args = vars(ap.parse_args())
FACIAL_LANDMARKS_68_IDXS = OrderedDict([
  ("mouth", (48, 68)),
  ("right_eyebrow", (17, 22)),
  ("left_eyebrow", (22, 27)),
  ("right_eye", (36, 42)),
  ("left_eye", (42, 48)),
  ("nose", (27, 36)),
  ("jaw", (0, 17))
])
FACIAL_LANDMARKS_5_IDXS = OrderedDict([
  ("right_eye", (2, 3)),
  ("left_eye", (0, 1)),
  ("nose", (4))
])
detector = dlib.get_frontal_face_detector()
predictor = dlib.shape_predictor(args["shape_predictor"])
image = cv2.imread(args["image"])
(h, w) = image.shape[:2]
width=500
r = width / float(w)
dim = (width, int(h * r))
image = cv2.resize(image, dim, interpolation=cv2.INTER_AREA)
gray = cv2.cvtColor(image, cv2.COLOR_BGR2GRAY)
rects = detector(gray, 1)
for (i, rect) in enumerate(rects):  # Perform key point localization on the face frame
  # Convert to ndarray
  shape = predictor(gray, rect)
  shape = shape_to_np(shape)
def shape_to_np(shape, dtype="int"):
  # Create 68*2
  coords = np.zeros((shape.num_parts, 2), dtype=dtype)
  # Iterate through each key point
  # Get coordinates
  for i in range(0, shape.num_parts):
    coords[i] = (shape.part(i).x, shape.part(i).y)
  return coords
for (name, (i, j)) in FACIAL_LANDMARKS_68_IDXS.items():
    clone = image.copy()
    cv2.putText(clone, name, (10, 30), cv2.FONT_HERSHEY_SIMPLEX,
      0.7, (0, 0, 255), 2)
    # Draw points based on positions
    for (x, y) in shape[i:j]:
      cv2.circle(clone, (x, y), 3, (0, 0, 255), -1)
    # Extract ROI area
    (x, y, w, h) = cv2.boundingRect(np.array([shape[i:j]]))
    roi = image[y:y + h, x:x + w]
    (h, w) = roi.shape[:2]
    width=250
    r = width / float(w)
    dim = (width, int(h * r))
    roi = cv2.resize(roi, dim, interpolation=cv2.INTER_AREA)
    # Display each part
    cv2.imshow("ROI", roi)
    cv2.imshow("Image", clone)
    cv2.waitKey(0)
output = visualize_facial_landmarks(image, shape)
cv2.imshow("Image", output)
cv2.waitKey(0)
def visualize_facial_landmarks(image, shape, colors=None, alpha=0.75):
  # Create two copies
  # overlay and one for the final output image
  overlay = image.copy()
  output = image.copy()
  # Set some color areas
  if colors is None:
    colors = [(19, 199, 109), (79, 76, 240), (230, 159, 23),
      (168, 100, 168), (158, 163, 32),
      (163, 38, 32), (180, 42, 220)]
  # Iterate through each area
  for (i, name) in enumerate(FACIAL_LANDMARKS_68_IDXS.keys()):
    # Get the coordinates of each point
    (j, k) = FACIAL_LANDMARKS_68_IDXS[name]
    pts = shape[j:k]
    # Check position
    if name == "jaw":
      # Connect with lines
      for l in range(1, len(pts)):
        ptA = tuple(pts[l - 1])
        ptB = tuple(pts[l])
        cv2.line(overlay, ptA, ptB, colors[i], 2)
    # Calculate convex hull
    else:
      hull = cv2.convexHull(pts)
      cv2.drawContours(overlay, [hull], -1, colors[i], -1)
  # Overlay on the original image, can specify ratio
  cv2.addWeighted(overlay, alpha, output, 1 - alpha, 0, output)
  return output
from collections import OrderedDict
import numpy as np
import argparse
import dlib
import cv2
ap = argparse.ArgumentParser()
ap.add_argument("-p", "--shape-predictor", required=True,  help="path to facial landmark predictor")
ap.add_argument("-i", "--image", required=True,  help="path to input image")
args = vars(ap.parse_args())
FACIAL_LANDMARKS_68_IDXS = OrderedDict([
  ("mouth", (48, 68)),
  ("right_eyebrow", (17, 22)),
  ("left_eyebrow", (22, 27)),
  ("right_eye", (36, 42)),
  ("left_eye", (42, 48)),
  ("nose", (27, 36)),
  ("jaw", (0, 17))
])
FACIAL_LANDMARKS_5_IDXS = OrderedDict([
  ("right_eye", (2, 3)),
  ("left_eye", (0, 1)),
  ("nose", (4))
])
def shape_to_np(shape, dtype="int"):
  # Create 68*2
  coords = np.zeros((shape.num_parts, 2), dtype=dtype)
  # Iterate through each key point
  # Get coordinates
  for i in range(0, shape.num_parts):
    coords[i] = (shape.part(i).x, shape.part(i).y)
  return coords
def visualize_facial_landmarks(image, shape, colors=None, alpha=0.75):
  # Create two copies
  # overlay and one for the final output image
  overlay = image.copy()
  output = image.copy()
  # Set some color areas
  if colors is None:
    colors = [(19, 199, 109), (79, 76, 240), (230, 159, 23),
      (168, 100, 168), (158, 163, 32),
      (163, 38, 32), (180, 42, 220)]
  # Iterate through each area
  for (i, name) in enumerate(FACIAL_LANDMARKS_68_IDXS.keys()):
    # Get the coordinates of each point
    (j, k) = FACIAL_LANDMARKS_68_IDXS[name]
    pts = shape[j:k]
    # Check position
    if name == "jaw":
      # Connect with lines
      for l in range(1, len(pts)):
        ptA = tuple(pts[l - 1])
        ptB = tuple(pts[l])
        cv2.line(overlay, ptA, ptB, colors[i], 2)
    # Calculate convex hull
    else:
      hull = cv2.convexHull(pts)
      cv2.drawContours(overlay, [hull], -1, colors[i], -1)
  # Overlay on the original image, can specify ratio
  cv2.addWeighted(overlay, alpha, output, 1 - alpha, 0, output)
  return output
# Load face detection and key point localization
detector = dlib.get_frontal_face_detector()
predictor = dlib.shape_predictor(args["shape_predictor"])
# Read input data, preprocess
image = cv2.imread(args["image"])
(h, w) = image.shape[:2]
width=500
r = width / float(w)
dim = (width, int(h * r))
image = cv2.resize(image, dim, interpolation=cv2.INTER_AREA)
gray = cv2.cvtColor(image, cv2.COLOR_BGR2GRAY)
# Face detection
rects = detector(gray, 1)
# Iterate through the detected boxes
for (i, rect) in enumerate(rects):  # Perform key point localization on the face frame
  # Convert to ndarray
  shape = predictor(gray, rect)
  shape = shape_to_np(shape)
  # Iterate through each part
  for (name, (i, j)) in FACIAL_LANDMARKS_68_IDXS.items():
    clone = image.copy()
    cv2.putText(clone, name, (10, 30), cv2.FONT_HERSHEY_SIMPLEX,
      0.7, (0, 0, 255), 2)
    # Draw points based on positions
    for (x, y) in shape[i:j]:
      cv2.circle(clone, (x, y), 3, (0, 0, 255), -1)
    # Extract ROI area
    (x, y, w, h) = cv2.boundingRect(np.array([shape[i:j]]))
    roi = image[y:y + h, x:x + w]
    (h, w) = roi.shape[:2]
    width=250
    r = width / float(w)
    dim = (width, int(h * r))
    roi = cv2.resize(roi, dim, interpolation=cv2.INTER_AREA)
    # Display each part
    cv2.imshow("ROI", roi)
    cv2.imshow("Image", clone)
    cv2.waitKey(0)
  # Display all areas
  output = visualize_facial_landmarks(image, shape)
  cv2.imshow("Image", output)
  cv2.waitKey(0)
This article is for academic sharing only. If there is any infringement, please contact to delete the article.
Good news!
The Beginner Learning Vision Knowledge Planet is now open to the public 👇👇👇


Download 1: OpenCV-Contrib Extension Module Chinese Version Tutorial
Reply "Extension Module Chinese Tutorial" in the background of the "Beginner Learning Vision" public account to download the first OpenCV extension module tutorial in Chinese, covering over twenty chapters including extension module installation, SFM algorithms, stereo vision, object tracking, biological vision, super-resolution processing, etc.

Download 2: Python Vision Practical Project 52 Lectures
Reply "Python Vision Practical Project" in the background of the "Beginner Learning Vision" public account to download 31 practical vision projects including image segmentation, mask detection, lane line detection, vehicle counting, eyeliner addition, license plate recognition, character recognition, emotion detection, text content extraction, and face recognition to help quickly learn computer vision.

Download 3: OpenCV Practical Project 20 Lectures
Reply "OpenCV Practical Project 20 Lectures" in the background of the "Beginner Learning Vision" public account to download 20 practical projects based on OpenCV to achieve advanced learning of OpenCV.

Group Chat

Welcome to join the reader group of the public account to communicate with peers. Currently, there are WeChat groups for SLAM, 3D vision, sensors, autonomous driving, computational photography, detection, segmentation, recognition, medical imaging, GAN, algorithm competitions, etc. (will gradually be subdivided later). Please scan the WeChat ID below to join the group, and note: "Nickname + School/Company + Research Direction", for example: "Zhang San + Shanghai Jiao Tong University + Vision SLAM". Please follow the format for notes, otherwise, you will not be approved. After successful addition, you will be invited to the relevant WeChat group based on your research direction. Please do not send advertisements in the group, otherwise, you will be asked to leave the group. Thank you for your understanding~