Click on the above“Beginner’s Vision Learning” to selectStar or “Top”
Important content delivered at the first time
Recently, in a research project, I started to understand the importance of image augmentation techniques. The goal of the project is to train a robust generative model capable of reconstructing the original image. The problem being addressed is anomaly detection, which is quite challenging due to the small amount of data and the model’s inability to accomplish all tasks alone.
A common scenario is to train a network model using normal images available for training and evaluate its performance on a test set containing both normal and anomalous images.
The initial hypothesis is that the generative model should capture the normal distribution well, but it should not be able to reconstruct anomalous samples. How do we validate this hypothesis? We can observe the reconstruction error; the reconstruction error for anomalous images should be higher, while the reconstruction error for normal samples should be lower.
In this article, we will list the best data augmentation techniques to increase the size and diversity of images in the dataset. The main goal is to improve the performance and generalization ability of the model.
We will explore simple transformations like rotation, cropping, and Gaussian blur, as well as more complex techniques such as Gaussian noise and random blocks.
Image Augmentation Techniques:
1. Simple Transformations
-
Resize
-
Grayscale
-
Normalization
-
Random Rotation
-
Center Crop
-
Random Crop
-
Gaussian Blur
2. More Advanced Techniques
-
Gaussian Noise
-
Random Blocks
-
Center Region
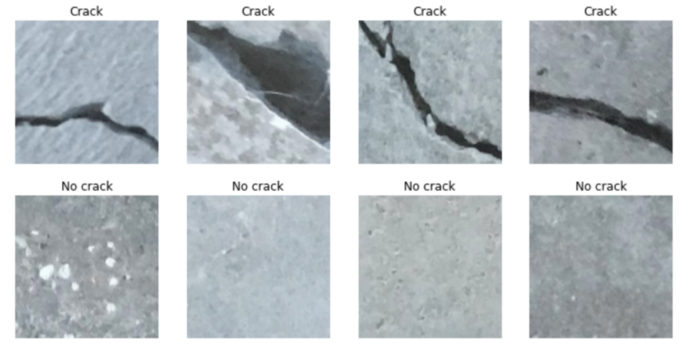
1. Introduction to Surface Crack Dataset
In this tutorial, we will use the surface crack detection dataset. You can download the dataset here or on Kaggle:
https://data.mendeley.com/datasets/5y9wdsg2zt/2
As inferred from the name, it provides images of surfaces with and without cracks. Thus, it can serve as a dataset for anomaly detection tasks, where the anomalous class is represented by images with cracks, and the normal class is represented by surfaces without cracks.
The dataset contains 4000 color images of defective and non-defective surfaces. Both classes have training and testing sets. Additionally, each dataset image is captured at a resolution of 227×227 pixels.
2. Simple Transformations
This section includes different transformation modules available in torchvision. Before delving deeper, we import the modules from the training dataset and an image without defects.
from PIL import Image
from pathlib import Path
import matplotlib.pyplot as plt
import numpy as np
import sys
import torch
import numpy as np
import torchvision.transforms as T

plt.rcParams["savefig.bbox"] = 'tight'
orig_img = Image.open(Path('../input/surface-crack-detection/Negative/00026.jpg'))
torch.manual_seed(0)
data_path = '../input/surface-crack-detection/'
diz_class = {'Positive':'Crack','Negative':'No crack'}
Let’s display the dimensions of the image:
np.asarray(orig_img).shape #(227, 227, 3)
This means we have a 227×227 image with 3 channels.
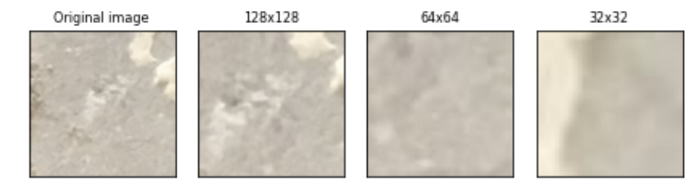
Resize
Since the image has a high height and width, it is necessary to reduce the dimensions before passing it to the neural network. For example, we can resize the 227×227 image to 32×32 and 128×128 images.
resized_imgs = [T.Resize(size=size)(orig_img) for size in [32,128]]
plot(resized_imgs,col_title=["32x32","128x128"])
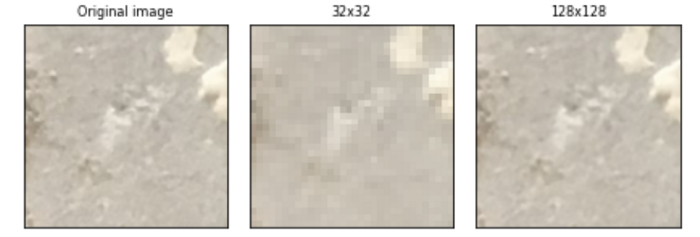
It is worth noting that when we obtain a 32×32 image, we lose resolution, while the 128×128 size seems to maintain high resolution of the samples.
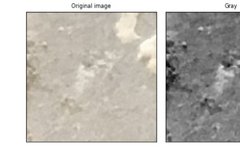
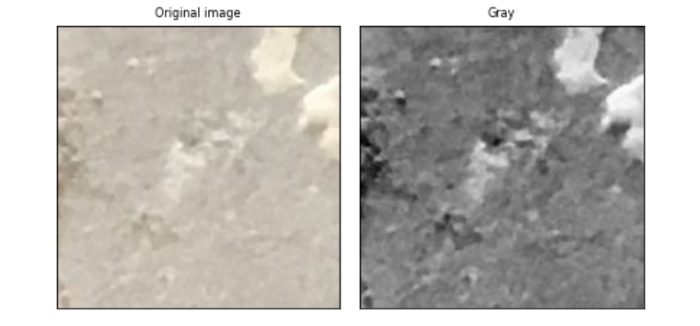
Grayscale
RGB images can be difficult to manage. Therefore, converting images to grayscale can be useful:
gray_img = T.Grayscale()(orig_img)
plot([gray_img], cmap='gray', col_title=["Gray"])
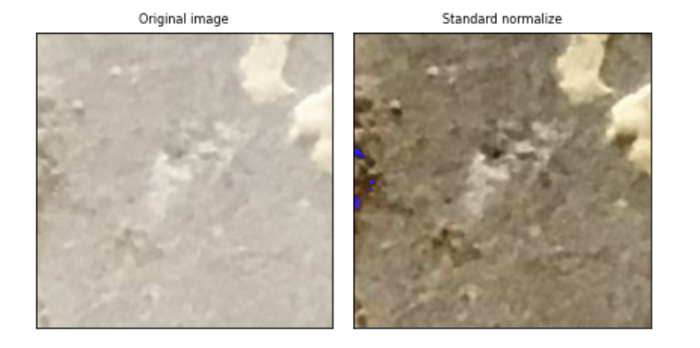
Normalization
Normalization is an effective method to speed up the computation of models based on neural network architectures and accelerate the learning process. Normalizing the image involves two steps:
-
We subtract the channel mean from each input channel
-
Later, we divide it by the channel standard deviation.
We can display the original image and its normalized version:
normalized_img = T.Normalize(mean=(0.5, 0.5, 0.5), std=(0.5, 0.5, 0.5))(T.ToTensor()(orig_img))
normalized_img = [T.ToPILImage()(normalized_img)]
plot(normalized_img, col_title=["Standard normalize"])
Random Rotation
The random rotation method rotates the image at random angles.
rotated_imgs = [T.RandomRotation(degrees=d)(orig_img) for d in range(50,151,50)]
plot(rotated_imgs, col_title=["Rotation 50","Rotation 100","Rotation 150"])

Center Crop
We use the T.CenterCrop method to crop the center part of the image, where we need to specify the crop size.
center_crops = [T.CenterCrop(size=size)(orig_img) for size in (128,64, 32)]
plot(center_crops,col_title=['128x128','64x64','32x32'])

This transformation is very useful when there is a large background in the image’s boundaries, which is not needed for the classification task.
Random Crop
Instead of cropping the center part of the image, we randomly crop a portion of the image using the T.RandomCrop method, which takes the output size of the crop as a parameter.
random_crops = [T.RandomCrop(size=size)(orig_img) for size in (832,704, 256)]
plot(random_crops,col_title=['832x832','704x704','256x256'])
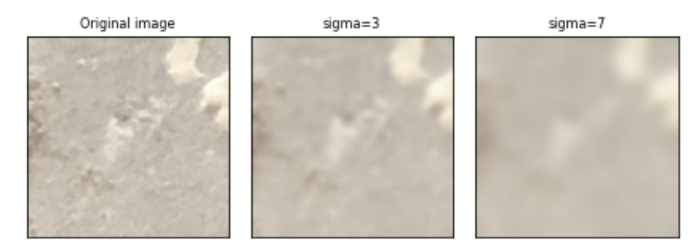
Gaussian Blur
We apply Gaussian blur transformation to the image using a Gaussian kernel. This method helps reduce the sharpness and clarity of the image, making the neural network more robust in learning patterns from the samples.
blurred_imgs = [T.GaussianBlur(kernel_size=(51, 91), sigma=sigma)(orig_img) for sigma in (3,7)]
plot(blurred_imgs)
3. More Advanced Techniques
The simple transformation examples provided by PyTorch have been demonstrated. Now, we will focus on more complex techniques implemented from scratch.
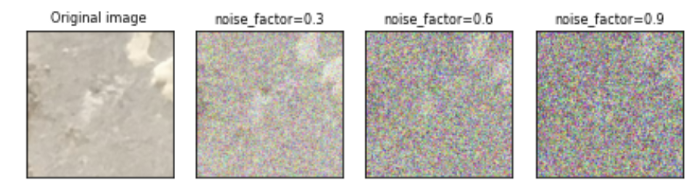
Gaussian Noise
Gaussian noise is a common method for adding noise to the entire dataset, forcing the model to learn the most important information contained in the data.
It involves injecting a Gaussian noise matrix, which is a matrix of random values drawn from a Gaussian distribution. Later, we will clip the samples between 0 and 1. The higher the noise factor, the greater the noise in the image.
def add_noise(inputs,noise_factor=0.3):
     noisy = inputs+torch.randn_like(inputs) * noise_factor
     noisy = torch.clip(noisy,0.,1.)
     return noisy

noise_imgs = [add_noise(T.ToTensor()(orig_img),noise_factor) for noise_factor in (0.3,0.6,0.9)]
noise_imgs = [T.ToPILImage()(noise_img) for noise_img in noise_imgs]
plot(noise_imgs, col_title=["noise_factor=0.3","noise_factor=0.6","noise_factor=0.9"])
Random Blocks
Square patches are randomly applied to the image. The more patches there are, the more difficult it becomes for the neural network to solve the problem.
def add_random_boxes(img,n_k,size=32):
    h,w = size,size
    img = np.asarray(img)
    img_size = img.shape[1]
    boxes = []
    for k in range(n_k):
        y,x = np.random.randint(0,img_size-w,(2,))
        img[y:y+h,x:x+w] = 0
        boxes.append((x,y,h,w))
    img = Image.fromarray(img.astype('uint8'), 'RGB')
    return img

blocks_imgs = [add_random_boxes(orig_img,n_k=i) for i in (10,20)]
plot(blocks_imgs,col_title=["10 black boxes","20 black boxes"])

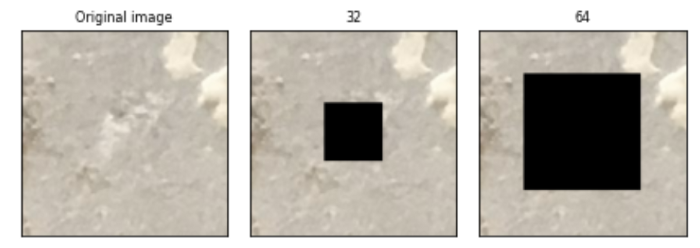
Center Region
This is a very simple method to make the model more generalized. It involves adding a patch block in the central region of the image.
def add_central_region(img,size=32):
    h,w = size,size
    img = np.asarray(img)
    img_size = img.shape[1]
    img[int(img_size/2-h):int(img_size/2+h),int(img_size/2-w):int(img_size/2+w)] = 0
    img = Image.fromarray(img.astype('uint8'), 'RGB')
    return img

central_imgs = [add_central_region(orig_img,size=s) for s in (32,64)]
plot(central_imgs,col_title=["32","64"])
Final Thoughts:
I hope you find this tutorial useful. The aim is to provide an overview of image augmentation methods based on neural networks to address the generalization issues of models. The code is available on GitHub:
https://github.com/eugeniaring/Medium-Articles/blob/main/Anomaly%20Detection/image-augmentation-on-crack-images.ipynb
Thank you for reading!
Good News!
Beginner’s Vision Learning Knowledge Planet
Is now open to the public👇👇👇
Download 1: OpenCV-Contrib Extension Module Chinese Version Tutorial

Reply with: Extension Module Chinese Tutorial in the background of "Beginner's Vision Learning" public account to download the first OpenCV extension module tutorial in Chinese on the internet, covering more than twenty chapters including extension module installation, SFM algorithm, stereo vision, object tracking, biological vision, super-resolution processing, etc.

Download 2: Python Vision Practical Projects 52 Lectures

Reply with: Python Vision Practical Projects in the background of "Beginner's Vision Learning" public account to download 31 visual practical projects including image segmentation, mask detection, lane line detection, vehicle counting, eyeliner addition, license plate recognition, character recognition, emotion detection, text content extraction, facial recognition, etc., to assist in quickly learning computer vision.

Download 3: OpenCV Practical Projects 20 Lectures

Reply with: OpenCV Practical Projects 20 Lectures in the background of "Beginner's Vision Learning" public account to download 20 practical projects based on OpenCV for advanced learning of OpenCV.

Group Chat

Welcome to join the reader group of the public account to communicate with peers. Currently, there are WeChat groups for SLAM, 3D vision, sensors, autonomous driving, computational photography, detection, segmentation, recognition, medical imaging, GAN, algorithm competitions, etc. (these will be gradually subdivided). Please scan the WeChat ID below to join the group, noting: "Nickname + School/Company + Research Direction", for example: "Zhang San + Shanghai Jiao Tong University + Vision SLAM". Please follow the format for remarks, otherwise, it will not be approved. After successful addition, invitations will be sent to enter relevant WeChat groups based on research direction. Please do not send advertisements in the group, otherwise, you will be removed from the group. Thank you for your understanding~
Good News!
Beginner’s Vision Learning Knowledge Planet
Is now open to the public👇👇👇
Download 1: OpenCV-Contrib Extension Module Chinese Version Tutorial
Reply with: Extension Module Chinese Tutorial in the background of "Beginner's Vision Learning" public account to download the first OpenCV extension module tutorial in Chinese on the internet, covering more than twenty chapters including extension module installation, SFM algorithm, stereo vision, object tracking, biological vision, super-resolution processing, etc.
Download 2: Python Vision Practical Projects 52 Lectures
Reply with: Python Vision Practical Projects in the background of "Beginner's Vision Learning" public account to download 31 visual practical projects including image segmentation, mask detection, lane line detection, vehicle counting, eyeliner addition, license plate recognition, character recognition, emotion detection, text content extraction, facial recognition, etc., to assist in quickly learning computer vision.
Download 3: OpenCV Practical Projects 20 Lectures
Reply with: OpenCV Practical Projects 20 Lectures in the background of "Beginner's Vision Learning" public account to download 20 practical projects based on OpenCV for advanced learning of OpenCV.
Group Chat
Welcome to join the reader group of the public account to communicate with peers. Currently, there are WeChat groups for SLAM, 3D vision, sensors, autonomous driving, computational photography, detection, segmentation, recognition, medical imaging, GAN, algorithm competitions, etc. (these will be gradually subdivided). Please scan the WeChat ID below to join the group, noting: "Nickname + School/Company + Research Direction", for example: "Zhang San + Shanghai Jiao Tong University + Vision SLAM". Please follow the format for remarks, otherwise, it will not be approved. After successful addition, invitations will be sent to enter relevant WeChat groups based on research direction. Please do not send advertisements in the group, otherwise, you will be removed from the group. Thank you for your understanding~