Follow “Deep Learning Natural Language Processing” to learn and grow together!
Bookmark us to get more valuable content first-hand.
-
Overview of CNN Framework -
Convolution Layer -
Pooling Layer -
Implementation of Convolution and Pooling Layers -
CNN Implementation -
Introduction to CNN Visualization


-
The fully connected layer “ignores” the shape of the data, flattening 3D data into 1D; the shape contains important spatial information: ① Spatially adjacent pixels have similar values, while pixels far apart are unrelated; ② The RGB channels have close correlations; ③ The 3D shape may hide essential patterns worth extracting.
-
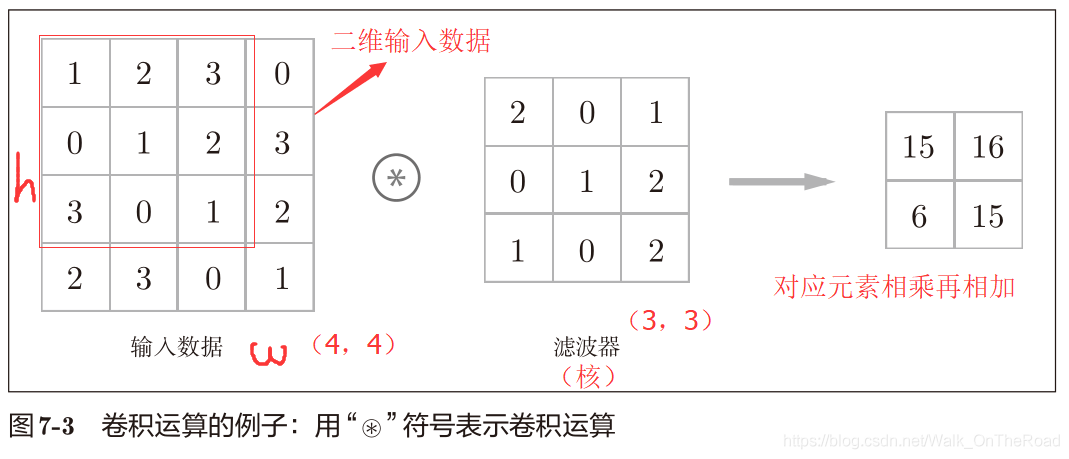
The convolution layer can maintain the shape. It can correctly interpret data such as images that have shapes.

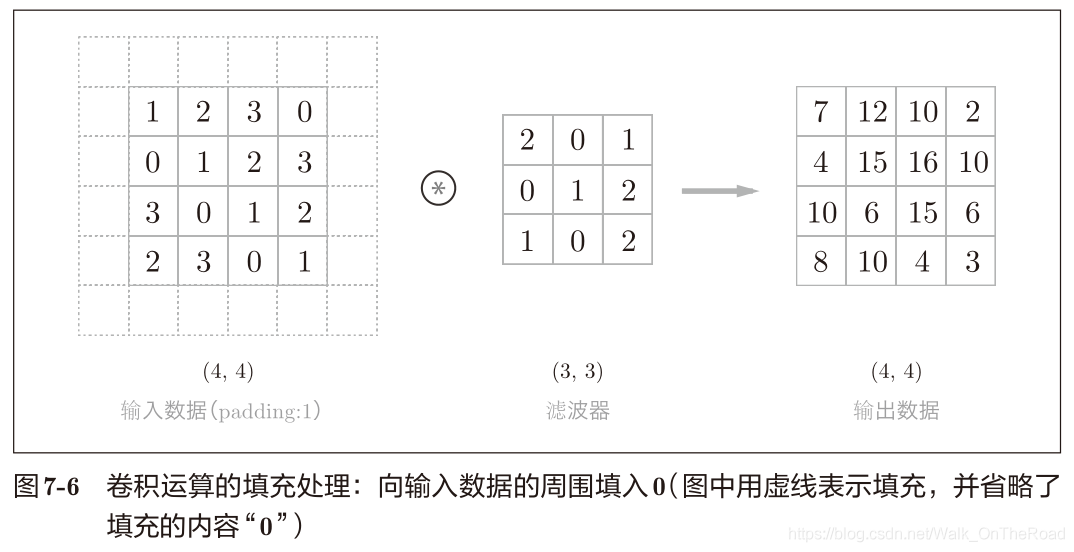
The input feature map is multiplied and accumulated with the convolution kernel, sliding the window with a certain stride to obtain the output feature map, and a bias can also be added (1*1).



-
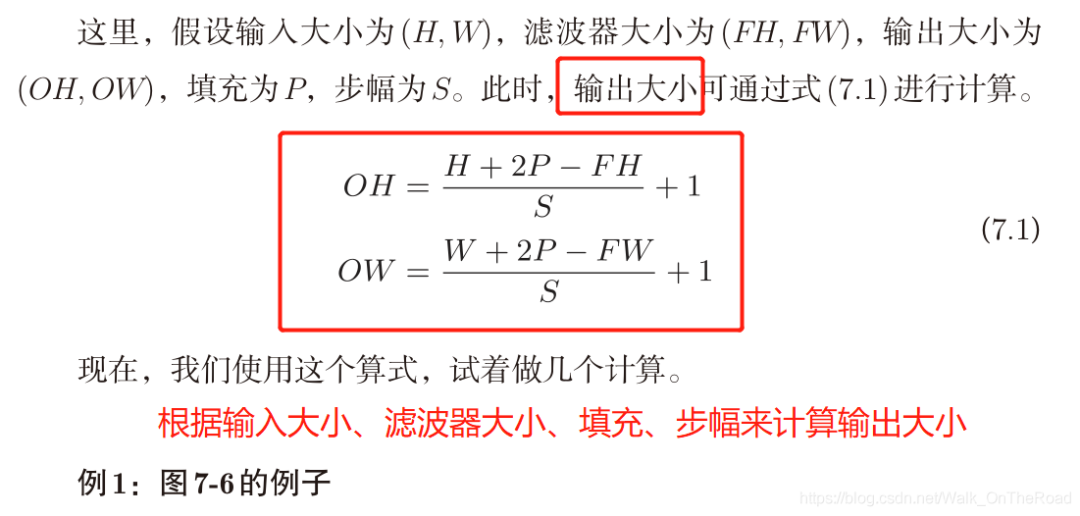
(OH,OW) output size
-
(H,W) input size
-
(FH,FW) filter size
-
P padding
-
S stride

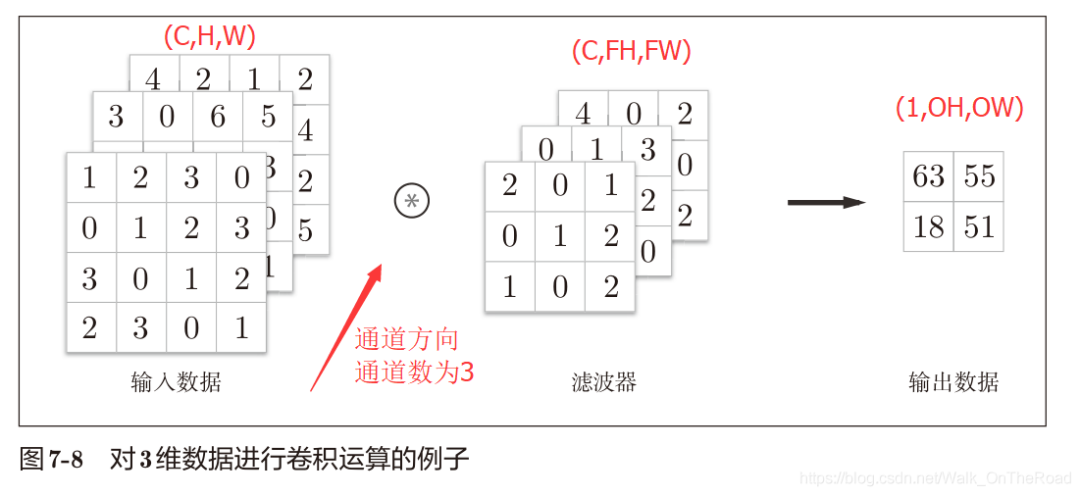
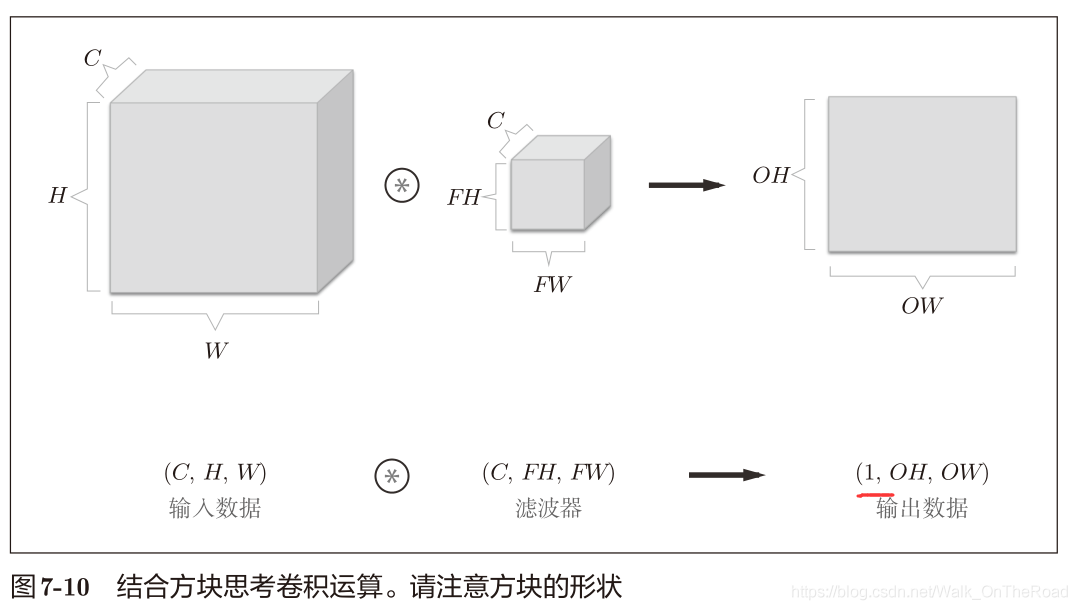
-
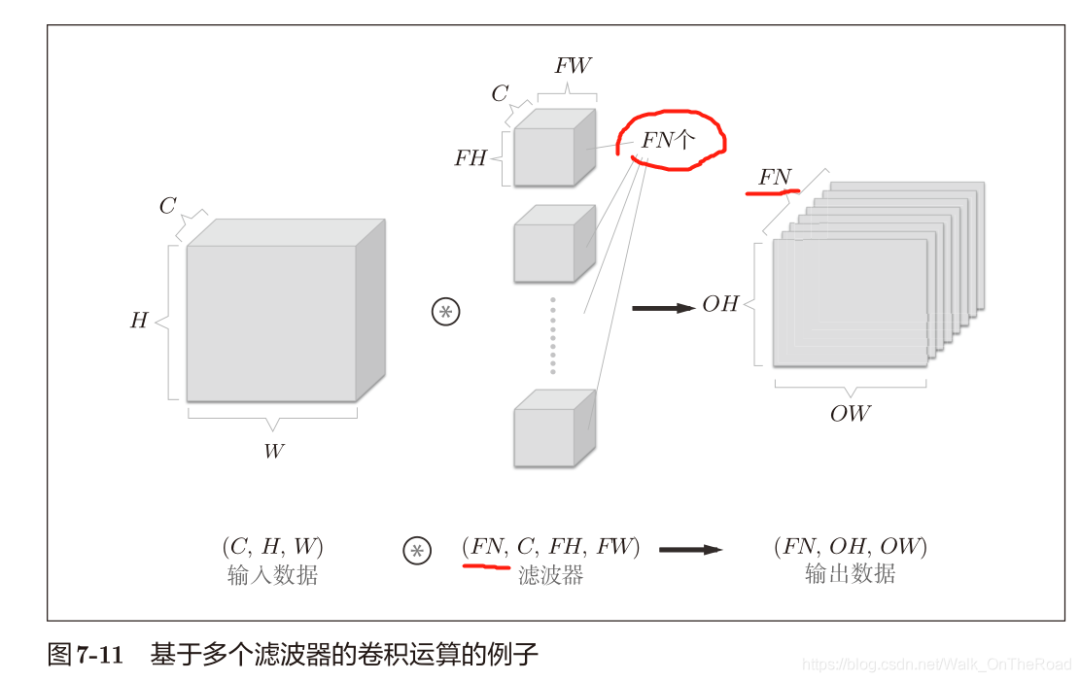
By applying multiple filters (weights), e.g., FN filters. As shown in the figure below.

-
Purpose: to achieve efficient data processing, packaging N data together for processing. This combines N processes into one.
3D -> 4D, i.e., (C,H,W) -> (N,C,H,W)
-
Purpose: to reduce the spatial computation in the H and W directions. For example, compressing a 2 × 2 area into one element for processing, reducing spatial size.
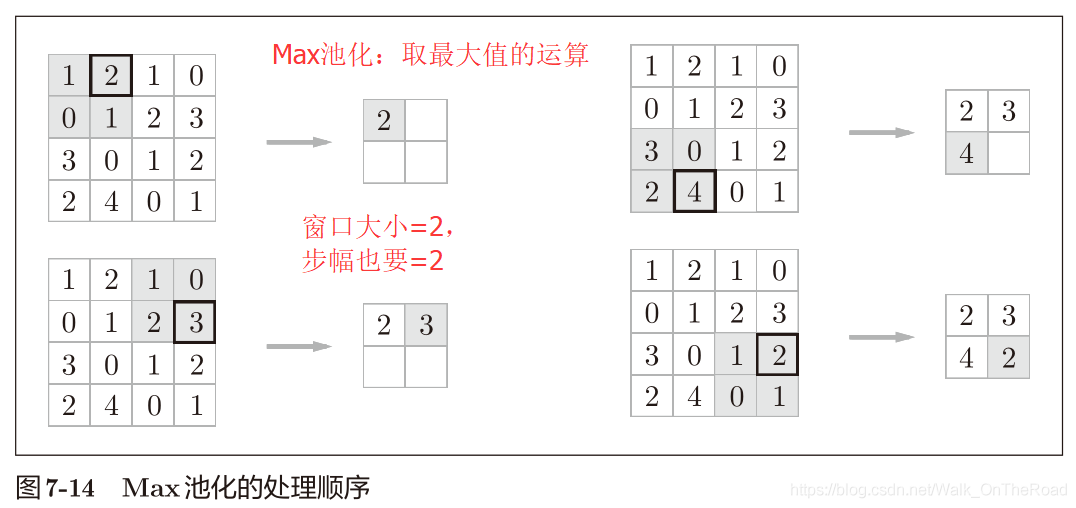
-
No parameters to learn;
-
The number of channels does not change; if 3 inputs are given, the output will also be 3;
-
Robustness to small positional changes (robust), i.e., when the input data undergoes slight deviations, pooling can still return the same result; pooling can absorb deviations in the input data.

For example: randomly generate a 4D data (10, 1, 28, 28) with 10 channels, each of height and length 28.
>>> x = np.random.rand(10, 1, 28, 28) # Randomly generate 10 channels of height and length 28 data
>>> x.shape(10, 1, 28, 28)
>>> x[0].shape # (1, 28, 28) x[0]: first data (first block)
>>> x[1].shape # (1, 28, 28) x[1]: second data
>>> x[0, 0] # or x[0][0] First data's first channel
>>> x[1, 0] # or x[1][0] Second data's first channel
-
Problem: Implementing convolution requires repeating several for loops, which is cumbersome, and accessing elements with NumPy is best not done using for (slow).
-
Solution: Use the im2col function (image to column): expand the input data to fit the filter (weights).
Convert 4D data to 2D data.
(N,C,H,W), i.e., (batch size, channel count, height, width).
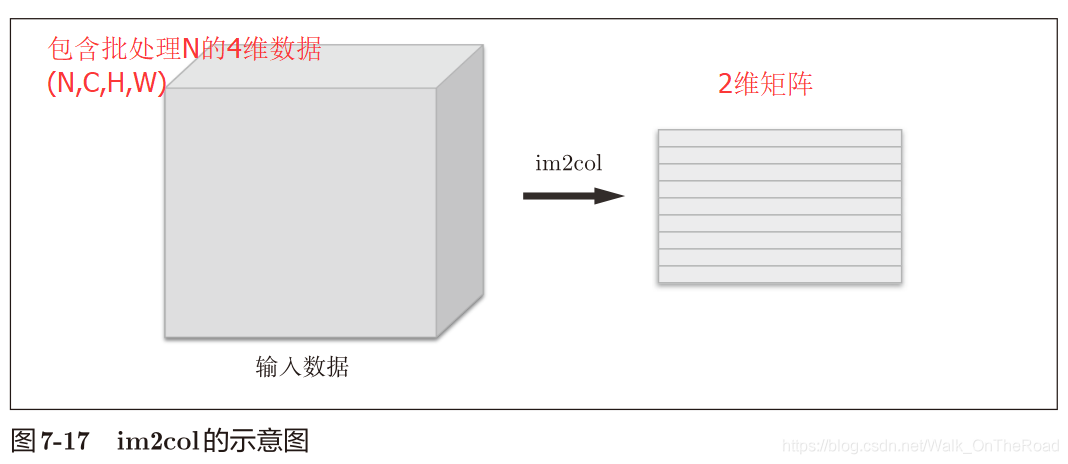
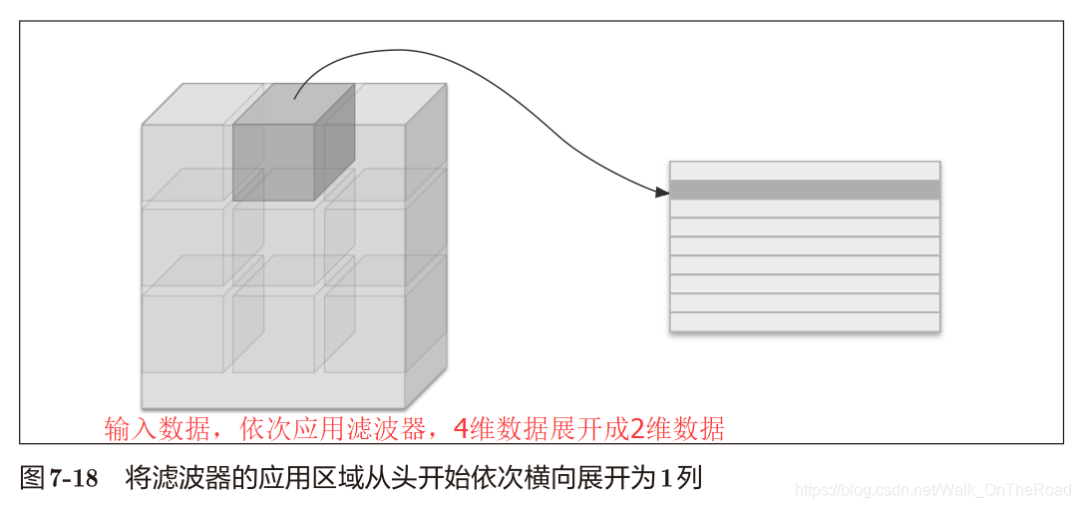
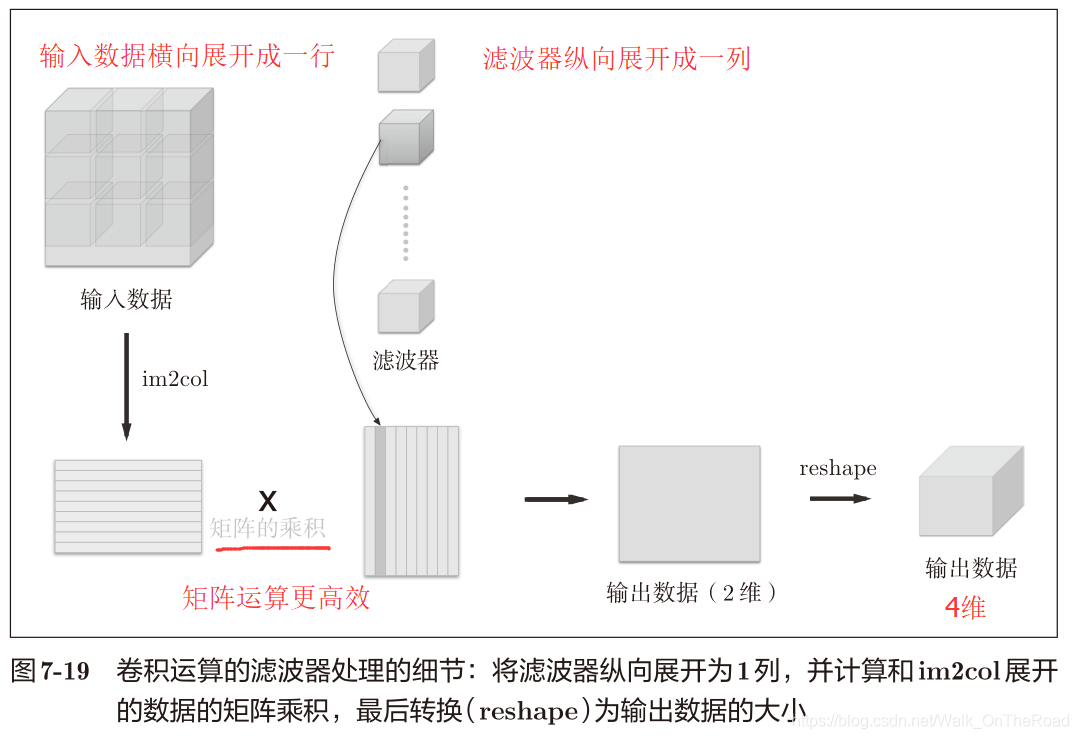

The im2col function: converts 4D input data to 2D.
x input 4D -> 2D matrix.
W filter 4D -> 2D matrix.
Matrix product X*W + b -> output 2D —(reshape)—> output 4D.
im2col (input_data, filter_h, filter_w, stride=1, pad=0)Code implementation for convolution layer forward pass
import sys, os
sys.path.append(os.pardir)
from common.util import im2col
x1 = np.random.rand(1, 3, 7, 7) # Batch size of 1, channel of 3 for 7 × 7 data
col1 = im2col(x1, 5, 5, stride=1, pad=0)
print(col1.shape) # (9, 75)
x2 = np.random.rand(10, 3, 7, 7) # Batch size of 10, channel of 3 for 7 × 7 data
col2 = im2col(x2, 5, 5, stride=1, pad=0)
print(col2.shape) # (90, 75)
# Convolution layer class
class Convolution:
    def __init__(self, W, b, stride=1, pad=0):
        self.W = W
        self.b = b
        self.stride = stride
        self.pad = pad
    # Forward pass
    def forward(self, x):
        FN, C, FH, FW = self.W.shape
        N, C, H, W = x.shape
        out_h = int(1 + (H + 2*self.pad - FH) / self.stride)
        out_w = int(1 + (W + 2*self.pad - FW) / self.stride)
        col = im2col(x, FH, FW, self.stride, self.pad)
        col_W = self.W.reshape(FN, -1).T # Flatten the filter
        out = np.dot(col, col_W) + self.b
        out = out.reshape(N, out_h, out_w, -1).transpose(0, 3, 1, 2)
        return out
    # Backward pass in common/layer.py must perform the inverse of im2col -> col2im (matrix to image)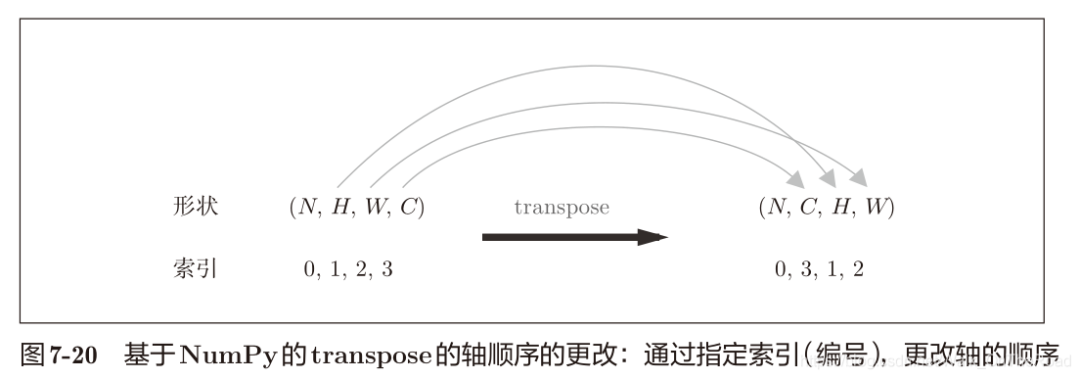

Using the im2col function.
Independently expand along the channel direction, while pooling adds the values of each channel together.
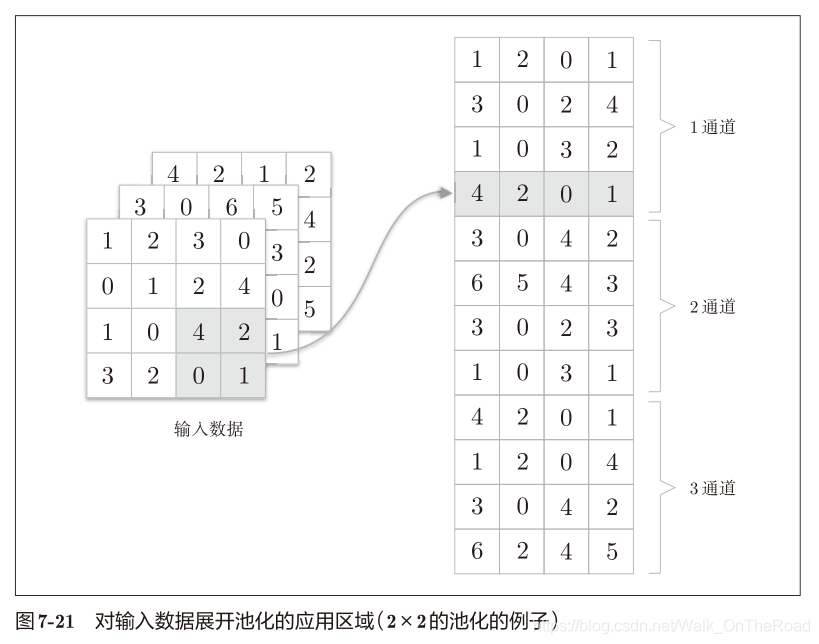
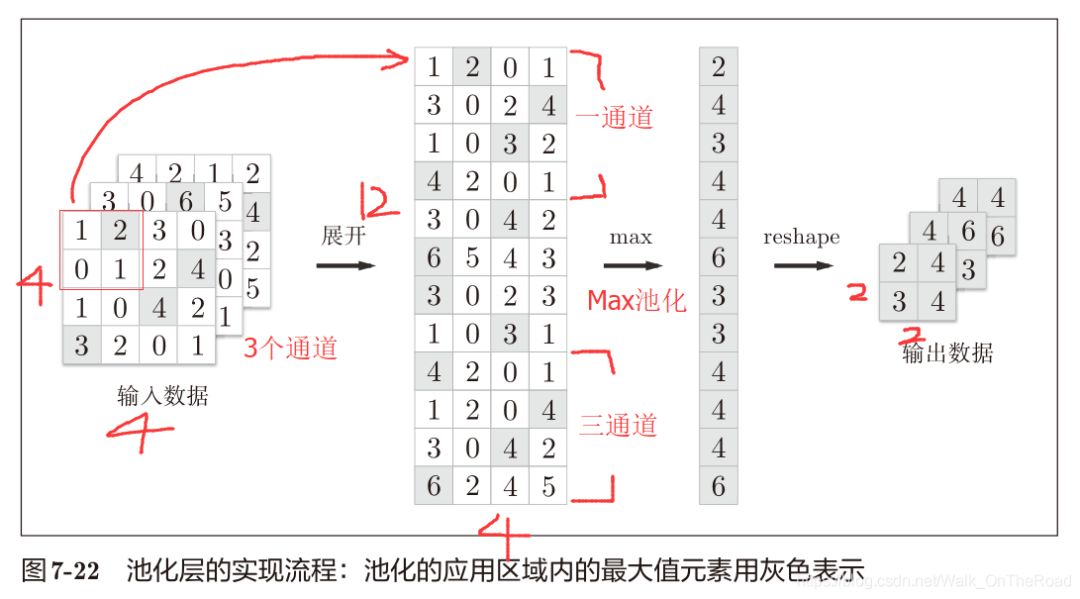
Code implementation for pooling layer forward pass
class Pooling:
    def __init__(self, pool_h, pool_w, stride=1, pad=0):
        self.pool_h = pool_h
        self.pool_w = pool_w
        self.stride = stride
        self.pad = pad
    def forward(self, x):
        N, C, H, W = x.shape
        # Calculate output size
        out_h = int(1 + (H - self.pool_h) / self.stride)
        out_w = int(1 + (W - self.pool_w) / self.stride)
        # Expand (1)    1. Expand input data
        col = im2col(x, self.pool_h, self.pool_w, self.stride, self.pad)
        col = col.reshape(-1, self.pool_h*self.pool_w)
        # Max value (2)  2. Get max value of each row
        out = np.max(col, axis=1)
        # Convert (3)    3. Convert to suitable output size
        out = out.reshape(N, out_h, out_w, C).transpose(0, 3, 1, 2)
        return out
The implementation of the pooling layer proceeds in three stages:
-
Expand input data.
-
Get the maximum value of each row.
-
Convert to suitable output size.
class SimpleConvNet:
    """Simple ConvNet
    conv - relu - pool - affine - relu - affine - softmax
        Parameters
    ----------
    input_size : Input size (784 for MNIST, three-dimensional (1, 28, 28))
    hidden_size_list : List of the number of neurons in hidden layers (e.g., [100, 100, 100])
    output_size : Output size (10 for MNIST, ten possible outputs)
    activation : 'relu' or 'sigmoid'
    weight_init_std : Specify the standard deviation of weights (e.g., 0.01)
        When specified as 'relu' or 'he', set 'He initialization'
        When specified as 'sigmoid' or 'xavier', set 'Xavier initialization'
    """
    def __init__(self, input_dim=(1, 28, 28),
                  conv_param={'filter_num':30, 'filter_size':5, 'pad':0, 'stride':1},
                 hidden_size=100, output_size=10, weight_init_std=0.01): # 30 filters of size 5*5
        # Extract filter parameters from conv_param dictionary for later use
        filter_num = conv_param['filter_num']
        filter_size = conv_param['filter_size']
        filter_pad = conv_param['pad']
        filter_stride = conv_param['stride']
        input_size = input_dim[1]  # 28
        conv_output_size = (input_size - filter_size + 2*filter_pad) / filter_stride + 1
        pool_output_size = int(filter_num * (conv_output_size/2) * (conv_output_size/2)) # Pooling layer output, H, W halved
        # Initialize weights for three layers
        self.params = {}
        # The filter is the weight W1 = (30,1,5,5) (4D data), i.e., 30 filters of height and width 5, channel count 1.
        self.params['W1'] = weight_init_std * \
                            np.random.randn(filter_num, input_dim[0], filter_size, filter_size)
        # Each filter has a bias b1, with 30 biases
        self.params['b1'] = np.zeros(filter_num)
        self.params['W2'] = weight_init_std * \
                            np.random.randn(pool_output_size, hidden_size)
        self.params['b2'] = np.zeros(hidden_size)
        self.params['W3'] = weight_init_std * \
                            np.random.randn(hidden_size, output_size)
        self.params['b3'] = np.zeros(output_size)
        # Create layers for calling
        self.layers = OrderedDict() # Ordered dictionary
        self.layers['Conv1'] = Convolution(self.params['W1'], self.params['b1'],
                                           conv_param['stride'], conv_param['pad'])
        self.layers['Relu1'] = Relu()
        self.layers['Pool1'] = Pooling(pool_h=2, pool_w=2, stride=2)
        self.layers['Affine1'] = Affine(self.params['W2'], self.params['b2'])
        self.layers['Relu2'] = Relu()
        self.layers['Affine2'] = Affine(self.params['W3'], self.params['b3'])
        self.last_layer = SoftmaxWithLoss()
    # Forward pass, sequentially calling layers and passing results to the next layer
    def predict(self, x):
        for layer in self.layers.values():
            x = layer.forward(x)
        return x
    # In addition to using predict, also perform forward until reaching the last SoftmaxWithLoss layer
    def loss(self, x, t):
        """Calculate loss function
        Parameters
        ----------
        x : Input data
        t : Teacher labels
        """
        y = self.predict(x)
        return self.last_layer.forward(y, t)
    def accuracy(self, x, t, batch_size=100):
        if t.ndim != 1 : t = np.argmax(t, axis=1)
        acc = 0.0
        for i in range(int(x.shape[0] / batch_size)):
            tx = x[i*batch_size:(i+1)*batch_size]
            tt = t[i*batch_size:(i+1)*batch_size]
            y = self.predict(tx)
            y = np.argmax(y, axis=1)
            acc += np.sum(y == tt)
        return acc / x.shape[0]
    def numerical_gradient(self, x, t):
        """Calculate gradient (numerical differentiation)
        Parameters
        ----------
        x : Input data
        t : Teacher labels
        Returns
        -------
        A dictionary variable containing gradients for each layer
            grads['W1'], grads['W2'], ... are the weights for each layer
            grads['b1'], grads['b2'], ... are the biases for each layer
        """
        loss_w = lambda w: self.loss(x, t)
        grads = {}
        for idx in (1, 2, 3):
            grads['W' + str(idx)] = numerical_gradient(loss_w, self.params['W' + str(idx)])
            grads['b' + str(idx)] = numerical_gradient(loss_w, self.params['b' + str(idx)])
        return grads
    # Call backward for each layer and store gradient parameters in grads dictionary
    def gradient(self, x, t):
        """Calculate gradient (backpropagation) (choose one)
        Parameters
        ----------
        x : Input data
        t : Teacher labels
        Returns
        -------
        A dictionary variable containing gradients for each layer
            grads['W1'], grads['W2'], ... are the weights for each layer
            grads['b1'], grads['b2'], ... are the biases for each layer
        """
        # forward
        self.loss(x, t)
        # backward
        dout = 1
        dout = self.last_layer.backward(dout)
        layers = list(self.layers.values())
        layers.reverse()
        for layer in layers:
            dout = layer.backward(dout)
        # Set
        grads = {}
        grads['W1'], grads['b1'] = self.layers['Conv1'].dW, self.layers['Conv1'].db
        grads['W2'], grads['b2'] = self.layers['Affine1'].dW, self.layers['Affine1'].db
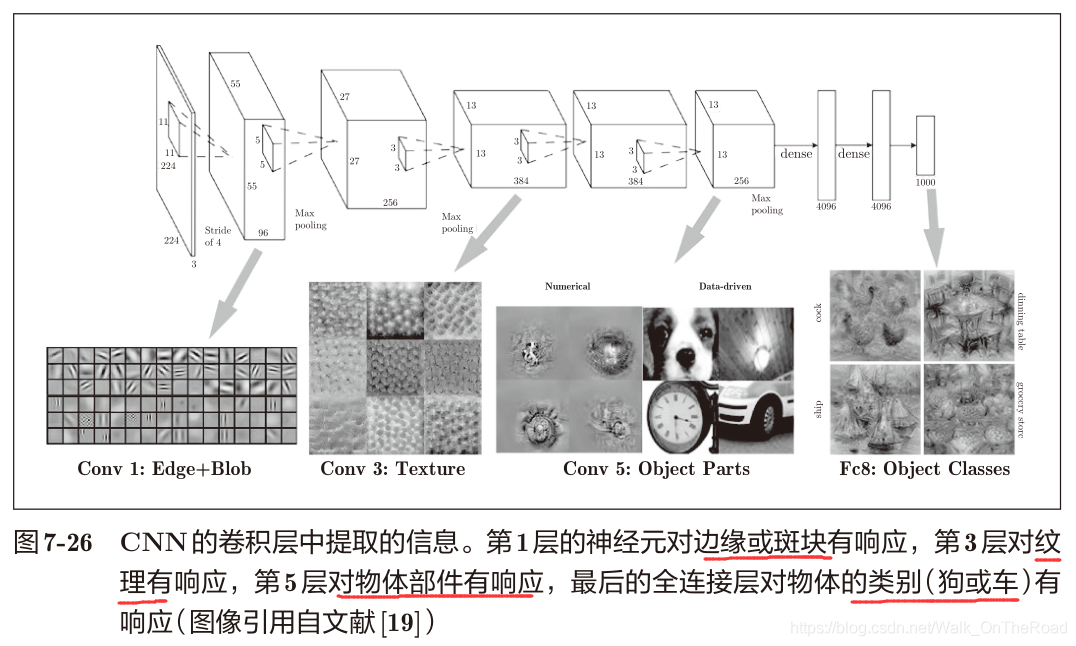
grads['W3'], grads['b3'] = self.layers['Affine2'].dW, self.layers['Affine2'].dbThe filters will extract raw information such as edges or patches. As the layers deepen, the extracted information becomes increasingly complex.
-
Extracted information becomes more complex:
Edges -> Textures -> Object Parts -> Classification
In 1998, the ancestor of CNN: LeNet -> for example, handwritten digit recognition.
In 2012: Deep Learning AlexNet.
They both stack multiple convolution and pooling layers, finally outputting through fully connected layers.
LeNet:
-
Activation function uses sigmoid (currently mainly using ReLU).
-
Data is reduced through subsampling (currently mainly using Max pooling).
AlexNet:
-
Activation function uses ReLU.
-
Uses LRN layer (local response normalization) for local regularization.
-
Uses dropout.
说个正事哈


由于微信平台算法改版,公号内容将不再以时间排序展示,如果大家想第一时间看到我们的推送,强烈建议星标我们和给我们多点点【在看】。星标具体步骤为:
(1)点击页面最上方“深度学习自然语言处理”,进入公众号主页。
(2)点击右上角的小点点,在弹出页面点击“设为星标”,就可以啦。

感谢支持,比心。


投稿或交流学习,备注:昵称-学校(公司)-方向,进入DL&NLP交流群。


方向有很多:机器学习、深度学习,python,情感分析、意见挖掘、句法分析、机器翻译、人机对话、知识图谱、语音识别等。


记得备注呦


推荐两个专辑给大家:
专辑 | 李宏毅人类语言处理2020笔记
专辑 | NLP论文解读
