Author: Adrian Rosebrock
Translator: Zhang Yiran
Proofreader: wwl
This article is about3700 words, recommended reading time8 minutes.
In this article, you will learn how to use siamese networks and the deep learning libraries Keras / TensorFlow to compare the similarity of two images (and whether they belong to the same or different classes).
This blog post is the third part of our trilogy series on the basics of siamese networks:
Part 1: Building Image Pairs for Siamese Networks with Python (Post from two weeks ago)(https://www.pyimagesearch.com/2020/11/23/building-image-pairs-for-siamese-networks-with-python/)
Part 2: Training Siamese Networks with Keras, TensorFlow, and Deep Learning (Tutorial from last week)(https://www.pyimagesearch.com/2020/11/30/siamese-networks-with-keras-tensorflow-and-deep-learning/)
Part 3: Comparing Images Using Siamese Networks (This tutorial)
Last week we learned how to train a siamese network. Our model performed well on the test set and correctly verified whether two images belong to the same category. After training, we serialized the model to disk.
Shortly after the tutorial was published, I received an email from PyImageSearch reader Scott, who asked:
“Hi, Adrian – thanks for providing the guide on siamese networks. I’ve heard of them in the deep learning field, but honestly, I didn’t know how they worked or what they could do. This series has really helped me clear my doubts and even helped me with one of my work projects.
How can we use the trained siamese network to make predictions on images outside of the training and testing sets?
Of course, Scott. That’s exactly what we’re going to discuss today.
To understand how to compare images using siamese networks, please continue reading.
Comparing Image Similarity Using Siamese Networks, Keras, and TensorFlow
In the first part of this article, we will discuss the basic process of using a trained siamese network to predict the similarity of two images, more specifically, predicting whether two input images belong to the same class.
Then, you will learn how to set up the development environment for siamese networks using Keras and TensorFlow.
Once your development environment is set up, we will review the project directory structure and then implement a Python script that uses siamese networks to compare image similarity.
Finally, we will summarize the discussion results in this tutorial.
How Siamese Networks Predict the Similarity of Two Images

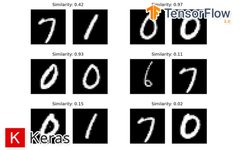
Figure 1: Comparing two images using siamese networks yields a similarity score. The closer the score is to “1”, the more similar the images are (thus more likely to belong to the same category). Conversely, the closer the score is to “0”, the less similar the two images are.
In last week’s tutorial, you learned how to train a siamese network to verify whether two pairs of digits belong to the same category or different categories and serialized the trained siamese model to disk.
Then the question becomes:
“How do we use our trained siamese network to predict the similarity between two images?”
The answer is that we utilize the last layer of the siamese network, which is the Sigmoid activation function.
The output range of the Sigmoid activation function is [0, 1], which means that when we input image pairs into the siamese network, the model’s output value is between 0 and 1.
A value of 0 indicates that the two images are completely different, while a value of 1 indicates that the two images are very similar.
An example of this similarity can be seen in Figure 1 earlier in this section:
-
Comparing “7” with “0” yields a similarity score of only 0.02.
-
However, comparing “0” with another “0” yields a very high similarity score of 0.93.
-
Typically, a similarity cutoff value of 0.5 (50%) is used as a threshold:
-
If the image similarity between two images is less than or equal to 0.5, they belong to different categories.
-
Conversely, if the predicted similarity of the image pair is greater than 0.5, they belong to the same class.
In this way, you can use siamese networks to (1) compare image similarity, and (2) determine whether images belong to the same category.
Practical use cases for siamese networks include:
-
Face recognition: Given two independent images containing faces, determine if the person in the two photos is the same person.
-
Signature verification: When two signatures appear, determine if one of them is a forgery.
-
Prescription drug identification: Given two prescription drugs, determine if they are the same drug or different drugs.
Setting Up Your Development Environment
This series of tutorials on siamese networks utilizes Keras and TensorFlow. If you plan to continue learning this tutorial or the previous two parts of this series, it is recommended that you take some time to set up your deep learning development environment.
You can refer to either of the following methods to install TensorFlow and Keras on your system
These two tutorials can help you set up the necessary software for this blog in a convenient python virtual environment
Having Trouble Setting Up Your Development Environment?
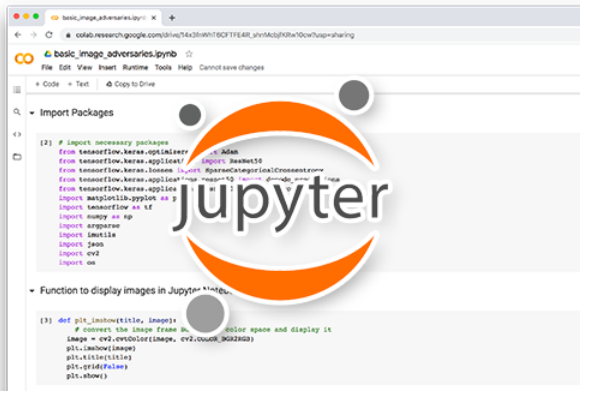
Figure 2: Having trouble setting up your development environment? Want to access a preconfigured Jupyter notebook on Google Colab? Be sure to join PyImageSearch Plus, and you will be up and running with this tutorial in minutes.
-
Short on time?
-
Using a domain-joined computer at your company to learn? Want to skip the hassle of command lines, package managers, and virtual environments?
-
Ready to run code on your Windows, macOS, and Linux systems right now?
Then, join PyImageSearch Plus today!(https://www.pyimagesearch.com/pyimagesearch-plus/)
You can access the Jupyter Notebook for this tutorial and other predefined PyImageSearch guides that can run directly in the Google Colab ecosystem! No installation required.
Most importantly, these Jupyter Notebooks will run on Windows, macOS, and Linux!
Before diving into this tutorial, let’s take a moment to check our project directory structure.
First, make sure to download the source code and example images from the “Download” section of this tutorial.
Let’s take a look at the project:
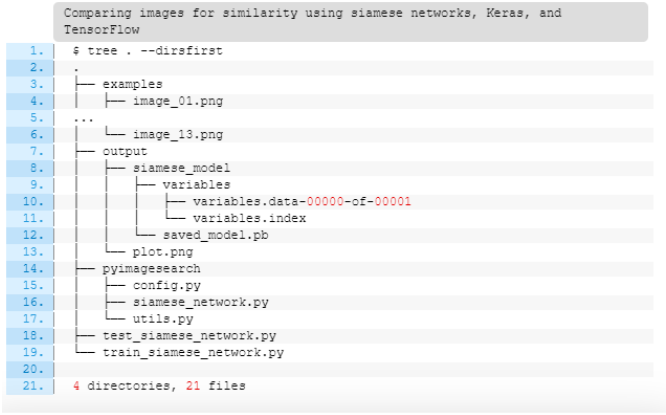
In the examples directory, we have many example digits
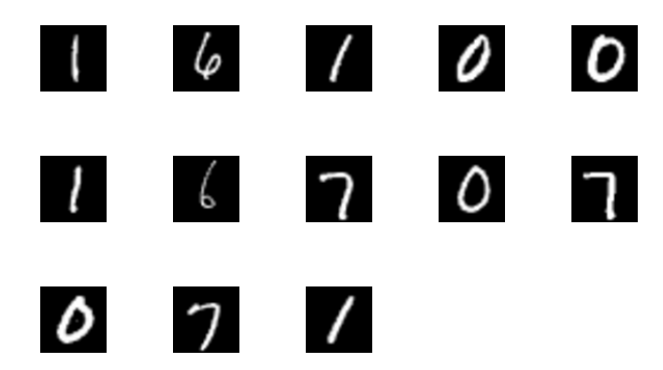
Figure 3: Example digits that we will use to compare the similarity of digits using the siamese network implemented with Keras and TensorFlow.
We will sample these digit pairs and then use our siamese network to compare their similarity.
The output directory contains the training history plot (plot.png) and our trained/serialized siamese network model (siamese_model/). Both files were generated in last week’s tutorial on training a custom siamese network model (https://www.pyimagesearch.com/2020/11/30/siamese-networks-with-keras-tensorflow-and-deep-learning/) – please make sure you read that tutorial before continuing, as it is necessary for today!
The pyimagesearch module contains three Python files:
1. Config.py: Configuration file that stores important variables such as output file paths and training configurations (including image input size, batch size, number of epochs, etc.)
2. Siamese_network.py: Our implementation of the siamese network architecture
3. Utils.py: Contains helper functions to generate image pairs, compute Euclidean distance, and plot training history
The train_siamese_network.py script contains:
1. Importing configuration, siamese network implementation, and utility functions
2. Loading the MNIST dataset from disk
3. Generating image pairs
4. Creating training/testing datasets
5. Training the siamese network
6. Serializing the trained siamese network to disk
Today, I will not cover these four scripts again, as last week’s tutorial on training the siamese network already introduced these four scripts. For completeness, I have included these files in today’s tutorial project directory structure, but to review what these files do and how they work, please refer to last week’s tutorial.
Finally, we will focus on today’s tutorial, test_siamese_network.py.
1. Load our trained siamese network model from disk
2. Get the paths of sample digit images from the examples directory
3. Randomly generate image pairs from these samples
4. Compare the similarity of the image pairs using the siamese network
Implementing Our Siamese Network Image Similarity Script
Now that we are ready to implement the siamese network using Keras and TensorFlow to obtain image similarity.
First, ensure you have downloaded the source code, example images, and pre-trained siamese network model from the “Download” section of this tutorial.
Open test_siamese_network.py and follow these steps:
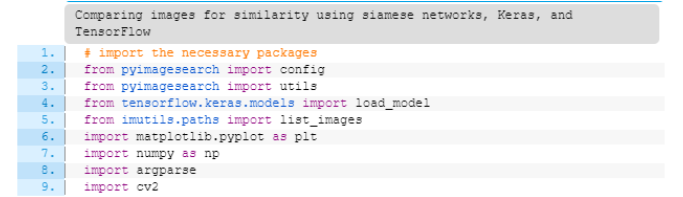
We first import the required Python packages (lines 2-9). Notable imports include:
-
config: Contains important configurations, including the path to the trained/serialized siamese network model on disk
-
utils: Contains the euclidean_distance function used in the siamese network Lambda layer – we need to import this package to suppress any user warnings related to loading the Lambda layer from disk
-
load_model: Keras/TensorFlow function used to load the trained siamese network from disk
-
list_images: Gets the paths of all images in the examples directory
Let’s continue to analyze the parameters of the statements:
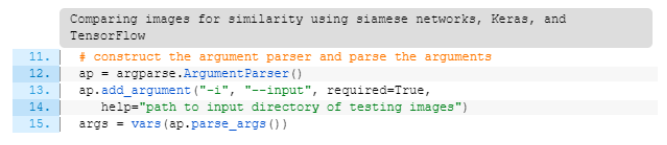
We only need one parameter here — input, which is the address of the image directory on disk whose similarity we want to compare. When running this script, we will provide the path to the examples directory as input here.
After parsing the command line parameters, we can now get all testImagePaths in the –input directory:
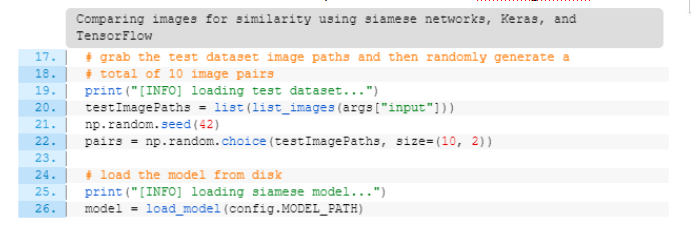
Line 20 gets the paths of all our example images, which contain the digits to compare for similarity. Line 22 randomly generates a total of 10 pairs of images from these testImagePaths.
Line 26 uses the load_model function to load our siamese network from disk.
With the siamese network loaded from disk, we can now compare the similarity of the images:
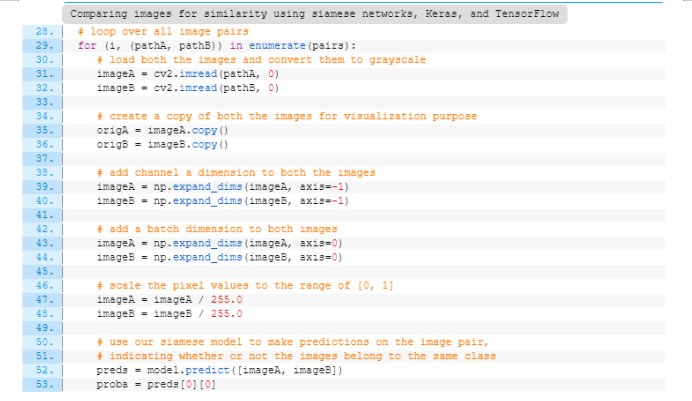
Line 29 loops through all image pairs, and for each pair of images, we
1. Load the two images from disk (lines 31, 32)
2. Copy the two images for later plotting/visualization (lines 35, 36)
3. Add a channel dimension along the batch dimension (lines 43, 44)
4. Scale pixel values from [0, 255] to [0, 1], just like we did when training the siamese network last week (lines 47, 48)(https://www.pyimagesearch.com/2020/11/30/siamese-networks-with-keras-tensorflow-and-deep-learning/)
Once imageA and imageB are processed, we call the .predict() method of the siamese network model (line 52) to compare their similarity, obtaining the probability/similarity score of the two images (line 53)
The final step is to display the two images along with their corresponding similarity score on the screen

Lines 56 and 57 create a matplotlib figure for the image pair, with the similarity score as the figure title.
Lines 60-67 plot the two images, and line 70 outputs the display to the screen.
Congratulations on implementing the siamese network to compare images and calculate similarity! In the next section, we will see the results of our hard work.
Results of Image Similarity Using Siamese Networks with Keras and TensorFlow
Now, we are ready to compare the similarity of images using our siamese network!
Before we check the results, please ensure you:
1. Have read our previous tutorial on training the siamese network (https://www.pyimagesearch.com/2020/11/30/siamese-networks-with-keras-tensorflow-and-deep-learning/) so that you understand how to train and generate our siamese network model
2. Have downloaded the source code, pre-trained siamese network, and example images from the “Download” section of this tutorial
Open a terminal and execute the following command:

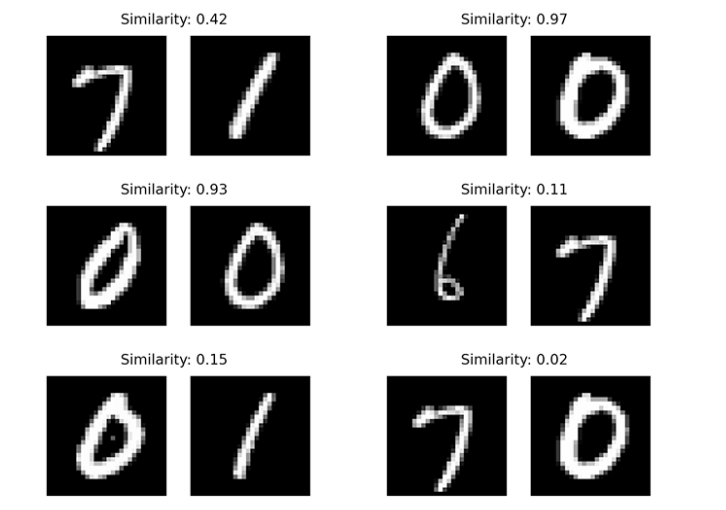
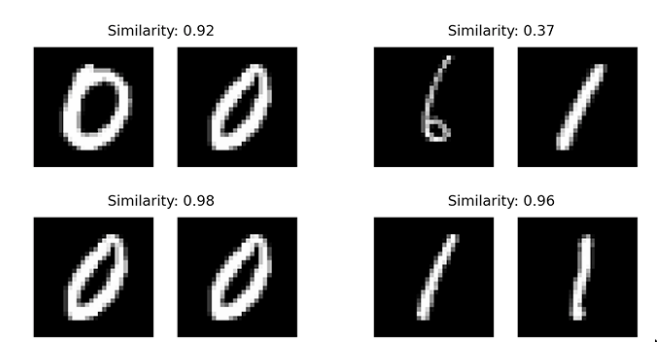
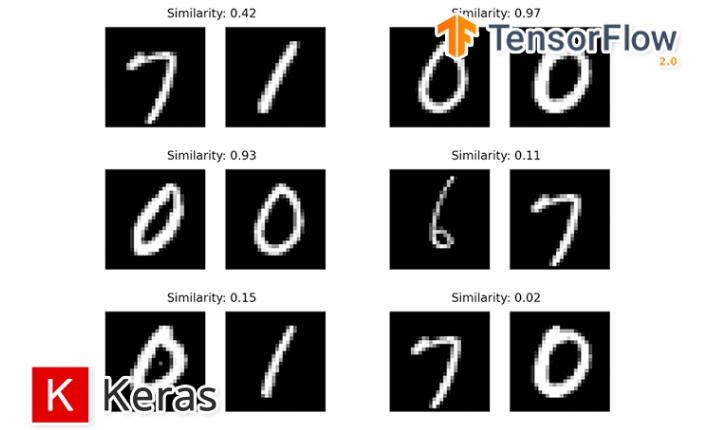
Figure 4: Results of comparing image similarity using the siamese network and Keras/TensorFlow deep learning library.
Note: Did you receive an error related to TypeError: (‘Keyword argument not understood:’, ‘groups’)? If so, please remember that the pre-trained model included in the “Download” section of this tutorial was trained using TensorFlow 2.3. Therefore, when running test_siamese_network.py, you should use TensorFlow 2.3. If you prefer to use a different version of TensorFlow, simply run train_siamese_network.py to train the model, generate a new siamese network model, and serialize it to disk. Then you will be able to run test_siamese_network.py without errors.
The above Figure 4 shows our image similarity results.
For the first image pair, one containing “7” and the other containing “1” – clearly, they are not the same image, and the similarity score is low at only 42%. Our siamese network correctly labeled these images as belonging to different categories.
The next image pair consists of two “0” digits. Our siamese network predicted a very high similarity of 97%, indicating that these two images belong to the same category.
You can see the same pattern for all other image pairs in Figure 4. Images with high similarity scores belong to the same category, while image pairs with low similarity scores belong to different categories.
Since we used a sigmoid activation layer as the final layer in our siamese network (with output values in the range of [0, 1]), it is common to use a similarity cutoff value of 0.5 (50%) as a threshold:
-
If the image similarity of two image pairs is less than or equal to 0.5, they belong to different categories.
-
Conversely, if the predicted similarity of the pair is less than 0.5, they belong to the same class.
When calculating image similarity using siamese networks, you can use this experience in your own projects.
Next Steps

Image 5: If you want to become an expert in neural networks and build your deep learning models using specific datasets, check out Deep Learning for Computer Vision with Python (https://www.pyimagesearch.com/deep-learning-computer-vision-python-book/) and get started! With this material, you can receive support from the PyImageSearch team.
Siamese networks are advanced deep learning techniques, so to truly master them, you need to delve into the fundamentals of neural networks and deep learning.
If this blog post has piqued your interest and you want to learn more, it’s best to start with my book Deep Learning for Computer Vision with Python (https://www.pyimagesearch.com/deep-learning-computer-vision-python-book/).
In this book, you will explore the fundamentals of neural networks and deep learning, which are crucial for using siamese networks as well as more complex models and architectures.
This book combines theory with code implementation, so you will quickly master:
-
The theory and foundations of deep learning fundamentals, allowing you to quickly understand and implement even without an advanced math degree. I provide the essential equations and implement them in code so you can grasp the concepts and use them in your own work.
-
Implementing your own custom neural network architectures. You will learn how to implement the latest architectures like ResNet, SqueezeNet, etc., as well as how to create your own custom CNN.
-
How to train CNNs on your own datasets. Unlike most deep learning tutorials, my course teaches you how to use your own custom datasets. By the end of this book, you will train CNNs on your own datasets.
-
Object detection (Faster R-CNN, SSD, and RetinaNet) and instance segmentation (Mask R-CNN). You will learn how to create your own custom object detector and segmentation networks.
-
You will also find answers and verified code recipes to:
-
Create and prepare your own custom image datasets for image classification, object detection, and segmentation
-
Better understand the algorithms behind deep learning for computer vision and how to implement them through hands-on tutorials (with plenty of code)
-
Put my tips, suggestions, and best practices into practice to maximize model accuracy
Deep Learning for Computer Vision with Python (https://www.pyimagesearch.com/deep-learning-computer-vision-python-book/) is filled with the high-quality content and no-nonsense teaching style typical of PyImageSearch.
If you’re ready to get started, grab a copy here. (https://pyimagesearch.dpdcart.com/cart/add?product_id=144623&method_id=154481&_ga=2.2294384.1585655171.1604272926-1981724077.1597366431)
If you’re still unsure about taking the next step into deep learning, check out these student success stories (https://www.pyimagesearch.com/pyimagesearch-reviews-testimonials/). Just like you, readers have been able to stand out in their careers, conduct groundbreaking research, and delve into incredibly rewarding hobbies – you can too!
If you need more information before trying, I’d be happy to send you the complete table of contents and sample chapters – just click here (https://www.pyimagesearch.com/deep-learning-computer-vision-python-book/).
You can also browse my other books and course products (https://www.pyimagesearch.com/books-and-courses/)
In this tutorial, you learned how to compare the similarity of two images, more specifically, whether two images belong to the same category or different categories. We accomplished this task using siamese networks along with the Keras and TensorFlow deep learning libraries.
This article is the final part of our three-part series introducing siamese networks. For reference, here are links to each guide in the series:
Part 1: Building Image Pairs for Siamese Networks with Python(https://www.pyimagesearch.com/2020/11/23/building-image-pairs-for-siamese-networks-with-python/)
Part 2: Training Siamese Networks with Keras, TensorFlow, and Deep Learning
(https://www.pyimagesearch.com/2020/11/30/siamese-networks-with-keras-tensorflow-and-deep-learning/)
Part 3: Comparing Images for Similarity Using Siamese Networks, Keras, and TensorFlow (This tutorial)
In the near future, I will introduce more advanced series on siamese networks, including:
Please stay tuned for these tutorials; you won’t want to miss them!
https://www.pyimagesearch.com/2020/12/07/comparing-images-for-similarity-using-siamese-networks-keras-and-tensorflow/
Comparing images for similarity using siamese networks, Keras, and TensorFlow
Zhang Yiran, graduated with a master’s degree from the Department of Computer Science at the University of Copenhagen, specializing in image completion. Currently engaged in natural language processing work. Interested in computer vision and natural language processing, enjoys reading and traveling.
Translation Group Recruitment Information
Job Content: Requires a meticulous heart to translate selected foreign articles into fluent Chinese. If you are a data science/statistics/computer major student studying abroad, or working overseas in related fields, or confident in your foreign language skills, you are welcome to join the translation team.
What You Can Get: Regular translation training to improve volunteers’ translation skills, increase awareness of cutting-edge data science, overseas friends can stay connected with domestic technical application development, and the THU Data Team’s background brings good development opportunities for volunteers.
Other Benefits: Data science workers from well-known companies, students from prestigious universities such as Peking University and Tsinghua University, and overseas students will become your partners in the translation team.
Click on the end of the article “Read Original” to join the Data Team~
Reprint Notice
If you need to reprint, please indicate the author and source in a prominent position at the beginning (reprinted from: Data Team ID: DatapiTHU), and place a prominent QR code of Data Team at the end of the article. For articles with original labels, please send [Article Name – Pending Authorization Public Account Name and ID] to the contact email to apply for whitelist authorization and edit according to requirements.
After publishing, please feedback the link to the contact email (see below). Unauthorized reprints and adaptations will be pursued legally.
Click “Read Original” to embrace the organization