
- ●
- Understand what LangGraph is.
- ●
- Explore the basics of LangGraph for building stateful agents.
- ●
- Explore TogetherAI to access open-access models like DeepSeekCoder.
- ●
- Build an AI coding agent using LangGraph to write unit tests.
This article is published as part of the Data Science Blog Marathon.
What is LangGraph?
LangGraph is an extension of the LangChain ecosystem. While LangChain allows for the construction of AI coding agents that can perform tasks using multiple tools, it cannot coordinate multiple chains or participants across steps. This is a key behavior for creating agents that complete complex tasks. LangGraph was conceived with these considerations in mind. It views agent workflows as cyclic graphical structures, where each node represents a function or a Langchain Runnable object, and edges are the connections between nodes.
The main features of LangGraph include:
- Nodes: Any function or Langchain Runnable object, such as tools.
- Edges: Define the direction between nodes.
- Stateful Graph: The primary type of graph. It is designed to manage and update state objects as it processes data through its nodes.
LangGraph leverages this to facilitate cyclic LLM calls with state persistence, which is crucial for agent behavior. The architecture is inspired by Pregel and Apache Beam.
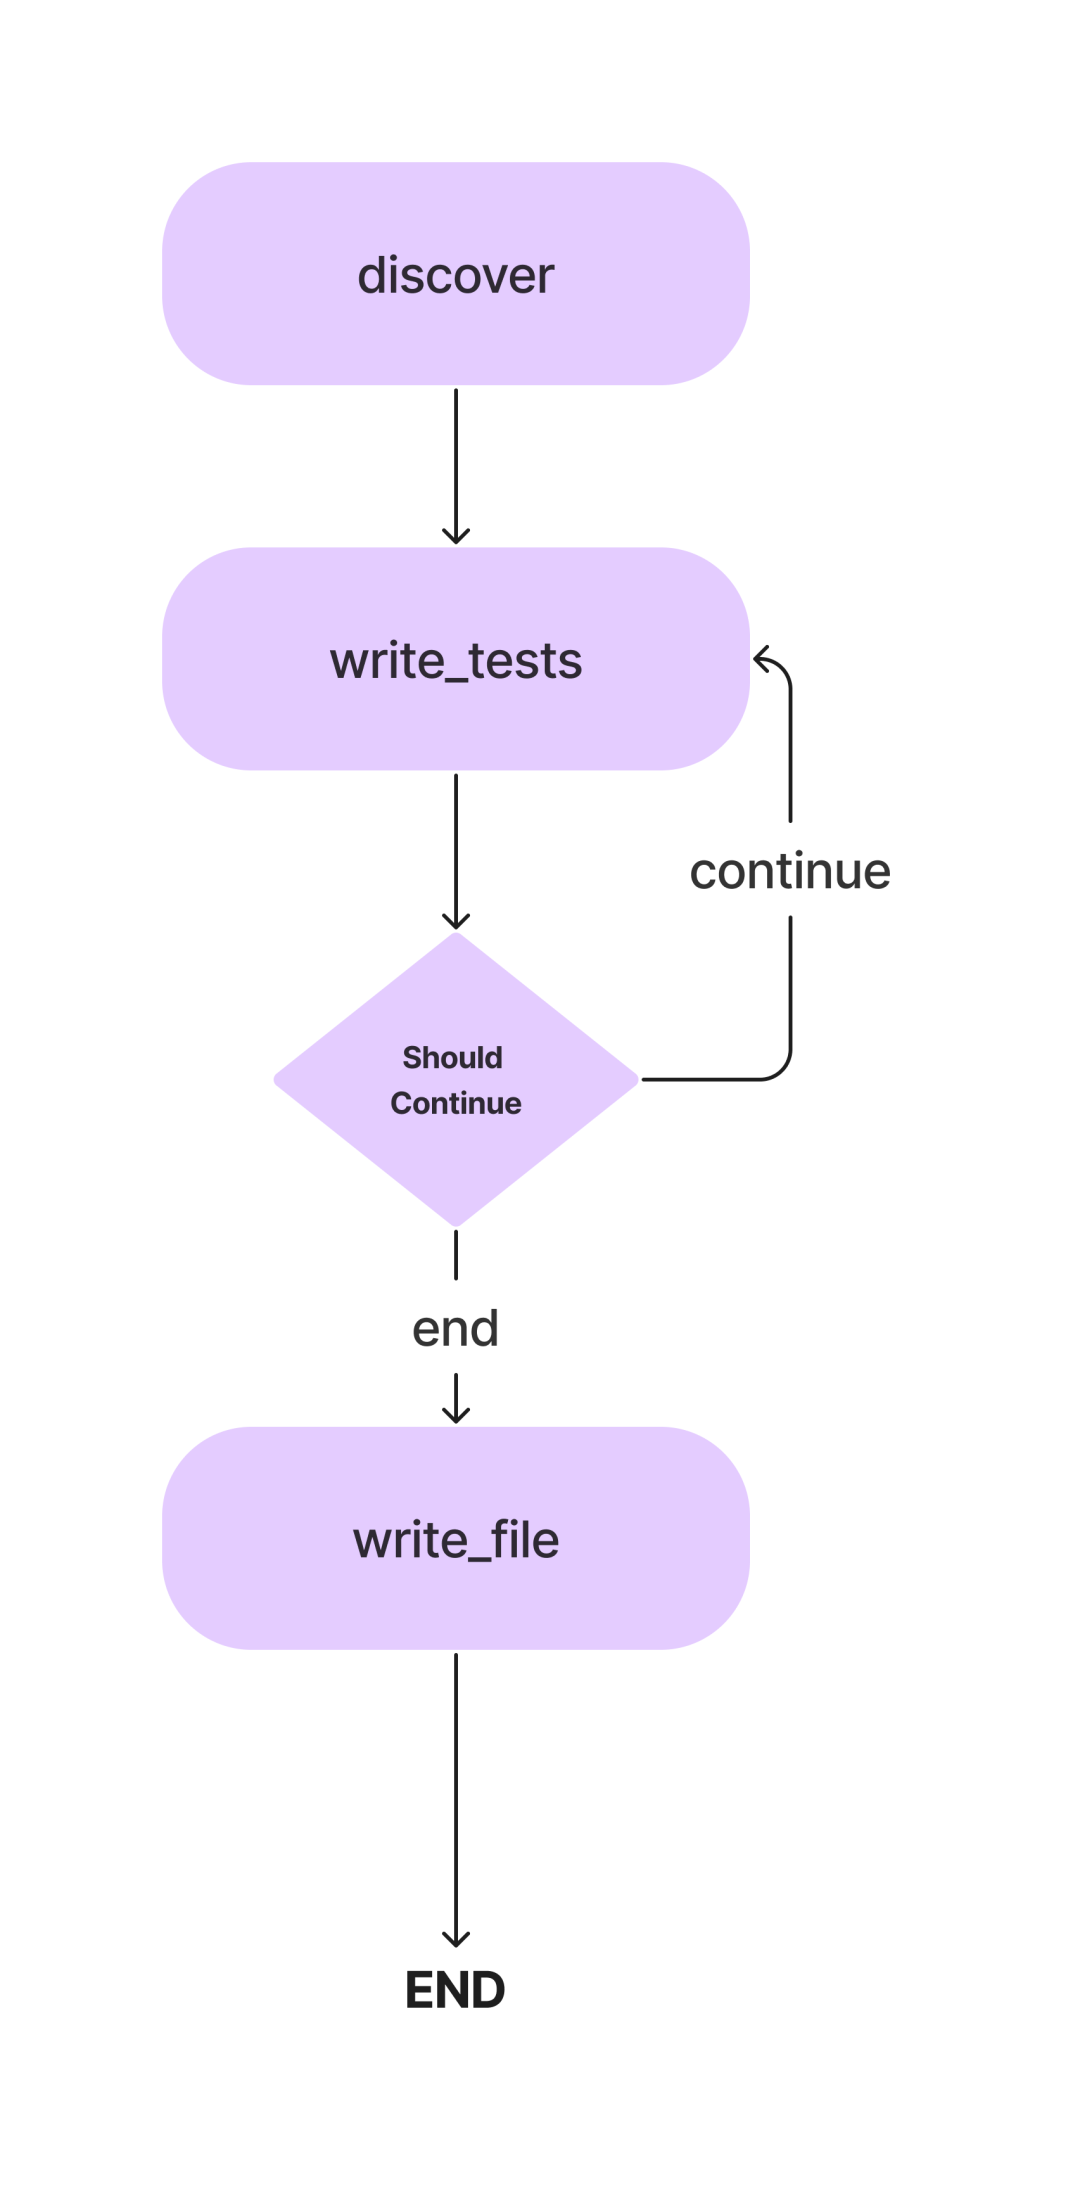
In this article, we will build an agent to write Pytest unit tests for Python classes using methods. Here’s the workflow.
When building an AI coding agent for writing simple unit tests, we will discuss these concepts in detail. Now, let’s get into the coding part.
But before that, let’s set up our development environment.
Installing Dependencies
The first thing. As with any Python project, create a virtual environment and activate it.
python -m venv auto-unit-tests-writer
cd auto-unit-tests-writer
source bin/activate
Now, install the dependencies.
!pip install langgraph langchain langchain_openai coloramaImport all libraries and their classes.
from typing import TypedDict, List
import colorama
import os
from langchain_openai import ChatOpenAI
from langchain_core.messages import SystemMessage
from langchain_core.messages import HumanMessage
from langchain_core.runnables import RunnableConfig
from langgraph.graph import StateGraph, END
from langgraph.pregel import GraphRecursionError
We also need to create directories and files for the test cases. You can either create the files manually or use Python.
# Define the paths.
search_path = os.path.join(os.getcwd(), "app")
code_file = os.path.join(search_path, "src/crud.py")
test_file = os.path.join(search_path, "test/test_crud.py")
# Create the folders and files if necessary.
if not os.path.exists(search_path):
    os.mkdir(search_path)
    os.mkdir(os.path.join(search_path, "src"))
    os.mkdir(os.path.join(search_path, "test"))
Now, update the crud.py file with the code for the in-memory CRUD application. We will use this code to write unit tests. For this, you can use a Python program. We will add the following program to our code.py file.
# crud.py
code = """
class Item:
    def __init__(self, id, name, description=None):
        self.id = id
        self.name = name
        self.description = description
    def __repr__(self):
        return f"Item(id={self.id}, name={self.name}, description={self.description})"
class CRUDApp:
    def __init__(self):
        self.items = []
    def create_item(self, id, name, description=None):
        item = Item(id, name, description)
        self.items.append(item)
        return item
    def read_item(self, id):
        for item in self.items:
            if item.id == id:
                return item
        return None
    def update_item(self, id, name=None, description=None):
        for item in self.items:
            if item.id == id:
                if name:
                    item.name = name
                if description:
                    item.description = description
                return item
        return None
    def delete_item(self, id):
        for index, item in enumerate(self.items):
            if item.id == id:
                return self.items.pop(index)
        return None
    def list_items(self):
        return self.items
"""
with open(code_file, 'w') as f:
    f.write(code)
Setting Up LLM
Now, we will specify the LLM that will be used in this project. The model used here depends on the task and resource availability. You can use proprietary, powerful models like GPT-4, Gemini Ultra, or GPT-3.5. Additionally, you can use open-access models like Mixtral and Llama-2. In this case, since it involves writing code, we can use fine-tuned coding models like DeepSeekCoder-33B or Llama-2 coders. Currently, there are several platforms for LLM inference, such as Anayscale, Abacus, and Together. We will use Together AI to infer DeepSeekCoder. Therefore, before proceeding, please obtain an API key from Together.
from langchain_openai import ChatOpenAI
llm = ChatOpenAI(base_url="https://api.together.xyz/v1",
    api_key="your-key",
    model="deepseek-ai/deepseek-coder-33b-instruct")
Since the Together API is compatible with the OpenAI SDK, we can communicate with models hosted on Together using Langchain’s OpenAI SDK by changing the base_url parameter to “https://api.together.xyz/v1”. In the api_key, pass the Together API key, and pass the model name available on Together instead of the model.
Defining Agent State
This is one of the key parts of LangGraph. Here, we will define an AgentState that is responsible for tracking the state of the Agent throughout the execution. This is primarily a TypedDict class that contains the entities that maintain the agent’s state. Let’s define AgentState.
class AgentState(TypedDict):
    class_source: str
    class_methods: List[str]
    tests_source: str
In the above AgentState class, class_source stores the original Python class, class_methods stores the methods of the class, and tests_source stores the unit test code. We define these as AgentState so that we can use them in the execution steps.
Now, define the Graph using AgentState.
# Create the graph.
workflow = StateGraph(AgentState)
As mentioned earlier, this is a stateful graph, and now we have added our state object.
Defining Nodes
Now that we have defined AgentState, we need to add nodes. So, what exactly is a node? In LangGraph, a node is a function or any runnable object that performs a single operation, such as Langchain tools. In our case, we can define several nodes, such as one for finding class methods, one for inferring and updating unit tests to the state object, and one for writing them to the test file.
We also need a way to extract code from LLM messages. Here’s how.
def extract_code_from_message(message):
    lines = message.split("\n")
    code = ""
    in_code = False
    for line in lines:
        if "```" in line:
            in_code = not in_code
        elif in_code:
            code += line + "\n"
    return code
This code snippet assumes the code is within triple quotes.
Now, let’s define our nodes.
import_prompt_template = """Here is a path of a file with code: {code_file}.Here is the path of a file with tests: {test_file}.Write a proper import statement for the class in the file."""
# Discover the class and its methods.
def discover_function(state: AgentState):
    assert os.path.exists(code_file)
    with open(code_file, "r") as f:
        source = f.read()
    state["class_source"] = source
    # Get the methods.
    methods = []
    for line in source.split("\n"):
        if "def " in line:
            methods.append(line.split("def ")[1].split("(")[0])
    state["class_methods"] = methods
    # Generate the import statement and start the code.
    import_prompt = import_prompt_template.format(
        code_file=code_file,
        test_file=test_file
    )
    message = llm.invoke([HumanMessage(content=import_prompt)]).content
    code = extract_code_from_message(message)
    state["tests_source"] = code + "\n\n"
    return state
# Add a node for discovery.
workflow.add_node(
    "discover",
    discover_function
)
In the above code snippet, we define a function for discovering code. It extracts the code from the AgentState class_source element, breaks down the class into individual methods, and passes it to the LLM via a prompt. The output is stored in the tests_source element of the AgentState. We only let it write the import statement for unit test cases.
We also added the first node to the StateGraph object.
Now, moving on to the next node.
Additionally, we can set up some prompt templates that we need. Here are example templates that you can modify as needed.
# System message template.
system_message_template = """You are a smart developer. You can do this! You will write unit tests that have a high quality. Use pytest.
Reply with the source code for the test only. Do not include the class in your response. I will add the imports myself.If there is no test to write, reply with "# No test to write" and nothing more. Do not include the class in your response.
Example:
```def test_function():
    ...```
I will give you 200 EUR if you adhere to the instructions and write a high quality test. Do not write test classes, only methods."""
# Write the tests template.
write_test_template = """Here is a class:'''{class_source}'''
Implement a test for the method "{class_method}"."""
Now, define the node.
# This method will write a test.
def write_tests_function(state: AgentState):
    # Get the next method to write a test for.
    class_method = state["class_methods"].pop(0)
    print(f"Writing test for {class_method}.")
    # Get the source code.
    class_source = state["class_source"]
    # Create the prompt.
    write_test_prompt = write_test_template.format(
        class_source=class_source,
        class_method=class_method
    )
    print(colorama.Fore.CYAN + write_test_prompt + colorama.Style.RESET_ALL)
    # Get the test source code.
    system_message = SystemMessage(system_message_template)
    human_message = HumanMessage(write_test_prompt)
    test_source = llm.invoke([system_message, human_message]).content
    test_source = extract_code_from_message(test_source)
    print(colorama.Fore.GREEN + test_source + colorama.Style.RESET_ALL)
    state["tests_source"] += test_source + "\n\n"
    return state
# Add the node.
workflow.add_node(
    "write_tests",
    write_tests_function
)
Here, we will let the LLM write test cases for each method, update them in the tests_source element of the AgentState, and add them to the workflow StateGraph object.
Edges
Now that we have two nodes, we will define the edges between them to specify the execution direction. LangGraph primarily provides two types of edges.
- Conditional Edges: The execution flow depends on the agent’s response. This is crucial for adding cyclicity to the workflow. The agent can decide which node to move to next based on certain conditions. It can return to the previous node, repeat the current node, or move to the next node.
- Normal Edges: This is the normal case, where nodes are always called after the previous node has been invoked.
We don’t need conditions to connect discover and write_tests, so we will use normal edges. Additionally, define an entry point to specify where the execution should start.
# Define the entry point. This is where the flow will start.
workflow.set_entry_point("discover")
# Always go from discover to write_tests.
workflow.add_edge("discover", "write_tests")
The execution starts from the discover method and then moves to the function that writes the tests. We need another node to write the unit test code to the test file.
# Write the file.
def write_file(state: AgentState):
    with open(test_file, "w") as f:
        f.write(state["tests_source"])
    return state
# Add a node to write the file.
workflow.add_node(
    "write_file",
    write_file
)
Since this is our last node, we will define the edge between write_tests and write_file.
Here’s how we do that.
# Find out if we are done.
def should_continue(state: AgentState):
    if len(state["class_methods"]) == 0:
        return "end"
    else:
        return "continue"
# Add the conditional edge.
workflow.add_conditional_edges(
    "write_tests",
    should_continue,
    {
        "continue": "write_tests",
        "end": "write_file"
    }
)
The add_conditional_edge function takes the write_tests function, a should_continue function that decides the step to execute based on the class_methods entry, and a mapping with strings as keys and other functions as values.
The edges start from write_tests and execute either option in the mapping based on the output of should_continue. For example, if state[“class_methods”] is not empty, we have not written tests for all methods; we repeat the write_tests function, and when we are done writing tests, we execute write_file.
When all methods’ tests are inferred from the LLM, these tests will be written to the test file.
Now, let’s add the last edge to the closure of the workflow object.
# Always go from write_file to end.
workflow.add_edge("write_file", END)
Executing the Workflow
The last thing left is to compile the workflow and run it.
# Create the app and run it.
app = workflow.compile()
inputs = {}
config = RunnableConfig(recursion_limit=100)
try:
    result = app.invoke(inputs, config)
    print(result)
except GraphRecursionError:
    print("Graph recursion limit reached.")
This will invoke the application. The recursion limit is the number of times the LLM infers for the given workflow. When exceeded, the workflow will stop.
You can view the logs in the terminal or notebook. Here are the execution logs for the simple CRUD application.
Much of the heavy lifting will be done by the underlying model, and this is a demo application with the Deepseek encoder model. For better performance, you can use GPT-4 or Claude Opus, haiku, etc.
You can also use Langchain tools for web surfing, stock price analysis, etc.
- Complete code on GitHub Gist: GitHub Gist
- Colab Notebook: LangGraph Code Agent
LangChain and LangGraph
Now the question is when to use LangChain with LangGraph. If the goal is to create a multi-agent system and coordinate between them, then LangGraph is your best bet. However, if you want to create a DAG or chain to accomplish tasks, LangChain expression language is more suitable.
Why Use LangGraph?
LangGraph is a powerful framework that can enhance many existing solutions.
- Improved RAG Pipeline: LangGraph can enhance RAG through its cyclic graph structure. We can introduce a feedback loop to evaluate the quality of retrieved objects and improve queries if needed, repeating the process.
- Multi-Agent Workflows: LangGraph is designed to support multi-agent workflows. This is crucial for solving complex tasks divided into smaller subtasks. Different agents with shared state and different LLMs and tools can collaborate to solve a single task.
- Human-in-the-loop: LangGraph has built-in support for Human-in-the-loop workflows. This means humans can review the state before moving to the next node.
- Planning Agents: LangGraph is well-suited for building planning agents, where LLM planners plan and decompose user requests, executors call tools and functions, and LLM synthesizes answers based on previous outputs.
- Multimodal Agents: LangGraph can build multimodal agents, such as web navigators with visual support.
Real-Life Use Cases
In many fields, complex AI coding agents can provide assistance.
- Personal Agents: Imagine having your own Jarvis-like assistant on your devices, ready to help with tasks on command, whether through text, voice, or gestures. This is one of the most exciting uses of AI agents!
- AI Instructors: Chatbots are great, but they have their limitations. An AI agent equipped with the right tools can go beyond basic conversations. A virtual AI instructor that adjusts teaching methods based on user feedback can change the game.
- Software User Experience: Using AI agents can improve the user experience of software. Agents can complete tasks using voice or gesture commands instead of manually navigating applications.
- Spatial Computing: With the rise of AR/VR technologies, the demand for AI agents will grow. Agents can process surrounding information and execute tasks on demand. This could be one of the best use cases for AI agents.
- LLM OS: An AI-first operating system where agents are first-class citizens. Agents will be responsible for executing tasks ranging from mundane to complex.
Conclusion
LangGraph is an effective framework for building cyclic state multi-participant agent systems. It fills the gap left by the original LangChain framework. As it is an extension of LangChain, we can benefit from all the advantages of the LangChain ecosystem. As the quality and capabilities of LLMs grow, creating agent systems for automating complex workflows will become easier. Therefore, here are the key takeaways from this article.
Key Takeaways
- LangGraph is an extension of LangChain that allows us to build cyclic, stateful, multi-participant agent systems.
- It implements a graphical structure with nodes and edges. Nodes are functions or tools, and edges are the connections between nodes.
- There are two types of edges: conditional edges and normal edges. Conditional edges have conditions when moving from one edge to another, which is crucial for adding cyclicity to workflows.
- LangGraph is better suited for building cyclic multi-participant agents, while LangChain is better for creating chains or directed acyclic systems.
Source: https://www.analyticsvidhya.com/blog/2024/03/build-an-ai-coding-agent-with-langgraph-by-langchain/
MO AI
Add WeChat admin
Join Mo-AI club group chat

Long press to recognize the QR code
Follow our public account

Discover the unexpected, create possibilities
Mo