Introduction
Langchain recently launched an impressive course focused on LangGraph and its key features in developing powerful agent and multi-agent workflows.
In this series, we will explore the essential insights from the course and create applications that leverage agent workflows. In the first part, we will cover the basic concepts of LangGraph and how to get started. The second part will focus on developing a comprehensive end-to-end agent-based application using LangGraph.
What is an Agentic Workflow?
In most LLM-based applications, tasks are usually organized sequentially, known as a “chain.” While this approach ensures reliability and consistent execution, it can be somewhat rigid.
What if we let the LLM decide the next action?
Agentic workflows provide an iterative and collaborative model that transforms interactions with the LLM into a series of manageable, refinable steps. This approach allows for continuous improvement and adaptation throughout the task completion process. The more “agentic” a system is, the greater the LLM’s ability to determine how the system behaves.
What is LangGraph?
LangGraph is an open-source framework designed to create agent and multi-agent applications. Unlike the LangChain package, LangGraph’s core idea is to provide developers with greater precision and control to tackle the complexities of agent workflows, making it very suitable for the complexities of real-world systems.
While LangChain facilitates the creation of directed acyclic graphs (DAG) for linear workflows, LangGraph further develops this by allowing cycles to be introduced. These cycles are crucial for developing complex agent-like behaviors, enabling the LLM to iteratively refine its actions based on changing conditions.
Basic Concepts of LangGraph
-
• State: At the core of LangGraph is the concept of a state graph, where each node represents a step in the computation. It ensures that each step has access to relevant information from previous steps, facilitating dynamic decision-making based on accumulated data throughout the process.
-
• Node: Nodes are the fundamental elements of LangGraph. Each node represents a function or computational step that can be customized to perform various operations based on workflow needs.
-
• Edge: Edges connect nodes in the graph, defining the flow of computation. LangGraph supports conditional edges that can dynamically determine the next node to execute based on the current state of the graph.
Things to Know Before Building Agentic Flow in LangGraph
Persistence:
-
• LangGraph can automatically save the graph state after each step using checkpointing tools.
-
• This built-in persistence layer provides us with memory, allowing LangGraph to continue from the previous state.
-
• All we need to do is compile the graph with the checkpointing tool, and our graph will have memory!
#One of the easiest checkpointers to use is the `MemorySaver`, an in-memory key-value store for Graph state.
#We can also use external DB
from langgraph.checkpoint.memory import MemorySaver
memory = MemorySaver()
graph_memory = builder.compile(checkpointer=memory)
State Reducer:
-
• The reducer defines how updates are performed.
-
• By using the
Annotatedtype, you can specify a reducer function. -
• For example, if you want to update the graph state in parallel nodes by appending values rather than overwriting them, you can use a reducer like
operator.add. This function comes from Python’s built-in operator module and performs list concatenation when applied to lists.
from operator import add
from typing import Annotated

class State(TypedDict):
  foo: Annotated[list[int], add]
State Pattern:
-
• When defining a LangGraph
StateGraph, use the state pattern to represent the structure and data types that the graph will use. -
• All nodes should follow this pattern for communication. LangGraph provides flexibility in defining the state pattern to accommodate various Python and validation methods.
## TypedDict
#As we mentioned in Module 1, we can use the `TypedDict` class from python's `typing` module.
#It allows you to specify keys and their corresponding value types.

from typing import Literal
class TypedDictState(TypedDict):
    name: str
    mood: Literal["happy","sad"]

## Dataclass
#Python's dataclasses provide another way to define structured data.
#Dataclasses offer a concise syntax for creating classes that are primarily used to store data.

from dataclasses import dataclass

@dataclass
class DataclassState:
    name: str
    mood: Literal["happy","sad"]

## Pyadantic

#`TypedDict` and `dataclasses` provide type hints but they don't enforce types at runtime.
#This means you could potentially assign invalid values without raising an error!
#Pydantic is a data validation and settings management library using Python type annotations.
#It's particularly well-suited for defining state schemas in LangGraph due to its validation capabilities.

from pydantic import BaseModel, field_validator, ValidationError

class PydanticState(BaseModel):
    name: str
    mood: Literal["happy", "sad"]

    @field_validator('mood')
    @classmethod
    def validate_mood(cls, value):
        # Ensure the mood is either "happy" or "sad"
        if value not in ["happy", "sad"]:
            raise ValueError("Each mood must be either 'happy' or 'sad'")
        return value
Pattern Design:
Defining a pattern for the graph can be important as we want more control over:
-
• Internal nodes may pass information not needed in the graph’s input/output.
-
• We might also want to use different input/output patterns for the graph. For example, the output may only include one relevant output key.
#1. Private State
#- Useful for anything needed in the intermediate logic of the graph,
#- but unrelated to the overall input or output of the graph
from typing_extensions import TypedDict
from IPython.display import Image, display
from langgraph.graph import StateGraph, START, END

class OverallState(TypedDict):
    foo: int

class PrivateState(TypedDict):
    baz: int

#2. Input/Output Patterns
#- By default, `StateGraph` accepts a single pattern, and all nodes should communicate with that pattern.
#- However, you can also [define explicit input and output patterns for the graph](https://langchain-ai.github.io/langgraph/how-tos/input_output_schema/?h=input+outp).
#- In these cases, we usually define an "internal" pattern containing *all* keys related to graph operations.
#- But we use specific `input` and `output` patterns to restrict inputs and outputs.

class OverallState(TypedDict):
    question: str
    answer: str
    notes: str

def thinking_node(state: OverallState):
    return {"answer": "bye", "notes": "... his is name is Lance"}

def answer_node(state: OverallState):
    return {"answer": "bye Lance"}
Streaming:
LangGraph supports various streaming modes. The main ones are:
-
•
values: This streaming mode returns the values of the graph. This is the complete state of the graph after each node call.
inputs = {"messages": [("human", "what's the weather in Delhi?")]}
async for chunk in graph.astream(inputs, stream_mode="values"):
chunk["messages"][-1].pretty_print()-
•
updates: This streaming mode returns updates to the graph. This is the update of the graph state after each node call.
async for chunk in graph.astream(inputs, stream_mode="updates"):
    for node, values in chunk.items():
        print(f"Receiving update from node: '{node}'")
We can pass ‘stream_mode’ as a parameter
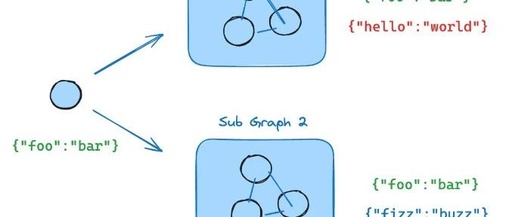
Subgraphs:
Subgraphs allow you to create and manage different states in different parts of the graph. This enables you to build things like multi-agent teams, where each team can track its own independent state.

We will gain more details about using subgraphs in part 2 of the series.
Practice: Building a Weather Analysis Bot Using Agentic Flow
We will design a simple agent workflow to –
-
• Parallelly check the temperature for given cities.
-
• Provide the warmest city among all the given cities.
Step 1: Load All Environment Variables
We will use Langsmith for monitoring and logging here.
AZURE_OPENAI_API_KEY = <api-key>
AZURE_OPENAI_ENDPOINT = <api-endpoint>
AZURE_OPENAI_VERSION = '2024-02-15-preview'
AZURE_GPT4O_MODEL = 'gpt-4o'
AZURE_OPENAI_EMBEDDINGS_MODEL = 'text-embedding-ada-002'
LANGCHAIN_TRACING_V2 = 'true'
LANGCHAIN_ENDPOINT = "https://api.smith.langchain.com"
LANGCHAIN_API_KEY = <langsmith-key>
LANGCHAIN_PROJECT = <langsmith-project>
Step 2: Import Necessary Python Libraries
from langchain_openai import AzureOpenAIEmbeddings, AzureChatOpenAI
from langgraph.graph import MessagesState
from langchain_core.messages import HumanMessage, SystemMessage
from langgraph.graph import START, StateGraph
from langgraph.prebuilt import tools_condition
from langgraph.prebuilt import ToolNode
from IPython.display import Image, display
## Import things that are needed generically for tools
from langchain.pydantic_v1 import BaseModel, Field
from langchain.tools import StructuredToolStep-3: Initialize Model variable
Step 3: Define Model Variables
llm = AzureChatOpenAI(temperature=0,
                           api_key=os.getenv('AZURE_OPENAI_API_KEY'),
                           azure_endpoint=os.getenv('AZURE_OPENAI_ENDPOINT'),
                           openai_api_version=os.getenv('AZURE_OPENAI_VERSION'),
                           azure_deployment=os.getenv('AZURE_GPT4O_MODEL')
                           )

embeddings = AzureOpenAIEmbeddings(
                            api_key=os.getenv('AZURE_OPENAI_API_KEY'),
                            azure_endpoint=os.getenv('AZURE_OPENAI_ENDPOINT'),
                            azure_deployment=os.getenv('AZURE_OPENAI_EMBEDDINGS_MODEL'),
                            openai_api_version=os.getenv('AZURE_OPENAI_VERSION'),
                            )
Step 4: Define Tools the Agent Will Use
We define two tools
-
• get_current_weather(city: str) -> int: This tool will provide the latest weather
-
• get_difference(minuend: int, subtrahend: int) -> int: This tool will provide the weather difference between two cities
class City(BaseModel):
    city: str = Field(description="City")

def get_current_weather(city: str) -> int:
    # Here we are passing hard-coded value but can be integrated with weather api
    temparation = {'delhi':30,
                   'mumbai':20,
                   'chennai':40}
    return temparation[city.lower()]


weather = StructuredTool.from_function(
    func=get_current_weather,
    name="Get_Weather",
    description="Get the current temperature from a city, in Fahrenheit",
    args_schema=City,
    return_direct=False,
)

class DifferenceInput(BaseModel):
    minuend: int = Field(
        description="The number from which another number is to be subtracted"
    )
    subtrahend: int = Field(description="The number to be subtracted")

def get_difference(minuend: int, subtrahend: int) -> int:
    return minuend - subtrahend


difference = StructuredTool.from_function(
    func=get_difference,
    name="Difference",
    description="Get the difference between two numbers",
    args_schema=DifferenceInput,
    return_direct=False,
)
Step 5: Bind Tools to LLM
The ‘bind_tools’ function allows us to enable the chat model to invoke tools. The model can choose to return a tool call, multiple tool calls, or not invoke any tools at all.
tools_weather = [weather, difference]
llm_with_tools_weather = llm.bind_tools(tools_weather)
Step 6: Define the Graph and Its Nodes and Edges
In our graph, we build a ReAct agent that decides which tools to call and when to end the process
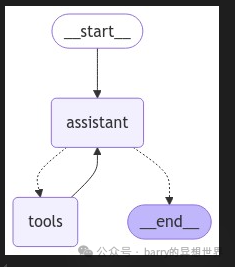
## System message
sys_msg = SystemMessage(content="You are a helpful assistant.")

## Node
def assistant(state: MessagesState):
   return {"messages": [llm_with_tools_weather.invoke([sys_msg] + state["messages"])]}

## Graph
builder = StateGraph(MessagesState)

## Define nodes: these do the work
builder.add_node("assistant", assistant)
builder.add_node("tools", ToolNode(tools_weather))

## Define edges: these determine how the control flow moves
builder.add_edge(START, "assistant")
builder.add_conditional_edges(
    "assistant",
    # If the latest message (result) from assistant is a tool call -> tools_condition routes to tools
    # If the latest message (result) from assistant is a not a tool call -> tools_condition routes to END
    tools_condition,
)
builder.add_edge("tools", "assistant")
react_graph = builder.compile()

## Show
display(Image(react_graph.get_graph(xray=True).draw_mermaid_png()))
Step 7: Invoke the “Agent” Flow
We can invoke our agent flow using the invoke() method, passing parameters as JSON
messages = [HumanMessage(content="Where is it warmest: Chennai, Delhi and Mumbai? And by how much is it warmer than the other cities?")]
messages = react_graph.invoke({"messages": messages})

##Agent's Response
"""
The current temperatures are as follows:
- Chennai: 40°F
- Delhi: 30°F
- Mumbai: 20°F

Chennai is the warmest city. Here is how much warmer it is compared to the other cities:
- Chennai is 10°F warmer than Delhi.
- Chennai is 20°F warmer than Mumbai.

Additionally, Delhi is 10°F warmer than Mumbai.
"""
So, our basic agent flow is now ready!Code can be found here basic_graph.py
https://github.com/anurag-mishra899/agentic_workflow/blob/main/basic_graph.py
Conclusion:
In this blog, we explored the concept of agent workflows and highlighted some of their key benefits. We delved into how to leverage LangGraph to build such workflows and introduced the basic concepts of LangGraph. Finally, we developed a basic, functional agent workflow using LangGraph.