• Hello everyone, I am student Xiao Zhang, sharing AI knowledge and practical cases daily.
• Welcome to like + follow 👏, continue learning, and continuously output practical content.
• +v: jasper_8017 let’s communicate 💬 and improve together 💪.
Today we continue to learn the basic content of LangGraph. In the previous two articles, we learned about the basic usage and conditional branches of LangGraph. In this article, we will continue to learn how to use LangGraph to implement a loop structure.
0. Complete Code
0.1 Complete Code
Let’s start with the complete code. For demo code reference, click here:
from langchain_community.tools.tavily_search import TavilySearchResults

tools = [TavilySearchResults(max_results=1)]

from langgraph.prebuilt import ToolExecutor

tool_executor = ToolExecutor(tools)

from langchain_openai import ChatOpenAI

# We will set streaming=True so that we can stream tokens
# See the streaming section for more information on this.
model = ChatOpenAI(temperature=0)

from langchain.tools.render import format_tool_to_openai_function

functions = [format_tool_to_openai_function(t) for t in tools]
model = model.bind_functions(functions)

from typing import TypedDict, Annotated, Sequence
import operator
from langchain_core.messages import BaseMessage


class AgentState(TypedDict):
    messages: Annotated[Sequence[BaseMessage], operator.add]

from langgraph.prebuilt import ToolInvocation
import json
from langchain_core.messages import FunctionMessage

# Define the function that determines whether to continue or not
def should_continue(state):
    messages = state['messages']
    last_message = messages[-1]
    # If there is no function call, then we finish
    if "function_call" not in last_message.additional_kwargs:
        return "end"
    # Otherwise if there is, we continue
    else:
        return "continue"

# Define the function that calls the model
def call_model(state):
    messages = state['messages']
    response = model.invoke(messages)
    # We return a list, because this will get added to the existing list
    return {"messages": [response]}

# Define the function to execute tools
def call_tool(state):
    messages = state['messages']
    # Based on the continue condition
    # we know the last message involves a function call
    last_message = messages[-1]
    # We construct an ToolInvocation from the function_call
    action = ToolInvocation(
        tool=last_message.additional_kwargs["function_call"]["name"],
        tool_input=json.loads(last_message.additional_kwargs["function_call"]["arguments"]),
    )
    # We call the tool_executor and get back a response
    response = tool_executor.invoke(action)
    # We use the response to create a FunctionMessage
    function_message = FunctionMessage(content=str(response), name=action.tool)
    # We return a list, because this will get added to the existing list
    return {"messages": [function_message]}

from langgraph.graph import StateGraph, END
# Define a new graph
workflow = StateGraph(AgentState)

# Define the two nodes we will cycle between
workflow.add_node("agent", call_model)
workflow.add_node("action", call_tool)

# Set the entrypoint as `agent`
# This means that this node is the first one called
workflow.set_entry_point("agent")

# We now add a conditional edge
workflow.add_conditional_edges(
    # First, we define the start node. We use `agent`.
    # This means these are the edges taken after the `agent` node is called.
    "agent",
    # Next, we pass in the function that will determine which node is called next.
    should_continue,
    # Finally we pass in a mapping.
    # The keys are strings, and the values are other nodes.
    # END is a special node marking that the graph should finish.
    # What will happen is we will call `should_continue`, and then the output of that
    # will be matched against the keys in this mapping.
    # Based on which one it matches, that node will then be called.
    {
        # If `tools`, then we call the tool node.
        "continue": "action",
        # Otherwise we finish.
        "end": END
    }
)

# We now add a normal edge from `tools` to `agent`.
# This means that after `tools` is called, `agent` node is called next.
workflow.add_edge('action', 'agent')

# Finally, we compile it!
# This compiles it into a LangChain Runnable,
# meaning you can use it as you would any other runnable
app = workflow.compile()

from langchain_core.messages import HumanMessage

inputs = {"messages": [HumanMessage(content="what is the weather in sf")]}
response = app.invoke(inputs)

print(response)
0.2 Preparation Before Running
The demo program provided by the official requires the Tavily API key.
You need to go to this place (https://app.tavily.com/home) to apply for one yourself.
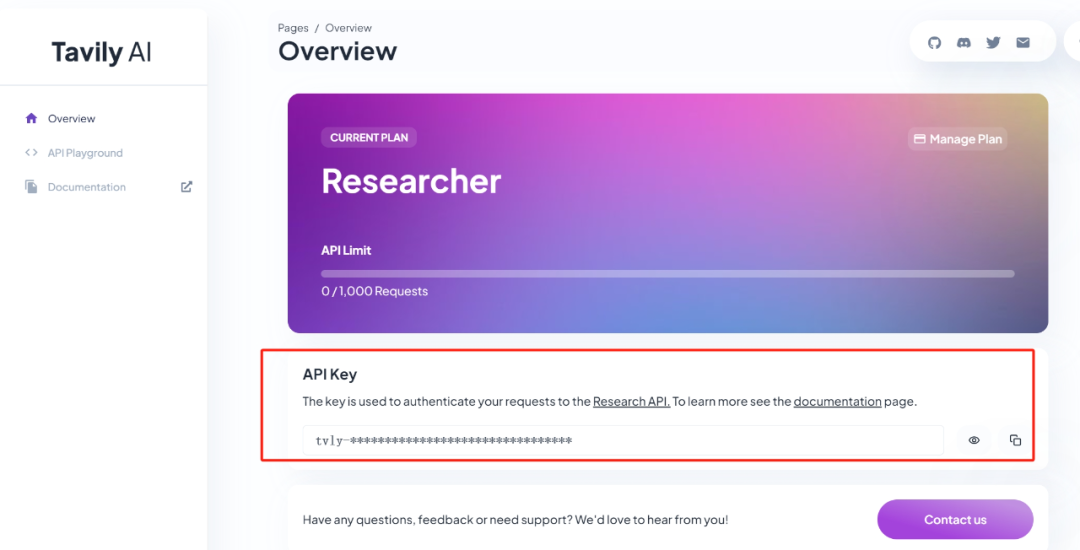
After applying, remember to add the API key to your environment variables.
TAVILY_API_KEY = "tvly-xxxxxxxxxxx"1. Code Explanation
1.1 Creating a Graph – StateGraph
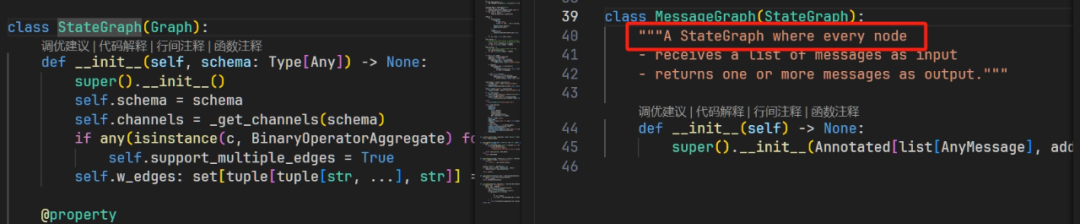
First, instantiate a Graph. Unlike the previous Graph that was used, which was MessageGraph, this example uses StateGraph.
from langgraph.graph import StateGraph, END
# Define a new graph
workflow = StateGraph(AgentState)
MessageGraph and StateGraph don’t seem to have much difference:
1.2 Adding Nodes – node
# Define the two nodes we will cycle between
workflow.add_node("agent", call_model)
workflow.add_node("action", call_tool)
Two nodes were added:
-
• Initial node agent, used to call the large model.
-
• Node action, used to execute tools.
1.3 Adding Edges
# We now add a conditional edge
workflow.add_conditional_edges(
    "agent",
    should_continue,
    {
        # If `tools`, then we call the tool node.
        "continue": "action",
        "end": END
    }
)

workflow.add_edge('action', 'agent')
A conditional edge and a normal edge were added.
Now the graph structure should look like this:
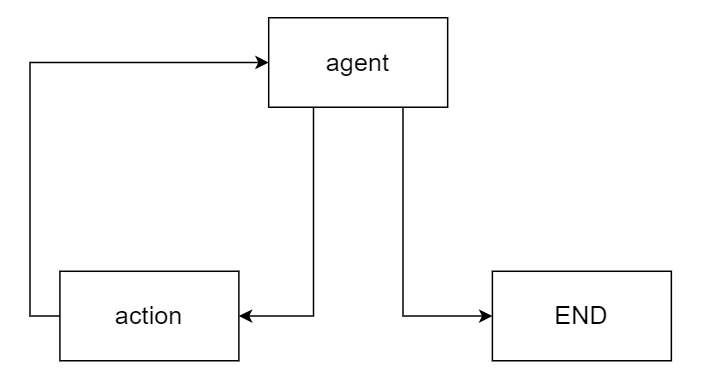
Let’s take a look at the condition of the conditional edge: should_continue
def should_continue(state):
    messages = state['messages']
    last_message = messages[-1]
    # If there is no function call, then we finish
    if "function_call" not in last_message.additional_kwargs:
        return "end"
    # Otherwise if there is, we continue
    else:
        return "continue"
This determines whether there are tools to be executed. If so, it takes the direction of agent —> action; if not, it takes the direction of agent —> END.
1.4 Summary
So far, the implementation structure has become quite clear. Compared to the previous article on conditional branches, the main change is this line:
workflow.add_edge('action', 'agent')It changed from action —> END to action —> agent.
Additionally, another point to note:
def call_model(state):
    messages = state['messages']
    response = model.invoke(messages)
    # We return a list, because this will get added to the existing list
    return {"messages": [response]}
When invoking the model, pay attention to the parameter type of invoke, messages = state['messages'], which is not the state type but the messages type inside it, that is, HumanMessage or AIMessage types.
If you find this article helpful, please give a like and follow ~~~
• Hello everyone, I am student Xiao Zhang, sharing AI knowledge and practical cases daily.
• Welcome to like + follow 👏, continue learning, and continuously output practical content.
• +v: jasper_8017 let’s communicate 💬 and improve together 💪.
