Source: Read Chip Technology
This article is approximately 4800 words, and it is recommended to read it in 10 minutes.
This article introduces 9 tips for training neural networks using Pytorch.

Image Source: unsplash.com/@dulgier
In fact, your model may still be at the level of the Stone Age. You might still be training with 32-bit precision or *GASP (General Activity Simulation Language)*, or you might only be training on a single GPU. If there are 99 acceleration guides available, perhaps you’ve only seen one? (That’s right, it is). However, this ultimate guide will teach you step by step how to clear all the (GP models) from your model.

Don’t let your neural networks end up like this. (Image Source: Monsters U)
The introduction of this guide progresses from simple to complex, gradually introducing you to modifications that allow you to fully leverage your network. The examples will include some Pytorch code and related tags that can be used in the Pytorch-Lightning trainer, in case you don’t want to code it yourself!
Who is this guide for? Anyone using Pytorch to research non-trivial deep learning models, such as industrial researchers, PhD students, academics, etc… These models may take days, weeks, or even months to train.
Pytorch-Lightning

The various optimizations discussed in this article can be found in the Pytorch library called Pytorch-Lightning(https://github.com/williamFalcon/pytorch-lightning?source=post_page—————————).
Lightning is a lightweight wrapper based on Pytorch that helps researchers automatically train models, while key model components remain completely under the control of researchers.
Refer to this tutorial for more powerful examples(https://github.com/williamFalcon/pytorch-lightning/blob/master/examples/new_project_templates/single_gpu_node_template.py?source=post_page—————————).
Lightning adopts the latest, cutting-edge methods to minimize the chances of errors.
The Lightning model defined for MNIST(https://github.com/williamFalcon/pytorch-lightning/blob/master/examples/new_project_templates/lightning_module_template.py?source=post_page—————————) can be used for the trainer.
from pytorch-lightning import Trainer
model = LightningModule(…)
trainer = Trainer()
trainer.fit(model)
1. DataLoader

This may be the easiest place to speed things up. The days of speeding up data loading by saving h5py or numpy files are long gone. It is very simple to load image data using the Pytorch dataloader(https://pytorch.org/tutorials/beginner/data_loading_tutorial.html?source=post_page—————————).
dataset = MNIST(root=self.hparams.data_root, train=train, download=True)
loader = DataLoader(dataset, batch_size=32, shuffle=True)
for batch in loader:
    x, y = batch
    model.training_step(x, y)...
In Lightning, you do not need to specify a training loop; just define dataLoaders, and the trainer will call them when needed.
https://github.com/williamFalcon/pytorch-lightning/blob/master/examples/new_project_templates/lightning_module_template.py?source=post_page—————————#L163-L217
2. Number of Processes in DataLoaders

The second secret to speeding up is to allow batch parallel loading. So, you can load many batches at once instead of loading one at a time.
# slow
loader = DataLoader(dataset, batch_size=32, shuffle=True)
# fast (use 10 workers)
loader = DataLoader(dataset, batch_size=32, shuffle=True, num_workers=10)
3. Batch Size

Before starting the next optimization step, increase the batch size to the maximum allowed by CPU memory or GPU memory.
The next sections will focus on reducing memory usage so that the batch size can continue to increase.
Remember, you will likely need to update the learning rate again. If you double the batch size, it’s best to also double the learning rate.
4. Accumulating Gradients

If you have maximized computational resources and the batch size is still too low (say 8), you need to simulate a larger batch size for gradient descent to get accurate estimates.
If you want the batch size to reach 128, then execute 16 forward and backward passes (batch size of 8) before performing a single optimizer step.
# clear last step
optimizer.zero_grad()
# 16 accumulated gradient steps
scaled_loss = 0
for accumulated_step_i in range(16):
    out = model.forward()
    loss = some_loss(out, y)
    loss.backward()
    scaled_loss += loss.item()
# update weights after 8 steps. effective batch = 8*16
optimizer.step()
# loss is now scaled up by the number of accumulated batches
actual_loss = scaled_loss / 16
In Lightning, these are automatically executed. Just set the tag:
https://williamfalcon.github.io/pytorch-lightning/Trainer/Training%20Loop/?source=post_page—————————#accumulated-gradients
trainer = Trainer(accumulate_grad_batches=16)
trainer.fit(model)
5. Retaining the Computational Graph

It is easy to blow up memory by not releasing pointers to the computational graph, for example… saving loss for logging.
losses = []...
losses.append(loss)
print(f'current loss: {torch.mean(losses)}')
The problem with the above is that the loss still has a graph copy. In this case, you can use .item() to release it.
# bad
losses.append(loss)
# good
losses.append(loss.item())
Lightning pays special attention to ensuring that it cannot retain the graph copy
(Example: https://github.com/williamFalcon/pytorch-lightning/blob/master/pytorch_lightning/models/trainer.py?source=post_page—————————#L767-L768)
6. Move to Single GPU

Once the previous steps are completed, you can move on to GPU training. Training on the GPU will parallelize mathematical computations across many GPU cores. How much acceleration you can achieve depends on the type of GPU used. For personal use, I recommend using the 2080Ti, for company use, the V100 is available.
At first, you may feel overwhelmed, but you only need to do two things: 1) move your model to the GPU; 2) when running data with it, move the data to the GPU.
# put model on GPU
model.cuda(0)
# put data on gpu (cuda on a variable returns a cuda copy)
x = x.cuda(0)
# runs on GPU now
model(x)
If using Lightning, you do not need to do anything in your code. Just set the tag
(https://williamfalcon.github.io/pytorch-lightning/Trainer/Distributed%20training/?source=post_page—————————#single-gpu):
# ask lightning to use gpu 0 for training
trainer = Trainer(gpus=[0])
trainer.fit(model)
When training on the GPU, be mindful to limit the amount of transfer between CPU and GPU.
# expensive
x = x.cuda(0)
# very expensive
x = x.cpu()
x = x.cuda(0)
For example, if you run out of memory, do not move data back to the CPU to save memory. Try to optimize your code in other ways, or allocate code across GPUs before using this method.
Also, be aware of operations that force synchronization of GPUs. For example, clearing memory caches.
# really bad idea.
# Stops all the GPUs until they all catch up
torch.cuda.empty_cache()
However, if using Lightning, this problem may only occur when defining the Lightning module. Lightning pays special attention to avoid such errors.
7. 16-bit Mixed Precision Training
Using 16-bit precision can effectively cut memory usage in half. Most models are trained using 32-bit precision numbers. However, recent research has found that models can also work well with 16-bit precision. Mixed precision refers to training some specific models with 16-bit while using 32-bit for weight classes.
To use 16-bit precision in Pytorch, first install the apex library from NVIDIA and make these changes to your model.
# enable 16-bit on the model and the optimizer
model, optimizers = amp.initialize(model, optimizers, opt_level='O2')
# when doing .backward, let amp do it so it can scale the loss
with amp.scale_loss(loss, optimizer) as scaled_loss:
    scaled_loss.backward()
The amp package handles most of the work. If gradients explode or tend to zero, it even scales the loss.
In Lightning, using 16-bit is straightforward(https://williamfalcon.github.io/pytorch-lightning/Trainer/Distributed%20training/?source=post_page—————————#16-bit-mixed-precision), requiring no modifications to your model or completing the above steps.
trainer = Trainer(amp_level='O2', use_amp=False)
trainer.fit(model)
8. Move to Multi-GPU
Now, things get interesting. There are 3 (maybe more?) ways to train on multiple GPUs.
Batch Training
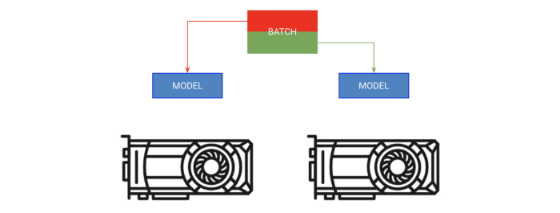
Method A copies the model on each GPU; Method B assigns a portion of the batch to each GPU.
The first method is called batch training. This strategy copies the model to each GPU, and each GPU gets a part of the batch.
# copy model on each GPU and give a fourth of the batch to each
model = DataParallel(model, devices=[0, 1, 2, 3])
# out has 4 outputs (one for each gpu)
out = model(x.cuda(0))
In Lightning, you can directly instruct the trainer to increase the number of GPUs without completing any of the above operations.
# ask lightning to use 4 GPUs for training
trainer = Trainer(gpus=[0, 1, 2, 3])
trainer.fit(model)
Model Training
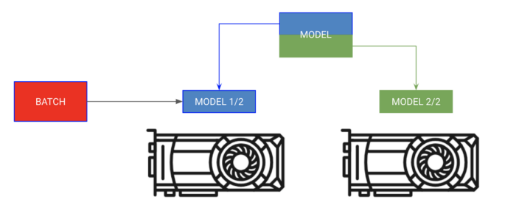
Assign different parts of the model to different GPUs, sequentially distributing the batch.
Sometimes a model may be too large to fit in memory. For example, a Sequence to Sequence model with an encoder and decoder may consume 20GB of memory when generating outputs. In this case, we want to place the encoder and decoder on separate GPUs.
# each model is sooo big we can't fit both in memory
encoder_rnn.cuda(0)
decoder_rnn.cuda(1)

# run input through encoder on GPU 0
out = encoder_rnn(x.cuda(0))

# run output through decoder on the next GPU
out = decoder_rnn(x.cuda(1))

# normally we want to bring all outputs back to GPU 0
out = out.cuda(0)
For this type of training, you do not need to assign the Lightning trainer to any GPU. Instead, just import your module into the correct GPU’s Lightning module:
class MyModule(LightningModule):
    def __init__():
        self.encoder = RNN(...)
        self.decoder = RNN(...)
    def forward(x):
        # models won't be moved after the first forward because
        # they are already on the correct GPUs
        self.encoder.cuda(0)
        self.decoder.cuda(1)
        out = self.encoder(x)
        out = self.decoder(out.cuda(1))
# don't pass GPUs to trainer
model = MyModule()
trainer = Trainer()
trainer.fit(model)
Mixing Two Training Methods
In the above example, both the encoder and decoder can still benefit from parallelizing each operation. We can now get more creative.
# change these lines
self.encoder = RNN(...)
self.decoder = RNN(...)
# to these
# now each RNN is based on a different gpu set
self.encoder = DataParallel(self.encoder, devices=[0, 1, 2, 3])
self.decoder = DataParallel(self.encoder, devices=[4, 5, 6, 7])
# in forward...
out = self.encoder(x.cuda(0))
# notice inputs on first gpu in devices
out = self.decoder(out.cuda(4))  # <--- the 4 here
Considerations When Using Multiple GPUs
-
If model.cuda() already exists on that device, it will not perform any operation.
-
Always input to the first device in the device list.
-
Transferring data across devices is very expensive; do not do it unless absolutely necessary.
-
Optimizers and gradients will be stored on GPU 0. Therefore, the memory used by GPU 0 is likely much larger than that of other processors.
9. Move to Multi-GPU Phase (8+ GPUs)
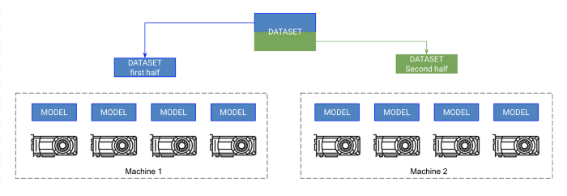
Each GPU on the machine gets a copy of the model. Each machine gets a portion of the data and trains only on that portion. The machines synchronize gradients with each other.
Once you reach this step, you can train the Imagenet dataset in a few minutes! It is not as difficult as it seems, but it requires more knowledge about computing clusters. These instructions assume you are using SLURM on a cluster.
Pytorch replicates the model across GPUs on different nodes and synchronizes gradients for multi-node training. Thus, each model is independently initialized on each GPU and essentially trained independently on a partition of the data, just receiving gradient updates from all models.
Advanced Phase:
-
Initialize a copy of the model on each GPU (make sure to set the seed so that each model initializes to the same weights, otherwise it will not work).
-
Split the dataset into subsets. Each GPU only trains on its subset.
-
On .backward(), all copies will receive copies of the gradients from each model. Only then will the models communicate with each other.
Pytorch has a great abstraction called Distributed Data Parallel (DDP) that can do this for you. To use DDP, you need to do 4 things:
def tng_dataloader():
    d = MNIST()
    # 4: Add distributed sampler
    # sampler sends a portion of tng data to each machine
    dist_sampler = DistributedSampler(dataset)
    dataloader = DataLoader(d, shuffle=False, sampler=dist_sampler)
def main_process_entrypoint(gpu_nb):
    # 2: set up connections between all gpus across all machines
    # all gpus connect to a single GPU "root"
    # the default uses env://
    world = nb_gpus * nb_nodes
    dist.init_process_group("nccl", rank=gpu_nb, world_size=world)
    # 3: wrap model in DPP
    torch.cuda.set_device(gpu_nb)
    model.cuda(gpu_nb)
    model = DistributedDataParallel(model, device_ids=[gpu_nb])
    # train your model now...
if  __name__ == '__main__':
    # 1: spawn number of processes
    # your cluster will call main for each machine
    mp.spawn(main_process_entrypoint, nprocs=8)
The Pytorch team has a detailed practical tutorial on this(https://github.com/pytorch/examples/blob/master/imagenet/main.py?source=post_page—————————).
However, in Lightning, this is a built-in feature. Just set the node count flag, and let Lightning handle the rest.
# train on 1024 gpus across 128 nodes
trainer = Trainer(nb_gpu_nodes=128, gpus=[0, 1, 2, 3, 4, 5, 6, 7])
Lightning also comes with a SlurmCluster manager to help you easily submit the correct details for SLURM tasks.
Example: https://github.com/williamFalcon/pytorch-lightning/blob/master/examples/new_project_templates/multi_node_cluster_template.py?source=post_page—————————#L103-L134
Bonus! Faster Multi-GPU Single Node Training
It turns out that distributed data parallel is much faster than data parallel because its only communication is gradient synchronization. Therefore, it is better to replace data parallel with distributed data parallel, even if only doing single-machine training.
In Lightning, this can be easily achieved by setting the distributed_backend to ddp (Distributed Data Parallel) and setting the number of GPUs.
# train on 4 gpus on the same machine MUCH faster than DataParallel
trainer = Trainer(distributed_backend='ddp', gpus=[0, 1, 2, 3])
10. Thoughts and Tips on Model Acceleration
How to think about problems by looking for bottlenecks? You can divide the model into several parts:
First, ensure there are no bottlenecks in data loading. To do this, you can use existing data loading solutions mentioned above, but if there isn’t one that fits your needs, you can use offline processing and ultra-fast caching as high-performance data storage, like h5py.
Next, look at what to do during training. Ensure fast forwarding, avoid redundant computations, and minimize data transfer between CPU and GPU. Finally, avoid slowing down the GPU (which is covered in this guide).
Then, maximize batch size. Generally, the size of GPU memory limits batch size. From this perspective, it is essentially about distributing across GPUs, but minimizing latency and effectively using large batches (for example, in datasets, you might achieve an effective batch size of 8000+ across multiple GPUs).
However, be careful when handling large batches. Consult literature on specific issues and learn how others handle them!
Editor: Wang Jing
Proofreader: Yang Xuejun