Training with PyTorch: More Than Just Training

Click below on thecard to follow the “Beginner’s Guide to Python” public account

Let’s discuss some techniques that help you conduct experiments during the training process. I will provide some theory, code snippets, and complete workflow examples. The main points include:
  • Dataset Splitting
  • Metrics
  • Reproducibility
  • Configuration, Logging, and Visualization
Dataset Splitting
I prefer a split that includes a training set, validation set, and test set. There’s nothing much to say here; you can use random splitting, or if you have an imbalanced dataset (which often happens in real-world scenarios) — stratified splitting.
For the test set, try to manually select a “golden dataset” that contains all the examples you want your model to excel at. The test set should remain unchanged between experiments. It should only be used after you have completed model training. This will give you objective metrics before deploying to a production environment. Don’t forget, your dataset should be as close to the production environment as possible to be representative.
Metrics
Selecting the right metrics for your task is crucial. One of my favorite examples of incorrect metric usage is from Kaggle’s “Exoplanet Hunting in Deep Space” dataset, where you can find many notebooks where people use accuracy on a severely imbalanced dataset with about 5000 negative samples and 50 positive samples. Of course, they achieved 99% accuracy by always predicting negative samples. In that case, they would never find exoplanets, so let’s choose metrics wisely.
A deep discussion of metrics is beyond the scope of this article, but I will briefly mention some reliable options:
  • F1 Score
  • Precision and Recall
  • mAP (for detection tasks)
  • IoU (for segmentation tasks)
  • Accuracy (for balanced datasets)
  • ROC-AUC
Example scores for real image classification problems:
+--------+----------+--------+-----------+--------+| split  | accuracy |   f1   | precision | recall |+--------+----------+--------+-----------+--------+| val    | 0.9915   | 0.9897 | 0.9895    | 0.99   || test   | 0.9926   | 0.9921 | 0.9927    | 0.9915 |+--------+----------+--------+-----------+--------+
Select a few metrics for your task:
def get_metrics(gt_labels: List[int], preds: List[int]) -> Dict[str, float]:    num_classes = len(set(gt_labels))    if num_classes == 2:        average = "binary"    else:        average = "macro"
    metrics = {}    metrics["accuracy"] = accuracy_score(gt_labels, preds)    metrics["f1"] = f1_score(gt_labels, preds, average=average)    metrics["precision"] = precision_score(gt_labels, preds, average=average)    metrics["recall"] = recall_score(gt_labels, preds, average=average)    return metrics
Additionally, plot precision-threshold and recall-threshold curves to better select the confidence threshold.
Training with PyTorch: More Than Just Training
Reproducibility
Without reliable reproducibility, we cannot talk about experiments. You should get the same results when you do not change anything. A simple example, if you are using torch and Nvidia, how to freeze all seeds:
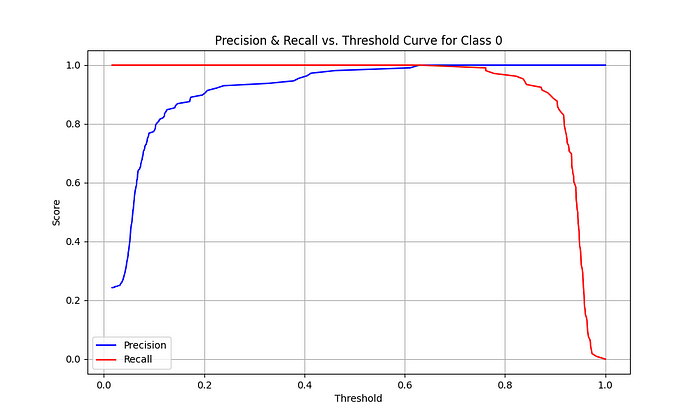
def set_seeds(seed: int, cudnn_fixed: bool = False) -> None:    torch.manual_seed(seed)    np.random.seed(seed)    random.seed(seed)
    if cudnn_fixed:        torch.backends.cudnn.deterministic = True        torch.backends.cudnn.benchmark = False
Note: cudnn_fixed may affect performance. I use it during experiments and then turn it off during the final training phase after selecting parameters.
This is what happens when you have cudnn fixed and do not change parameters — training is exactly the same. This is the result we want from cudnn_fixed.
Training with PyTorch: More Than Just Training
Now you can tune parameters and ensure that the changes in results are due to the changes in parameters.
Configuration, Logging, and Visualization
This is often the part people forget, but I find it very useful:
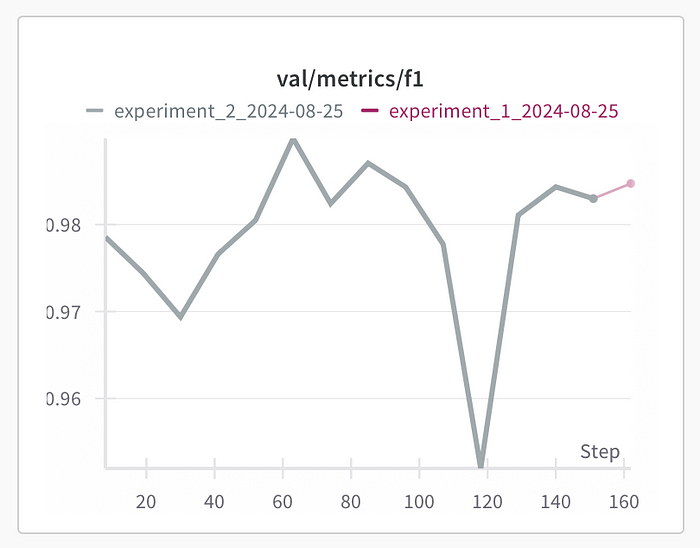
  • Configuration files containing variables and hyperparameters
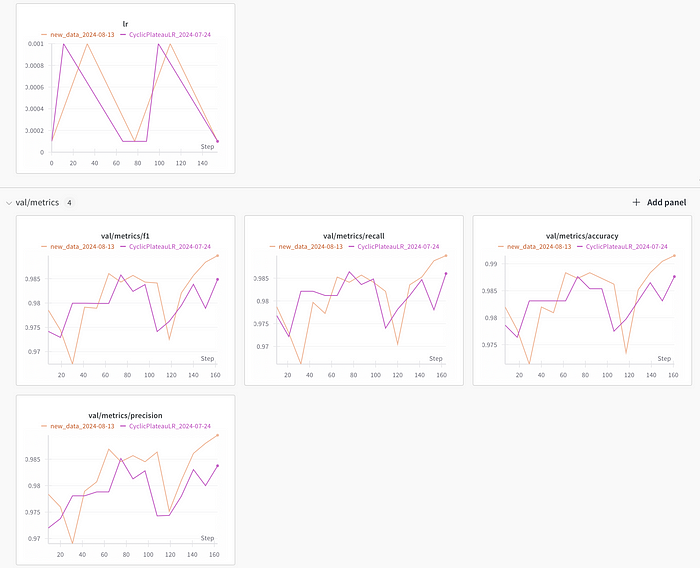
  • Logging all metrics and configurations
  • Visualization of metrics
When you have a project with many modules, configuration files are very handy; you can put variables in one configuration file and use them across all modules. You should also store training configurations there. Here’s an example of a Hydra configuration I use:
project_name: project_name
exp_name: baseline
exp: ${exp_name}_${now_dir}
train:  root: /path/to/project  device: cuda
  label_to_name: {0: "class_1", 1: "class_2", 2: "class_3"}  img_size: [256, 256] # (h, w)
  train_split: 0.8  val_split: 0.1 # test_split = 1 - train_split - val_split
  batch_size: 64  epochs: 15  use_scheduler: True
  layers_to_train: -1
  num_workers: 10  threads_to_use: 10
  data_path: ${train.root}/dataset  path_to_save: ${train.root}/output/models/${exp}  vis_path: ${train.root}/output/visualized
  seed: 42  cudnn_fixed: False  debug_img_processing: False

export: # TensorRT must be done on the inference device  half: False  max_batch_size: 1
  model_path: ${train.path_to_save}  path_to_data: ${train.root}/to_test
The configuration files and metrics for each training session should be logged. By integrating with wandb (or something similar), each training session is recorded and visualized.
Training with PyTorch: More Than Just Training
I also prefer to save locally:
During Training:
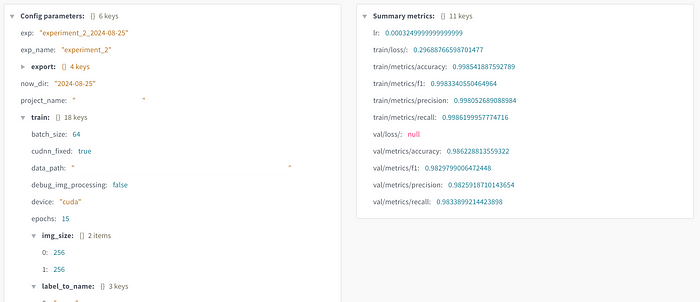
  • Print validation metrics after each epoch
  • If it achieves the best metrics, save the model
  • If debugging mode is on, save preprocessed images
At the End of Training:
  • Save metrics.csv containing the best validation and test metrics
After Training:
  • Save model.onnx, model.engine, and any other formats created during model export
  • Save visualizations showing model attention
Structure Example:
output|├── debug_img_processing|   ├── img_1|   └── img_2|├── models|   ├── experiment_1|       ├── model.pt|       ├── model.engine|       ├── precision_recall_curves|           └── val_precision_recall_vs_threshold.png|       └── metrics.csv|└── visualized    ├── class_1        ├── img_1        └── img_2
·  END  ·


🌟 Want to become a computer vision expert? Come to the "Beginner's Guide to Python" public account! Reply "Python Visual Practical Projects" to unlock a big gift bag of 31 super interesting visual projects! 🎁


This article is for learning and communication purposes only. If there is any infringement, please contact the author for deletion.

Leave a Comment